ECO mode CHEVROLET LOW CAB FORWARD 2020 Owner's Manual
[x] Cancel search | Manufacturer: CHEVROLET, Model Year: 2020, Model line: LOW CAB FORWARD, Model: CHEVROLET LOW CAB FORWARD 2020Pages: 374, PDF Size: 6.18 MB
Page 3 of 374
Chevrolet Low Cab Forward 5.2L Diesel Engine 4500 HD/XD/5500 HD/XD
Owner Manual (GMNA-Localizing-U.S.-13337621) - 2020 - crc - 8/5/19
2 Introduction
Introduction
The names, logos, emblems,
slogans, vehicle model names, and
vehicle body designs appearing in
this manual including, but not limited
to, GM, the GM logo, CHEVROLET,
and the CHEVROLET Emblem are
trademarks and/or service marks of
General Motors LLC, its
subsidiaries, affiliates, or licensors.
This manual has been prepared to
acquaint you with the operation and
maintenance of your vehicle, and to
provide important safety information.
It includes a Maintenance Schedule
and is supplemented with a
Warranty and Owner Assistance
Information booklet. We urge you to
read these publications carefully.The following recommendations will
help ensure the most enjoyable,
safe, and trouble-free operation of
your vehicle. When it comes to
service, keep in mind that your
commercial truck dealer knows your
vehicle best and is interested in
your complete satisfaction. Your
dealer invites you to return for all of
your service needs both during and
after the warranty period.
Remember, if you have a concern
that has not been handled to your
satisfaction, follow the steps in the
separate Warranty and Owner
Assistance Information booklet. We
thank you for choosing our product,
and want to assure you of our
continuing interest in your motoring
pleasure and satisfaction.
Model Reference
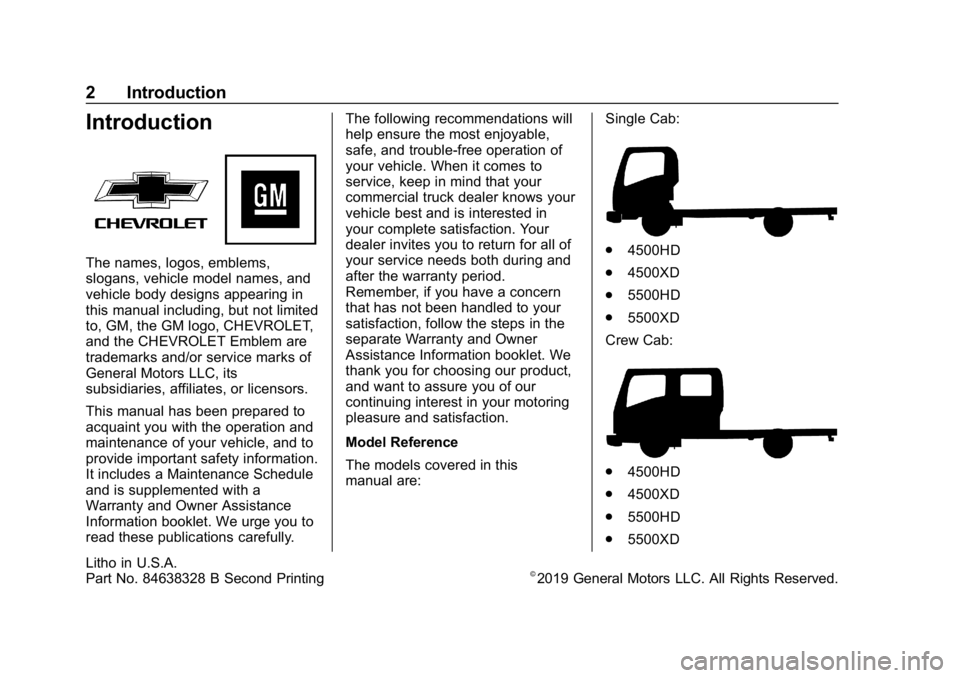
The models covered in this
manual are:
Single Cab:.
4500HD
. 4500XD
. 5500HD
. 5500XD
Crew Cab:
. 4500HD
. 4500XD
. 5500HD
. 5500XD
Litho in U.S.A.
Part No. 84638328 B Second Printing©2019 General Motors LLC. All Rights Reserved.
Page 16 of 374
Chevrolet Low Cab Forward 5.2L Diesel Engine 4500 HD/XD/5500 HD/XD
Owner Manual (GMNA-Localizing-U.S.-13337621) - 2020 - crc - 12/5/18
Keys, Doors, and Windows 15
system causes the right and left turn
signal lights to simultaneously flash
once upon receiving the signals
from the remote control unit.
Should you lose the remote control
unit, please contact your dealer.
After locking the doors using the
remote control unit, be sure to
check that they are locked by
pulling the door handles.
Avoid getting water on the remote
control unit, dropping it, hitting it
against another object, or stepping
on it; otherwise, the remote control
unit could malfunction.
Do not leave the remote control unit
on the dashboard or any other
surface where the unit might be
exposed to high temperatures
(exceeding 60°C/140°F). Doing so
may result in shorter battery life or
malfunction of the remote
control unit.
If the keyless entry system fails to
operate normally, lock and unlock
the doors using the key and have
the system inspected by your
dealer.The lock or unlock buttons on the
remote control unit must be fully
pressed for more than 1 second
to work.
If you do not open any doors within
about 30 seconds after pressing the
unlock button to unlock the doors,
the automatic locking function of the
system will lock the doors again to
prevent theft.
In areas near a TV tower, electric
power plant, radio station, etc. or
under any conditions involving
strong electrical disturbances, the
remote control unit operating range
might change or the keyless entry
system might not work.
The keyless entry system does not
operate in the following cases:
.
The engine control switch is in
the "ON" position.
. The key is inserted in the engine
control switch.
. One of the doors is open.Replacing the Battery in the
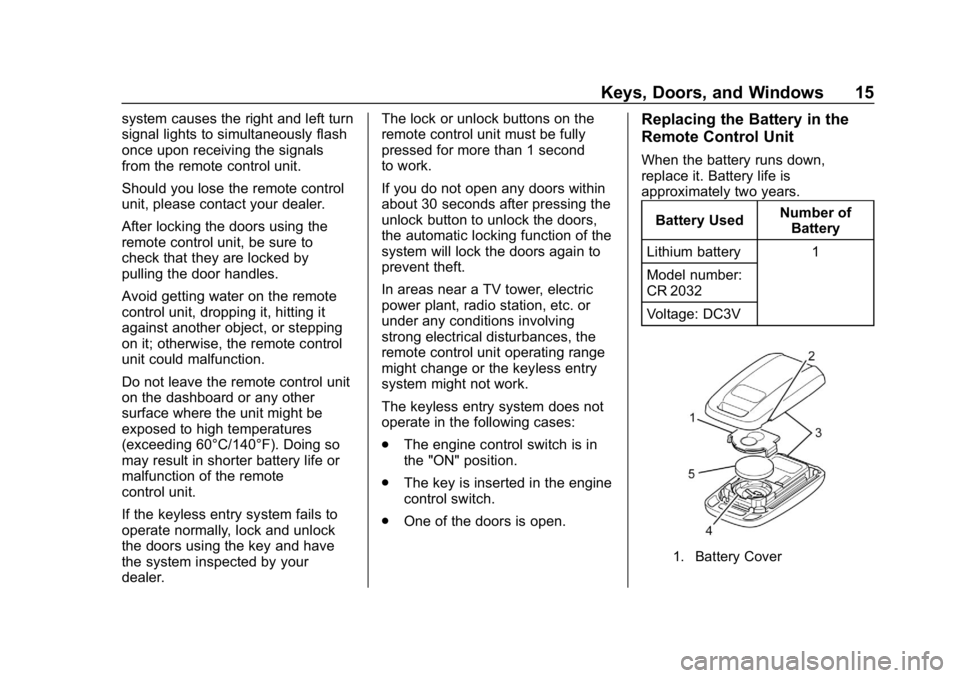
Remote Control Unit
When the battery runs down,
replace it. Battery life is
approximately two years.
Battery Used Number of
Battery
Lithium battery 1
Model number:
CR 2032
Voltage: DC3V
1. Battery Cover
Page 24 of 374

Chevrolet Low Cab Forward 5.2L Diesel Engine 4500 HD/XD/5500 HD/XD
Owner Manual (GMNA-Localizing-U.S.-13337621) - 2020 - crc - 12/5/18
Keys, Doors, and Windows 23
Windows
Power Windows
{Warning
If you are traveling with a child,
do not leave the child alone in the
vehicle. If the child touches the
controls or equipment, an
accident could occur. (For
example, the vehicle could move
or a fire could start.) Also, the cab
inside could become dangerously
hot in hot weather.
{Warning
Before closing the windows, make
sure that there is no risk of a
hand, head, or anything else
being trapped in the moving
window.
You and others could be seriously
injured.
{Warning
Regardless of whether the vehicle
is moving or stationary, you must
never allow a child to put his/her
head, hands, or other body part
out of the window. Allowing such
behavior would be dangerous
because the child could hit an
obstacle.
You and others could be seriously
injured.
The power windows operate only
when the engine control switch is in
the ON position. Open each door
window by pressing the power
window switch; close each one by
raising the switch.
Window Switches on
Driver ’s Door
The power window switch on the
driver ’s door can operate both
driver ’s (2) and passenger ’s (1)
power windows.
To Open the Driver ’s Window
Lightly pressing the driver-side
window switch will lower the driver ’s
window until the switch is released
(manual mode operation). When the
switch is firmly pressed, the window
will lower completely without the
need to press the switch
continuously (automatic mode
Page 25 of 374

Chevrolet Low Cab Forward 5.2L Diesel Engine 4500 HD/XD/5500 HD/XD
Owner Manual (GMNA-Localizing-U.S.-13337621) - 2020 - crc - 12/5/18
24 Keys, Doors, and Windows
operation). If you want to stop the
automatic movement of the window
before it lowers completely, raise the
switch lightly.
To Close the Driver’s Window
Lightly raising the driver-side
window switch will cause the
driver's window to move up until the
switch is released.
To Open the Passenger ’s Window
The passenger's window continues
to lower while the passenger-side
switch on the driver's door is being
pressed.
To Close the Passenger ’s Window
The passenger's window continues
to move up while the
passenger-side switch on the
driver's door is being raised.
Window Switches on
Passenger ’s Door and Rear
Doors (If equipped)
The power window switch on the
passenger's door can raise and
lower the passenger's side window only, while, if equipped, the rear
power window switches can raise
and lower the rear door windows.
{Warning
Be sure to warn passengers not
to let any part of the body
become trapped or caught in a
moving window.
You and others could be seriously
injured.
The window continues to lower
while the window switch is being
pressed and continues to rise while
the switch is being raised. It will
stop moving at any position when
the switch is released.
When the rear power window lock
switch is in the “LOCK”position, it is
not possible to open and close the
rear windows.
Window Switches on Center of
Dashboard (Crew Cab Model)
The power window switch on the
instrument panel and rear door can
raise and lower the rear door
window.
To Open a Rear Window
Rear Power Window Switch
The window glass will move
downward while you are pushing
the bottom part of the switch.
To Close a Rear Window
The window glass will move upward
while you are pushing the top part of
the switch.
Page 48 of 374

Chevrolet Low Cab Forward 5.2L Diesel Engine 4500 HD/XD/5500 HD/XD
Owner Manual (GMNA-Localizing-U.S.-13337621) - 2020 - crc - 12/5/18
Storage 47
Model MaximumGVWR
kg (lb.) Front GAWR
Capacitykg (lb.) Rear GAWR
Capacitykg (lb.)
4500HD 6 577 (14,500) 2 431 (5,360) 4 482 (9,880)
4500XD 7 258 (16,000) 3 007 (6,630) 4 998 (11,020)
5500HD 8 142 (17,950) 3 098 (6,830) 5 888 (12,980)
5500XD 8 845 (19,500) 3 300 (7,275) 6 196 (13,660)
Maximum Front and Rear Axle
Weights
The weight of the cargo load must
be properly distributed over both the
front and rear axles. The “VIN,Weight Rating, and Greenhouse
Gas (GHG) Emissions Plate”
shows
the maximum weight that the front
axle can carry (front GAWR). It also
shows the maximum weight that the
rear axle can carry (rear GAWR).
The GVWR is the maximum
permissible loaded weight of the
vehicle and takes into account the
capabilities of the engine,
transmission, frame, springs,
brakes, axles and tires. Actual loads
at the front and the rear axles can
only be determined by weighing the
vehicle. This can be done at
highway weigh stations or other
such places. See your dealer for help. The cargo load should be
distributed on both sides of the
center line as equally as possible.
Tires
The tires on your truck must be of
the proper size and properly inflated
for the load that you are carrying.
The
“VIN, Weight Rating, and
Greenhouse Gas (GHG) Emissions
Plate” shows the originally equipped
tire size and recommended inflation
pressures.
For the vehicle plate location, see
Vehicle Identification Number (VIN)
0 343.
See “Tire Load and Inflation Table”
under Tire Pressure 0297.
Page 65 of 374

Chevrolet Low Cab Forward 5.2L Diesel Engine 4500 HD/XD/5500 HD/XD
Owner Manual (GMNA-Localizing-U.S.-13337621) - 2020 - crc - 12/5/18
64 Instruments and Controls
Brake Low Vacuum Warning
Light
This light should come on briefly
when the engine control switch is
turned to the ON position, and then
should go out after the engine is
started. If the light does not come
on when the engine control switch is
turned to ON, it could indicate a
burned out bulb or a blown fuse.
Have the system repaired if the light
does not come on during this check.
The warning light and buzzer will
come on simultaneously when the
brake booster’s vacuum or pressure
becomes insufficient either during
driving or when the engine control
switch is in the ON position, or when
there is an abnormality in the
charging system, such as an
alternator malfunction or loosening
or splitting of the fan belt or whenever the hydraulic brake
booster (HBB) becomes faulty. The
warning buzzer will stop sounding
when the parking brake is engaged.
On 4500HD and 4500XD, the brake
low vacuum warning light and
warning buzzer should come on to
indicate low vacuum reserve for
brake power assist. At the same
time, the Back up Electric Vacuum
Pump operates.
(5500HD, 5500XD models) When
the HBB pressure is low, and/or the
HBB fluid (Dexron
–VI) level is low,
the light and warning buzzer should
come on. Do not use brake fluid in
the brake booster reservoir. Use
only Dexron –VI ATF.
If this happens while driving:
. Do not pump the brakes. The
system is designed to stop the
truck with reserve power assist if
the pedal is held down. This
reserve is greatly reduced each
time you apply and release the
brakes.
. Stopping distance may be
longer. .
You may have to push much
harder on the brake pedal.
. Have the vehicle repaired before
you continue driving.
The buzzer stops when the selector
lever is shifted to the P position.
{Warning
Do not drive while the buzzer
sounds as the brakes are not
operating to their full capacity.
You and others could be seriously
injured.
Antilock Brake System
(ABS) Warning Light
This light comes on briefly when the
engine control switch is turned to
the ON position, and then should go
Page 73 of 374

Chevrolet Low Cab Forward 5.2L Diesel Engine 4500 HD/XD/5500 HD/XD
Owner Manual (GMNA-Localizing-U.S.-13337621) - 2020 - crc - 12/5/18
72 Instruments and Controls
Red means the battery voltage is
too low or too high. If the voltmeter
sign appears in red, have the
vehicle checked and serviced at
your dealer. During or immediately
after the engine is started, a red
abnormal L voltage may display on
the DIC. If the warning disappears
after the engine has started, there is
no problem with the battery voltage.
Calendar and Clock
{Warning
The calendar and clock can be
set only while the vehicle is
stationary. When setting the
calendar or clock, park your
vehicle in a safe place where
stopping or parking is permitted
and that is well clear of traffic.
Press the DIC selector once or
more to select the calendar. Press
and hold the DIC selector to enter
the clock setting screen. The year
segment will flash. Turn the DIC
selector clockwise or
counterclockwise to increase or decrease the year. While in the year
setting screen, press the DIC
selector once to switch to the month
setting screen. The month segment
will flash. Use the same method to
set the month. While in the month
setting screen, press the DIC
selector again to switch to the day
setting mode. Adjust the day using
the selector.
Press and hold the DIC selector to
complete the calendar setting.
When complete, the normal
calendar display will resume. Use
this same method to set the hour
and minute when in the clock setting
screen.
Dimmer
The brightness of the DIC can be
adjusted while the light control
switch is off. Select this screen and
turn the DIC selector clockwise or
counterclockwise to brighten or dim
the illumination. The brightness is
linked to the adjustment of the
instrument panel light level control
while the light control switch is on.
See
Instrument Panel Illumination
Control 083.
Warning Lights and Messages
.
Engine Overheat Warning Light
. Low Coolant Warning Light
. Water Separator Warning Light
. Air Cleaner Light
. Low Fuel Warning Light
. Regeneration Warning Lights
. Exhaust System Warning Light
. Refill DEF Warning Light
. DIC Errors
. Maintenance Data
. Hour Meter
See Vehicle Messages 074.
Maintenance Data Functions
Display/Not Display the
Maintenance Data Function
Maintenance Light: On the DIC, go
to the Maintenance Indicator Light.
Switch the display by pressing and
holding the DIC selector for more
than two seconds. Turn the DIC
selector clockwise or
counterclockwise to switch the
Page 87 of 374
Chevrolet Low Cab Forward 5.2L Diesel Engine 4500 HD/XD/5500 HD/XD
Owner Manual (GMNA-Localizing-U.S.-13337621) - 2020 - crc - 12/5/18
86 Infotainment System
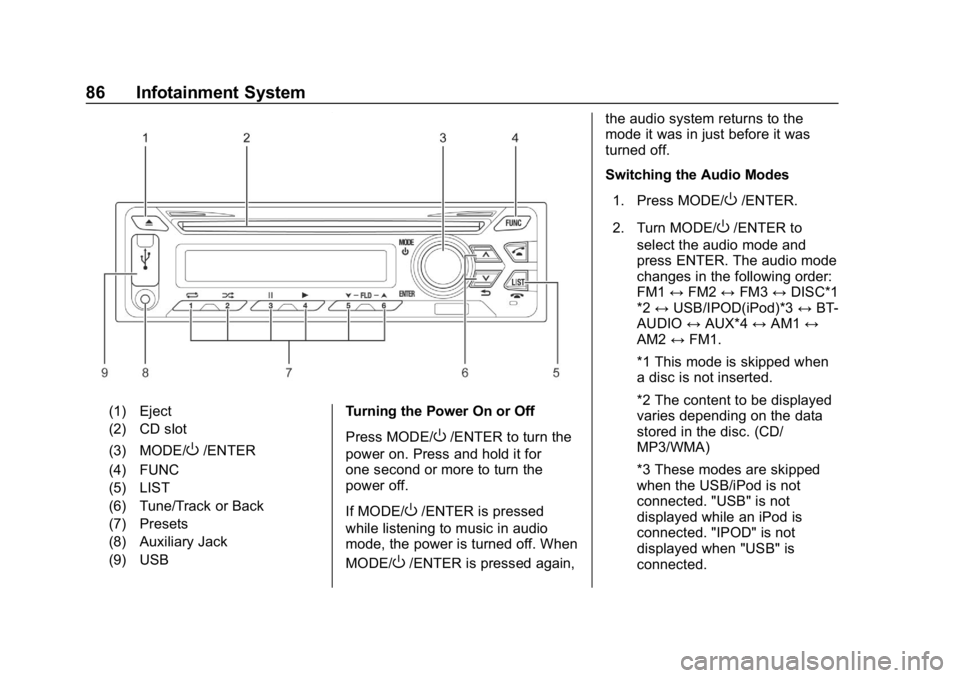
(1) Eject
(2) CD slot
(3) MODE/
O/ENTER
(4) FUNC
(5) LIST
(6) Tune/Track or Back
(7) Presets
(8) Auxiliary Jack
(9) USB Turning the Power On or Off
Press MODE/O/ENTER to turn the
power on. Press and hold it for
one second or more to turn the
power off.
If MODE/
O/ENTER is pressed
while listening to music in audio
mode, the power is turned off. When
MODE/
O/ENTER is pressed again, the audio system returns to the
mode it was in just before it was
turned off.
Switching the Audio Modes
1. Press MODE/
O/ENTER.
2. Turn MODE/
O/ENTER to
select the audio mode and
press ENTER. The audio mode
changes in the following order:
FM1 ↔FM2 ↔FM3 ↔DISC*1
*2 ↔ USB/IPOD(iPod)*3 ↔BT-
AUDIO ↔AUX*4 ↔AM1 ↔
AM2 ↔FM1.
*1 This mode is skipped when
a disc is not inserted.
*2 The content to be displayed
varies depending on the data
stored in the disc. (CD/
MP3/WMA)
*3 These modes are skipped
when the USB/iPod is not
connected. "USB" is not
displayed while an iPod is
connected. "IPOD" is not
displayed when "USB" is
connected.
Page 89 of 374
Chevrolet Low Cab Forward 5.2L Diesel Engine 4500 HD/XD/5500 HD/XD
Owner Manual (GMNA-Localizing-U.S.-13337621) - 2020 - crc - 12/5/18
88 Infotainment System
4. Turn MODE/O/ENTER
clockwise or counterclockwise
to adjust the right or left
speakers, and then press
ENTER.
Clock Display 1. Press FUNC.
2. Turn MODE/
O/ENTER to
select CLOCK, and then press
ENTER.
3. Turn MODE/
O/ENTER
clockwise or counterclockwise
to select OFF or ON, and then
press ENTER.
Time is not reset when clock mode
is turned off.
Setting the Time
1. Press FUNC.
2. Turn MODE/
O/ENTER to
select CLOCK, and then press
ENTER. 3. Turn MODE/
O/ENTER
clockwise or counterclockwise
to select SET, and then press
ENTER.
4. Turn MODE/
O/ENTER to set
the clock time (hour), and then
press ENTER. Turn clockwise
or counterclockwise to move
one hour forward or one hour
backward.
5. Turn MODE/
O/ENTER to set
the clock time (minute), and
then press ENTER. Turn
clockwise or counterclockwise
to move one minute forward or
one minute backward.
To return to the clock time (hour)
setting mode, press
0while
setting the clock time (minute).
Tuner Mode Operation
Turning on the Radio
1. Press MODE/
O/ENTER. 2. Turn MODE/
O/ENTER to
select "FM1", "FM2", "FM3",
"AM1" or "AM2", and then
press the "ENTER" button.
Follow one of the procedures below
to tune.
Tuning
Manual tuning:
1. Press Tune/Track
yorzfor
less than one second.
2. Press Tune/Track
yorzfor
less than one second again to
select the station of your
choice.
Automatic tuning:
1. Press Tune/Track
yorzfor
less than two seconds but
more than one second. The
radio starts searching for
stations, and stops when it
finds a station.
2. Press and hold Tune/Track
y
orzfor more than
two seconds. The radio keeps
Page 90 of 374
Chevrolet Low Cab Forward 5.2L Diesel Engine 4500 HD/XD/5500 HD/XD
Owner Manual (GMNA-Localizing-U.S.-13337621) - 2020 - crc - 12/5/18
Infotainment System 89
searching for stations within its
available frequency band. To
cancel, press the button again.
When Tune/Track
yis pressed, the
radio is tuned to the higher
frequency range (step up), and to
the lower frequency range (step
down) when pressing Tune/
Track
z.
In both cases, if the radio cannot
find stations, it continues searching.
Storing the Stations (PRESET)
Favorite stations can be tuned by
one touch operation if they are
stored in the Preset buttons.
A maximum of 30 stations can be
memorized and stored. 12 in AM
(six each for AM1 and AM2.), and
18 in FM (six each for FM1,
FM2 and FM3.) 1. Select the radio mode to be stored from FM1, FM2, FM3,
AM1 or AM2.
2. Tune in the station of your choice. 3. Press and hold down the
Preset buttons you want to
store in, for more than
two seconds. When the station
is stored, the Preset button
number and station frequency
appear on the display window.Radio Reception
Usually, a problem with radio
reception does not mean there is a
problem with your radio. It is just the
normal result of conditions outside
the vehicle. For example, nearby
buildings and terrain can interfere
with FM reception. Power lines or
telephone wires can interfere with
AM signals.
And of course, radio signals have a
limited range. The farther you are
from a station, the weaker its signal
will be. In addition, reception
conditions change constantly as
your vehicle moves.
Here are some common reception
problems that probably do not
indicate a problem with your radio.
FM Transmissions
Fading and drifting stations -
Generally, the effective range of FM
is about 40 km (25 miles). Once
outside this range, you may notice
fading and drifting, which increase
with the distance from the radio
transmitter. They are often
accompanied by distortion.
Multi-path - FM signals are
reflective, making it possible for two
signals to reach your antenna at the
same time. If this happens, the
signals will cancel each other out,
causing a momentary flutter or loss
of reception.
Static and fluttering - These occur
when signals are blocked by
buildings, trees, or other large
objects. Increasing the bass level
may reduce static and fluttering.
Station swapping - If the FM signal
you are listening to is interrupted or
weakened, and there is another
strong station nearby on the FM
band, your radio may tune in the
second station until the original
signal can be picked up again.