CHEVROLET MALIBU 2006 6.G Owners Manual
Manufacturer: CHEVROLET, Model Year: 2006, Model line: MALIBU, Model: CHEVROLET MALIBU 2006 6.GPages: 442, PDF Size: 2.61 MB
Page 221 of 442
The volume on the radio may vary when switching
between a radio station, CD, DVD, cassette, or auxiliary
device.
If there is a decreased audio signal during CD or DVD
play, there may be a low hissing noise through the
speakers and/or headphones. If the hissing sound in
the wireless headphones seems excessive, make sure
that the headphone batteries are fully charged. Some
amount of hissing is normal.
Video Screen
The video screen is located on the back of the �oor
console. Open the video screen by rotating the screen
up and adjust its position as desired.
The video screen may not be able to be rotated up if
the rear seat is too far forward. See “Rear Sliding Seat
(MAXX Only)” underRear Seat Operation on page 1-10
for more information.
When the video screen is not in use, push it down into
its stored position.
The DVD player and display will continue to operate
when the video screen is in either the up or down
positions.The window on the RSE system contains the transmitter
for the wireless headphones and the remote control.
If the screen is in the closed position, the signals will not
be available for the operation of the headphones or
the remote control.
Notice:Avoid directly touching the video screen,
as damage may occur. See “Cleaning the Video
Screen” later in this section for more information.
DVD Player
The DVD player is located on the end of the �oor
console under the video screen.
The DVD player can be controlled by the buttons on
the RSE system and/or by the buttons on the remote
control. See “Remote Control” later in this section
for more information.
The DVD player is only compatible with DVDs of the
appropriate region code for the country that the vehicle
was sold in. The DVD region code is printed on the
jackets of most DVDs. Video CDs, standard audio CDs,
and audio CD-Rs can be played by the DVD player.
The video screen will display a menu when an audio CD
or CD-R is playing.
If an error message appears on the video screen, see
“DVD Messages” later in this section.
3-89
Page 222 of 442
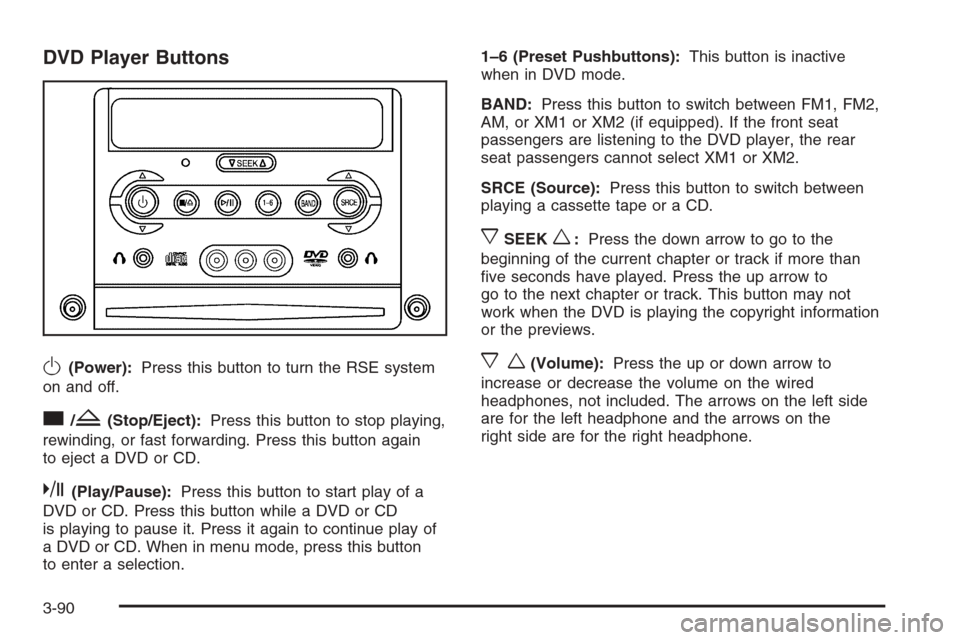
DVD Player Buttons
O(Power):Press this button to turn the RSE system
on and off.
c/Z(Stop/Eject):Press this button to stop playing,
rewinding, or fast forwarding. Press this button again
to eject a DVD or CD.
k(Play/Pause):Press this button to start play of a
DVD or CD. Press this button while a DVD or CD
is playing to pause it. Press it again to continue play of
a DVD or CD. When in menu mode, press this button
to enter a selection.1–6 (Preset Pushbuttons):This button is inactive
when in DVD mode.
BAND:Press this button to switch between FM1, FM2,
AM, or XM1 or XM2 (if equipped). If the front seat
passengers are listening to the DVD player, the rear
seat passengers cannot select XM1 or XM2.
SRCE (Source):Press this button to switch between
playing a cassette tape or a CD.
xSEEKw:Press the down arrow to go to the
beginning of the current chapter or track if more than
�ve seconds have played. Press the up arrow to
go to the next chapter or track. This button may not
work when the DVD is playing the copyright information
or the previews.
xw(Volume):Press the up or down arrow to
increase or decrease the volume on the wired
headphones, not included. The arrows on the left side
are for the left headphone and the arrows on the
right side are for the right headphone.
3-90
Page 223 of 442
Playing a Disc
To play a disc, gently insert the disc, with the label side
up, into the loading slot. The DVD player will continue
loading the disc and the player will automatically start if
the vehicle is in the CAP position, ACC, or RAP.
If a disc is already in the player, make sure that the
DVD player is on, then press the play/pause button
on the player faceplate or on the remote control.
Some DVDs will not allow fast forwarding or skipping
of the copyright information or the previews. Some
DVDs will begin playing after the previews have �nished.
If the DVD does not begin playing at the main title,
refer to the on-screen instructions.
Stopping and Resuming Playback
To stop playing a disc, press and release the stop button
on the DVD player faceplate or the remote control.
To resume playback, press the play/pause button
on the DVD player faceplate or the remote control.
The movie should resume play from where it was last
stopped if the disc has not been ejected or the stop
button has not been pressed twice on the remote control.If the disc has been ejected or if the stop button has
been pressed twice on the remote control, press the play
button once to resume play at the beginning of the
disc. A resume symbol will appear momentarily on the
video screen. When the resume symbol is displayed,
press the play button again to resume playback
from where the disc last stopped.
Ejecting a Disc
Press the eject button, on the DVD player or the remote
control, to eject the disc.
If a disc is ejected from the player, but not removed,
the DVD player will reload the disc after a short period
of time. The disc will be stored in the DVD player.
The DVD player will not resume play of the disc
automatically.
3-91
Page 224 of 442
Remote Control
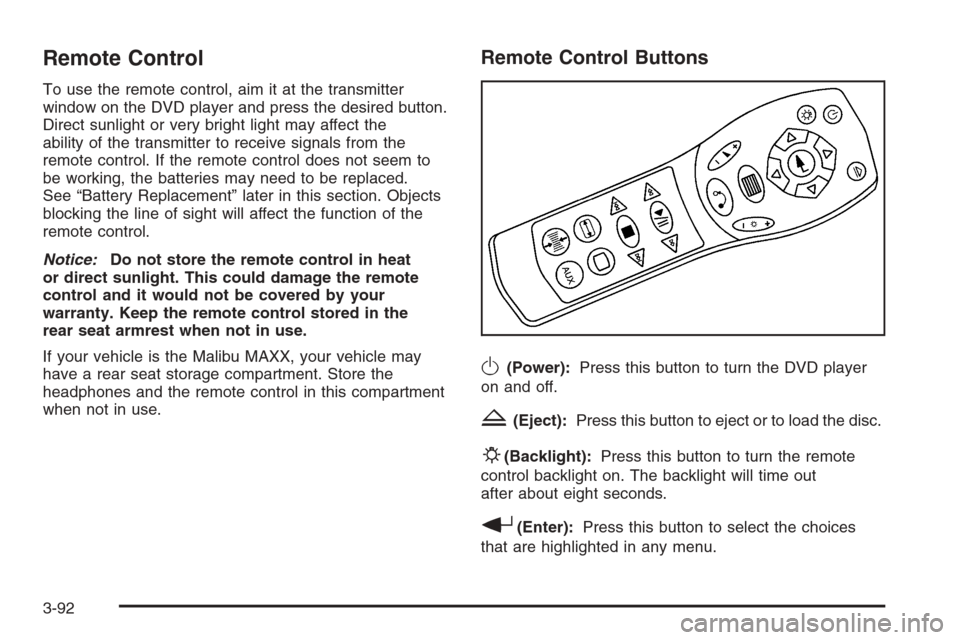
To use the remote control, aim it at the transmitter
window on the DVD player and press the desired button.
Direct sunlight or very bright light may affect the
ability of the transmitter to receive signals from the
remote control. If the remote control does not seem to
be working, the batteries may need to be replaced.
See “Battery Replacement” later in this section. Objects
blocking the line of sight will affect the function of the
remote control.
Notice:Do not store the remote control in heat
or direct sunlight. This could damage the remote
control and it would not be covered by your
warranty. Keep the remote control stored in the
rear seat armrest when not in use.
If your vehicle is the Malibu MAXX, your vehicle may
have a rear seat storage compartment. Store the
headphones and the remote control in this compartment
when not in use.
Remote Control Buttons
O(Power):Press this button to turn the DVD player
on and off.
Z(Eject):Press this button to eject or to load the disc.
P(Backlight):Press this button to turn the remote
control backlight on. The backlight will time out
after about eight seconds.
r(Enter):Press this button to select the choices
that are highlighted in any menu.
3-92
Page 225 of 442
w,x,o,p(Directional Arrows):Press these
buttons to navigate through DVD menus.
y(Main DVD Menu):Press this button to view the
media menu. The media menu is different on every disc.
Use the up, down, right, and left arrow buttons to
move the cursor around the media menu. After making
a selection, press the enter button. Press this button
again to start play of the disc.
u(Wired Headphone Volume):Press the plus and
minus buttons to increase or to decrease the volume of
both wired headphones (not included).
E(Screen Brightness):Press the plus and minus
buttons to increase or to decrease the intensity of
the video screen.
q(Return):Press this button to exit the current
active menu and return to the previous menu. This
button will operate only when a DVD is playing and/or a
menu is active.
s(Rewind):Press this button to rewind the DVD or
CD. To stop rewinding, press this button again. This
button may not work when the DVD is playing the
copyright information or the previews.
\(Fast Forward):Press this button to fast forward
the DVD or CD. To stop fast forwarding, press this
button again. This button may not work when the DVD
is playing the copyright information or the previews.
s(Play/Pause):Press this button to start play of
a DVD or CD. Press this button while a DVD or CD is
playing to pause it. Press this button again to continue
the play of the DVD or CD.
While in the menu, press this button to enter a selection.
When using RSA or an auxiliary device, pressing this
button will play a DVD or a CD if they are loaded.
g(Previous Chapter/Track):Press this button to
go to the beginning of the current track or chapter.
Press this button again to return to the previous track
or chapter. This button may not work when the DVD is
playing the copyright information or the previews.
l(Next Chapter/Track):Press this button to
advance to the beginning of the next chapter or track.
This button may not work when the DVD is playing
the copyright information or the previews.
c(Stop):Press this button to stop playing, rewinding,
or fast forwarding a DVD or CD. Press this button
twice to return to the beginning of the DVD.
3-93
Page 226 of 442
b(Size):Press this button to change the display
mode for 4:3 aspect ratio movies. This function cycles
between NORMAL, WIDE, and FULL video modes.
NormalThe horizontal image is not stretched.
The borders at the left and the right of the
picture are blanked. All lines of the vertical image
are displayed.
WideThe horizontal image is non-lineraly stretched.
The image tends to be stretched more at the
borders then the middle. The borders are not
displayed.
FullThe horizontal image is linearly stretched.
All vertical lines are displayed. No borders are
present.
z(Display):Press this button to display the title,
chapter, the time of a DVD or track number, the time
of a CD, and the menu functions on the video screen.
Press this button again to turn off the display item.
}(Audio Compression):DVDs have a wide
dynamic audio range. Audio compression may be
used to reduce the difference between soft and loud
selections of the DVD. Press this button to switch
the audio compression on and off.
AUX (Auxiliary):Press this button to switch the system
between the DVD player and an auxiliary source.
Setup Menu
To access the setup menu, ensure that a DVD is in
the player and the video is stopped. Press the display
button. Once the menu is activated, use the directional
arrows and the enter button to navigate the screen.
Picture Preferences
The USER PREFERENCE SETTINGS menu allows
the default viewing preferences to be modi�ed. Use the
remote control up and down arrow buttons to select.
The movie may stop while selections are being made.
TV Shape:The default video screen display may
be selected from 4:3 letterbox, 4:3 panscan, or 16:9.
Black Level Shift:The default black level to the video
screen may be adjusted.
Video Shift:The default position of the video on the
display may be adjusted.
Color Settings:The default color setting of the video
screen may be selected from Personal, Rich, Natural,
Soft, or Animation.
Personal Color:The default setting for Saturation,
Brightness, and Contrast may be adjusted.
3-94
Page 227 of 442
Sound Preferences
The USER PREFERENCE SETTINGS menu allows
the default sound preferences to be modi�ed. Use the
remote control up and down arrow buttons to select.
The movie may stop while selections are being made.
Analog Output:The default sound output may be
selected from Stereo or Dolby
®surround.
Dynamic Compression:The default setting may be
selected as On or Off.
Karaoke Vocal:The default setting may be selected
as On or Off.
Language Preferences
The USER PREFERENCE SETTINGS menu allows the
default language preferences to be modi�ed. Use the
remote control up and down arrow buttons to select.
The movie may stop while selections are being made.
Audio Language:The default DVD playback audio
language may be selected from various languages.
The audio output is dependent on whether a DVD
supports the selected language.Subtitle:The default DVD subtitle language may be
selected from English, Spanish, or French. The subtitle
language is dependent on whether the DVD supports
the selected language.
Menu:The default on-screen display language may be
selected from various languages.
Features
The USER PREFERENCE SETTINGS menu allows
you to modify the default feature preferences from the
display. Use the remote control up and down arrow
buttons to select. The movie may stop while selections
are being made.
Status Window:The status window may be selected
as On or Off. The status window provides disc type,
elapsed time, and number of titles information while
the menu bar is displayed or the DVD is stopped.
Help Text:Help text may be selected as On or Off.
A help text bar is provided at the bottom of the screen
describing the functions of an item selected from
any of the user menus.
3-95
Page 228 of 442
Menu Bar
The menu bar can be displayed across the top of
the screen by pressing the DISPLAY button on the
remote control. Selecting icons from the menu bar
allows adjustments to the audio and video settings.
Use the remote control left and right arrow buttons
to scroll through the menu bar. A description of
the highlighted icon will appear at the bottom of the
screen. Use the down arrow to display the options
for the highlighted icon.
The movie may stop playing while selections are
being made.
Current Subtitle Language:The subtitle language
may be selected as Off, English, Spanish, or French.
The actual subtitle language is dependent on whether
a DVD supports the selected language.
Current Audio Language:The audio language may
be selected as Off, English, Spanish, or French.
The actual audio language is dependent on whether
a DVD supports the selected language.
Smart Color:This color setting may be selected
without changing the default from the color
settings menu.Sound Mode:This analog output may be changed
without changing the default from the analog
output menu.
Frame-by-Frame:The DVD will pause and may be
viewed frame-by-frame, in forward or reverse, by
using the remote control arrow buttons. Press play to
resume play of the DVD. DVD audio will not be available
during selection.
Slow Motion:The DVD will pause and may be
viewed in slow motion, at various speeds, in forward or
reverse, by using the remote control arrow buttons.
Press play to resume play of the DVD. DVD audio will
not be available during selection.
Scan Speeds:The DVD may be viewed in fast motion,
at various speeds, in forward or reverse, by using the
remote control arrow buttons. Press play to resume play
of the DVD. DVD audio will not be available during
selection.
Enlarge Picture:The DVD will pause and the frame
may be enlarged by using the remote control arrow
key buttons. Pressing the enter button on the remote
control allows panning of the frame using the remote
control arrow buttons. Press play to resume play of the
DVD. DVD audio will not be available during selection.
3-96
Page 229 of 442
Title:Move between DVD titles by using the remote
control arrow buttons.
Chapter:Move between DVD chapters by using the
remote control arrow buttons.
Time Search:The user can jump to different areas
of a DVD by using the remote control arrow and enter
buttons to select a speci�c time position.
Favorite Track Selection (FTS):You may program
the unit to play only your favorite track selections from a
DVD or Audio CD. For a DVD, FTS is accessed from
the Menu bar. For a CD, the FTS screen will appear
on the display immediately when the CD is inserted.
From the screen, choose the tracks on the CD that you
wish to store, using the remote control right and left
arrows and the ENTER button to select. The player will
remember the selections and each time the CD is
inserted in the player, only those tracks will be played,
if FTS is turned on. The player can remember
selections for up to 50 discs. To remove FTS for a
disc, the disc must be in the player and the highlighted
tracks must be de-selected. Use the right and left
arrow buttons and the ENTER button or select CLEAR
ALL on the display.Not all DVDs support all of the feature defaults in the
setup menus. In the event a feature is not supported,
defaults will be provided by the DVD media.
Exit the setup menu by pressing the return button
on the remote control. If changes are made to the setup
menu, the DVD will resume play from the beginning.
Battery Replacement
To change the remote control batteries, do the following:
1. Unclip the battery door located on the back of the
remote control.
2. Replace the two AA batteries. Make sure that they
are installed correctly, using the diagram on the
inside of the battery compartment.
3. Close the battery door.
If the remote control is to be stored for a long period of
time, remove the batteries and keep them in a cool,
dry place.
3-97
Page 230 of 442
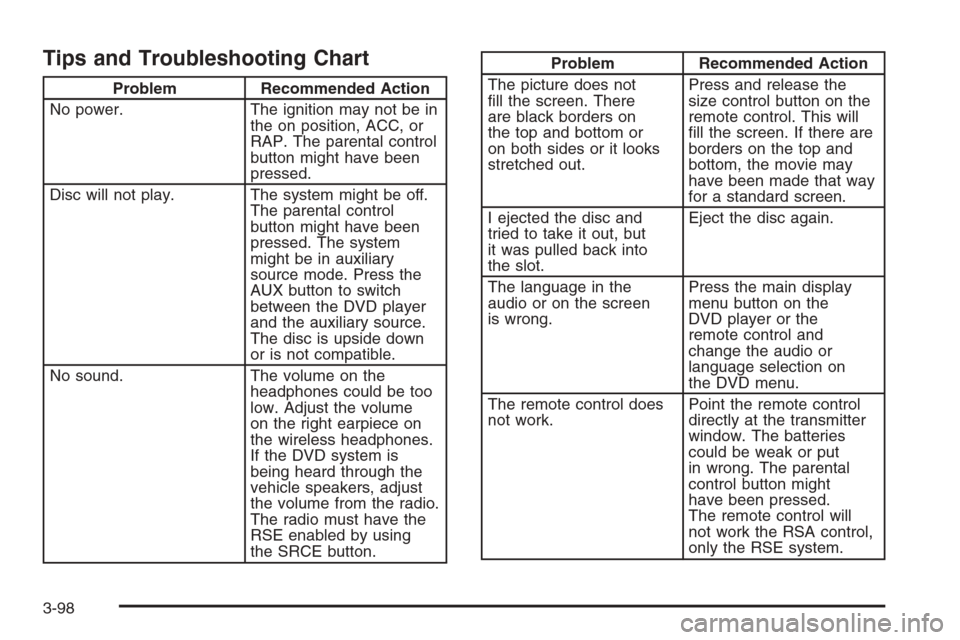
Tips and Troubleshooting Chart
Problem Recommended Action
No power. The ignition may not be in
the on position, ACC, or
RAP. The parental control
button might have been
pressed.
Disc will not play. The system might be off.
The parental control
button might have been
pressed. The system
might be in auxiliary
source mode. Press the
AUX button to switch
between the DVD player
and the auxiliary source.
The disc is upside down
or is not compatible.
No sound. The volume on the
headphones could be too
low. Adjust the volume
on the right earpiece on
the wireless headphones.
If the DVD system is
being heard through the
vehicle speakers, adjust
the volume from the radio.
The radio must have the
RSE enabled by using
the SRCE button.
Problem Recommended Action
The picture does not
�ll the screen. There
are black borders on
the top and bottom or
on both sides or it looks
stretched out.Press and release the
size control button on the
remote control. This will
�ll the screen. If there are
borders on the top and
bottom, the movie may
have been made that way
for a standard screen.
I ejected the disc and
tried to take it out, but
it was pulled back into
the slot.Eject the disc again.
The language in the
audio or on the screen
is wrong.Press the main display
menu button on the
DVD player or the
remote control and
change the audio or
language selection on
the DVD menu.
The remote control does
not work.Point the remote control
directly at the transmitter
window. The batteries
could be weak or put
in wrong. The parental
control button might
have been pressed.
The remote control will
not work the RSA control,
only the RSE system.
3-98