heating CHEVROLET MALIBU 2011 7.G Owners Manual
[x] Cancel search | Manufacturer: CHEVROLET, Model Year: 2011, Model line: MALIBU, Model: CHEVROLET MALIBU 2011 7.GPages: 382, PDF Size: 5.81 MB
Page 33 of 382
Black plate (5,1)Chevrolet Malibu Owner Manual - 2011
Keys, Doors and Windows 2-5
3. Insert the new battery, positiveside facing up. Replace with a
CR2032 or equivalent battery.
4. Snap the transmitter back together.
Remote Vehicle Start
Your vehicle may have a remote
starting feature that allows you to
start the engine from outside the
vehicle. It may also start the
vehicle's heating or air conditioning
systems and rear window defogger.
When the remote start system is
active and the vehicle has an
automatic climate control system, it
will automatically regulate the inside
temperature. Normal operation of
these systems will return after the
ignition key is turned to ON/RUN.
Laws in some communities may
restrict the use of remote starters.
For example, some laws may
require a person using remote start to have the vehicle in view when
doing so. Check local regulations for
any requirements on remote starting
of vehicles.
Do not use the remote start feature
if your vehicle is low on fuel. Your
vehicle may run out of fuel.
If your vehicle has the remote start
feature, the RKE transmitter
functions will have an increased
range of operation. However, the
range may be less while the vehicle
is running.
There are other conditions which
can affect the performance of the
transmitter, see
Remote Keyless
Entry (RKE) System
on page 2‑2for additional information.
/ (Remote Start): This button will
be on the RKE transmitter if the
vehicle has remote start. To start the vehicle using the remote
start feature:
1. Aim the transmitter at the
vehicle.
2. Press and release the transmitter's lock button, then
immediately press and hold the
transmitter's remote start button
for about four seconds or until
the vehicle's turn signal lamps
flash. The doors will lock.
When the vehicle starts, the
parking lamps turn on and
remain on while the engine is
running.
The remote start feature provides
two separate starts per ignition
cycle, each with 10 minutes of
engine running time, or one start
with a time extension. The first start
must expire or be canceled to get
two separate 10 minute starts.
Page 131 of 382
Black plate (21,1)Chevrolet Malibu Owner Manual - 2011
Instruments and Controls 5-21
Notice:Driving with the engine
coolant temperature warning light
on could cause the vehicle to
overheat. See Engine Overheating
on page 10‑19. The vehicle's
engine could be damaged, and it
might not be covered by the
vehicle warranty. Never drive with
the engine coolant temperature
warning light on.
The engine coolant temperature
warning light comes on when the
engine has overheated.
If this happens pull over and turn off
the engine as soon as possible. See
Engine Overheating
on page 10‑19for more information.
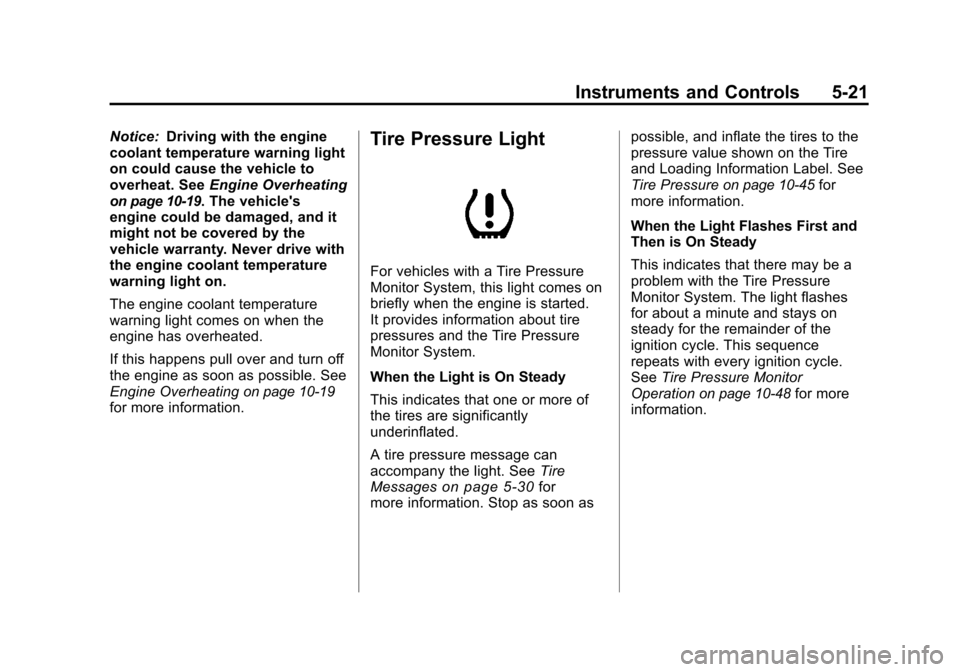
Tire Pressure Light
For vehicles with a Tire Pressure
Monitor System, this light comes on
briefly when the engine is started.
It provides information about tire
pressures and the Tire Pressure
Monitor System.
When the Light is On Steady
This indicates that one or more of
the tires are significantly
underinflated.
A tire pressure message can
accompany the light. See Tire
Messages
on page 5‑30for
more information. Stop as soon as possible, and inflate the tires to the
pressure value shown on the Tire
and Loading Information Label. See
Tire Pressure
on page 10‑45for
more information.
When the Light Flashes First and
Then is On Steady
This indicates that there may be a
problem with the Tire Pressure
Monitor System. The light flashes
for about a minute and stays on
steady for the remainder of the
ignition cycle. This sequence
repeats with every ignition cycle.
See Tire Pressure Monitor
Operation
on page 10‑48for more
information.
Page 185 of 382
Black plate (1,1)Chevrolet Malibu Owner Manual - 2011
Climate Controls 8-1
Climate Controls
Climate Control Systems
Climate Control Systems . . . . . . 8-1
Automatic Climate ControlSystem . . . . . . . . . . . . . . . . . . . . . . 8-5
Air Vents
Air Vents . . . . . . . . . . . . . . . . . . . . . . 8-9
Climate Control Systems
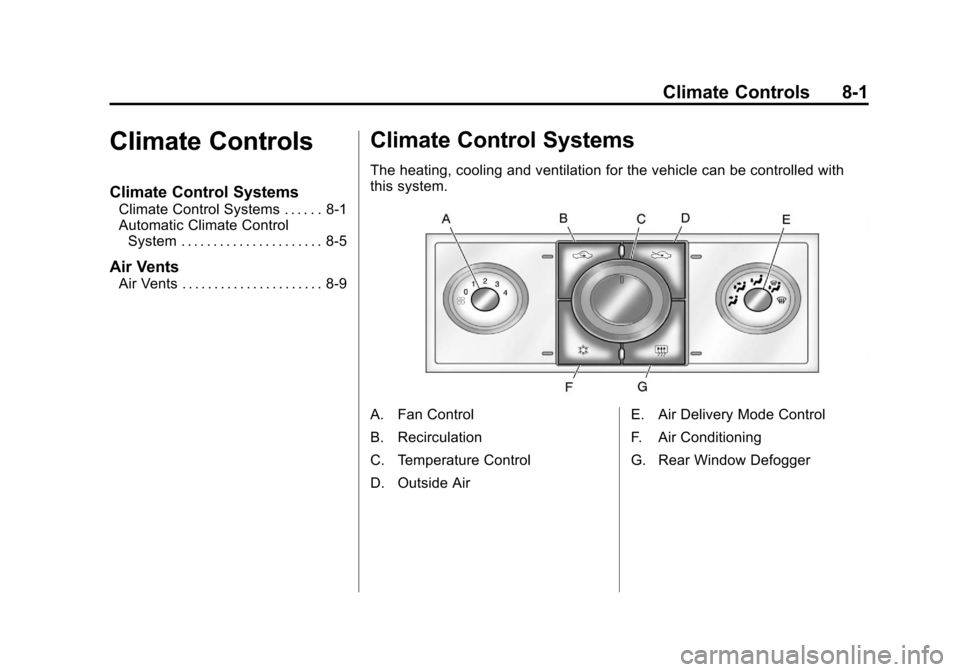
The heating, cooling and ventilation for the vehicle can be controlled with
this system.
A. Fan Control
B. Recirculation
C. Temperature Control
D. Outside Air E. Air Delivery Mode Control
F. Air Conditioning
G. Rear Window Defogger
Page 189 of 382
Black plate (5,1)Chevrolet Malibu Owner Manual - 2011
Climate Controls 8-5
Automatic Climate Control System
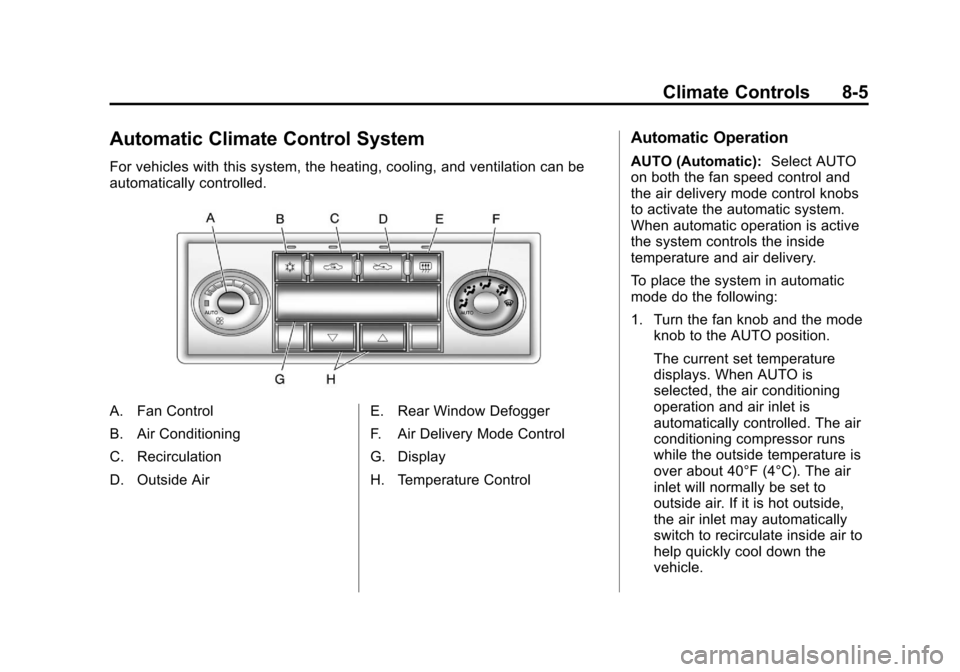
For vehicles with this system, the heating, cooling, and ventilation can be
automatically controlled.
A. Fan Control
B. Air Conditioning
C. Recirculation
D. Outside AirE. Rear Window Defogger
F. Air Delivery Mode Control
G. Display
H. Temperature Control
Automatic Operation
AUTO (Automatic):
Select AUTO
on both the fan speed control and
the air delivery mode control knobs
to activate the automatic system.
When automatic operation is active
the system controls the inside
temperature and air delivery.
To place the system in automatic
mode do the following:
1. Turn the fan knob and the mode knob to the AUTO position.
The current set temperature
displays. When AUTO is
selected, the air conditioning
operation and air inlet is
automatically controlled. The air
conditioning compressor runs
while the outside temperature is
over about 40°F (4°C). The air
inlet will normally be set to
outside air. If it is hot outside,
the air inlet may automatically
switch to recirculate inside air to
help quickly cool down the
vehicle.
Page 191 of 382

Black plate (7,1)Chevrolet Malibu Owner Manual - 2011
Climate Controls 8-7
windshield. The air conditioning
indicator light blinks three times if
the compressor is turned off while in
this mode.
#(Air Conditioning):Press turn
the air conditioning on and off. An
indicator light turns on to show the
air conditioning is on.
When air conditioning is selected or
is in AUTO mode, the system runs
the air conditioning automatically to
cool and dehumidify the air entering
the vehicle.
On hot days, open the windows long
enough to let hot inside air escape.
This reduces the time it takes for the
vehicle to cool down. Then keep the
windows closed for the air
conditioner to work its best.
On cool, but sunny days while using
manual operation of the automatic
system, use bi-level to deliver warm
air to the floor and cooler air to the
instrument panel outlets. To warm or
cool the air delivered, press the
temperature buttons to the desired
setting. In AUTO mode the system cools
and dehumidifies the air inside
the vehicle. Also while in AUTO
mode, the system maximizes its
performance by using recirculation
as necessary.
Heating:
On cold days when using
manual operation of the automatic
system, use floor mode to deliver air
to the floor outlets. To warm or cool
the air delivered, press
xorwto
the desired temperature setting.
To use the automatic mode, turn the
knob to AUTO and press
xorwto
adjust the temperature.
:(Outside Air): Press to turn
the outside air mode on. An
indicator light comes on to show it is
on. Air from outside the vehicle will
circulate throughout the vehicle. The
outside air mode can be used with
all modes, but it cannot be used
with the recirculation mode.
Pressing this button cancels the
recirculation mode.
h(Recirculation): Press to turn
the recirculation mode on. An
indicator light above the button
comes on to show it is on. This
mode recirculates and helps to
quickly cool the air inside the
vehicle. It can be used to help
prevent outside air and odors
from entering the vehicle. The
recirculation indicator light blinks
three times if you try to use
recirculation in a mode in which it
cannot function.
Pressing this button cancels the
auto recirculation feature. Each time
the vehicle is started, the system
reverts to the auto recirculation
function.
The recirculation mode cannot be
used with the floor, defrost, or defog
modes. If recirculation is selected in
these modes, the indicator flashes
three times and turns off to indicate
that this is not allowed. This is to
prevent window fogging.
Page 239 of 382
Black plate (45,1)Chevrolet Malibu Owner Manual - 2011
Driving and Operating 9-45
Making Turns
Notice:Making very sharp turns
while trailering could cause the
trailer to come in contact with the
vehicle. The vehicle could be
damaged. Avoid making very
sharp turns while trailering.
When turning with a trailer, make
wider turns than normal so the
trailer will not strike soft shoulders,
curbs, road signs, trees or other
objects. Use the turn signal well in
advance and avoid jerky or sudden
maneuvers.
Turn Signals When Towing a
Trailer
The turn signal indicators on the
instrument panel flash whenever
signaling a turn or lane change.
Properly hooked up, the trailer
lamps also flash, telling other
drivers the vehicle is turning,
changing lanes or stopping.
When towing a trailer, the arrows on
the instrument panel flash for turns
even if the bulbs on the trailer are burned out. Check occasionally to
be sure the trailer bulbs are still
working.
Driving On Grades
Reduce speed and shift to a lower
gear before starting down a long or
steep downgrade. If the
transmission is not shifted down, the
brakes might have to be used so
much that they would get hot and no
longer work well.
The vehicle can tow in D (Drive).
Use a lower gear if the transmission
shifts too often.
When towing at high altitude on
steep uphill grades, engine coolant
boils at a lower temperature than at
normal altitudes. If the engine is
turned off immediately after towing
at high altitude on steep uphill
grades, the vehicle could show
signs similar to engine overheating.
To avoid this, let the engine run
while parked, preferably on level
ground, with the transmission in
P (Park) for a few minutes before
turning the engine off. If the
overheat warning comes on, see
Engine Overheating on page 10‑19.
Parking on Hills
{WARNING
Parking the vehicle on a hill with
the trailer attached can be
dangerous. If something goes
wrong, the rig could start to move.
People can be injured, and both
the vehicle and the trailer can be
damaged. When possible, always
park the rig on a flat surface.
If parking the rig on a hill:
1. Press the brake pedal, but do not shift into P (Park) yet. Turn
the wheels into the curb if facing
downhill or into traffic if facing
uphill.
2. Have someone place chocks under the trailer wheels.
Page 240 of 382
Black plate (46,1)Chevrolet Malibu Owner Manual - 2011
9-46 Driving and Operating
3. When the wheel chocks are inplace, release the brake pedal
until the chocks absorb the load.
4. Reapply the brake pedal. Then apply the parking brake and shift
into P (Park).
5. Release the brake pedal.
Leaving After Parking on a Hill
1. Apply and hold the brake pedal.
2. Start the engine.
3. Shift into a gear.
4. Release the parking brake.
5. Let up on the brake pedal.
6. Drive slowly until the trailer is clear of the chocks.
7. Stop and have someone pick up and store the chocks.
Maintenance When Trailer
Towing
The vehicle needs service more
often when pulling a trailer. See this
manual's Maintenance Schedule or
Index for more information. Things
that are especially important in
trailer operation are automatic
transmission fluid, engine oil, axle
lubricant, belts, cooling system and
brake system. Inspect these before
and during the trip.
Check periodically to see that all
hitch nuts and bolts are tight.
Engine Cooling When Trailer
Towing
The cooling system may temporarily
overheat during severe operating
conditions. See Engine Overheating
on page 10‑19.
Trailer Towing
Before pulling a trailer, there are
three important considerations that
have to do with weight:
.The weight of the trailer.
.The weight of the trailer tongue.
.The total weight on your
vehicle's tires.
Weight of the Trailer
How heavy can a trailer safely be?
It should never weigh more than
454 kg (1,000 lbs). But even that
can be too heavy.
It depends on how the rig is used.
For example, speed, altitude, road
grades, outside temperature and
how much the vehicle is used to pull
a trailer are all important. It can
depend on any special equipment
on the vehicle, and the amount of
tongue weight the vehicle can carry.
See“Weight of the Trailer Tongue”
later in this section for more
information.
Page 243 of 382
Black plate (1,1)Chevrolet Malibu Owner Manual - 2011
Vehicle Care 10-1
Vehicle Care
General Information
General Information . . . . . . . . . . 10-2
California Proposition65 Warning . . . . . . . . . . . . . . . . . 10-3
California Perchlorate Materials Requirements . . . . 10-3
Accessories and Modifications . . . . . . . . . . . . . . . 10-3
Vehicle Checks
Doing Your OwnService Work . . . . . . . . . . . . . . . 10-4
Hood . . . . . . . . . . . . . . . . . . . . . . . . 10-5
Engine Compartment Overview . . . . . . . . . . . . . . . . . . . 10-6
Engine Oil . . . . . . . . . . . . . . . . . . . 10-9
Engine Oil Life System . . . . . 10-12
Automatic Transmission Fluid . . . . . . . . . . . . . . . . . . . . . . 10-13
Engine Air Cleaner/Filter . . . . 10-14
Cooling System . . . . . . . . . . . . 10-15
Engine Coolant . . . . . . . . . . . . . 10-16
Engine Overheating . . . . . . . . 10-19 Overheated Engine
Protection
Operating Mode . . . . . . . . . . . 10-20
Power Steering Fluid . . . . . . . 10-21
Washer Fluid . . . . . . . . . . . . . . . 10-22
Brakes . . . . . . . . . . . . . . . . . . . . . 10-22
Brake Fluid . . . . . . . . . . . . . . . . . 10-23
Battery . . . . . . . . . . . . . . . . . . . . . 10-25
Starter Switch Check . . . . . . . 10-25
Automatic Transmission Shift Lock Control Function
Check . . . . . . . . . . . . . . . . . . . . . 10-26
Ignition Transmission Lock Check . . . . . . . . . . . . . . . . . . . . . 10-26
Park Brake and P (Park) Mechanism Check . . . . . . . . 10-26
Wiper Blade Replacement . . . . . . . . . . . . . . 10-27
Headlamp Aiming
Headlamp Aiming . . . . . . . . . . 10-27
Bulb Replacement
Bulb Replacement . . . . . . . . . . 10-28
Halogen Bulbs . . . . . . . . . . . . . . 10-28
Taillamps, Turn Signal, andStoplamps . . . . . . . . . . . . . . . . 10-28
License Plate Lamp . . . . . . . . 10-29
Replacement Bulbs . . . . . . . . . 10-29
Electrical System
Electrical System Overload . . . . . . . . . . . . . . . . . . 10-30
Fuses . . . . . . . . . . . . . . . . . . . . . . 10-30
Engine Compartment Fuse Block . . . . . . . . . . . . . . . . . . . . . 10-31
Instrument Panel Fuse Block . . . . . . . . . . . . . . . . . . . . . 10-33
Rear Compartment Fuse Block . . . . . . . . . . . . . . . . . . . . . 10-35
Wheels and Tires
Tires . . . . . . . . . . . . . . . . . . . . . . . . 10-38
Winter Tires . . . . . . . . . . . . . . . . 10-39
Low-Profile Tires . . . . . . . . . . . 10-39
Tire Sidewall Labeling . . . . . . 10-40
Tire Designations . . . . . . . . . . . 10-42
Tire Terminology andDefinitions . . . . . . . . . . . . . . . . 10-42
Tire Pressure . . . . . . . . . . . . . . . 10-45
Tire Pressure for High-Speed Operation . . . . . . . . . . . . . . . . . 10-46
Tire Pressure Monitor System . . . . . . . . . . . . . . . . . . . 10-47
Tire Pressure Monitor Operation . . . . . . . . . . . . . . . . . 10-48
Tire Inspection . . . . . . . . . . . . . . 10-51
Tire Rotation . . . . . . . . . . . . . . . 10-52
Page 258 of 382
Black plate (16,1)Chevrolet Malibu Owner Manual - 2011
10-16 Vehicle Care
{WARNING
An electric engine cooling fan
under the hood can start up even
when the engine is not running
and can cause injury. Keep
hands, clothing, and tools away
from any underhood electric fan.
{WARNING
Heater and radiator hoses, and
other engine parts, can be very
hot. Do not touch them. If you do,
you can be burned.
Do not run the engine if there is a
leak. If you run the engine, it
could lose all coolant. That could
cause an engine fire, and you
could be burned. Get any leak
fixed before you drive the vehicle.Notice:
Using coolant other than
DEX-COOL
®can cause premature
engine, heater core, or radiator
corrosion. In addition, the engine
coolant could require changing
sooner, at 50 000 km
(30,000 miles) or 24 months,
whichever occurs first. Any
repairs would not be covered by
the vehicle warranty. Always use
DEX-COOL (silicate-free) coolant
in the vehicle.
Engine Coolant
The cooling system in the vehicle is
filled with DEX-COOL®engine
coolant. This coolant is designed to
remain in the vehicle for 5 years or
240 000 km (150,000 mi), whichever
occurs first.
The following explains the cooling
system and how to check and add
coolant when it is low. If there is a
problem with engine overheating,
see Engine Overheating
on
page 10‑19.
What to Use
{WARNING
Adding only plain water or some
other liquid to the cooling system
can be dangerous. Plain water
and other liquids, can boil before
the proper coolant mixture will.
The vehicle's coolant warning
system is set for the proper
coolant mixture. With plain water
or the wrong mixture, the engine
could get too hot but you would
not get the overheat warning. The
engine could catch fire and you or
others could be burned. Use a
50/50 mixture of clean, drinkable
water and DEX-COOL coolant.
Page 259 of 382
Black plate (17,1)Chevrolet Malibu Owner Manual - 2011
Vehicle Care 10-17
Use a 50/50 mixture of clean,
drinkable water and DEX-COOL
coolant. If using this mixture,
nothing else needs to be added.
This mixture:
.Gives freezing protection down
to−37°C (−34°F), outside
temperature.
.Gives boiling protection up to
129°C (265°F), engine
temperature.
.Protects against rust and
corrosion.
.Will not damage aluminum parts.
.Helps keep the proper engine
temperature.
Notice: If an improper coolant
mixture is used, the engine could
overheat and be badly damaged.
The repair cost would not be
covered by the vehicle warranty.
Too much water in the mixture
can freeze and crack the engine,
radiator, heater core, and other
parts.
Checking Coolant
The vehicle must be on a level
surface when checking the coolant
level.
Check to see if coolant is visible in
the coolant surge tank. If the coolant
inside the coolant surge tank is
boiling, do not do anything else until
it cools down. If coolant is visible
but the coolant level is not at or
above the FULL COLD mark, add a
50/50 mixture of clean, drinkable
water and DEX-COOL coolant at the
coolant surge tank, but be sure the
cooling system is cool before this is
done. See Engine Overheating
on
page 10‑19for more information.
The coolant level should be at or
above the FULL COLD mark on the
coolant surge tank. If it is not, there
may be a leak at the pressure cap
or in the radiator hoses, heater
hoses, radiator, water pump,
or somewhere else in the cooling
system.
How to Add Coolant to the
Coolant Surge Tank
{WARNING
You can be burned if you spill
coolant on hot engine parts.
Coolant contains ethylene glycol
and it will burn if the engine parts
are hot enough. Do not spill
coolant on a hot engine.
Notice: This vehicle has a
specific coolant fill procedure.
Failure to follow this procedure
could cause the engine to
overheat and be severely
damaged.
If coolant is needed, add the proper
DEX-COOL coolant mixture at the
coolant surge tank.