jump start CHEVROLET MALIBU 2013 8.G Owners Manual
[x] Cancel search | Manufacturer: CHEVROLET, Model Year: 2013, Model line: MALIBU, Model: CHEVROLET MALIBU 2013 8.GPages: 436, PDF Size: 7.43 MB
Page 2 of 436

Black plate (2,1)Chevrolet Malibu Owner Manual - 2013 - CRC - 6/6/12
2013 Chevrolet Malibu Owner ManualM
Wheels and Tires . . . . . . . . . . . 10-44
Jump Starting . . . . . . . . . . . . . . . 10-90
Towing . . . . . . . . . . . . . . . . . . . . . . 10-95
Appearance Care . . . . . . . . . . . 10-97
Service and Maintenance . . . 11-1
General Information . . . . . . . . . . 11-1
Maintenance Schedule . . . . . . . 11-2
Special Application Services . . . . . . . . . . . . . . . . . . . . 11-8
Additional Maintenance
and Care . . . . . . . . . . . . . . . . . . . . 11-9
Recommended Fluids, Lubricants, and Parts . . . . . . 11-12
Maintenance Records . . . . . . . 11-15
Technical Data . . . . . . . . . . . . . . . 12-1
Vehicle Identification . . . . . . . . . 12-1
Vehicle Data . . . . . . . . . . . . . . . . . . 12-2 Customer Information
. . . . . . . 13-1
Customer Information . . . . . . . . 13-2
Reporting Safety Defects . . . . 13-18
Vehicle Data Recording and
Privacy . . . . . . . . . . . . . . . . . . . . 13-19
OnStar . . . . . . . . . . . . . . . . . . . . . . . 14-1
OnStar Overview . . . . . . . . . . . . . 14-1
OnStar Services . . . . . . . . . . . . . . 14-2
OnStar Additional
Information . . . . . . . . . . . . . . . . . . 14-5
Index . . . . . . . . . . . . . . . . . . . . . i-1
Page 84 of 436
Black plate (32,1)Chevrolet Malibu Owner Manual - 2013 - CRC - 6/6/12
3-32 Seats and Restraints
If the airbag readiness light stays on
after the vehicle is started or comes
on when you are driving, the airbag
system may not work properly. Have
the vehicle serviced right away. See
Airbag Readiness Light on
page 5‑12for more information.
Vehicles with eAssist have a high
voltage battery and a standard 12‐
volt battery. If an airbag inflates or
the vehicle has been in a crash, the
vehicle's sensing system may shut
down the high voltage system.
When this occurs, the high voltage
battery is disconnected and the
vehicle is not charging the 12‐volt
battery or the electrical system. The
vehicle may start but it shuts down
once the 12‐volt battery is depleted.
When the 12‐volt battery is
depleted, the vehicle will not start
and the on‐board jump start feature
is disabled. The airbag readiness
light and/or the 12‐volt battery
warning light are displayed. Before
the vehicle can be operated again, it
must be serviced at your dealer.Child Restraints
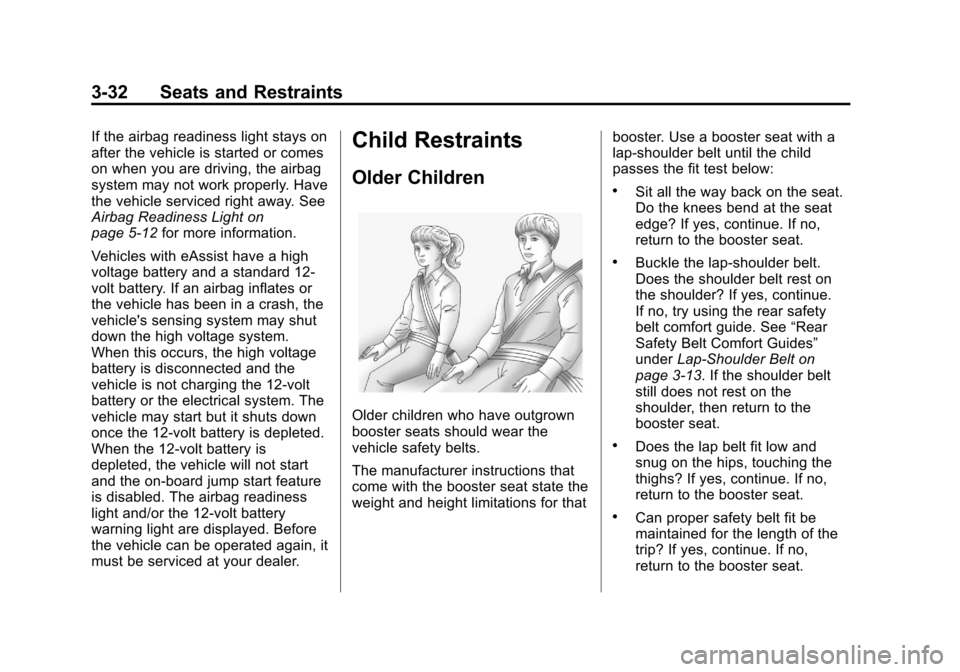
Older Children
Older children who have outgrown
booster seats should wear the
vehicle safety belts.
The manufacturer instructions that
come with the booster seat state the
weight and height limitations for that booster. Use a booster seat with a
lap-shoulder belt until the child
passes the fit test below:
.Sit all the way back on the seat.
Do the knees bend at the seat
edge? If yes, continue. If no,
return to the booster seat.
.Buckle the lap-shoulder belt.
Does the shoulder belt rest on
the shoulder? If yes, continue.
If no, try using the rear safety
belt comfort guide. See
“Rear
Safety Belt Comfort Guides”
under Lap-Shoulder Belt on
page 3‑13. If the shoulder belt
still does not rest on the
shoulder, then return to the
booster seat.
.Does the lap belt fit low and
snug on the hips, touching the
thighs? If yes, continue. If no,
return to the booster seat.
.Can proper safety belt fit be
maintained for the length of the
trip? If yes, continue. If no,
return to the booster seat.
Page 134 of 436
Black plate (26,1)Chevrolet Malibu Owner Manual - 2013 - CRC - 6/6/12
5-26 Instruments and Controls
Average Fuel Economy and
Instantaneous Fuel Economy
This display shows the approximate
average liters per 100 kilometers(L/100 km) or miles per
gallon (mpg). This number is
calculated based on the number of
L/100 km (mpg) recorded since the
last time this menu item was reset.
The fuel economy can be reset by
pressing SET/CLR while the
Average Fuel Economy display is
showing.
The instantaneous fuel economy
display shows the current fuel
economy in liters per 100 kilometers
(L/100 km) or miles per gallon
(mpg). This number reflects only the
fuel economy that the vehicle has
right now and changes frequently as
driving conditions change. Unlike
average economy, this display
cannot be reset.
Average Vehicle Speed
This display shows the average
speed of the vehicle in kilometers
per hour (km/h) or miles per hour (mph). This average is
calculated based on the various
vehicle speeds recorded since the
last reset of this value. The average
speed can be reset by pressing
SET/CLR while the Average Vehicle
Speed display is showing.
Timer
This display can be used as a timer.
To start the timer, press SET/CLR
while Timer is displayed. The
display will show the amount of time
that has passed since the timer was
last reset, not including time the
ignition is off. Time will continue to
be counted as long as the ignition is
on, even if another display is being
shown on the DIC. The timer will
record up to 99 hours, 59 minutes,
and 59 seconds (99:59:59) after
which the display will return to zero.
To stop the timer, press SET/CLR
briefly while Timer is displayed. To
reset the timer to zero, press and
hold SET/CLR.
Navigation
This display is used for the
Turn-by-Turn navigation,
if equipped.
Boost Gauge
This display, available on some
vehicles, is a boost gauge. It shows
a visual display of the level of boost.
Vehicle Information Menu
Items
Press MENU on the turn signal
lever until Vehicle Information menu
is displayed. Use
w/xto scroll
through the menu items. The
following is the list of all possible
vehicle information displays. Some
of the items may not be available for
your particular vehicle.
.Display Units
.Tire Pressure
.Jump Start (eAssist Only)
.Remaining Oil Life
.Battery
Page 135 of 436
Black plate (27,1)Chevrolet Malibu Owner Manual - 2013 - CRC - 6/6/12
Instruments and Controls 5-27
Display Units
Move
w/xto switch between
metric or US when the Unit display
is active. Press SET/CLR to confirm
the setting. This will change the
displays on the cluster and DIC to
either metric or English (US)
measurements.
Tire Pressure
The display will show a vehicle with
the approximate pressures of all
four tires. Tire pressure is displayed
in either kilopascal (kPa) or pounds
per square inch (psi). See Tire
Pressure Monitor System on
page 10‑54 andTire Pressure
Monitor Operation on page 10‑55.
Jump Start (eAssist Only)
This display allows for on-board
jump starting of the vehicle. See
"Jump Starting (On-board with
eAssist Only)" for more information. Remaining Oil Life
This display shows an estimate of
the oil's remaining useful life.
If Remaining Oil Life 99% is
displayed, that means 99% of the
current oil life remains.
When the remaining oil life is low,
the CHANGE ENGINE OIL SOON
message will appear on the display.
See
Engine Oil Messages on
page 5‑30. The oil should changed
as soon as possible. See Engine Oil
on page 10‑11. In addition to the
engine oil life system monitoring the
oil life, additional maintenance is
recommended. See Maintenance
Schedule on page 11‑2.
Remember, the Oil Life display must
be reset after each oil change. It will
not reset itself. Also, be careful not
to reset the Oil Life display
accidentally at any time other than
when the oil has just been changed. It cannot be reset accurately until
the next oil change. To reset the
engine oil life system, press SET/
CLR while the Oil Life display is
active. See
Engine Oil Life System
on page 10‑13.
Battery
This display, available on some
vehicles, shows the current battery
voltage. If the voltage is in the
normal range, the value will display.
For example, the display may read
Battery Voltage 15.0 Volts. The
vehicle's charging system regulates
voltage based on the state of the
battery. The battery voltage can
fluctuate while viewing this
information on the DIC. This is
normal. See Charging System Light
on page 5‑14. If there is a problem
with the battery charging system,
the DIC will display a message.
Page 141 of 436
Black plate (33,1)Chevrolet Malibu Owner Manual - 2013 - CRC - 6/6/12
Instruments and Controls 5-33
Starting the Vehicle
Messages
JUMP START ACTIVE WAIT TO
START
This message displays while
performing an on-board jump start
of the vehicle. See“Jump Starting
(On-board with eAssist Only).”
JUMP START COMPLETE
ATTEMPT START
This message displays while
performing an on-board jump start
of the vehicle. See “Jump Starting
(On-board with eAssist Only).”
JUMP START DISABLED SEE
OWNERS MANUAL
This message displays if there is a
problem with the on-board jump
start system, or the 12 volt battery is
too low to perform an on-board jump
start. Try using jumper cables and
performing a normal jump start. Take the vehicle to your dealer for
service to if this message continues
to be displayed.
Tire Messages
TIRE PRESSURE LOW ADD
AIR TO TIRE
On vehicles with the Tire Pressure
Monitor System (TPMS), this
message displays when the
pressure in one or more of the
vehicle's tires is low.
The low tire pressure warning light
will also come on. See
Tire
Pressure Light on page 5‑21.
If a tire pressure message appears
on the DIC, stop as soon as you
can. Inflate the tires by adding air
until the tire pressure is equal to the
values shown on the Tire and
Loading Information label. See Tires
on page 10‑44, Vehicle Load Limits
on page 9‑10, and Tire Pressure on
page 10‑52. You can receive more than one tire
pressure message at a time. To
read the other messages that may
have been sent at the same time,
press the SET/CLR button. The DIC
also shows the tire pressure values.
See
Driver Information Center (DIC)
on page 5‑24.SERVICE TIRE MONITOR
SYSTEM
This message displays if there is a
problem with the Tire Pressure
Monitor System (TPMS). See Tire
Pressure Monitor Operation on
page 10‑55.
TIRE LEARNING ACTIVE
This message displays when the
system is learning new tires. See
Tire Pressure Monitor Operation on
page 10‑55.
Page 232 of 436
Black plate (16,1)Chevrolet Malibu Owner Manual - 2013 - CRC - 6/6/12
9-16 Driving and Operating
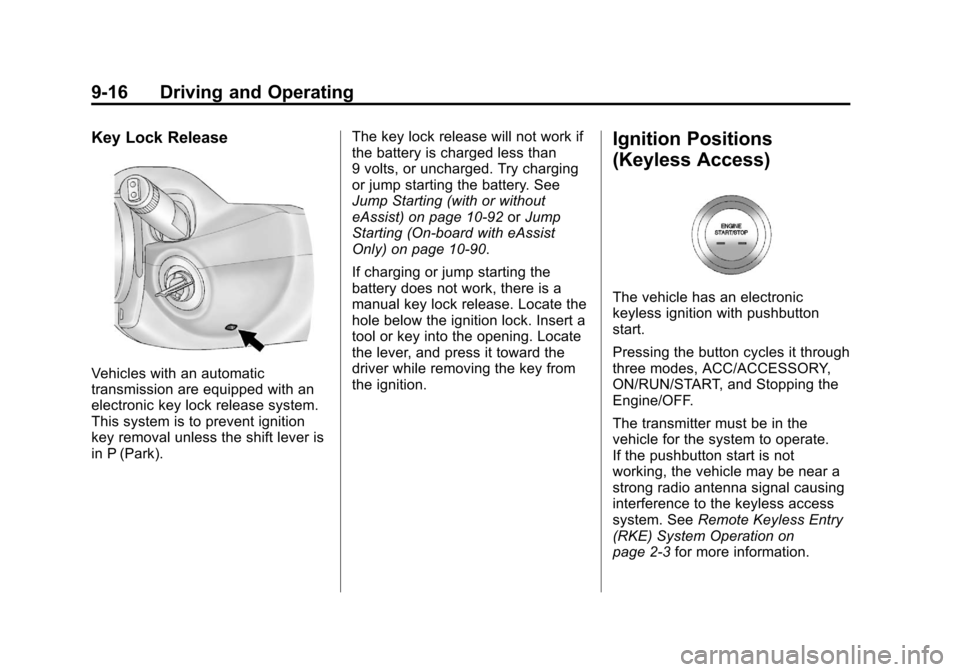
Key Lock Release
Vehicles with an automatic
transmission are equipped with an
electronic key lock release system.
This system is to prevent ignition
key removal unless the shift lever is
in P (Park).The key lock release will not work if
the battery is charged less than
9 volts, or uncharged. Try charging
or jump starting the battery. See
Jump Starting (with or without
eAssist) on page 10‑92
orJump
Starting (On-board with eAssist
Only) on page 10‑90.
If charging or jump starting the
battery does not work, there is a
manual key lock release. Locate the
hole below the ignition lock. Insert a
tool or key into the opening. Locate
the lever, and press it toward the
driver while removing the key from
the ignition.
Ignition Positions
(Keyless Access)
The vehicle has an electronic
keyless ignition with pushbutton
start.
Pressing the button cycles it through
three modes, ACC/ACCESSORY,
ON/RUN/START, and Stopping the
Engine/OFF.
The transmitter must be in the
vehicle for the system to operate.
If the pushbutton start is not
working, the vehicle may be near a
strong radio antenna signal causing
interference to the keyless access
system. See Remote Keyless Entry
(RKE) System Operation on
page 2‑3 for more information.
Page 239 of 436
Black plate (23,1)Chevrolet Malibu Owner Manual - 2013 - CRC - 6/6/12
Driving and Operating 9-23
Torque Lock
Torque lock is when the weight
of the vehicle puts too much
force on the parking pawl in the
transmission. This happens when
parking on a hill and shifting the
transmission into P (Park) is not
done properly, then it is difficult to
shift out of P (Park). To prevent
torque lock, set the parking brake
and then shift into P (Park). To find
out how, see“Shifting Into Park”
listed previously.
If torque lock does occur, your
vehicle may need to be pushed
uphill by another vehicle to relieve
the parking pawl pressure, so you
can shift out of P (Park).
Shifting out of Park
This vehicle is equipped with
an electronic shift lock release
system. The shift lock release is
designed to:
.Prevent ignition key removal
unless the shift lever is in
P (Park) with the shift lever
button fully released.
.Prevent movement of the shift
lever out of P (Park), unless the
ignition is in ON/RUN and the
brake pedal is applied.
The shift lock release is always
functional except in the case of an
uncharged or low voltage (less than
9-volt) battery.
If the vehicle has an uncharged
battery or a battery with low voltage,
try charging or jump starting the
battery. See Jump Starting (with or
without eAssist) on page 10‑92 or
Jump Starting (On-board with
eAssist Only) on page 10‑90. To shift out of P (Park):
1. Apply the brake pedal.
2. Place the ignition in ON/RUN.
3. Press the shift lever button.
4. Move the shift lever to the
desired position.
If still unable to shift out of P (Park):
1. Fully release the shift lever button.
2. Hold the brake pedal down and press the shift lever button
again.
3. Move the shift lever to the desired position.
If you are still having a problem
shifting, see your dealer.
Shift Lock Manual Release
If jump starting the vehicle did not
work, the shift lock manual release
must be used.
Page 268 of 436
Black plate (2,1)Chevrolet Malibu Owner Manual - 2013 - CRC - 6/6/12
10-2 Vehicle Care
Tire Pressure MonitorSystem . . . . . . . . . . . . . . . . . . . 10-54
Tire Pressure Monitor Operation . . . . . . . . . . . . . . . . . 10-55
Tire Inspection . . . . . . . . . . . . . . 10-58
Tire Rotation . . . . . . . . . . . . . . . 10-59
When It Is Time for New
Tires . . . . . . . . . . . . . . . . . . . . . . 10-60
Buying New Tires . . . . . . . . . . . 10-61
Different Size Tires and Wheels . . . . . . . . . . . . . . . . . . . 10-62
Uniform Tire Quality Grading . . . . . . . . . . . . . . . . . . . 10-63
Wheel Alignment and Tire Balance . . . . . . . . . . . . . . . . . . . 10-65
Wheel Replacement . . . . . . . . 10-65
Tire Chains . . . . . . . . . . . . . . . . . 10-66
If a Tire Goes Flat . . . . . . . . . . 10-66
Tire Sealant and Compressor Kit (With Pressure Relief
Button) . . . . . . . . . . . . . . . . . . . . 10-68
Tire Sealant and Compressor Kit (With Pressure Deflation
Button) . . . . . . . . . . . . . . . . . . . . 10-75
Storing the Tire Sealant and Compressor Kit . . . . . . . . . . . 10-83
Tire Changing . . . . . . . . . . . . . . 10-84
Compact Spare Tire . . . . . . . . 10-89Jump Starting
Jump Starting (On-board with eAssist Only) . . . . . . . . . 10-90
Jump Starting (with or without eAssist) . . . . . . . . . . . 10-92
Towing
Towing the Vehicle . . . . . . . . . 10-95
Recreational VehicleTowing . . . . . . . . . . . . . . . . . . . . 10-95
Appearance Care
Exterior Care . . . . . . . . . . . . . . . 10-97
Interior Care . . . . . . . . . . . . . . . 10-100
Floor Mats . . . . . . . . . . . . . . . . 10-103
General Information
For service and parts needs, visit
your dealer. You will receive
genuine GM parts and GM-trained
and supported service people.
Genuine GM parts have one of
these marks:
Page 291 of 436
Black plate (25,1)Chevrolet Malibu Owner Manual - 2013 - CRC - 6/6/12
Vehicle Care 10-25
.If brake fluid is spilled on the
vehicle's painted surfaces,
the paint finish can be
damaged. Be careful not to
spill brake fluid on the
vehicle. If you do, wash it off
immediately.
Battery
This vehicle has a standard 12-volt
battery. Refer to the replacement
number on the original battery label
when a new standard 12-volt battery
is needed.
eAssist vehicles also have a high
voltage battery. Only a trained
service technician with the proper
knowledge and tools should inspect,
test, or replace the high voltage
battery. See your dealer if the high
voltage battery needs service. The
dealer has information on how to
recycle the high voltage battery.
There is also information available
at http://www.recyclemybattery.com.
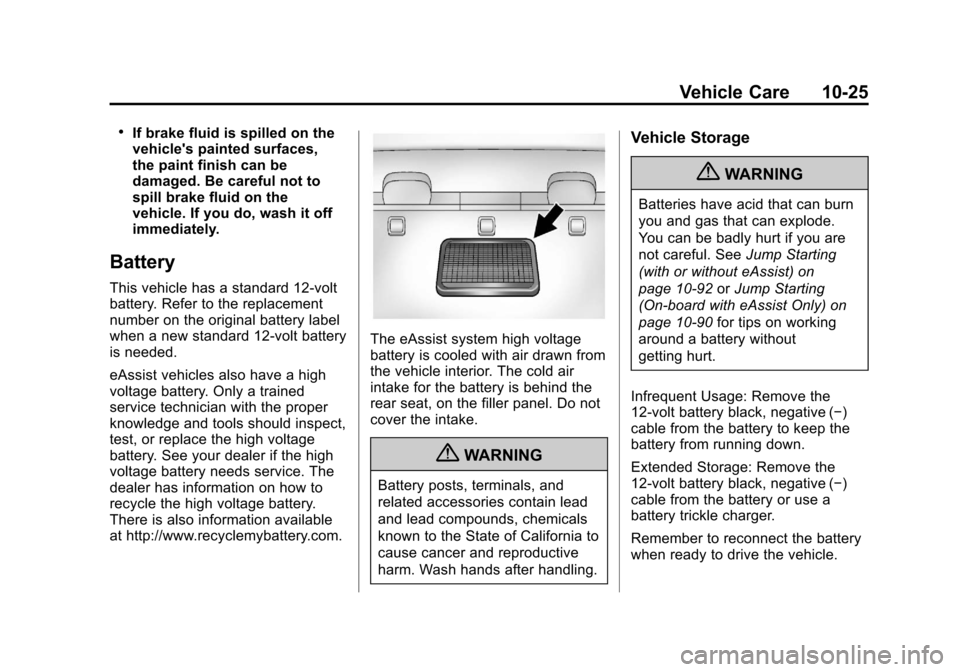
The eAssist system high voltage
battery is cooled with air drawn from
the vehicle interior. The cold air
intake for the battery is behind the
rear seat, on the filler panel. Do not
cover the intake.
{WARNING
Battery posts, terminals, and
related accessories contain lead
and lead compounds, chemicals
known to the State of California to
cause cancer and reproductive
harm. Wash hands after handling.
Vehicle Storage
{WARNING
Batteries have acid that can burn
you and gas that can explode.
You can be badly hurt if you are
not careful. SeeJump Starting
(with or without eAssist) on
page 10‑92 orJump Starting
(On-board with eAssist Only) on
page 10‑90 for tips on working
around a battery without
getting hurt.
Infrequent Usage: Remove the
12-volt battery black, negative (−)
cable from the battery to keep the
battery from running down.
Extended Storage: Remove the
12-volt battery black, negative (−)
cable from the battery or use a
battery trickle charger.
Remember to reconnect the battery
when ready to drive the vehicle.
Page 356 of 436
Black plate (90,1)Chevrolet Malibu Owner Manual - 2013 - CRC - 6/6/12
10-90 Vehicle Care
Stop as soon as possible and check
that the spare tire is correctly
inflated after being installed on the
vehicle. The compact spare tire is
designed for temporary use only.
The vehicle will perform differently
with the spare tire installed and it is
recommended that the vehicle
speed be limited to 80 km/h
(50 mph). To conserve the tread of
the spare tire, have the standard tire
repaired or replaced as soon as
convenient and return the spare tire
to the storage area.Notice:
When the compact spare
is installed, do not take the
vehicle through an automatic
car wash with guide rails. The
compact spare can get caught on
the rails which can damage the
tire, wheel, and other parts of the
vehicle.
Do not use the compact spare on
other vehicles.
Do not mix the compact spare tire or
wheel with other wheels or tires.
They will not fit. Keep the spare tire
and its wheel together.
Notice: Tire chains will not fit
the compact spare. Using them
can damage the vehicle and the
chains. Do not use tire chains on
the compact spare.Jump Starting
Jump Starting (On-board
with eAssist Only)
If the vehicle fails to crank, it may
be jump started by using the eAssist
battery to charge the 12-volt battery.
Use the following procedure to
activate the on-board jump start
using the DIC controls.
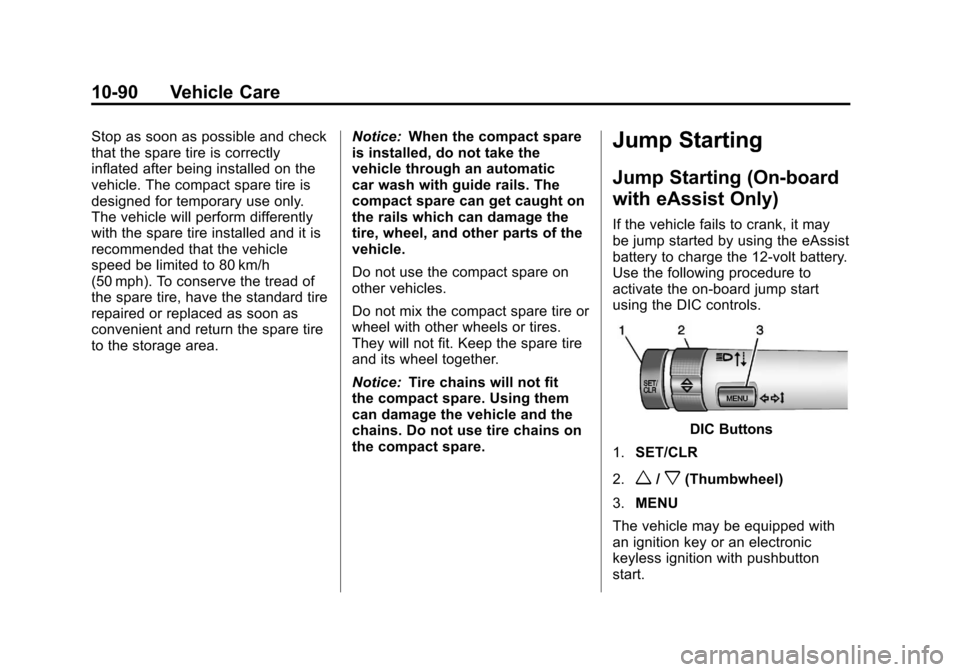
DIC Buttons
1. SET/CLR
2.
w/x(Thumbwheel)
3. MENU
The vehicle may be equipped with
an ignition key or an electronic
keyless ignition with pushbutton
start.