seat adjustment CHEVROLET MALIBU 2015 8.G Owners Manual
[x] Cancel search | Manufacturer: CHEVROLET, Model Year: 2015, Model line: MALIBU, Model: CHEVROLET MALIBU 2015 8.GPages: 399, PDF Size: 5.55 MB
Page 8 of 399
Black plate (1,1)Chevrolet Malibu Owner Manual (GMNA-Localizing-U.S./Canada/Mexico-
7575972) - 2015 - crc - 4/1/14
In Brief 1-1
In Brief
Instrument Panel
Instrument Panel Overview . . . . 1-2
Initial Drive Information
Initial Drive Information . . . . . . . . 1-4
Remote Keyless Entry (RKE)System . . . . . . . . . . . . . . . . . . . . . . 1-4
Remote Vehicle Start . . . . . . . . . 1-4
Door Locks . . . . . . . . . . . . . . . . . . . 1-5
Windows . . . . . . . . . . . . . . . . . . . . . . 1-5
Seat Adjustment . . . . . . . . . . . . . . 1-6
Memory Features . . . . . . . . . . . . . 1-8
Second Row Seats . . . . . . . . . . . 1-8
Heated Seats . . . . . . . . . . . . . . . . . 1-9
Head Restraint Adjustment . . . . 1-9
Safety Belts . . . . . . . . . . . . . . . . . . . 1-9
Passenger Sensing System . . . . . . . . . . . . . . . . . . . . . 1-10 Mirror Adjustment . . . . . . . . . . . . 1-10
Steering Wheel
Adjustment . . . . . . . . . . . . . . . . . 1-11
Interior Lighting . . . . . . . . . . . . . . 1-11
Exterior Lighting . . . . . . . . . . . . . 1-12
Windshield Wiper/Washer . . . . 1-12
Climate Controls . . . . . . . . . . . . . 1-13
Transmission . . . . . . . . . . . . . . . . 1-14
Vehicle Features
Infotainment System . . . . . . . . . 1-15
Radio(s) . . . . . . . . . . . . . . . . . . . . . 1-15
Satellite Radio . . . . . . . . . . . . . . . 1-15
Portable Audio Devices . . . . . . 1-15
Bluetooth
®. . . . . . . . . . . . . . . . . . . 1-15
Steering Wheel Controls . . . . . 1-16
Cruise Control . . . . . . . . . . . . . . . 1-16
Driver Information Center (DIC) . . . . . . . . . . . . . . . 1-17
Forward Collision Alert (FCA) System . . . . . . . . . . . . . . . . . . . . . 1-17 Lane Departure
Warning (LDW) . . . . . . . . . . . . . 1-17
Rear Vision Camera (RVC) . . . . . . . . . . . . . 1-17
Parking Assist . . . . . . . . . . . . . . . 1-18
Power Outlets . . . . . . . . . . . . . . . 1-18
Universal Remote System . . . 1-18
Sunroof . . . . . . . . . . . . . . . . . . . . . . 1-18
Performance and Maintenance
Traction Control/Electronic
Stability Control . . . . . . . . . . . . 1-19
Tire Pressure Monitor . . . . . . . . 1-20
Engine Oil Life System . . . . . . 1-20
E85 or FlexFuel . . . . . . . . . . . . . . 1-21
Driving for Better Fuel Economy . . . . . . . . . . . . . . . . . . . 1-21
Roadside Assistance Program . . . . . . . . . . . . . . . . . . . . 1-21
OnStar
®. . . . . . . . . . . . . . . . . . . . . 1-21
Page 10 of 399

Black plate (3,1)Chevrolet Malibu Owner Manual (GMNA-Localizing-U.S./Canada/Mexico-
7575972) - 2015 - crc - 4/1/14
In Brief 1-3
1.Air Vents on page 8-8.
2. Turn Signal Lever. See Turn and
Lane-Change Signals on
page 6-4.
Driver Information Center
Buttons. See Driver Information
Center (DIC) on page 5-21.
3. Instrument Cluster on page 5-8.
Driver Information Center (DIC)
on page 5-21.
4. Windshield Wiper/Washer on
page 5-3.
5. Storage Area (If Equipped). See Instrument Panel Storage on
page 4-1.
6. Light Sensor. See Automatic
Headlamp System on page 6-3.
7. Infotainment on page 7-1.
8. CD Player on page 7-13. 9.
Exterior Lamp Controls on
page 6-1.
Fog Lamps on page 6-4 (If
Equipped).
Instrument Panel Illumination
Control on page 6-5.
10. Storage Compartment. See Instrument Panel Storage on
page 4-1.
11. Data Link Connector (Out of View). See Malfunction
Indicator Lamp on page 5-13.
12. Hood Release. See Hood on
page 10-4.
13. Cruise Control on page 9-31.
Forward Collision Alert (FCA)
System on page 9-34 (If
Equipped).
14. Steering Wheel Adjustment on
page 5-2.
15. Horn on page 5-3.
16. Steering Wheel Controls on
page 5-2. 17.
Ignition Positions (Keyless
Access) on page 9-14 or
Ignition Positions (Key Access)
on page 9-16.
18. Heated Front Seats on
page 3-7 (If Equipped).
19. Hazard Warning Flashers on
page 6-3.
20. Shift Lever. See Automatic
Transmission on page 9-25.
21. Parking Brake on page 9-28.
22. Power Outlets on page 5-5.
23. Traction Control/Electronic
Stability Control on page 9-29.
Lane Departure Warning
(LDW) on page 9-42 (If
Equipped).
24. Climate Control Systems on
page 8-1.
Dual Automatic Climate Control
System on page 8-4.
Page 13 of 399
Black plate (6,1)Chevrolet Malibu Owner Manual (GMNA-Localizing-U.S./Canada/Mexico-
7575972) - 2015 - crc - 4/1/14
1-6 In Brief
Express Window Operation
Windows with an express-down
feature allow the window to be
lowered without holding the switch.
If equipped, windows may also have
an express-up feature. Pull a
window switch up or press it down
all the way, release it, and the
window goes up or down
automatically. Stop the window by
pulling or pressing the switch in the
same direction a second time, or by
briefly operating the switch to the
first detent in either direction.
SeePower Windows on page 2-20.
Seat Adjustment
Manual Front Seats
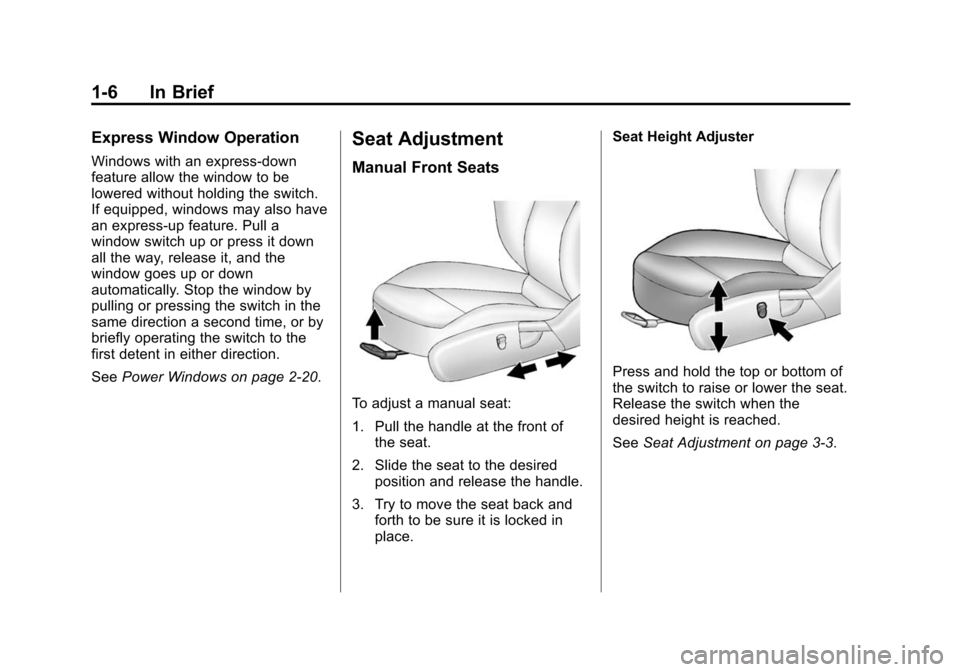
To adjust a manual seat:
1. Pull the handle at the front of
the seat.
2. Slide the seat to the desired position and release the handle.
3. Try to move the seat back and forth to be sure it is locked in
place. Seat Height Adjuster
Press and hold the top or bottom of
the switch to raise or lower the seat.
Release the switch when the
desired height is reached.
See
Seat Adjustment on page 3-3.
Page 14 of 399
Black plate (7,1)Chevrolet Malibu Owner Manual (GMNA-Localizing-U.S./Canada/Mexico-
7575972) - 2015 - crc - 4/1/14
In Brief 1-7
Power Seats
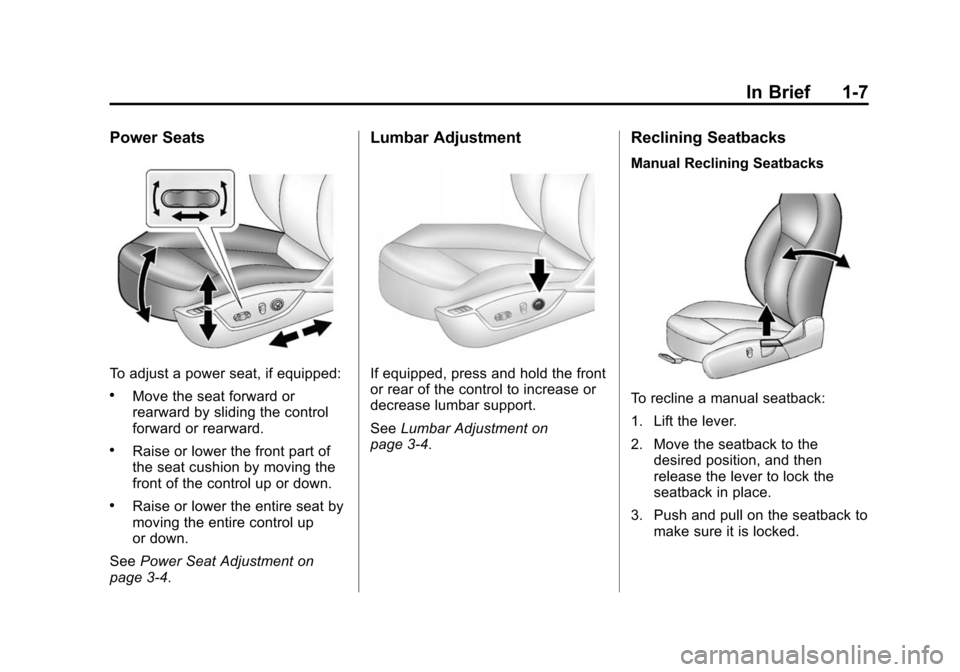
To adjust a power seat, if equipped:
.Move the seat forward or
rearward by sliding the control
forward or rearward.
.Raise or lower the front part of
the seat cushion by moving the
front of the control up or down.
.Raise or lower the entire seat by
moving the entire control up
or down.
See Power Seat Adjustment on
page 3-4.
Lumbar Adjustment
If equipped, press and hold the front
or rear of the control to increase or
decrease lumbar support.
See Lumbar Adjustment on
page 3-4.
Reclining Seatbacks
Manual Reclining Seatbacks
To recline a manual seatback:
1. Lift the lever.
2. Move the seatback to the
desired position, and then
release the lever to lock the
seatback in place.
3. Push and pull on the seatback to make sure it is locked.
Page 16 of 399
Black plate (9,1)Chevrolet Malibu Owner Manual (GMNA-Localizing-U.S./Canada/Mexico-
7575972) - 2015 - crc - 4/1/14
In Brief 1-9
Heated Seats
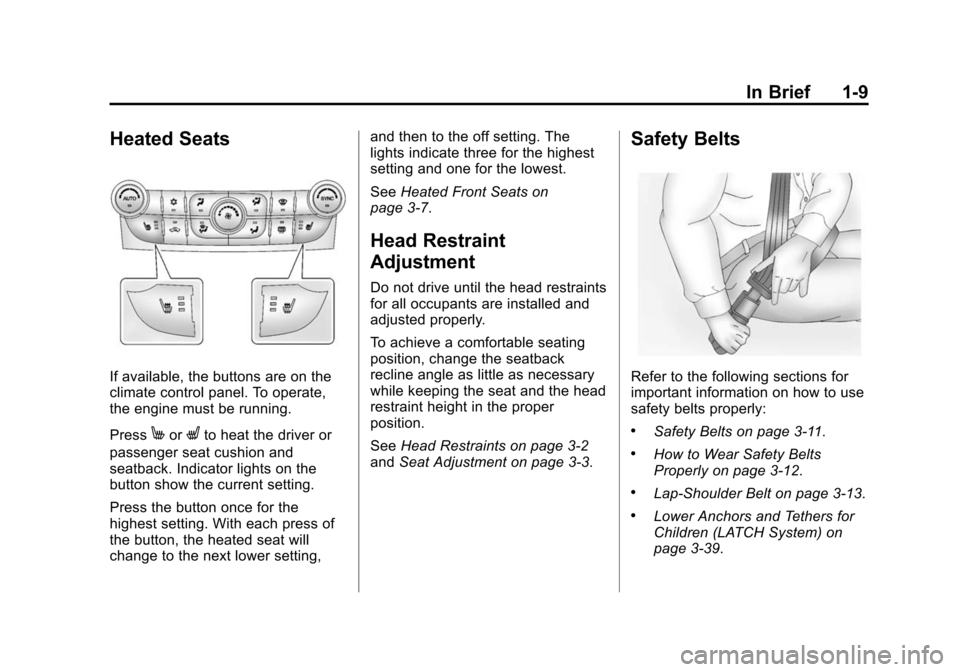
If available, the buttons are on the
climate control panel. To operate,
the engine must be running.
Press
MorLto heat the driver or
passenger seat cushion and
seatback. Indicator lights on the
button show the current setting.
Press the button once for the
highest setting. With each press of
the button, the heated seat will
change to the next lower setting, and then to the off setting. The
lights indicate three for the highest
setting and one for the lowest.
See
Heated Front Seats on
page 3-7.
Head Restraint
Adjustment
Do not drive until the head restraints
for all occupants are installed and
adjusted properly.
To achieve a comfortable seating
position, change the seatback
recline angle as little as necessary
while keeping the seat and the head
restraint height in the proper
position.
See Head Restraints on page 3-2
and Seat Adjustment on page 3-3.
Safety Belts
Refer to the following sections for
important information on how to use
safety belts properly:
.Safety Belts on page 3-11.
.How to Wear Safety Belts
Properly on page 3-12.
.Lap-Shoulder Belt on page 3-13.
.Lower Anchors and Tethers for
Children (LATCH System) on
page 3-39.
Page 54 of 399
Black plate (1,1)Chevrolet Malibu Owner Manual (GMNA-Localizing-U.S./Canada/Mexico-
7575972) - 2015 - crc - 4/1/14
Seats and Restraints 3-1
Seats and
Restraints
Head Restraints
Head Restraints . . . . . . . . . . . . . . . 3-2
Front Seats
Seat Adjustment . . . . . . . . . . . . . . 3-3
Power Seat Adjustment . . . . . . . 3-4
Lumbar Adjustment . . . . . . . . . . . 3-4
Reclining Seatbacks . . . . . . . . . . 3-4
Memory Seats . . . . . . . . . . . . . . . . 3-6
Heated Front Seats . . . . . . . . . . . 3-7
Rear Seats
Rear Seats . . . . . . . . . . . . . . . . . . . . 3-9
Rear Seat Armrest . . . . . . . . . . . 3-10
Safety Belts
Safety Belts . . . . . . . . . . . . . . . . . . 3-11
How to Wear Safety BeltsProperly . . . . . . . . . . . . . . . . . . . . 3-12 Lap-Shoulder Belt . . . . . . . . . . . 3-13
Safety Belt Use During
Pregnancy . . . . . . . . . . . . . . . . . . 3-16
Safety Belt Extender . . . . . . . . . 3-16
Safety System Check . . . . . . . . 3-16
Safety Belt Care . . . . . . . . . . . . . 3-17
Replacing Safety Belt System Parts after a Crash . . . . . . . . . 3-17
Airbag System
Airbag System . . . . . . . . . . . . . . . 3-18
Where Are the Airbags? . . . . . 3-20
When Should an AirbagInflate? . . . . . . . . . . . . . . . . . . . . . 3-21
What Makes an Airbag Inflate? . . . . . . . . . . . . . . . . . . . . . 3-22
How Does an Airbag
Restrain? . . . . . . . . . . . . . . . . . . . 3-22
What Will You See after an Airbag Inflates? . . . . . . . . . . . . 3-23
Passenger Sensing System . . . . . . . . . . . . . . . . . . . . . 3-24 Servicing the Airbag-Equipped
Vehicle . . . . . . . . . . . . . . . . . . . . . 3-29
Adding Equipment to the Airbag-Equipped Vehicle . . . 3-29
Airbag System Check . . . . . . . . 3-30
Replacing Airbag System
Parts after a Crash . . . . . . . . . 3-30
Child Restraints
Older Children . . . . . . . . . . . . . . . 3-31
Infants and YoungChildren . . . . . . . . . . . . . . . . . . . . 3-33
Child Restraint Systems . . . . . 3-36
Where to Put the Restraint . . . 3-37
Lower Anchors and Tethers for Children (LATCH
System) . . . . . . . . . . . . . . . . . . . . 3-39
Replacing LATCH System Parts After a Crash . . . . . . . . . 3-46
Securing Child Restraints (Rear Seat) . . . . . . . . . . . . . . . . . 3-46
Securing Child Restraints (Front Passenger Seat) . . . . 3-49
Page 56 of 399
Black plate (3,1)Chevrolet Malibu Owner Manual (GMNA-Localizing-U.S./Canada/Mexico-
7575972) - 2015 - crc - 4/1/14
Seats and Restraints 3-3
The height of the head restraint can
be adjusted. Pull the head restraint
up to raise it. Try to move the head
restraint to make sure that it is
locked in place.
To lower the head restraint, press
the button, located on the top of the
seatback, and push the head
restraint down. Try to move the
head restraint after the button is
released to make sure that it is
locked in place.
If you are installing a child restraint
in the rear seat, see "Securing a
Child Restraint Designed for the
LATCH System" underLower
Anchors and Tethers for Children
(LATCH System) on page 3-39.Front Seats
Seat Adjustment
{Warning
You can lose control of the
vehicle if you try to adjust a driver
seat while the vehicle is moving.
Adjust the driver seat only when
the vehicle is not moving.
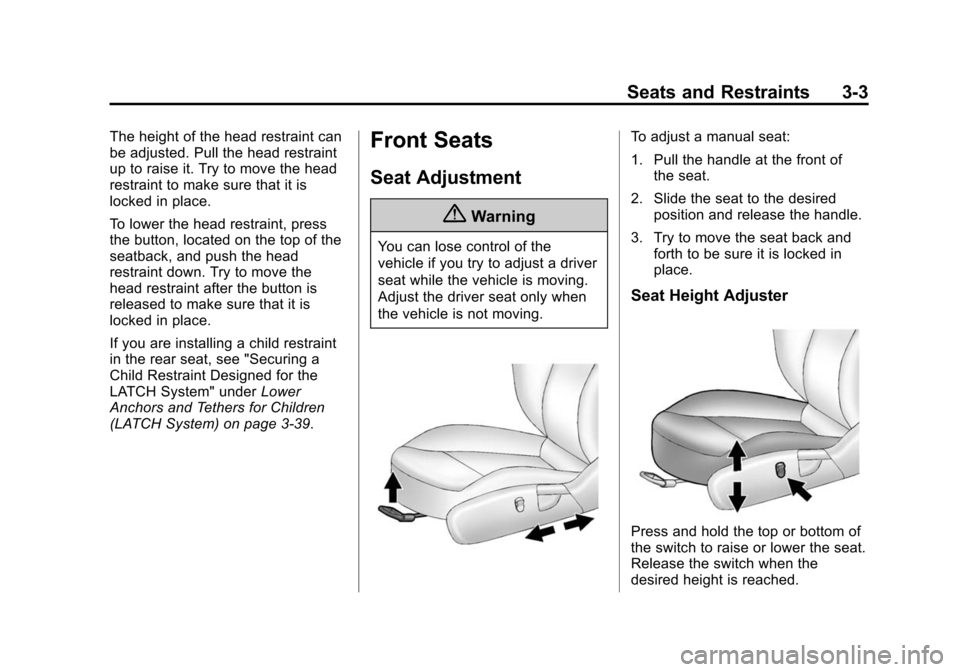
To adjust a manual seat:
1. Pull the handle at the front of
the seat.
2. Slide the seat to the desired position and release the handle.
3. Try to move the seat back and forth to be sure it is locked in
place.
Seat Height Adjuster
Press and hold the top or bottom of
the switch to raise or lower the seat.
Release the switch when the
desired height is reached.
Page 57 of 399
Black plate (4,1)Chevrolet Malibu Owner Manual (GMNA-Localizing-U.S./Canada/Mexico-
7575972) - 2015 - crc - 4/1/14
3-4 Seats and Restraints
Power Seat Adjustment
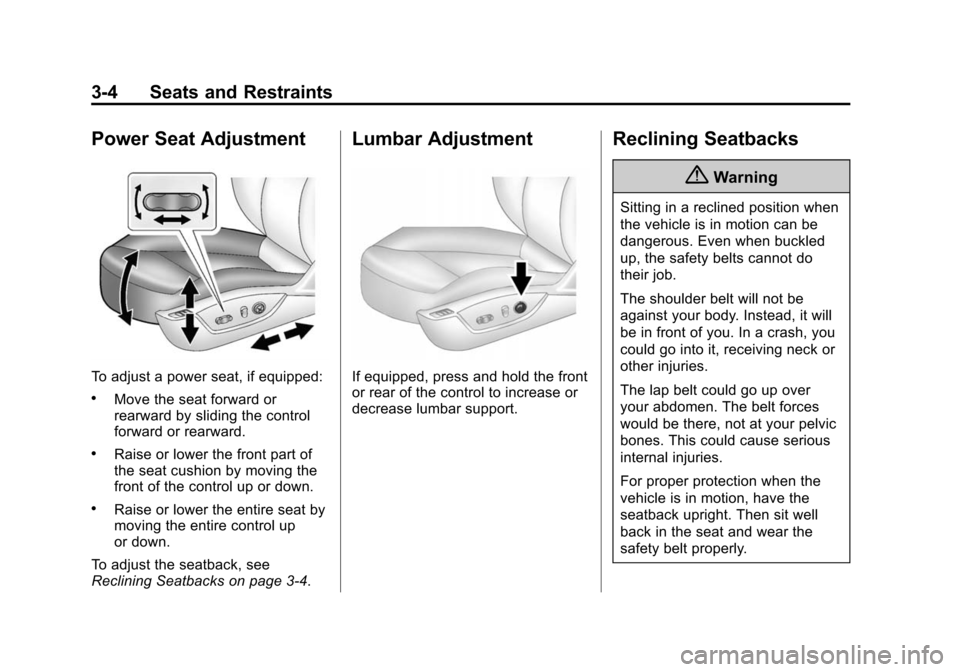
To adjust a power seat, if equipped:
.Move the seat forward or
rearward by sliding the control
forward or rearward.
.Raise or lower the front part of
the seat cushion by moving the
front of the control up or down.
.Raise or lower the entire seat by
moving the entire control up
or down.
To adjust the seatback, see
Reclining Seatbacks on page 3-4.
Lumbar Adjustment
If equipped, press and hold the front
or rear of the control to increase or
decrease lumbar support.
Reclining Seatbacks
{Warning
Sitting in a reclined position when
the vehicle is in motion can be
dangerous. Even when buckled
up, the safety belts cannot do
their job.
The shoulder belt will not be
against your body. Instead, it will
be in front of you. In a crash, you
could go into it, receiving neck or
other injuries.
The lap belt could go up over
your abdomen. The belt forces
would be there, not at your pelvic
bones. This could cause serious
internal injuries.
For proper protection when the
vehicle is in motion, have the
seatback upright. Then sit well
back in the seat and wear the
safety belt properly.
Page 67 of 399
Black plate (14,1)Chevrolet Malibu Owner Manual (GMNA-Localizing-U.S./Canada/Mexico-
7575972) - 2015 - crc - 4/1/14
3-14 Seats and Restraints
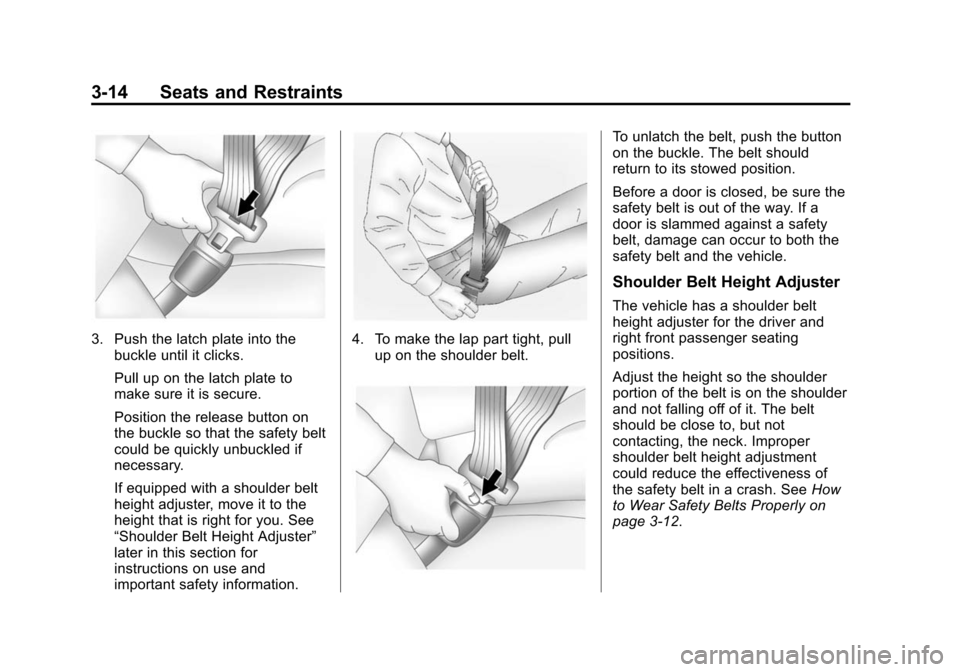
3. Push the latch plate into thebuckle until it clicks.
Pull up on the latch plate to
make sure it is secure.
Position the release button on
the buckle so that the safety belt
could be quickly unbuckled if
necessary.
If equipped with a shoulder belt
height adjuster, move it to the
height that is right for you. See
“Shoulder Belt Height Adjuster”
later in this section for
instructions on use and
important safety information.4. To make the lap part tight, pullup on the shoulder belt.
To unlatch the belt, push the button
on the buckle. The belt should
return to its stowed position.
Before a door is closed, be sure the
safety belt is out of the way. If a
door is slammed against a safety
belt, damage can occur to both the
safety belt and the vehicle.
Shoulder Belt Height Adjuster
The vehicle has a shoulder belt
height adjuster for the driver and
right front passenger seating
positions.
Adjust the height so the shoulder
portion of the belt is on the shoulder
and not falling off of it. The belt
should be close to, but not
contacting, the neck. Improper
shoulder belt height adjustment
could reduce the effectiveness of
the safety belt in a crash. See How
to Wear Safety Belts Properly on
page 3-12.
Page 99 of 399
Black plate (46,1)Chevrolet Malibu Owner Manual (GMNA-Localizing-U.S./Canada/Mexico-
7575972) - 2015 - crc - 4/1/14
3-46 Seats and Restraints
{Warning
With head restraints that are not
installed and adjusted properly,
there is a greater chance that
occupants will suffer a neck/
spinal injury in a crash. Do not
drive until the head restraints for
all occupants are installed and
adjusted properly.
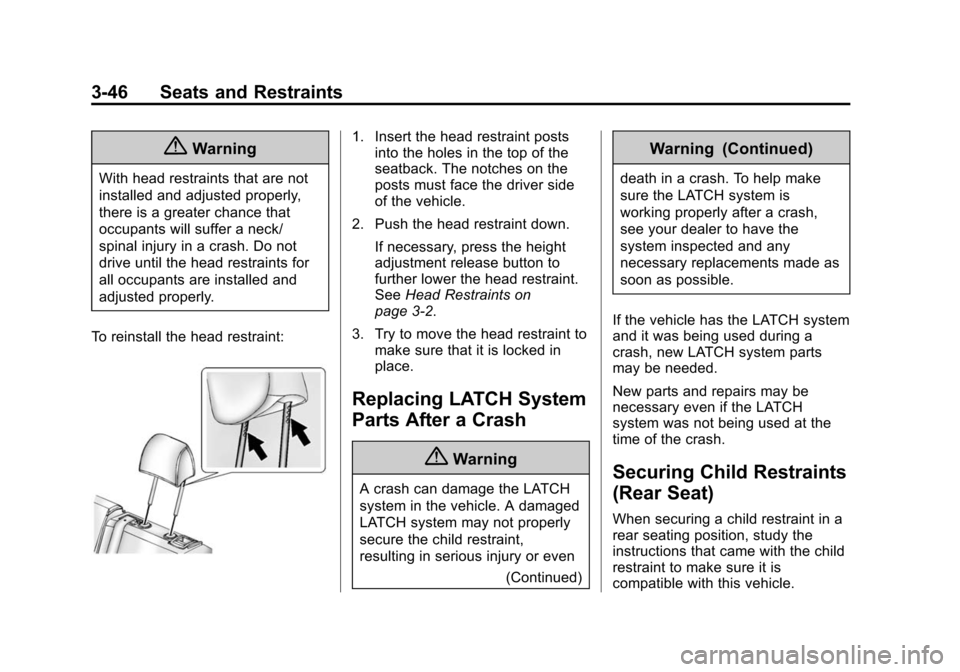
To reinstall the head restraint:
1. Insert the head restraint posts into the holes in the top of the
seatback. The notches on the
posts must face the driver side
of the vehicle.
2. Push the head restraint down.
If necessary, press the height
adjustment release button to
further lower the head restraint.
See Head Restraints on
page 3-2.
3. Try to move the head restraint to make sure that it is locked in
place.
Replacing LATCH System
Parts After a Crash
{Warning
A crash can damage the LATCH
system in the vehicle. A damaged
LATCH system may not properly
secure the child restraint,
resulting in serious injury or even
(Continued)
Warning (Continued)
death in a crash. To help make
sure the LATCH system is
working properly after a crash,
see your dealer to have the
system inspected and any
necessary replacements made as
soon as possible.
If the vehicle has the LATCH system
and it was being used during a
crash, new LATCH system parts
may be needed.
New parts and repairs may be
necessary even if the LATCH
system was not being used at the
time of the crash.
Securing Child Restraints
(Rear Seat)
When securing a child restraint in a
rear seating position, study the
instructions that came with the child
restraint to make sure it is
compatible with this vehicle.