CHEVROLET MALIBU 2017 9.G User Guide
Manufacturer: CHEVROLET, Model Year: 2017, Model line: MALIBU, Model: CHEVROLET MALIBU 2017 9.GPages: 419, PDF Size: 7.81 MB
Page 11 of 419
Chevrolet Malibu Owner Manual (GMNA-Localizing-U.S./Canada/Mexico-10122664) - 2017 - crc - 6/1/16
10 In Brief
Windows
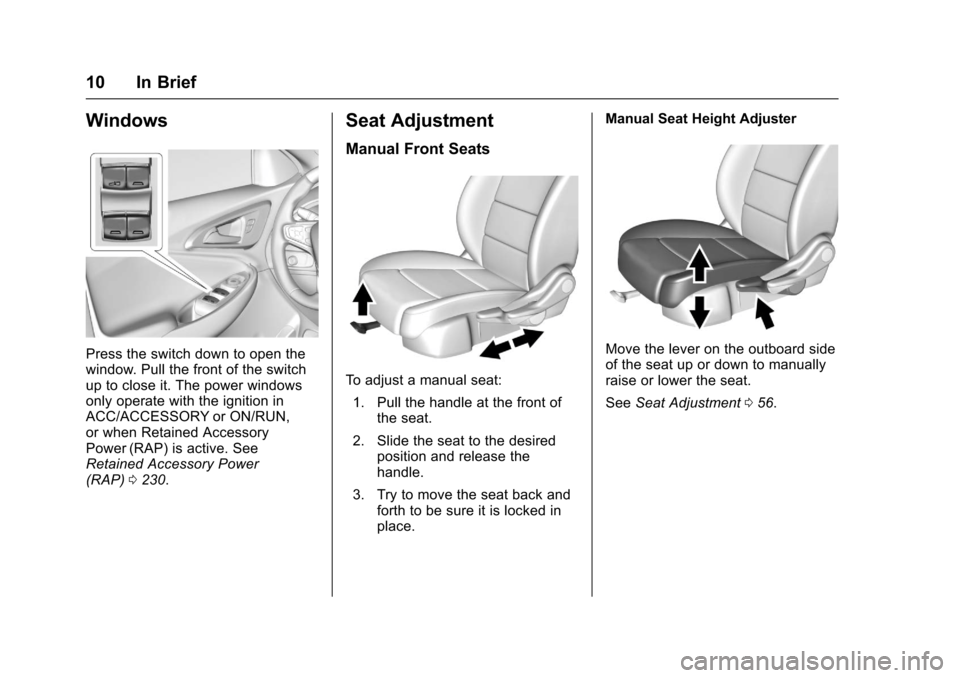
Press the switch down to open thewindow. Pull the front of the switchup to close it. The power windowsonly operate with the ignition inACC/ACCESSORY or ON/RUN,or when Retained AccessoryPower (RAP) is active. SeeRetained Accessory Power(RAP)0230.
Seat Adjustment
Manual Front Seats
To a d j u s t a m a n u a l s e a t :
1. Pull the handle at the front ofthe seat.
2. Slide the seat to the desiredposition and release thehandle.
3. Try to move the seat back andforth to be sure it is locked inplace.
Manual Seat Height Adjuster
Move the lever on the outboard sideof the seat up or down to manuallyraise or lower the seat.
SeeSeat Adjustment056.
Page 12 of 419
Chevrolet Malibu Owner Manual (GMNA-Localizing-U.S./Canada/Mexico-10122664) - 2017 - crc - 6/1/16
In Brief 11
Power Seats
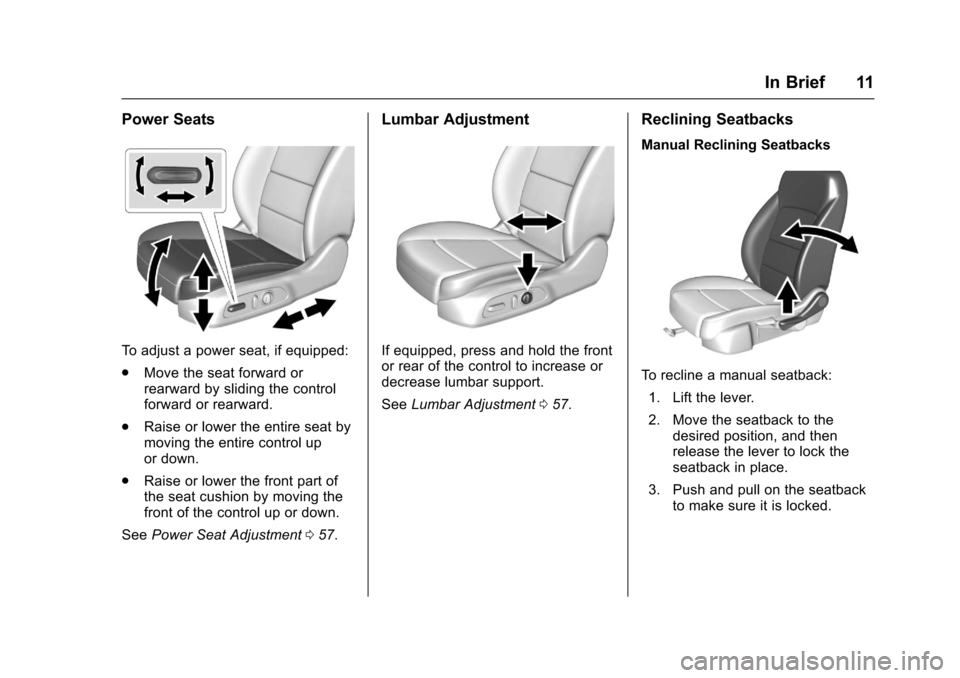
To a d j u s t a p o w e r s e a t , i f e q u i p p e d :
.Move the seat forward orrearward by sliding the controlforward or rearward.
.Raise or lower the entire seat bymoving the entire control upor down.
.Raise or lower the front part ofthe seat cushion by moving thefront of the control up or down.
SeePower Seat Adjustment057.
Lumbar Adjustment
If equipped, press and hold the frontor rear of the control to increase ordecrease lumbar support.
SeeLumbar Adjustment057.
Reclining Seatbacks
Manual Reclining Seatbacks
To r e c l i n e a m a n u a l s e a t b a c k :
1. Lift the lever.
2. Move the seatback to thedesired position, and thenrelease the lever to lock theseatback in place.
3. Push and pull on the seatbackto make sure it is locked.
Page 13 of 419
Chevrolet Malibu Owner Manual (GMNA-Localizing-U.S./Canada/Mexico-10122664) - 2017 - crc - 6/1/16
12 In Brief
To r e t u r n t h e s e a t b a c k t o t h e u p r i g h tposition:
1. Lift the lever fully withoutapplying pressure to theseatback, and the seatback willreturn to the upright position.
2. Push and pull on the seatbackto make sure it is locked.
Power Reclining Seatbacks
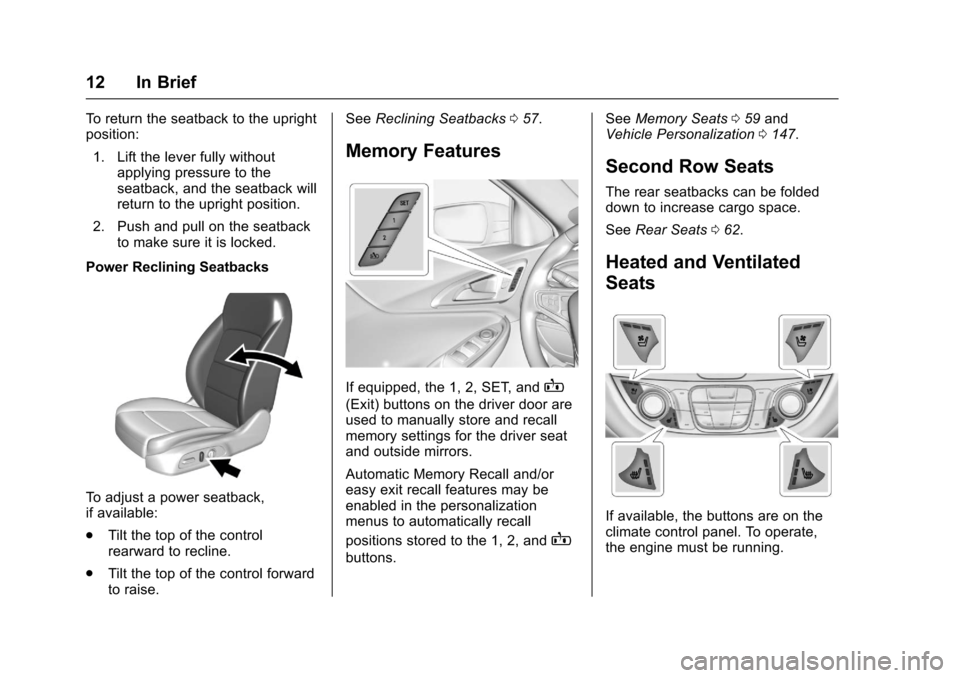
To a d j u s t a p o w e r s e a t b a c k ,if available:
.Tilt the top of the controlrearward to recline.
.Tilt the top of the control forwardto raise.
SeeReclining Seatbacks057.
Memory Features
If equipped, the 1, 2, SET, andB
(Exit) buttons on the driver door areused to manually store and recallmemory settings for the driver seatand outside mirrors.
Automatic Memory Recall and/oreasy exit recall features may beenabled in the personalizationmenus to automatically recall
positions stored to the 1, 2, andB
buttons.
SeeMemory Seats059andVehicle Personalization0147.
Second Row Seats
The rear seatbacks can be foldeddown to increase cargo space.
SeeRear Seats062.
Heated and Ventilated
Seats
If available, the buttons are on theclimate control panel. To operate,the engine must be running.
Page 14 of 419
Chevrolet Malibu Owner Manual (GMNA-Localizing-U.S./Canada/Mexico-10122664) - 2017 - crc - 6/1/16
In Brief 13
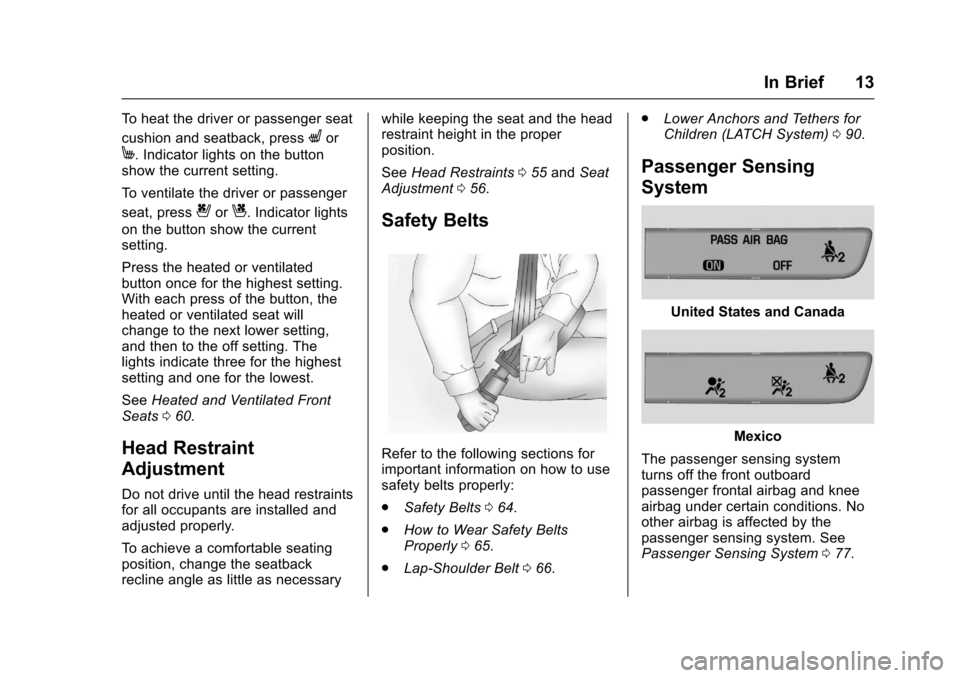
To h e a t t h e d r i v e r o r p a s s e n g e r s e a t
cushion and seatback, pressLor
M.Indicatorlightsonthebuttonshow the current setting.
To v e n t i l a t e t h e d r i v e r o r p a s s e n g e r
seat, press{orC.Indicatorlights
on the button show the currentsetting.
Press the heated or ventilatedbutton once for the highest setting.With each press of the button, theheated or ventilated seat willchange to the next lower setting,and then to the off setting. Thelights indicate three for the highestsetting and one for the lowest.
SeeHeated and Ventilated FrontSeats060.
Head Restraint
Adjustment
Do not drive until the head restraintsfor all occupants are installed andadjusted properly.
To a c h i e v e a c o m f o r t a b l e s e a t i n gposition, change the seatbackrecline angle as little as necessary
while keeping the seat and the headrestraint height in the properposition.
SeeHead Restraints055andSeatAdjustment056.
Safety Belts
Refer to the following sections forimportant information on how to usesafety belts properly:
.Safety Belts064.
.How to Wear Safety BeltsProperly065.
.Lap-Shoulder Belt066.
.Lower Anchors and Tethers forChildren (LATCH System)090.
Passenger Sensing
System
United States and Canada
Mexico
The passenger sensing systemturns off the front outboardpassenger frontal airbag and kneeairbag under certain conditions. Noother airbag is affected by thepassenger sensing system. SeePassenger Sensing System077.
Page 15 of 419
Chevrolet Malibu Owner Manual (GMNA-Localizing-U.S./Canada/Mexico-10122664) - 2017 - crc - 6/1/16
14 In Brief
The passenger airbag statusindicator will light on the overheadconsole when the vehicle is started.SeePassenger Airbag StatusIndicator0121.
Mirror Adjustment
Interior Mirror
Adjust the rearview mirror for a clearview of the area behind yourvehicle.
Manual Rearview Mirror
If equipped, push the tab forward fordaytime use and pull it rearward fornighttime use to avoid glare of theheadlamps from behind.
Automatic Dimming RearviewMirror
If equipped, the mirror willautomatically reduce the glare of theheadlamps from behind. Thedimming feature comes on when thevehicle is started.
SeeAutomatic Dimming RearviewMirror049.
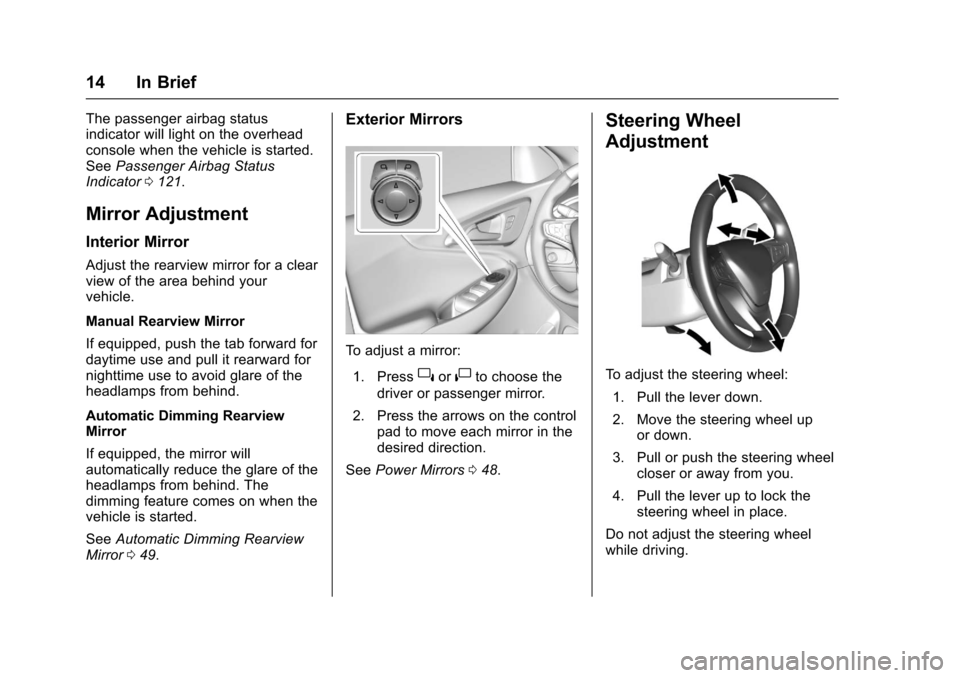
Exterior Mirrors
To a d j u s t a m i r r o r :
1. Press}or|to choose the
driver or passenger mirror.
2. Press the arrows on the controlpad to move each mirror in thedesired direction.
SeePower Mirrors048.
Steering Wheel
Adjustment
To a d j u s t t h e s t e e r i n g w h e e l :
1. Pull the lever down.
2. Move the steering wheel upor down.
3. Pull or push the steering wheelcloser or away from you.
4. Pull the lever up to lock thesteering wheel in place.
Do not adjust the steering wheelwhile driving.
Page 16 of 419

Chevrolet Malibu Owner Manual (GMNA-Localizing-U.S./Canada/Mexico-10122664) - 2017 - crc - 6/1/16
In Brief 15
Interior Lighting
Dome Lamps
The dome lamp controls are in theoverhead console.
To o p e r a t e , p r e s s t h e f o l l o w i n gbuttons:
+ON/OFF :Press to turn the domelamps on manually.
jOFF :Press to turn off thedome lamps when a door is open.An indicator light on the button willturn on when the dome lamp
override is activated. Pressj
OFF again to deactivate this feature
and the indicator light will turn off.The dome lamps will come on whendoors are opened.
Reading Lamps
There may be front and rear readinglamps.
If equipped, the front reading lampsare in the overhead console.
Press the lamp lenses to turn thereading lamps on or off.
If equipped, the rear reading lampsare in the headliner.
Press the button near each lamp toturn reading lamps on or off.
For more information on interiorlighting, seeInstrument PanelIllumination Control0167.
Page 17 of 419
Chevrolet Malibu Owner Manual (GMNA-Localizing-U.S./Canada/Mexico-10122664) - 2017 - crc - 6/1/16
16 In Brief
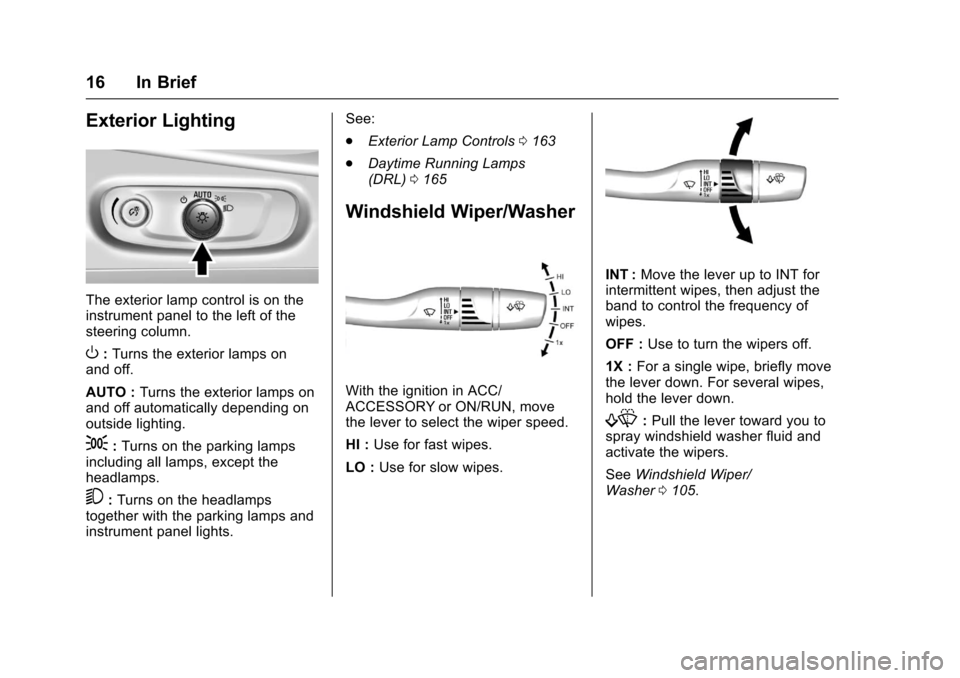
Exterior Lighting
The exterior lamp control is on theinstrument panel to the left of thesteering column.
O:Turns the exterior lamps onand off.
AUTO :Turns the exterior lamps onand off automatically depending onoutside lighting.
;:Turns on the parking lampsincluding all lamps, except theheadlamps.
5:Turns on the headlampstogether with the parking lamps andinstrument panel lights.
See:
.Exterior Lamp Controls0163
.Daytime Running Lamps(DRL)0165
Windshield Wiper/Washer
With the ignition in ACC/ACCESSORY or ON/RUN, movethe lever to select the wiper speed.
HI :Use for fast wipes.
LO :Use for slow wipes.
INT :Move the lever up to INT forintermittent wipes, then adjust theband to control the frequency ofwipes.
OFF :Use to turn the wipers off.
1X :For a single wipe, briefly movethe lever down. For several wipes,hold the lever down.
f:Pull the lever toward you tospray windshield washer fluid andactivate the wipers.
SeeWindshield Wiper/Washer0105.
Page 18 of 419
Chevrolet Malibu Owner Manual (GMNA-Localizing-U.S./Canada/Mexico-10122664) - 2017 - crc - 6/1/16
In Brief 17
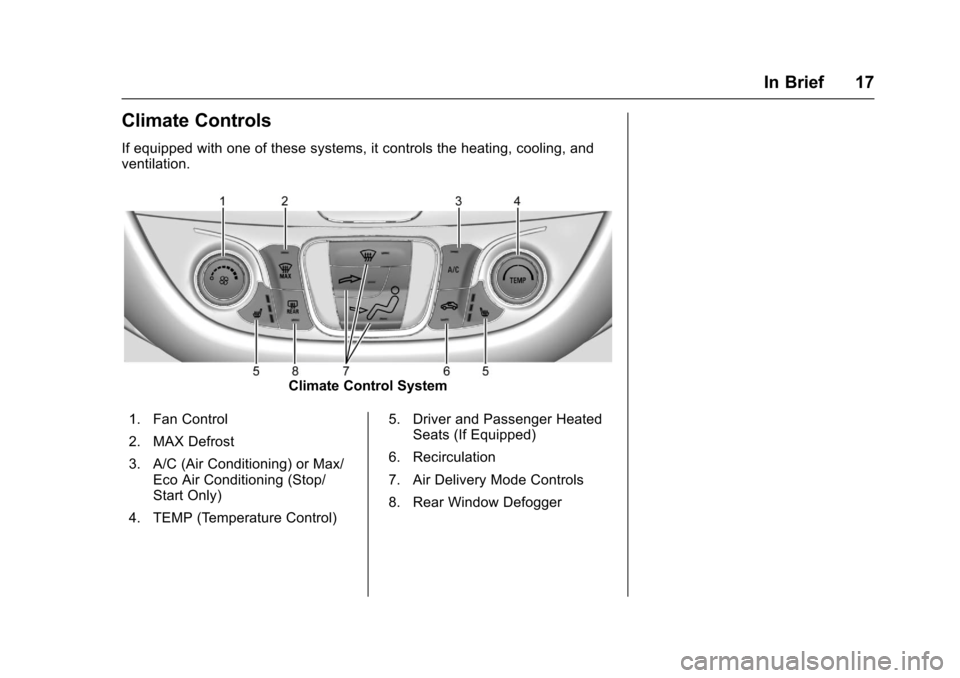
Climate Controls
If equipped with one of these systems, it controls the heating, cooling, andventilation.
Climate Control System
1. Fan Control
2. MAX Defrost
3. A/C (Air Conditioning) or Max/Eco Air Conditioning (Stop/Start Only)
4. TEMP (Temperature Control)
5. Driver and Passenger HeatedSeats (If Equipped)
6. Recirculation
7. Air Delivery Mode Controls
8. Rear Window Defogger
Page 19 of 419
Chevrolet Malibu Owner Manual (GMNA-Localizing-U.S./Canada/Mexico-10122664) - 2017 - crc - 6/1/16
18 In Brief
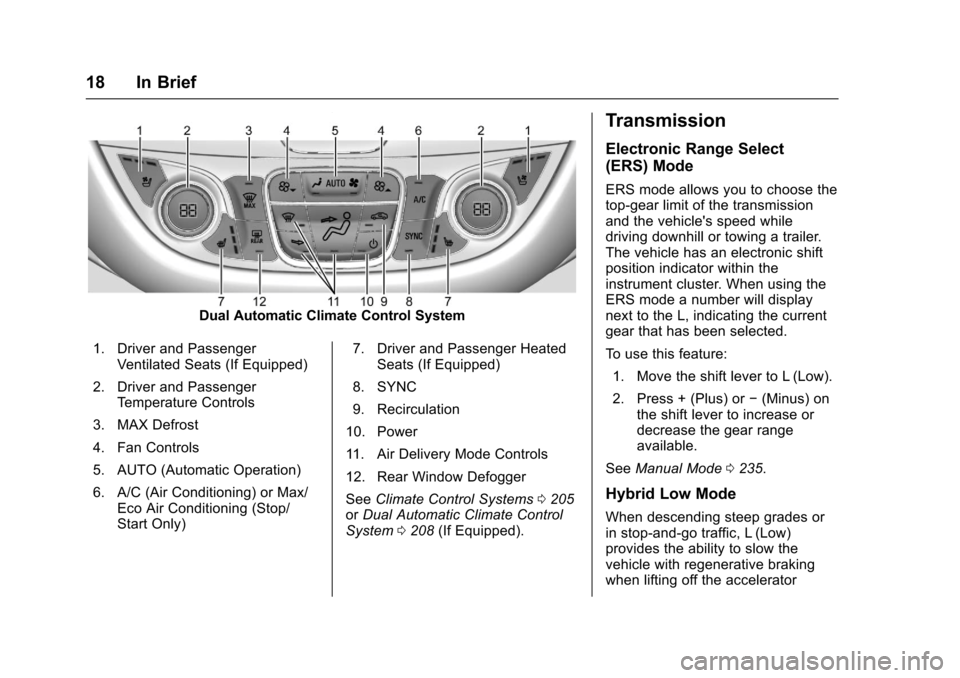
Dual Automatic Climate Control System
1. Driver and PassengerVentilated Seats (If Equipped)
2. Driver and PassengerTe m p e r a t u r e C o n t r o l s
3. MAX Defrost
4. Fan Controls
5. AUTO (Automatic Operation)
6. A/C (Air Conditioning) or Max/Eco Air Conditioning (Stop/Start Only)
7. Driver and Passenger HeatedSeats (If Equipped)
8. SYNC
9. Recirculation
10. Power
11 . A i r D e l i v e r y M o d e C o n t r o l s
12. Rear Window Defogger
SeeClimate Control Systems0205orDual Automatic Climate ControlSystem0208(If Equipped).
Transmission
Electronic Range Select
(ERS) Mode
ERS mode allows you to choose thetop-gear limit of the transmissionand the vehicle's speed whiledriving downhill or towing a trailer.The vehicle has an electronic shiftposition indicator within theinstrument cluster. When using theERS mode a number will displaynext to the L, indicating the currentgear that has been selected.
To u s e t h i s f e a t u r e :
1. Move the shift lever to L (Low).
2. Press + (Plus) or✓(Minus) onthe shift lever to increase ordecrease the gear rangeavailable.
SeeManual Mode0235.
Hybrid Low Mode
When descending steep grades orin stop-and-go traffic, L (Low)provides the ability to slow thevehicle with regenerative brakingwhen lifting off the accelerator
Page 20 of 419
Chevrolet Malibu Owner Manual (GMNA-Localizing-U.S./Canada/Mexico-10122664) - 2017 - crc - 6/1/16
In Brief 19
pedal. L2 (Low 2) provides moderatebraking and L1 (Low 1) providesmaximum braking below 80 km/h(50 mph). When the battery reachesfull charge the engine may run tomaintain braking.
To u s e t h i s f e a t u r e :
1. Move the shift lever to L (Low).The transmission will enterL2 (Low 2).
2. Press + (Plus) or✓(Minus) onthe shift lever to shift betweenL2 (Low 2) and L1 (Low 1).
SeeManual Mode0235.
Vehicle Features
Infotainment System
Base radio information is included inthis manual. See the infotainmentmanual for information on otheravailable infotainment systems.
Read the following pages tobecome familiar with these features.
{Warning
Ta k i n g y o u r e y e s o f f t h e r o a d f o r
too long or too often while using
any infotainment feature can
cause a crash. You or others
could be injured or killed. Do not
give extended attention to
infotainment tasks while driving.
Limit your glances at the vehicle
displays and focus your attention
on driving. Use voice commands
whenever possible.
The infotainment system has built-infeatures intended to help avoiddistraction by disabling somefunctions when driving. These
functions may gray out when theyare unavailable. Many infotainmentfeatures are also available throughthe instrument cluster and steeringwheel controls.
Before driving:
.Become familiar with theoperation, faceplate buttons, andscreen buttons.
.Set up the audio by presettingfavorite stations, setting thetone, and adjusting thespeakers.
.Set up phone numbers inadvance so they can be calledeasily by pressing a singlebutton or by using a single voicecommand if equipped withBluetooth phone capability.
SeeDefensive Driving0216.
To p l a y t h e i n f o t a i n m e n t s y s t e m w i t hthe ignition off, seeRetainedAccessory Power (RAP)0230.