CHEVROLET MALIBU 2017 9.G Owners Manual
Manufacturer: CHEVROLET, Model Year: 2017, Model line: MALIBU, Model: CHEVROLET MALIBU 2017 9.GPages: 419, PDF Size: 7.81 MB
Page 341 of 419
Chevrolet Malibu Owner Manual (GMNA-Localizing-U.S./Canada/Mexico-10122664) - 2017 - crc - 5/23/16
340 Vehicle Care
Warning (Continued)
recommended pressure. Do not
exceed the recommended
pressure.
{Warning
Storing the tire sealant and
compressor kit or other
equipment in the passenger
compartment of the vehicle could
cause injury. In a sudden stop or
collision, loose equipment could
strike someone. Store the tire
sealant and compressor kit in its
original location.
If this vehicle has a tire sealant andcompressor kit, there may not be aspare tire or tire changingequipment, and on some vehiclesthere may not be a place to storeatire.
The tire sealant and compressorcan be used to temporarily sealpunctures up to 6 mm (0.25 in) in
the tread area of the tire. It can alsobe used to inflate anunderinflated tire.
If the tire has been separated fromthe wheel, has damaged sidewalls,or has a large puncture, the tire istoo severely damaged for the tiresealant and compressor kit to beeffective. SeeRoadside AssistanceProgram0387.
Read and follow all of the tiresealant and compressor kitinstructions.
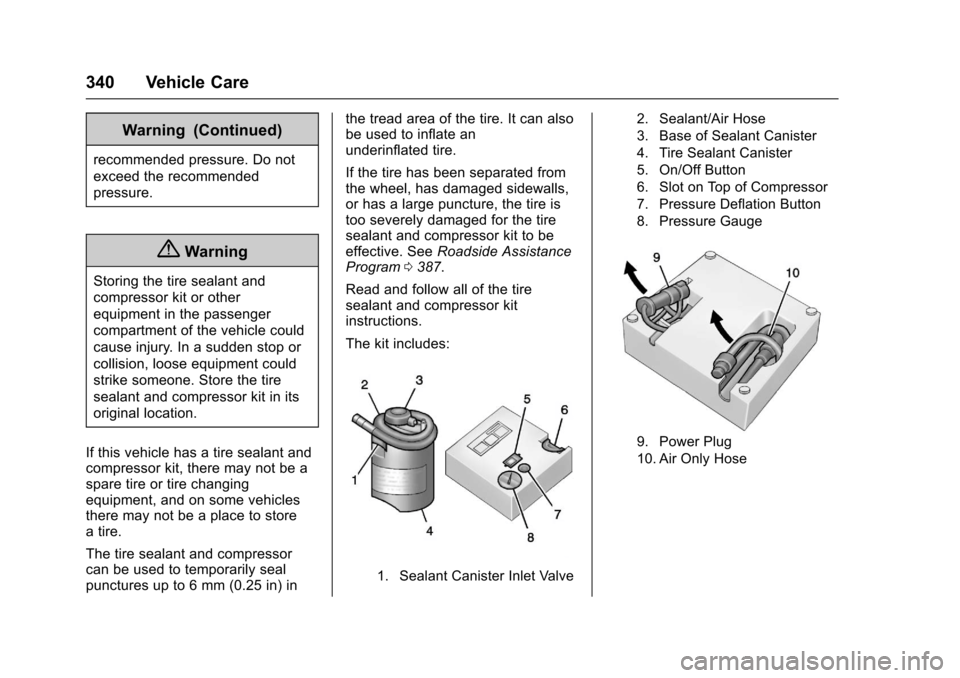
The kit includes:
1. Sealant Canister Inlet Valve
2. Sealant/Air Hose
3. Base of Sealant Canister
4. Tire Sealant Canister
5. On/Off Button
6. Slot on Top of Compressor
7. Pressure Deflation Button
8. Pressure Gauge
9. Power Plug
10. Air Only Hose
Page 342 of 419
Chevrolet Malibu Owner Manual (GMNA-Localizing-U.S./Canada/Mexico-10122664) - 2017 - crc - 5/23/16
Vehicle Care 341
Tire Sealant
Read and follow the safe handlinginstructions on the label adhered tothe tire sealant canister (4).
Check the tire sealant expirationdate on the tire sealant canister.The tire sealant canister (4) shouldbe replaced before its expirationdate. Replacement tire sealantcanisters are available at your localdealer.
There is only enough sealant to sealone tire. After usage, the tire sealantcanister must be replaced.
Using the Tire Sealant and
Compressor Kit to Temporarily
Seal and Inflate a
Punctured Tire
When using the tire sealant andcompressor kit during coldtemperatures, warm the kit in aheated environment for five minutes.This will help to inflate the tirefaster.
If a tire goes flat, avoid further tireand wheel damage by driving slowlyto a level place. Turn on the hazardwarning flashers. SeeHazardWarning Flashers0166.
SeeIf a Tire Goes Flat0338forother important safety warnings.
Do not remove any objects thathave penetrated the tire.
1. Remove the tire sealantcanister (4) and compressorfrom its storage location. SeeStoring the Tire Sealant andCompressor Kit0346.
2. Remove the air only hose (10)and the power plug (9) from thebottom of the compressor.
3. Place the compressor on theground near the flat tire.
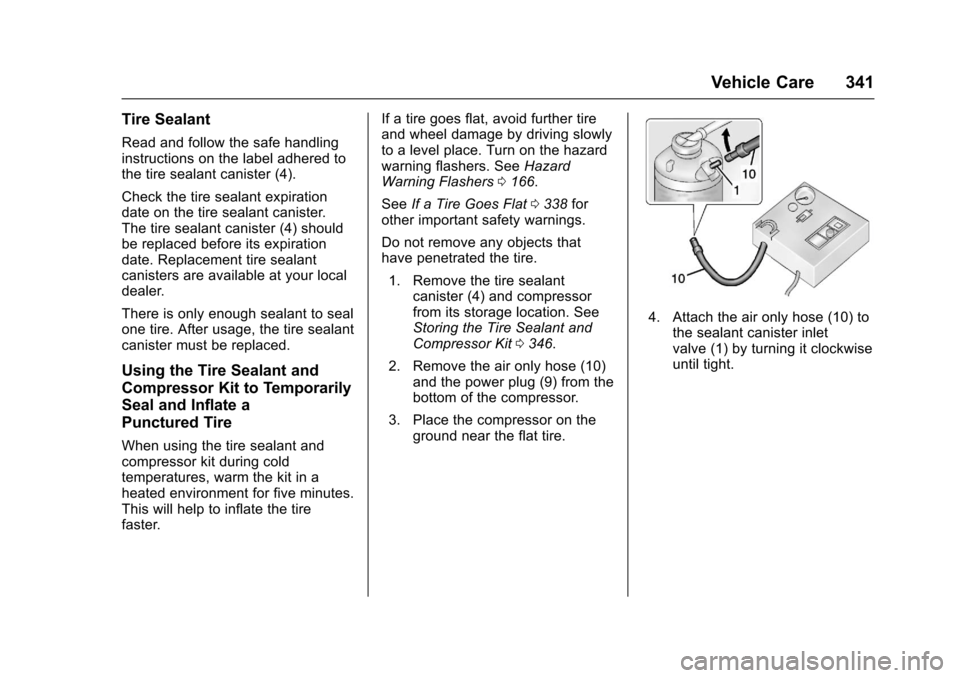
4. Attach the air only hose (10) tothe sealant canister inletvalve (1) by turning it clockwiseuntil tight.
Page 343 of 419
Chevrolet Malibu Owner Manual (GMNA-Localizing-U.S./Canada/Mexico-10122664) - 2017 - crc - 5/23/16
342 Vehicle Care
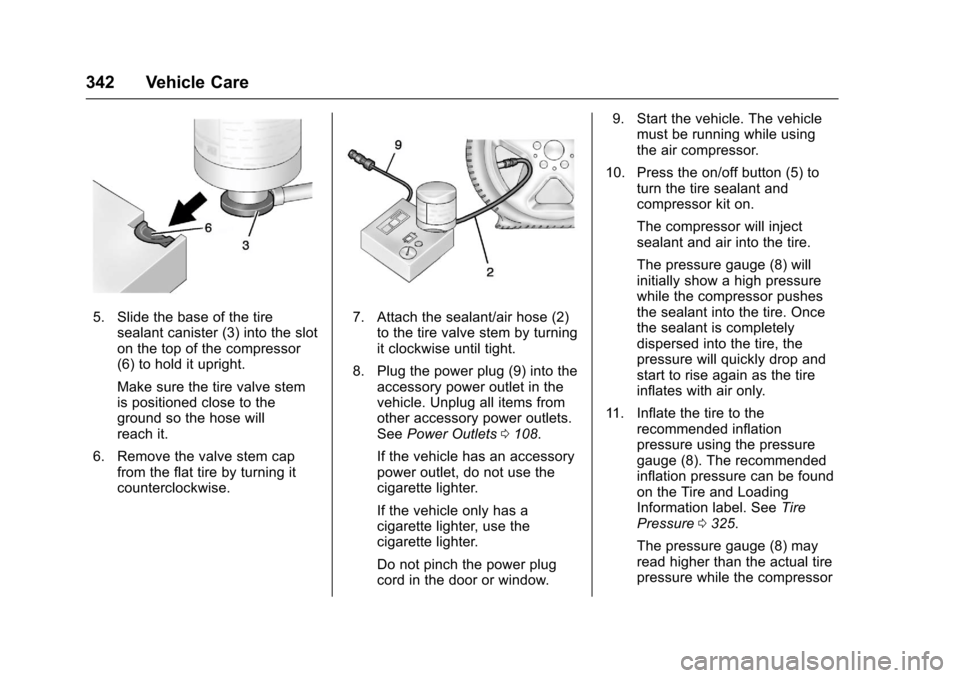
5. Slide the base of the tiresealant canister (3) into the sloton the top of the compressor(6) to hold it upright.
Make sure the tire valve stemis positioned close to theground so the hose willreach it.
6. Remove the valve stem capfrom the flat tire by turning itcounterclockwise.
7. Attach the sealant/air hose (2)to the tire valve stem by turningit clockwise until tight.
8. Plug the power plug (9) into theaccessory power outlet in thevehicle. Unplug all items fromother accessory power outlets.SeePower Outlets0108.
If the vehicle has an accessorypower outlet, do not use thecigarette lighter.
If the vehicle only has acigarette lighter, use thecigarette lighter.
Do not pinch the power plugcord in the door or window.
9. Start the vehicle. The vehiclemust be running while usingthe air compressor.
10. Press the on/off button (5) toturn the tire sealant andcompressor kit on.
The compressor will injectsealant and air into the tire.
The pressure gauge (8) willinitially show a high pressurewhile the compressor pushesthe sealant into the tire. Oncethe sealant is completelydispersed into the tire, thepressure will quickly drop andstart to rise again as the tireinflates with air only.
11 . I n f l a t e t h e t i r e t o t h erecommended inflationpressure using the pressuregauge (8). The recommendedinflation pressure can be foundon the Tire and LoadingInformation label. SeeTirePressure0325.
The pressure gauge (8) mayread higher than the actual tirepressure while the compressor
Page 344 of 419

Chevrolet Malibu Owner Manual (GMNA-Localizing-U.S./Canada/Mexico-10122664) - 2017 - crc - 5/23/16
Vehicle Care 343
is on. Turn the compressor offto get an accurate pressurereading. The compressor maybe turned on/off until thecorrect pressure is reached.
Caution
If the recommended pressure
cannot be reached after
approximately 25 minutes, the
vehicle should not be driven
farther. The tire is too severely
damaged and the tire sealant and
compressor kit cannot inflate the
tire. Remove the power plug from
the accessory power outlet and
unscrew the inflating hose from
the tire valve. SeeRoadside
Assistance Program0387.
12. Press the on/off button (5) toturn the tire sealant andcompressor kit off.
The tire is not sealed and willcontinue to leak air until thevehicle is driven and thesealant is distributed in the tire.
Therefore, Steps 13–21 mustbe done immediately afterStep 12.
Be careful while handling thetire sealant and compressor kitas it could be warm afterusage.
13. Unplug the power plug (9) fromthe accessory power outlet inthe vehicle.
14. Turn the sealant/air hose (2)counterclockwise to remove itfrom the tire valve stem.
15. Replace the tire valvestem cap.
16. Remove the tire sealantcanister (4) from the slot on topof the compressor (6).
17. Turn the air only hose (10)counterclockwise to remove itfrom the tire sealant canisterinlet valve (1).
18. Turn the sealant/air hose (2)clockwise onto the sealantcanister inlet valve (1) toprevent sealant leakage.
19. Return the air only hose (10)and power plug (9) back totheir original storage location.
20. If the flat tire was able to inflateto the recommended inflationpressure, remove themaximum speed label from thesealant canister and place it inahighlyvisiblelocation.
Do not exceed the speed onthis label until the damaged tireis repaired or replaced.
21. Return the equipment to itsoriginal storage location in thevehicle.
22. Immediately drive the vehicle8km(5mi)todistributethesealant in the tire.
23. Stop at a safe location andcheck the tire pressure. Referto Steps 1–10 under“Using the
Page 345 of 419

Chevrolet Malibu Owner Manual (GMNA-Localizing-U.S./Canada/Mexico-10122664) - 2017 - crc - 5/23/16
344 Vehicle Care
Tire Sealant and CompressorKit without Sealant to Inflate aTire (Not Punctured).”
If the tire pressure has fallenmore than 68 kPa (10 psi)below the recommendedinflation pressure, stop drivingthe vehicle. The tire is tooseverely damaged and the tiresealant cannot seal the tire.SeeRoadside AssistanceProgram0387.
If the tire pressure has notdropped more than 68 kPa(10 psi) from the recommendedinflation pressure, inflate thetire to the recommendedinflation pressure.
24. Wipe off any sealant from thewheel, tire, or vehicle.
25. Dispose of the used tiresealant canister (4) at a localdealer or in accordance withlocal state codes and practices.
26. Replace it with a new canisteravailable from your dealer.
27. After temporarily sealing a tireusing the tire sealant andcompressor kit, take thevehicle to an authorized dealerwithin 161 km (100 mi) ofdriving to have the tire repairedor replaced.
Using the Tire Sealant and
Compressor Kit without
Sealant to Inflate a Tire (Not
Punctured)
The kit includes:
1. Sealant Canister Inlet Valve
2. Sealant/Air Hose
3. Base of Sealant Canister
4. Tire Sealant Canister
5. On/Off Button
6. Slot on Top of Compressor
7. Pressure Deflation Button
8. Pressure Gauge
9. Power Plug
10. Air Only Hose
If a tire goes flat, avoid further tireand wheel damage by driving slowlyto a level place. Turn on the hazardwarning flashers. SeeHazardWarning Flashers0166.
SeeIf a Tire Goes Flat0338forother important safety warnings.
Page 346 of 419

Chevrolet Malibu Owner Manual (GMNA-Localizing-U.S./Canada/Mexico-10122664) - 2017 - crc - 5/23/16
Vehicle Care 345
1. Remove the compressor fromits storage location. SeeStoring the Tire Sealant andCompressor Kit0346.
2. Remove the air only hose (10)and the power plug (9) from thebottom of the compressor.
3. Place the compressor on theground near the flat tire.
Make sure the tire valve stemis positioned close to theground so the hose willreach it.
4. Remove the valve stem capfrom the flat tire by turning itcounterclockwise.
5. Attach the air only hose (10) tothe tire valve stem by turning itclockwise until tight.
6. Plug the power plug (9) into theaccessory power outlet in thevehicle. Unplug all items fromother accessory power outlets.SeePower Outlets0108.
If the vehicle has an accessorypower outlet, do not use thecigarette lighter.
If the vehicle only has acigarette lighter, use thecigarette lighter.
Do not pinch the power plugcord in the door or window.
7. Start the vehicle. The vehiclemust be running while usingthe air compressor.
8. Press the on/off button (5) toturn the tire sealant andcompressor kit on.
The compressor will inflate thetire with air only.
9. Inflate the tire to therecommended inflationpressure using the pressuregauge (8). The recommendedinflation pressure can be foundon the Tire and LoadingInformation label. SeeTirePressure0325.
The pressure gauge (8) mayread higher than the actual tirepressure while the compressoris on. Turn the compressor offto get an accurate pressure
reading. The compressor maybe turned on/off until thecorrect pressure is reached.
Caution
If the recommended pressure
cannot be reached after
approximately 25 minutes, the
vehicle should not be driven
farther. The tire is too severely
damaged and the tire sealant and
compressor kit cannot inflate the
tire. Remove the power plug from
the accessory power outlet and
unscrew the inflating hose from
the tire valve. SeeRoadside
Assistance Program0387.
10. Press the on/off button (5) toturn the tire sealant andcompressor kit off.
Be careful while handling thecompressor as it could bewarm after usage.
11 . U n p l u g t h e p o w e r p l u g ( 9 ) f r o mthe accessory power outlet inthe vehicle.
Page 347 of 419
Chevrolet Malibu Owner Manual (GMNA-Localizing-U.S./Canada/Mexico-10122664) - 2017 - crc - 5/23/16
346 Vehicle Care
12. Turn the air only hose (10)counterclockwise to remove itfrom the tire valve stem.
13. Replace the tire valvestem cap.
14. Return the air only hose (10)and power plug (9) back totheir original storage location.
15. Return the equipment to itsoriginal storage location in thevehicle.
The tire sealant and compressor kithas accessory adapters located in acompartment on the bottom of itshousing that can be used to inflateair mattresses, balls, etc.
Storing the Tire Sealant
and Compressor Kit
To a c c e s s t h e t i r e s e a l a n t a n dcompressor kit:
1. Open the trunk. SeeTr u n k044.
2. Lift the cover.
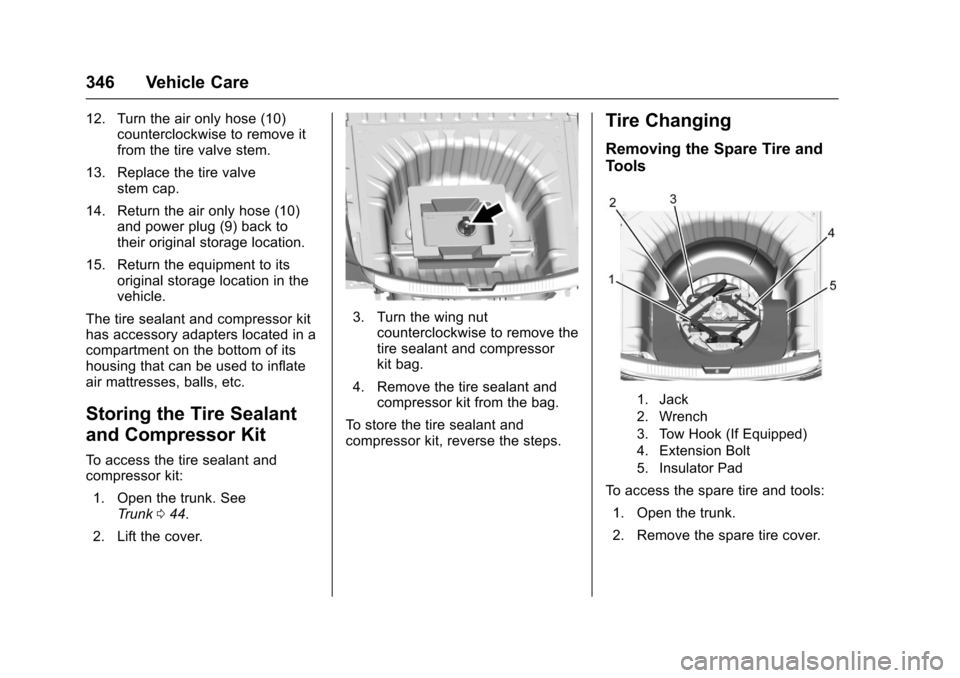
3. Turn the wing nutcounterclockwise to remove thetire sealant and compressorkit bag.
4. Remove the tire sealant andcompressor kit from the bag.
To s t o r e t h e t i r e s e a l a n t a n dcompressor kit, reverse the steps.
Tire Changing
Removing the Spare Tire and
Tools
1. Jack
2. Wrench
3. Tow Hook (If Equipped)
4. Extension Bolt
5. Insulator Pad
To a c c e s s t h e s p a r e t i r e a n d t o o l s :
1. Open the trunk.
2. Remove the spare tire cover.
Page 348 of 419
Chevrolet Malibu Owner Manual (GMNA-Localizing-U.S./Canada/Mexico-10122664) - 2017 - crc - 5/23/16
Vehicle Care 347
3. Turn the retainer nutcounterclockwise and removethe spare tire. Place the sparetire next to the tire beingchanged.
4. The jack and tools are storedbelow the spare tire. Removethem from their container andplace them near the tire beingchanged.
Removing the Flat Tire and
Installing the Spare Tire
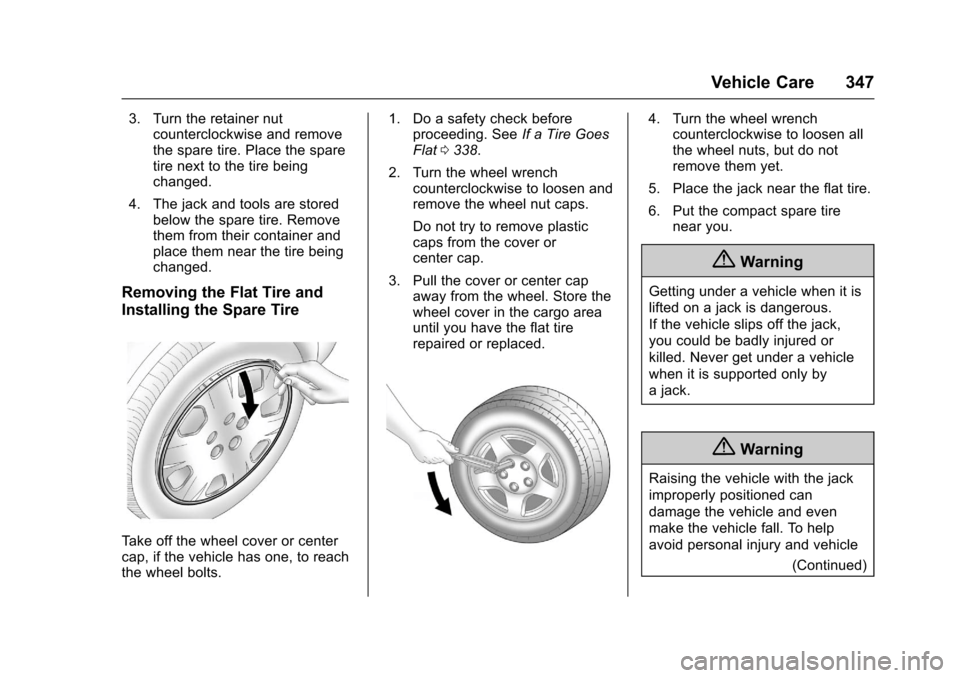
Ta k e o f f t h e w h e e l c o v e r o r c e n t e rcap, if the vehicle has one, to reachthe wheel bolts.
1. Do a safety check beforeproceeding. SeeIf a Tire GoesFlat0338.
2. Turn the wheel wrenchcounterclockwise to loosen andremove the wheel nut caps.
Do not try to remove plasticcaps from the cover orcenter cap.
3. Pull the cover or center capaway from the wheel. Store thewheel cover in the cargo areauntil you have the flat tirerepaired or replaced.
4. Turn the wheel wrenchcounterclockwise to loosen allthe wheel nuts, but do notremove them yet.
5. Place the jack near the flat tire.
6. Put the compact spare tirenear you.
{Warning
Getting under a vehicle when it is
lifted on a jack is dangerous.
If the vehicle slips off the jack,
you could be badly injured or
killed. Never get under a vehicle
when it is supported only by
ajack.
{Warning
Raising the vehicle with the jack
improperly positioned can
damage the vehicle and even
make the vehicle fall. To help
avoid personal injury and vehicle
(Continued)
Page 349 of 419
Chevrolet Malibu Owner Manual (GMNA-Localizing-U.S./Canada/Mexico-10122664) - 2017 - crc - 5/23/16
348 Vehicle Care
Warning (Continued)
damage, be sure to fit the jack lift
head into the proper location
before raising the vehicle.
{Warning
Lifting a vehicle and getting under
it to do maintenance or repairs is
dangerous without the
appropriate safety equipment and
training. If a jack is provided with
the vehicle, it is designed only for
changing a flat tire. If it is used for
anything else, you or others could
be badly injured or killed if the
vehicle slips off the jack. If a jack
is provided with the vehicle, only
use it for changing a flat tire.
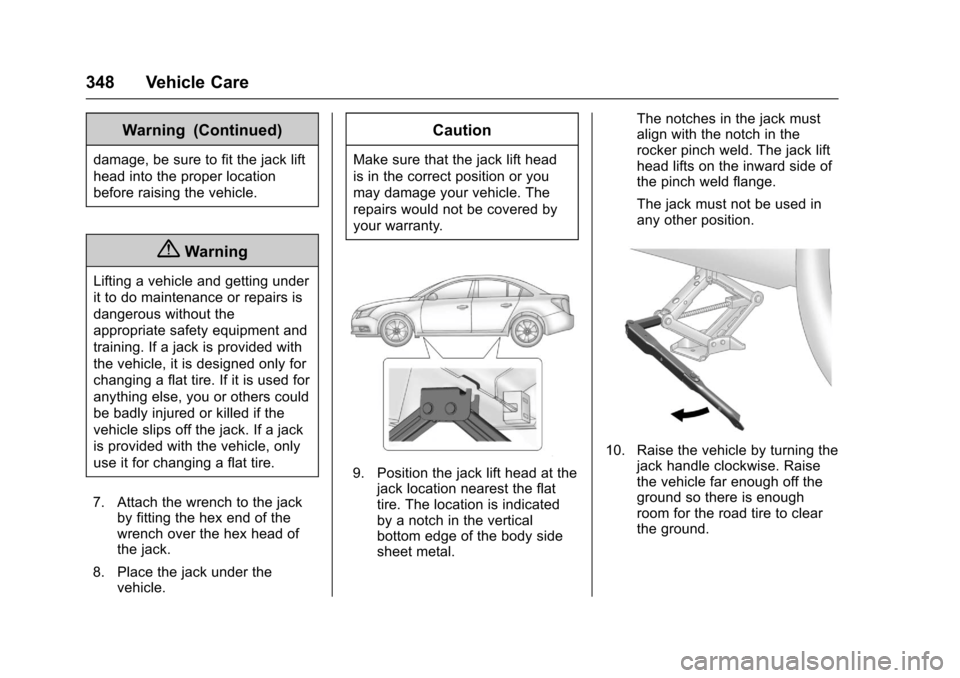
7. Attach the wrench to the jackby fitting the hex end of thewrench over the hex head ofthe jack.
8. Place the jack under thevehicle.
Caution
Make sure that the jack lift head
is in the correct position or you
may damage your vehicle. The
repairs would not be covered by
your warranty.
9. Position the jack lift head at thejack location nearest the flattire. The location is indicatedby a notch in the verticalbottom edge of the body sidesheet metal.
The notches in the jack mustalign with the notch in therocker pinch weld. The jack lifthead lifts on the inward side ofthe pinch weld flange.
The jack must not be used inany other position.
10. Raise the vehicle by turning thejack handle clockwise. Raisethe vehicle far enough off theground so there is enoughroom for the road tire to clearthe ground.
Page 350 of 419
Chevrolet Malibu Owner Manual (GMNA-Localizing-U.S./Canada/Mexico-10122664) - 2017 - crc - 5/23/16
Vehicle Care 349
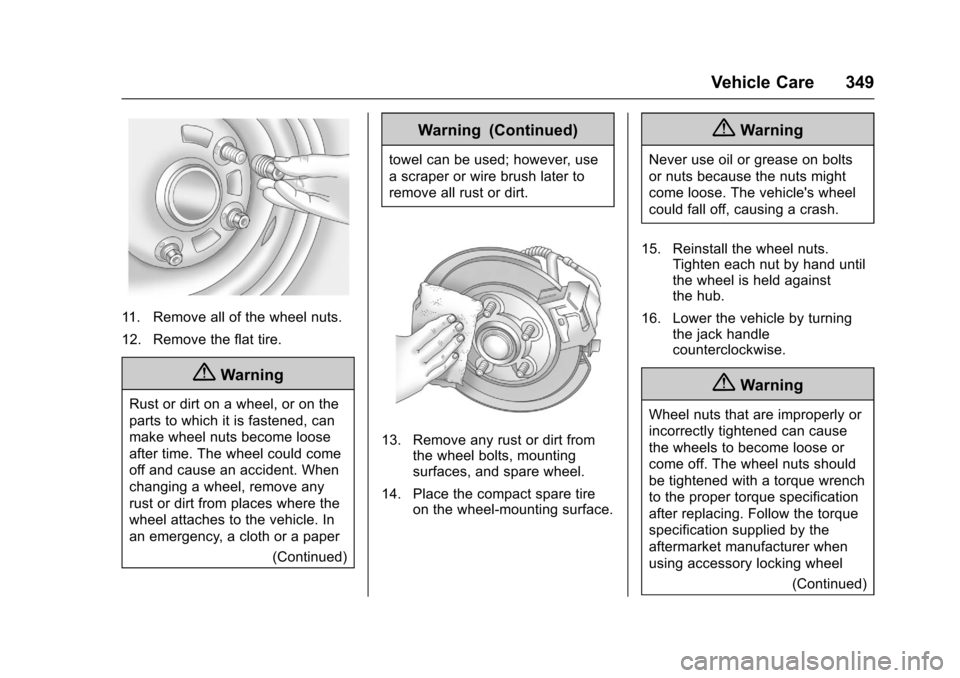
11 . R e m o v e a l l o f t h e w h e e l n u t s .
12. Remove the flat tire.
{Warning
Rust or dirt on a wheel, or on the
parts to which it is fastened, can
make wheel nuts become loose
after time. The wheel could come
off and cause an accident. When
changing a wheel, remove any
rust or dirt from places where the
wheel attaches to the vehicle. In
an emergency, a cloth or a paper
(Continued)
Warning (Continued)
towel can be used; however, use
ascraperorwirebrushlaterto
remove all rust or dirt.
13. Remove any rust or dirt fromthe wheel bolts, mountingsurfaces, and spare wheel.
14. Place the compact spare tireon the wheel-mounting surface.
{Warning
Never use oil or grease on bolts
or nuts because the nuts might
come loose. The vehicle's wheel
could fall off, causing a crash.
15. Reinstall the wheel nuts.Tighten each nut by hand untilthe wheel is held againstthe hub.
16. Lower the vehicle by turningthe jack handlecounterclockwise.
{Warning
Wheel nuts that are improperly or
incorrectly tightened can cause
the wheels to become loose or
come off. The wheel nuts should
be tightened with a torque wrench
to the proper torque specification
after replacing. Follow the torque
specification supplied by the
aftermarket manufacturer when
using accessory locking wheel
(Continued)