CHEVROLET MALIBU 2018 Get To Know Guide
Manufacturer: CHEVROLET, Model Year: 2018, Model line: MALIBU, Model: CHEVROLET MALIBU 2018Pages: 16, PDF Size: 2.19 MB
Page 1 of 16
1
2018 MALIBU
GETTING TO KNOW YOUR
chevrolet.com
Review this Quick Reference Guide for an overview of some important feat\
ures in your Chevrolet Malibu. Some optional equipment described in this guide may no\
t be included in your vehicle. More information can be found in your Owner’s Manual and at \
my.chevrolet.com/learn. For easy reference, keep this guide with your Owner’s Manual in your \
glove box.
Certain restrictions, precautions, and safety procedures apply to your v\
ehicle. Please read your Owner’s Manual for complete instructions.
Page 2 of 16
2
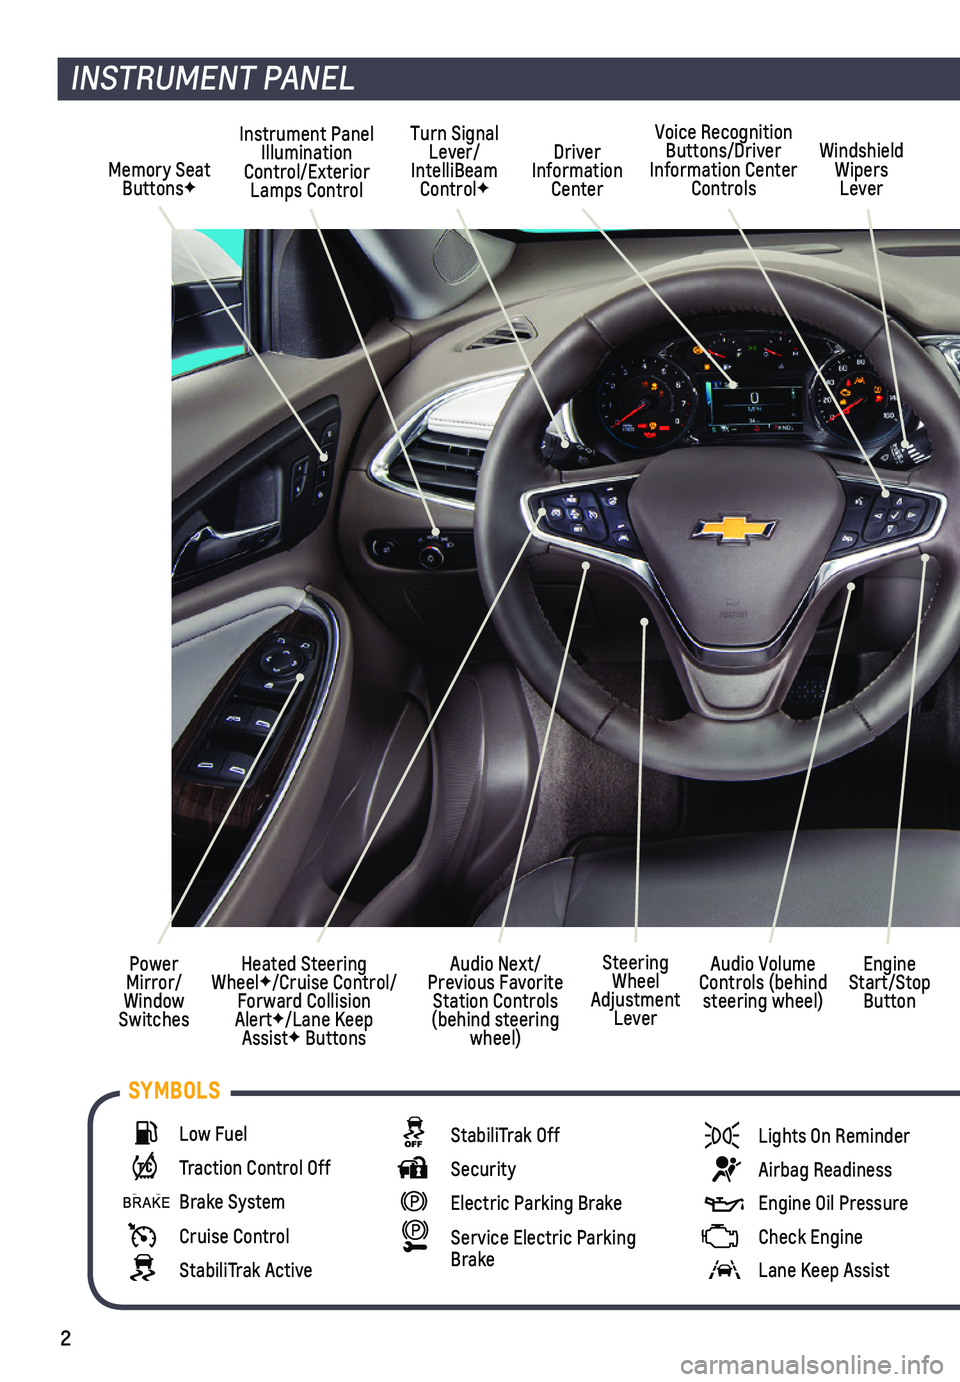
Memory Seat ButtonsF
Instrument Panel Illumination Control/Exterior Lamps Control
Driver Information Center
Voice Recognition Buttons/Driver Information Center Controls
Windshield Wipers Lever
Audio Next/Previous Favorite Station Controls (behind steering wheel)
Turn Signal Lever/IntelliBeam ControlF
Heated Steering WheelF/Cruise Control/Forward Collision AlertF/Lane Keep AssistF Buttons
Power Mirror/Window Switches
INSTRUMENT PANEL
Engine Start/Stop Button
Audio Volume Controls (behind steering wheel)
Steering Wheel Adjustment Lever
Low Fuel
Traction Control Off
Brake System
Cruise Control
StabiliTrak Active
StabiliTrak Off
Security
Electric Parking Brake
Service Electric Parking Brake
Lights On Reminder
Airbag Readiness
Engine Oil Pressure
Check Engine
Lane Keep Assist
SYMBOLS
Page 3 of 16
3
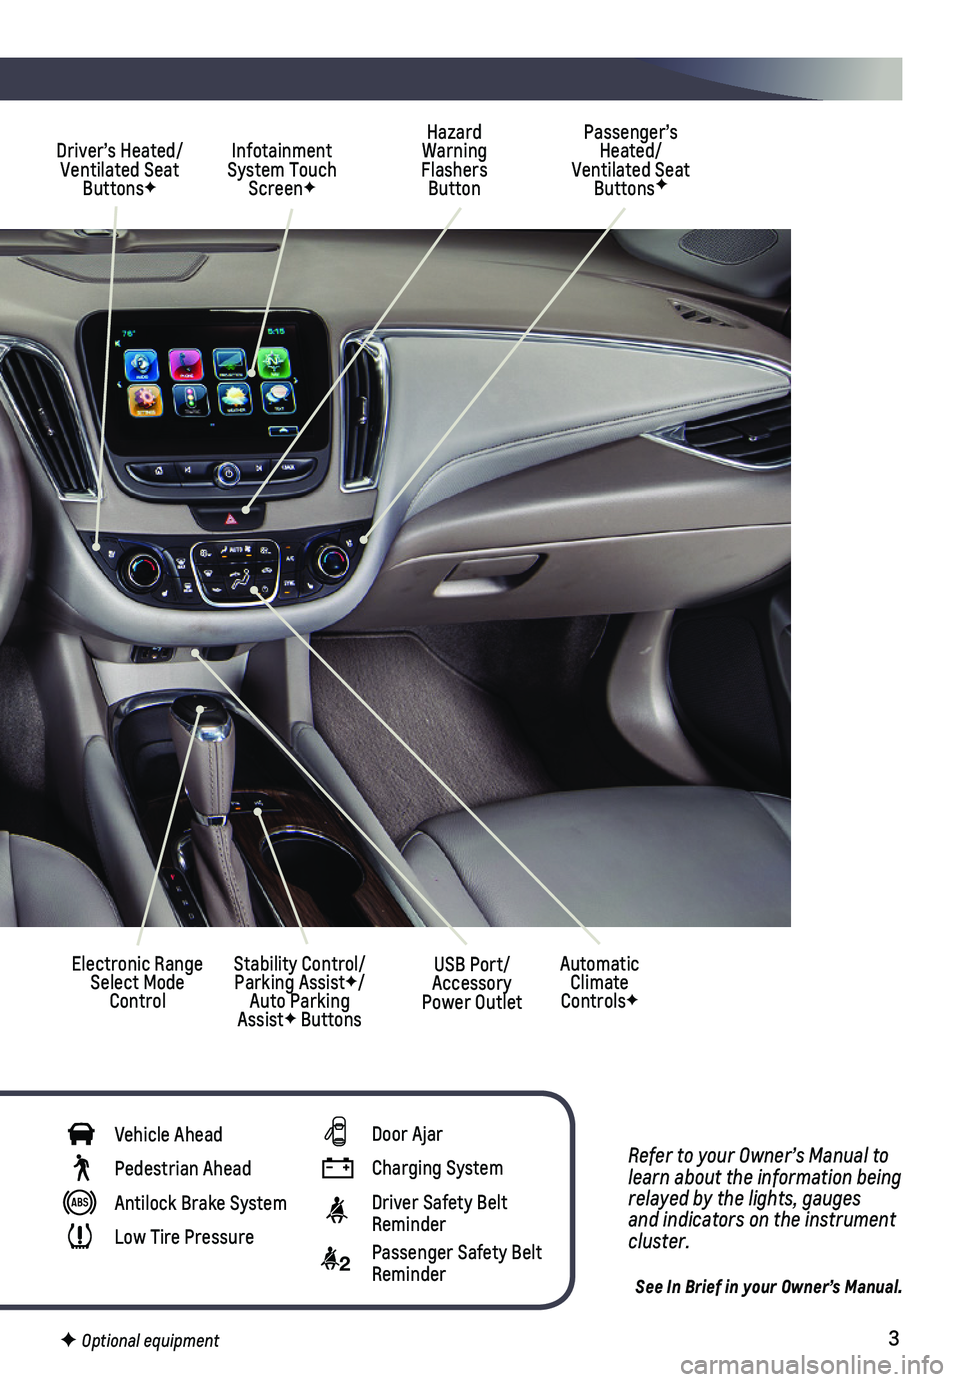
Refer to your Owner’s Manual to learn about the information being relayed by the lights, gauges and indicators on the instrument cluster.
See In Brief in your Owner’s Manual.
Hazard Warning Flashers Button
Infotainment System Touch ScreenF
Passenger’s Heated/Ventilated Seat ButtonsF
Electronic Range Select Mode Control
Stability Control/Parking AssistF/Auto Parking AssistF Buttons
Driver’s Heated/Ventilated Seat ButtonsF
Automatic Climate ControlsF
USB Port/Accessory Power Outlet
Vehicle Ahead
Pedestrian Ahead
Antilock Brake System
Low Tire Pressure
Door Ajar
Charging System
Driver Safety Belt Reminder
2 Passenger Safety Belt Reminder
F Optional equipment
Page 4 of 16
4
KEYLESS ACCESS SYSTEM
The Keyless Access System enables operation of the doors, ignition and t\
runk without removing the Remote Keyless Entry transmitter from a pocket or purse. Th\
e transmitter must be within 3 feet of a front door or the trunk.
KEYLESS UNLOCKING
With the transmitter within range:
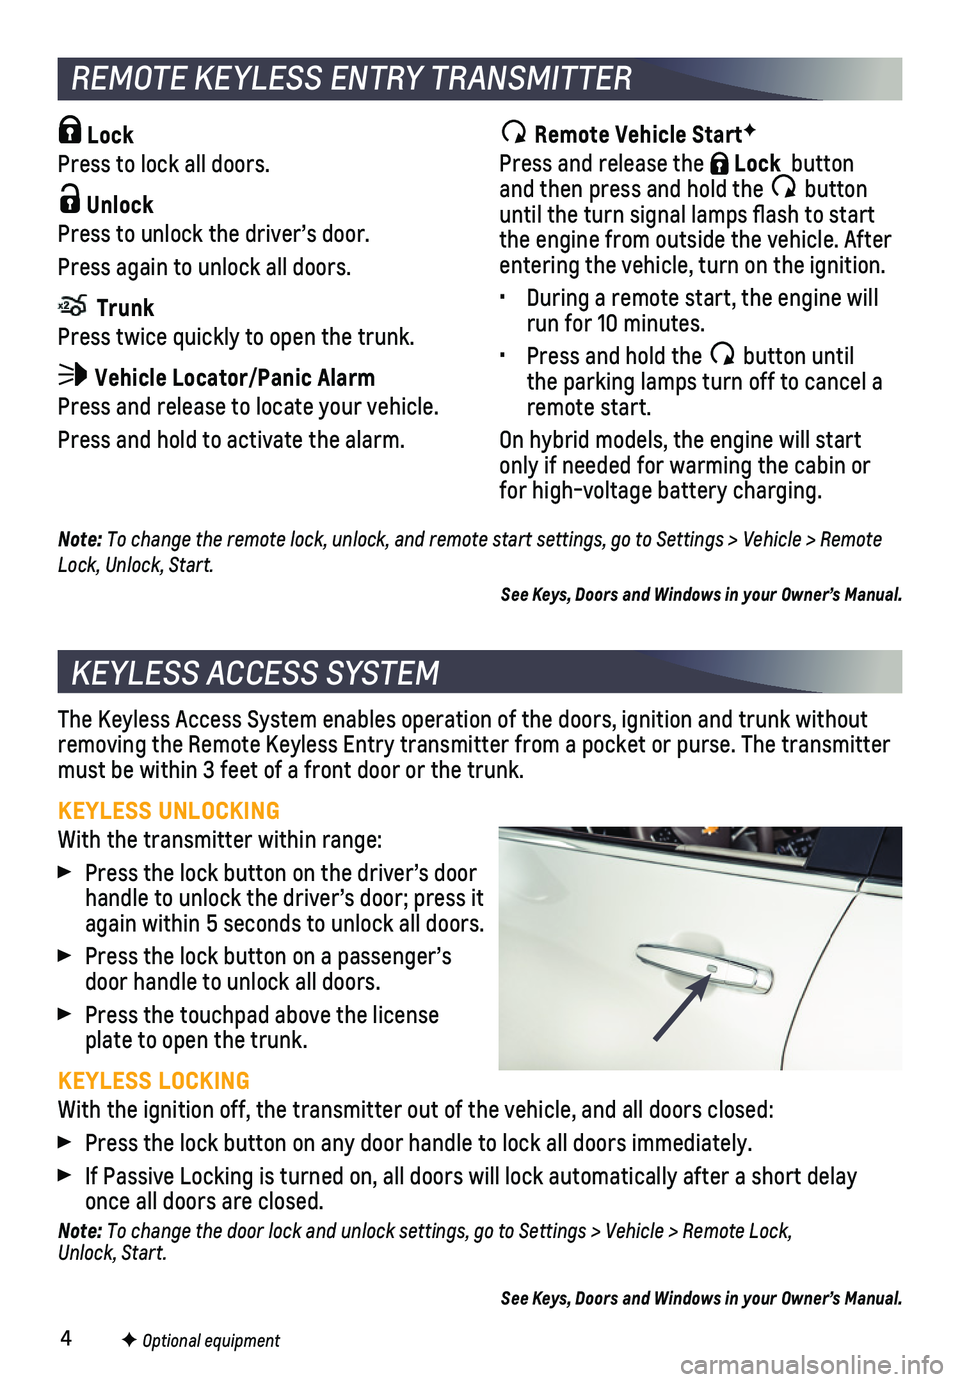
Press the lock button on the driver’s door handle to unlock the driver’s door; press it again within 5 seconds to unlock all doors.
Press the lock button on a passenger’s door handle to unlock all doors.
Press the touchpad above the license plate to open the trunk.
KEYLESS LOCKING
With the ignition off, the transmitter out of the vehicle, and all doors\
closed:
Press the lock button on any door handle to lock all doors immediately.
If Passive Locking is turned on, all doors will lock automatically after\
a short delay once all doors are closed.
Note: To change the door lock and unlock settings, go to Settings > Vehicle > Remote Lock, Unlock, Start.
See Keys, Doors and Windows in your Owner’s Manual.
Remote Vehicle StartF
Press and release the Lock button and then press and hold the button until the turn signal lamps flash to start the engine from outside the vehicle. After entering the vehicle, turn on the ignition.
• During a remote start, the engine will run for 10 minutes.
• Press and hold the button until the parking lamps turn off to cancel a remote start.
On hybrid models, the engine will start only if needed for warming the cabin or for high-voltage battery charging.
Lock
Press to lock all doors.
Unlock
Press to unlock the driver’s door.
Press again to unlock all doors.
Trunk
Press twice quickly to open the trunk.
Vehicle Locator/Panic Alarm
Press and release to locate your vehicle.
Press and hold to activate the alarm.
REMOTE KEYLESS ENTRY TRANSMITTER
F Optional equipment
Note: To change the remote lock, unlock, and remote start settings, go to Settings > Vehicle > Remote Lock, Unlock, Start.
See Keys, Doors and Windows in your Owner’s Manual.
Page 5 of 16
5
KEYLESS (PUSHBUTTON) START
AUTO ENGINE STOP/START OPERATION
(NON-HYBRID MODEL)
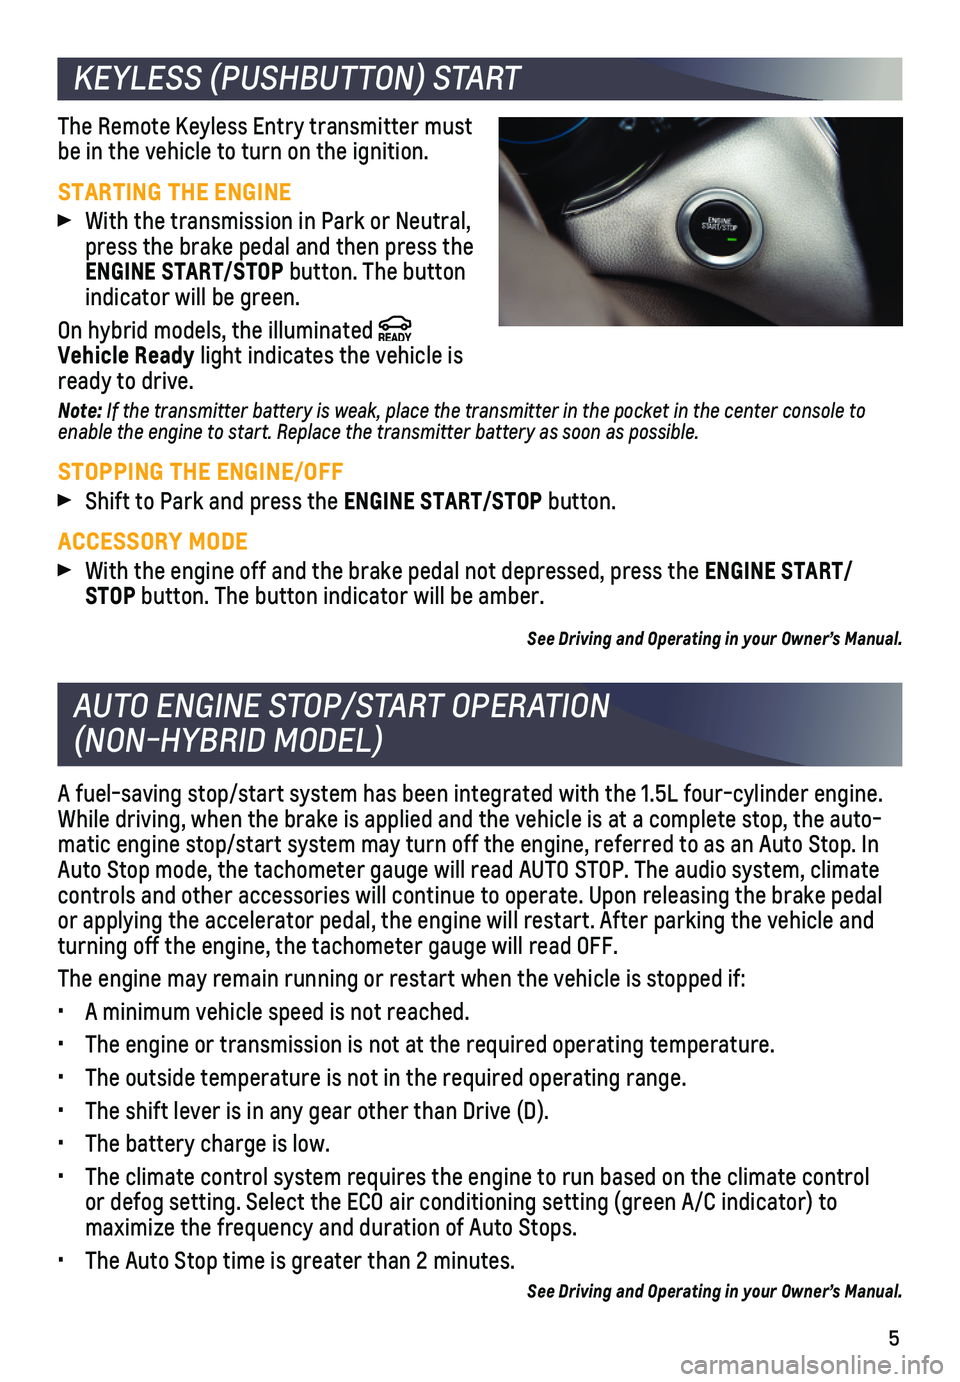
The Remote Keyless Entry transmitter must be in the vehicle to turn on the ignition.
STARTING THE ENGINE
With the transmission in Park or Neutral, press the brake pedal and then press the ENGINE START/STOP button. The button indicator will be green.
On hybrid models, the illuminated Vehicle Ready light indicates the vehicle is ready to drive.
Note: If the transmitter battery is weak, place the transmitter in the pocket in the center console to enable the engine to start. Replace the transmitter battery as soon as possible.
STOPPING THE ENGINE/OFF
Shift to Park and press the ENGINE START/STOP button.
ACCESSORY MODE
With the engine off and the brake pedal not depressed, press the ENGINE START/STOP button. The button indicator will be amber.
See Driving and Operating in your Owner’s Manual.
A fuel-saving stop/start system has been integrated with the 1.5L four-c\
ylinder engine. While driving, when the brake is applied and the vehicle is at a complet\
e stop, the auto-matic engine stop/start system may turn off the engine, referred to as a\
n Auto Stop. In Auto Stop mode, the tachometer gauge will read AUTO STOP. The audio syst\
em, climate controls and other accessories will continue to operate. Upon releasing \
the brake pedal or applying the accelerator pedal, the engine will restart. After parkin\
g the vehicle and turning off the engine, the tachometer gauge will read OFF.
The engine may remain running or restart when the vehicle is stopped if:\
• A minimum vehicle speed is not reached.
• The engine or transmission is not at the required operating temperature.\
• The outside temperature is not in the required operating range.
• The shift lever is in any gear other than Drive (D).
• The battery charge is low.
• The climate control system requires the engine to run based on the clima\
te control or defog setting. Select the ECO air conditioning setting (green A/C indic\
ator) to
maximize the frequency and duration of Auto Stops.
• The Auto Stop time is greater than 2 minutes.
See Driving and Operating in your Owner’s Manual.
Page 6 of 16
6
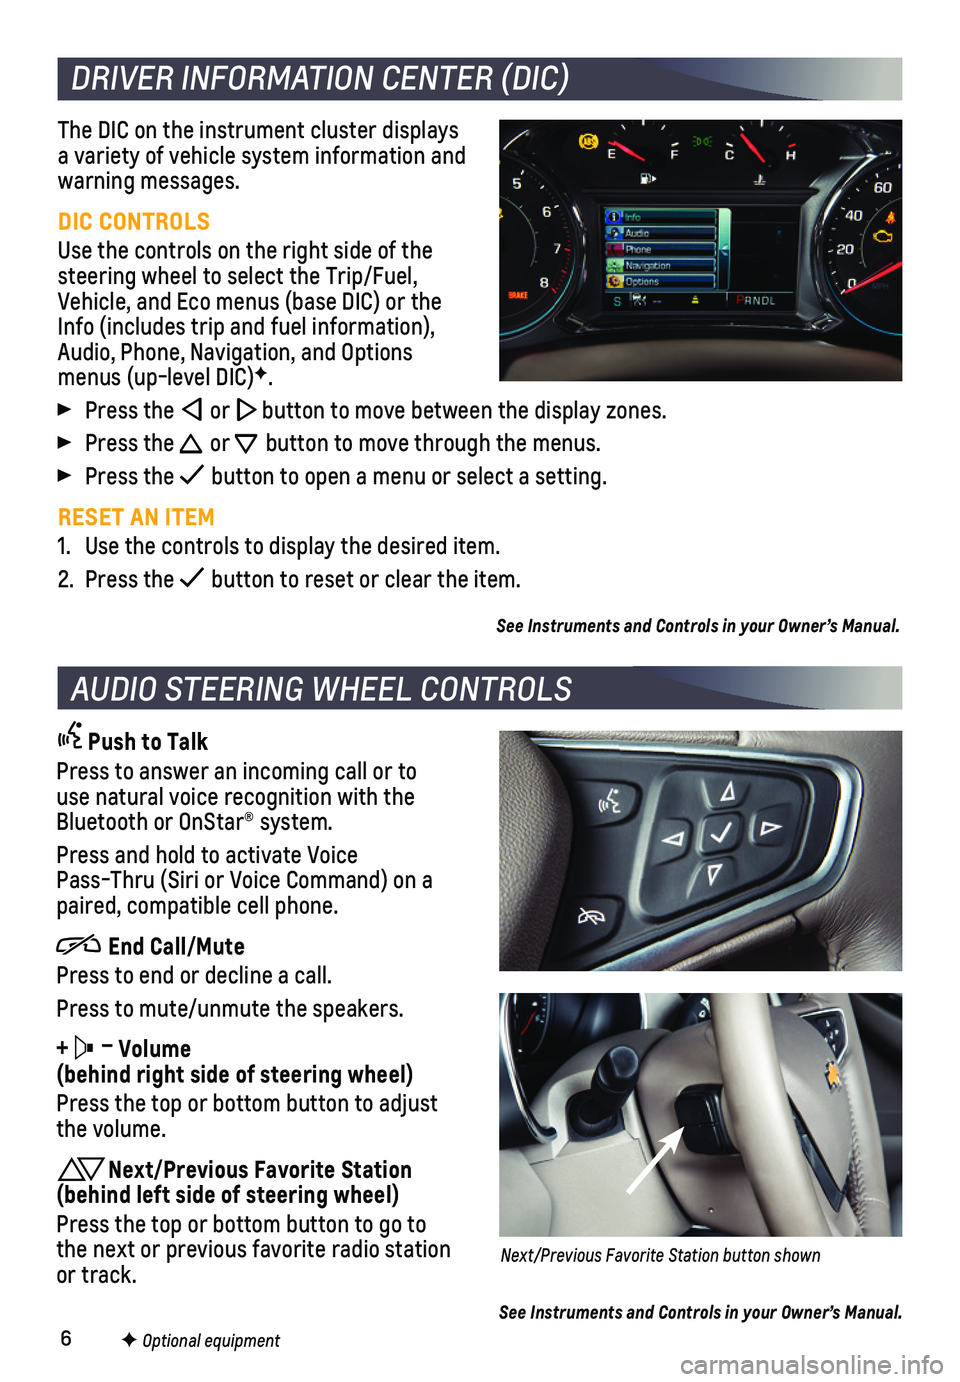
The DIC on the instrument cluster displays a variety of vehicle system information and warning messages.
DIC CONTROLS
Use the controls on the right side of the steering wheel to select the Trip/Fuel, Vehicle, and Eco menus (base DIC) or the Info (includes trip and fuel information), Audio, Phone, Navigation, and Options menus (up-level DIC)F.
Press the or button to move between the display zones.
Press the or button to move through the menus.
Press the button to open a menu or select a setting.
RESET AN ITEM
1. Use the controls to display the desired item.
2. Press the button to reset or clear the item.
See Instruments and Controls in your Owner’s Manual.
DRIVER INFORMATION CENTER (DIC)
F Optional equipment
AUDIO STEERING WHEEL CONTROLS
Push to Talk
Press to answer an incoming call or to use natural voice recognition with the Bluetooth or OnStar® system.
Press and hold to activate Voice
Pass-Thru (Siri or Voice Command) on a paired, compatible cell phone.
End Call/Mute
Press to end or decline a call.
Press to mute/unmute the speakers.
+ – Volume (behind right side of steering wheel)
Press the top or bottom button to adjust the volume.
Next/Previous Favorite Station (behind left side of steering wheel)
Press the top or bottom button to go to the next or previous favorite radio station or track.Next/Previous Favorite Station button shown
See Instruments and Controls in your Owner’s Manual.
Page 7 of 16
7F Optional equipment *Screen measured diagonally
CHEVROLET MYLINK INFOTAINMENT SYSTEMF
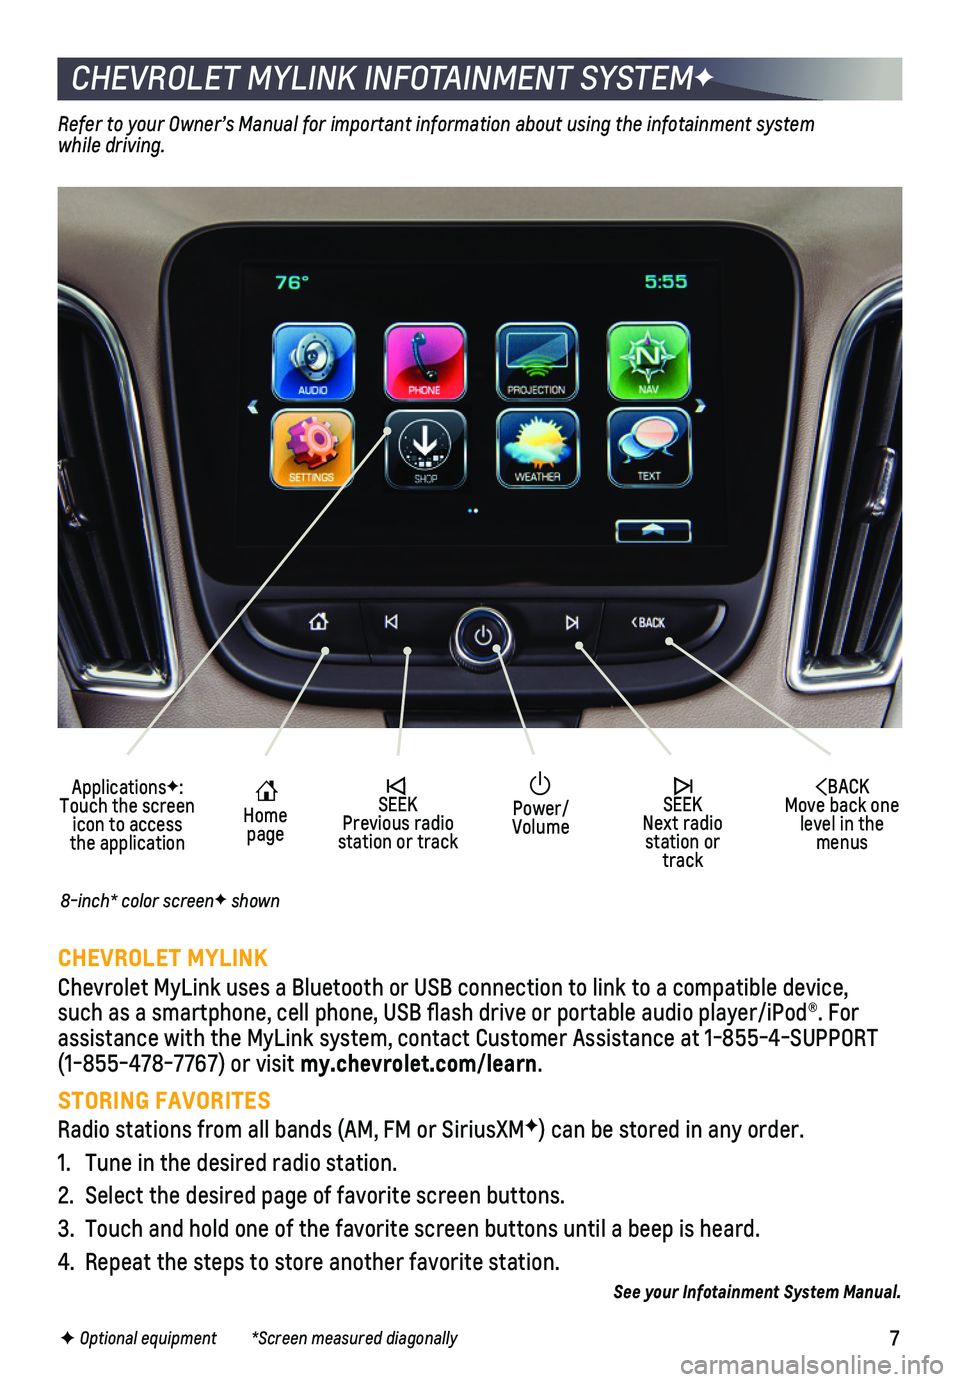
ApplicationsF: Touch the screen icon to access the application
Home page
SEEK Previous radio station or track
BACK Move back one level in the menus
SEEK Next radio station or track
Power/Volume
Refer to your Owner’s Manual for important information about using the infotainment system while driving.
CHEVROLET MYLINK
Chevrolet MyLink uses a Bluetooth or USB connection to link to a compati\
ble device, such as a smartphone, cell phone, USB flash drive or portable audio player/\
iPod®. For assistance with the MyLink system, contact Customer Assistance at 1-855-\
4-SUPPORT (1-855-478-7767) or visit my.chevrolet.com/learn.
8-inch* color screenF shown
See your Infotainment System Manual.
STORING FAVORITES
Radio stations from all bands (AM, FM or SiriusXMF) can be stored in any order.
1. Tune in the desired radio station.
2. Select the desired page of favorite screen buttons.
3. Touch and hold one of the favorite screen buttons until a beep is heard.\
4. Repeat the steps to store another favorite station.
Page 8 of 16
8
CHEVROLET MYLINK INFOTAINMENT SYSTEMF
CHEVROLET SHOP
In-vehicle apps — connecting to music, news, weather, travel informat\
ion and more — are available for download to the radio through the SHOP icon on the home pa\
ge.
Downloading and using the apps requires internet connectivity and a data\
plan accessed through the vehicle’s OnStar 4G LTE Wi-Fi hotspot, if active, or a mo\
bile device hotspot.
Visit my.chevrolet.com/learn for more information.
NATURAL VOICE RECOGNITION
Control the music source and make phone calls hands-free (after pairing\
your Bluetooth-enabled phone) using the natural voice recognition system.
1. Press the Push to Talk button on the steering wheel.
2. The radio will play a prompt followed by a beep.
3. After the beep, say what you want it to do using natural speech.
• Example Phone command (using your paired phone): “Call Amanda” o\
r “Dial 555-1212”
• Example Media Music Device Search command (when connected to USB only)\
: “Play artist [name]” or “Play song [name]”
• Example Radio command: “Tune FM 104.3” or “Tune XM Classic Viny\
l”
• Help: Say “Help” for voice recognition assistance
APPLE CARPLAY™ AND ANDROID AUTO™
Apple CarPlay or Android Auto capability may be available through a comp\
atible
smartphone. If available, a Projection icon will appear on the home page of the infotainment display.
1. No app is required for Apple CarPlay. Download the Android Auto app to y\
our phone from the Google Play Store.
2. Connect your phone by plugging the compatible phone USB cable into a USB\
data port. Use your device’s factory-provided USB cable. Aftermarket cables may \
not work.
3. The Projection icon will change to Apple CarPlay or Android Auto, depending on the phone. Apple CarPlay or Android Auto may launch automatically upo\
n USB
connection. If not, touch the Apple CarPlay or Android Auto icon on the \
home page.
For more information on using Apple CarPlay or Android Auto, call 1-855-\
4-SUPPORT (1-855-478-7767) or visit my.chevrolet.com/learn.
PORTABLE AUDIO DEVICES
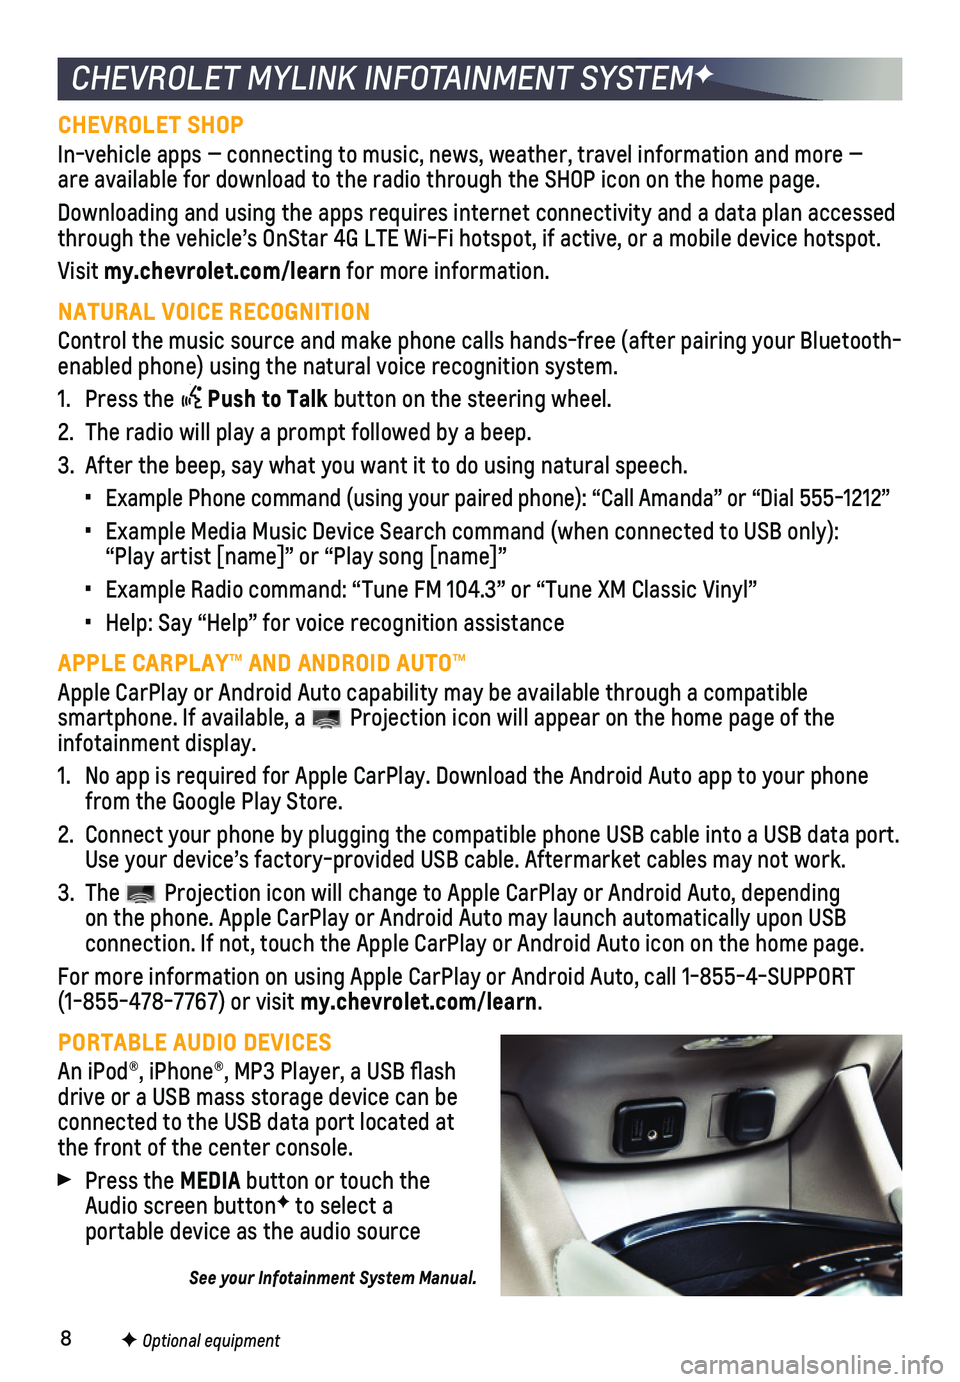
An iPod®, iPhone®, MP3 Player, a USB flash drive or a USB mass storage device can be connected to the USB data port located at the front of the center console.
Press the MEDIA button or touch the Audio screen buttonF to select a
portable device as the audio source
See your Infotainment System Manual.
F Optional equipment
Page 9 of 16
9
BLUETOOTH® SYSTEMF
Refer to your Owner’s Manual for important information about using the Bluetooth system while driving.
Before using a Bluetooth-enabled device in the vehicle, it must be paire\
d with the in-vehicle Bluetooth system. The pairing process is disabled when the ve\
hicle is moving. Not all devices will support all functions. Visit my.chevrolet.com/learn for more information.
PAIR A PHONE
1. Press the Phone button and select Pair or Search Device. If equipped, press the
Push to Talk button and say “Pair.”
2. Start the pairing process on the phone. Locate Your Vehicle or Chevrolet\
MyLink on the phone.
3. Confirm the codes that appear on the infotainment screen and the phone\
.
4. When pairing is complete, the phone screen is displayed on the infotainm\
ent system. Depending on the phone, the phone book is downloaded automatically.
STREAMING AUDIO
To stream audio from a paired device connected via Bluetooth, select the\
Audio icon on the infotainment screen and touch Media until Bluetooth is displayed.\
Control audio operation using the device controls or infotainment controls.
See Infotainment System in your Owner’s Manual.
F Optional equipment
UNIVERSAL REMOTE SYSTEM
ONSTAR® WITH 4G LTE AND WI-FI®F
The Universal Remote System on the overhead console enables your vehicle\
to control 3 different devices, ranging from garage doors and gates to home lightin\
g. Go to www.homelink.com for detailed videos and instructions on how to program the Universal Remote System. For additional assistance, call 1-800-355-3515.\
See Instruments and Controls in your Owner’s Manual.
With OnStar 4G LTE and Wi-Fi®, up to 7 devices (smartphones, tablets\
and laptops) can be connected to high-speed internet through the vehicle’s built-in Wi\
-Fi hotspot.
To retrieve the SSID and password for the hotspot, press the OnStar Voic\
e Command button on the overhead console or rearview mirror, wait for the prompt, \
and then say “Wi-Fi settings.” The information will be displayed on the screen.\
For assistance, press the blue OnStar button or call 1-888-4-ONSTAR (1-888-466-7827).
Note: See onstar.com for a detailed instruction guide, vehicle availability, details, and system limitations.
See OnStar in your Owner’s Manual.
Page 10 of 16
10F Optional equipment
Some vehicle features can be customized using the Settings menus on the infotain-ment system. The Settings menusF may include Time and Date, Language, Valet Mode, Radio, Vehicle, Bluetooth, Rear Camera, Return to Factory Settings and others.
1. Press the MENU knob or touch Settings on the home screen.
2. Select the desired menu item.
3. Select the desired feature and setting.
4. Select BACK to exit each menu.
VEHICLE PERSONALIZATION
The Wireless Charging system is located in a pocket below the armrest of\
the center console. To check device compatibility, visit my.chevrolet.com/learn. See your phone retailer for details on required phone accessories.
1. The vehicle must be on, or Retained Accessory Power must be active.
2. Remove all objects from the charging pocket.
3. Place the device in the pocket with the screen facing the rear of the vehicle.
4. The symbol will display on the
infotainment screen when the device is charging.
See Instruments and Controls in your Owner’s Manual.
WIRELESS CHARGINGF
TEEN DRIVERF
Teen Driver allows multiple keys to be registered for beginning drivers.\
When active, the system mutes the audio of the radio or any device paired with the vehicl\
e if front seat occupants aren’t wearing their safety belts. It also provides audible\
and visual warnings when the vehicle is traveling over predetermined speeds. A Report Card i\
s produced at the end of every driving cycle with data about driving behavior.
When the vehicle is started with a registered key, a Driver Information \
Center message displays that Teen Driver is active.
To create a Personal Identification Number, register a key, change Tee\
n Driver set-tings, or access the Report Card, go to Settings > Teen Driver.
See your Infotainment System Manual.
See Instruments and Controls in your Owner’s Manual.