battery CHEVROLET MALIBU 2019 Service Manual
[x] Cancel search | Manufacturer: CHEVROLET, Model Year: 2019, Model line: MALIBU, Model: CHEVROLET MALIBU 2019Pages: 382, PDF Size: 37.7 MB
Page 238 of 382

Chevrolet Malibu Owner Manual (GMNA-Localizing-U.S./Canada/Mexico-
12461813) - 2019 - crc - 12/11/18
238 Vehicle Care
1.Engine Air Cleaner/Filter0247.
2. Engine Oil Fill Cap. See
Engine Oil0242.
3. Engine Oil Dipstick. See
Engine Oil0242.
4. Engine Cooling Fan (Out of
View). SeeCooling System
(Power Electronics)0253or
Cooling System (Engine)
0248.
5. Brake Fluid Reservoir. See
Brakes0255.
6. Coolant Surge Tank and
Pressure Cap. SeeCooling
System (Power Electronics)
0253or
Cooling System (Engine)
0248.
7.Battery - North America0257.
8. Remote Positive (+) Battery
Terminal (Under Cover). See
Jump Starting - North America
0312.
9.Engine Compartment Fuse
Block0268.10. Windshield Washer Fluid
Reservoir. SeeWasher Fluid
0254.
11. Remote Negative (-) Battery
Terminal. SeeJump Starting -
North America0312.
Page 240 of 382

Chevrolet Malibu Owner Manual (GMNA-Localizing-U.S./Canada/Mexico-
12461813) - 2019 - crc - 12/11/18
240 Vehicle Care
1.Engine Air Cleaner/Filter0247.
2. Engine Cooling Fan (Out of
View). SeeCooling System
(Power Electronics)0253or
Cooling System (Engine)
0248.
3. Engine Oil Dipstick. See
Engine Oil0242.
4. Engine Oil Fill Cap. See
Engine Oil0242.
5. Brake Fluid Reservoir. See
Brakes0255.
6. Automatic Transmission Fluid
Fill Cap. SeeAutomatic
Transmission Fluid0246.
7. Coolant Surge Tank and
Pressure Cap. SeeCooling
System (Power Electronics)
0253or
Cooling System (Engine)
0248.
8. Remote Positive (+) Battery
Terminal (Under Cover). See
Jump Starting - North America
0312.9. Power Electronics Coolant
Reservoir. SeeCooling System
(Power Electronics)0253or
Cooling System (Engine)
0248.
10.Engine Compartment Fuse
Block0268.
11. Windshield Washer Fluid
Reservoir. SeeWasher Fluid
0254.
12. Remote Negative (-) Battery
Terminal. SeeJump Starting -
North America0312.
Page 242 of 382
Chevrolet Malibu Owner Manual (GMNA-Localizing-U.S./Canada/Mexico-
12461813) - 2019 - crc - 12/11/18
242 Vehicle Care
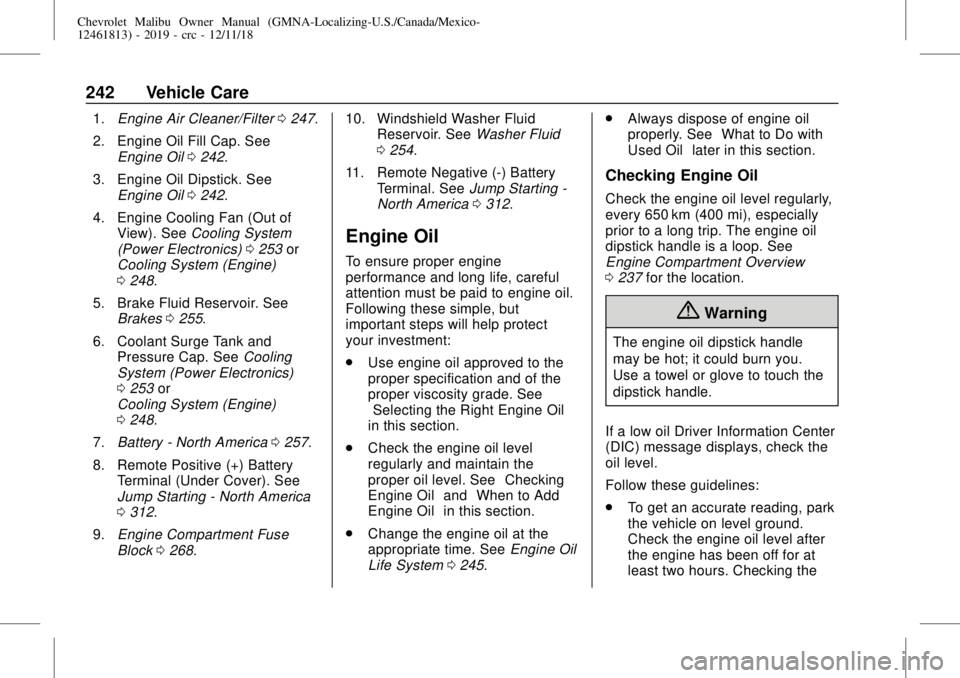
1.Engine Air Cleaner/Filter0247.
2. Engine Oil Fill Cap. See
Engine Oil0242.
3. Engine Oil Dipstick. See
Engine Oil0242.
4. Engine Cooling Fan (Out of
View). SeeCooling System
(Power Electronics)0253or
Cooling System (Engine)
0248.
5. Brake Fluid Reservoir. See
Brakes0255.
6. Coolant Surge Tank and
Pressure Cap. SeeCooling
System (Power Electronics)
0253or
Cooling System (Engine)
0248.
7.Battery - North America0257.
8. Remote Positive (+) Battery
Terminal (Under Cover). See
Jump Starting - North America
0312.
9.Engine Compartment Fuse
Block0268.10. Windshield Washer Fluid
Reservoir. SeeWasher Fluid
0254.
11. Remote Negative (-) Battery
Terminal. SeeJump Starting -
North America0312.
Engine Oil
To ensure proper engine
performance and long life, careful
attention must be paid to engine oil.
Following these simple, but
important steps will help protect
your investment:
.
Use engine oil approved to the
proper specification and of the
proper viscosity grade. See
“Selecting the Right Engine Oil”
in this section.
.
Check the engine oil level
regularly and maintain the
proper oil level. See“Checking
Engine Oil”and“When to Add
Engine Oil”in this section.
.
Change the engine oil at the
appropriate time. SeeEngine Oil
Life System0245..
Always dispose of engine oil
properly. See“What to Do with
Used Oil”later in this section.
Checking Engine Oil
Check the engine oil level regularly,
every 650 km (400 mi), especially
prior to a long trip. The engine oil
dipstick handle is a loop. See
Engine Compartment Overview
0237for the location.
{Warning
The engine oil dipstick handle
may be hot; it could burn you.
Use a towel or glove to touch the
dipstick handle.
If a low oil Driver Information Center
(DIC) message displays, check the
oil level.
Follow these guidelines:
.
To get an accurate reading, park
the vehicle on level ground.
Check the engine oil level after
the engine has been off for at
least two hours. Checking the
Page 257 of 382
Chevrolet Malibu Owner Manual (GMNA-Localizing-U.S./Canada/Mexico-
12461813) - 2019 - crc - 12/11/18
Vehicle Care 257
When the brake fluid falls to a low
level, the brake warning light comes
on. SeeBrake System Warning
Light0126.
Brake fluid absorbs water over time
which degrades the effectiveness of
the brake fluid. Replace brake fluid
at the specified intervals to prevent
increased stopping distance. See
Maintenance Schedule0329.
What to Add
Use only GM approved DOT 3
brake fluid from a clean, sealed
container. SeeRecommended
Fluids and Lubricants0338.
{Warning
The wrong or contaminated brake
fluid could result in damage to the
brake system. This could result in
the loss of braking leading to a
possible injury. Always use the
proper GM approved brake fluid.
Caution
If brake fluid is spilled on the
vehicle's painted surfaces, the
paint finish can be damaged.
Immediately wash off any painted
surface.
Battery - North America
The original equipment battery is
maintenance free. Do not remove
the cap and do not add fluid.
The non-hybrid vehicle has a
standard 12-volt battery under the
hood. SeeEngine Compartment
Overview0237.
Refer to the replacement number
shown on the original battery label
when a new 12-volt battery is
needed.
Hybrid Vehicle
The hybrid vehicle 12-volt battery is
in the trunk on the driver side.
Hybrid vehicles also have a high
voltage battery. Only a trained
service technician with the properknowledge and tools should inspect,
test, or replace the high voltage
battery. See your dealer if the high
voltage battery needs service. The
dealer has information on how to
recycle the high voltage battery.
The hybrid high voltage battery is
cooled with air drawn from the
vehicle interior. The cold air intake
for the battery is under the rear
seat. Do not block the area in front
of the cold air intake.
{Warning
Damage to the high voltage
battery or high voltage system
can create a risk of electric shock,
overheating, or fire.
If the vehicle is damaged from a
moderate to severe crash, flood,
fire, or other event, the vehicle
should be inspected as soon as
possible. Until the vehicle has
been inspected, store it outside at
least 15 m (50 ft) from any
(Continued)
Page 258 of 382
Chevrolet Malibu Owner Manual (GMNA-Localizing-U.S./Canada/Mexico-
12461813) - 2019 - crc - 12/11/18
258 Vehicle Care
Warning (Continued)
structure or anything that can
burn. Ventilate the vehicle by
opening a window or a door.
Contact Customer Assistance as
soon as possible to determine
whether an inspection is needed.
SeeCustomer Assistance Offices
0348.
Stop/Start System
If equipped with the 1.5L L4 engine,
the vehicle has a Stop/Start system
to shut off the engine to help
conserve fuel. SeeStop/Start
System0179.
Vehicles with a 1.5L engine have an
Absorbed Glass Mat (AGM) 12-volt
battery. Installation of a standard
12-volt battery will result in reduced
12-volt battery life.
When using a 12-volt battery
charger on the 12-volt AGM battery,
some chargers have an AGM
battery setting on the charger.If available, use the AGM setting on
the charger, to limit charge voltage
to 14.8 volts.
{Warning
WARNING:Battery posts,
terminals, and related
accessories contain lead and lead
compounds, chemicals known to
the State of California to cause
cancer and birth defects or other
reproductive harm. Batteries also
contain other chemicals known to
the State of California to cause
cancer.WASH HANDS AFTER
HANDLING.For more information
go to www.P65Warnings.ca.gov/
passenger-vehicle.
SeeCalifornia Proposition
65 Warning0234and the back
cover.
Vehicle Storage
{Warning
Batteries have acid that can burn
you and gas that can explode.
You can be badly hurt if you are
not careful. SeeJump Starting -
North America0312for tips on
working around a battery without
getting hurt.
Infrequent Usage: Remove the
12-volt battery black, negative (−)
cable from the battery to keep the
battery from running down.
Extended Storage: Remove the
12-volt battery black, negative (−)
cable from the battery or use a
battery trickle charger.
Remember to reconnect the battery
when ready to drive the vehicle.
Page 259 of 382
Chevrolet Malibu Owner Manual (GMNA-Localizing-U.S./Canada/Mexico-
12461813) - 2019 - crc - 12/11/18
Vehicle Care 259
Negative Battery Cable
Disconnection
{Warning
Before disconnecting the negative
battery cable, turn off all features,
turn the ignition off, and remove
the key, if equipped, from the
vehicle. If this is not done, you or
others could be injured, and the
vehicle could be damaged.
Caution
If the battery is disconnected with
the ignition on or the vehicle in
Retained Accessory Power
(RAP), the OnStar back-up
battery will be permanently
discharged and will need to be
replaced.
1. Make sure the lamps, features,
and accessories are turned off.
2. Turn the ignition off and
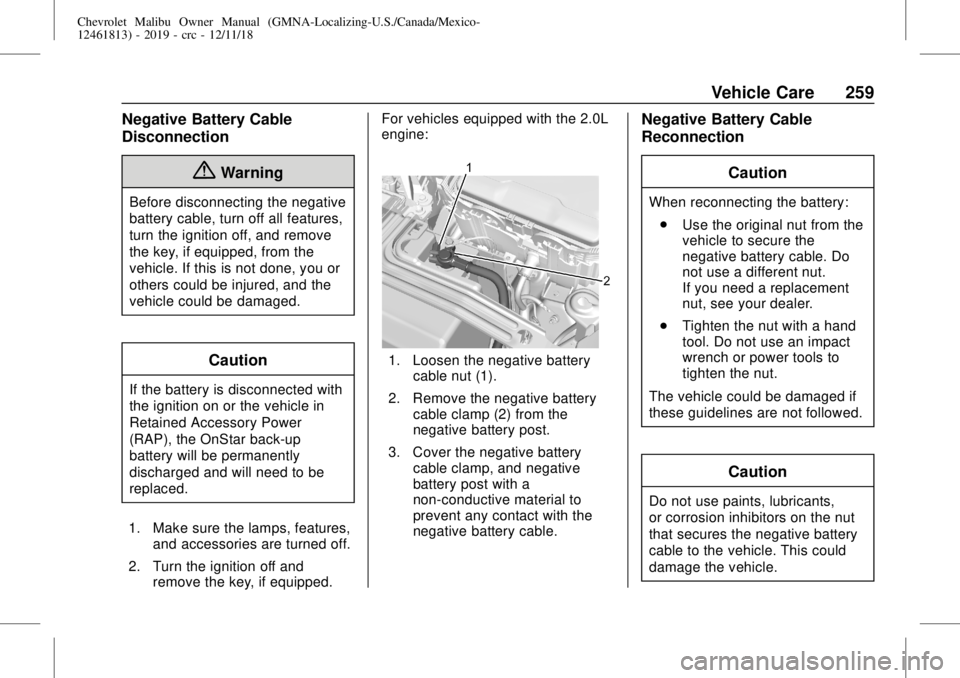
remove the key, if equipped.For vehicles equipped with the 2.0L
engine:
1. Loosen the negative battery
cable nut (1).
2. Remove the negative battery
cable clamp (2) from the
negative battery post.
3. Cover the negative battery
cable clamp, and negative
battery post with a
non-conductive material to
prevent any contact with the
negative battery cable.
Negative Battery Cable
Reconnection
Caution
When reconnecting the battery:
.
Use the original nut from the
vehicle to secure the
negative battery cable. Do
not use a different nut.
If you need a replacement
nut, see your dealer.
.
Tighten the nut with a hand
tool. Do not use an impact
wrench or power tools to
tighten the nut.
The vehicle could be damaged if
these guidelines are not followed.
Caution
Do not use paints, lubricants,
or corrosion inhibitors on the nut
that secures the negative battery
cable to the vehicle. This could
damage the vehicle.
Page 260 of 382
Chevrolet Malibu Owner Manual (GMNA-Localizing-U.S./Canada/Mexico-
12461813) - 2019 - crc - 12/11/18
260 Vehicle Care
For vehicles equipped with the 2.0L
engine:
1. Install the negative battery
cable clamp to the negative
battery post.
2. Tighten the negative battery
cable nut.
3. Turn the ignition on.
Starter Switch Check
{Warning
When you are doing this
inspection, the vehicle could
move suddenly. If the vehicle
moves, you or others could be
injured.
1. Before starting this check, be
sure there is enough room
around the vehicle.
2. Apply both the parking brake
and the regular brake.Do not use the accelerator
pedal, and be ready to turn off
the engine immediately if it
starts.
3. Try to start the engine in each
gear. The vehicle should start
only in P (Park) or N (Neutral).
If the vehicle starts in any other
position, contact your dealer for
service.
Automatic Transmission
Shift Lock Control
Function Check
{Warning
When you are doing this
inspection, the vehicle could
move suddenly. If the vehicle
moves, you or others could be
injured.
1. Before starting this check, be
sure there is enough room
around the vehicle. It should be
parked on a level surface.2. Apply the parking brake. Be
ready to apply the regular
brake immediately if the vehicle
begins to move.
3. With the engine off, turn the
ignition on, but do not start the
engine. Without applying the
regular brake, try to move the
shift lever out of P (Park) with
normal effort. If the shift lever
moves out of P (Park), contact
your dealer for service.
Park Brake and P (Park)
Mechanism Check
{Warning
When you are doing this check,
the vehicle could begin to move.
You or others could be injured
and property could be damaged.
Make sure there is room in front
of the vehicle in case it begins to
roll. Be ready to apply the regular
brake at once should the vehicle
begin to move.
Page 271 of 382
Chevrolet Malibu Owner Manual (GMNA-Localizing-U.S./Canada/Mexico-
12461813) - 2019 - crc - 12/11/18
Vehicle Care 271
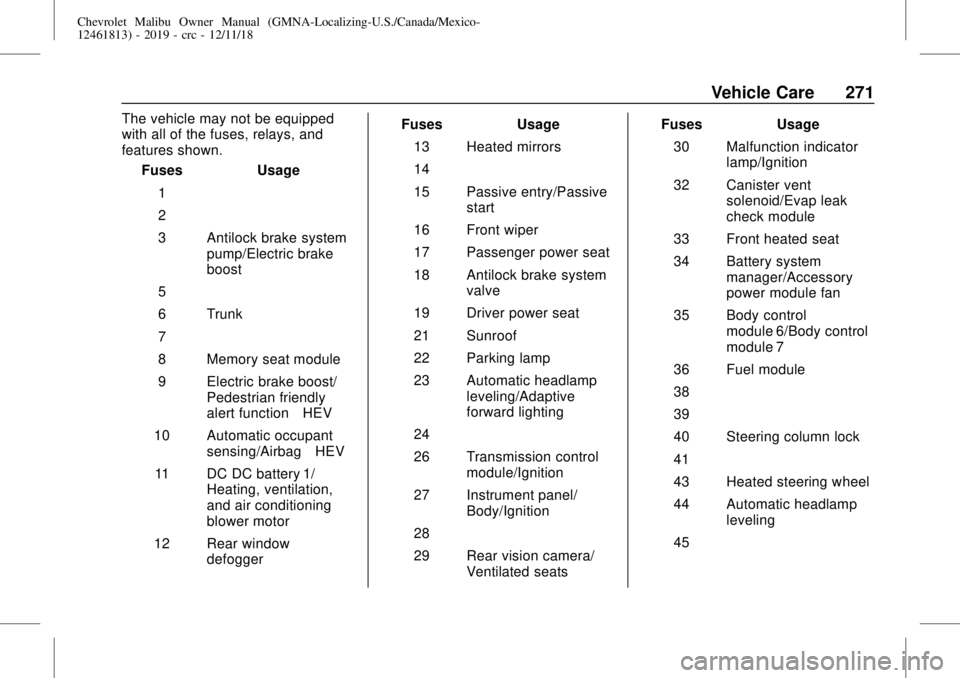
The vehicle may not be equipped
with all of the fuses, relays, and
features shown.
Fuses Usage
1–
2–
3 Antilock brake system
pump/Electric brake
boost
5–
6 Trunk
7–
8 Memory seat module
9 Electric brake boost/
Pedestrian friendly
alert function–HEV
10 Automatic occupant
sensing/Airbag–HEV
11 DC DC battery 1/
Heating, ventilation,
and air conditioning
blower motor
12 Rear window
defoggerFuses Usage
13 Heated mirrors
14–
15 Passive entry/Passive
start
16 Front wiper
17 Passenger power seat
18 Antilock brake system
valve
19 Driver power seat
21 Sunroof
22 Parking lamp
23 Automatic headlamp
leveling/Adaptive
forward lighting
24–
26 Transmission control
module/Ignition
27 Instrument panel/
Body/Ignition
28–
29 Rear vision camera/
Ventilated seatsFuses Usage
30 Malfunction indicator
lamp/Ignition
32 Canister vent
solenoid/Evap leak
check module
33 Front heated seat
34 Battery system
manager/Accessory
power module fan
35 Body control
module 6/Body control
module 7
36 Fuel module
38–
39–
40 Steering column lock
41–
43 Heated steering wheel
44 Automatic headlamp
leveling
45–
Page 272 of 382
Chevrolet Malibu Owner Manual (GMNA-Localizing-U.S./Canada/Mexico-
12461813) - 2019 - crc - 12/11/18
272 Vehicle Care
Fuses Usage
46 Engine control
module/Ignition
47–
48 Electric brake
boost–HEV/
Cooling fan
49 DC DC battery 2
50–
51–
52–
53–
54–
55–
56 Starter motor
57 Diesel exhaust fluid
heater
58–
59 High-beam
headlamps
60 Cooling fan
61–Fuses Usage
62–
63–
65 Air conditioning–HEV
67–
68–
69–
70–
72 Starter pinion
74–
75 Engine control
module main
76 Engine control module
sense
78 Horn
79 Washer pump
81 Transmission control
module/Engine control
module
82–
83 Ignition coil
84 Powertrain on engineFuses Usage
85 Shunt
86 Shunt
87–
88 Aeroshutter
89–
91–
92 Traction power
inverter module/Motor
generator unit
pump–HEV/
Transmission oil
pump–non HEV
93 Automatic headlamp
leveling
95–
96–
97–
99 Coolant pump
Relays Usage
4–
Page 274 of 382
Chevrolet Malibu Owner Manual (GMNA-Localizing-U.S./Canada/Mexico-
12461813) - 2019 - crc - 12/11/18
274 Vehicle Care
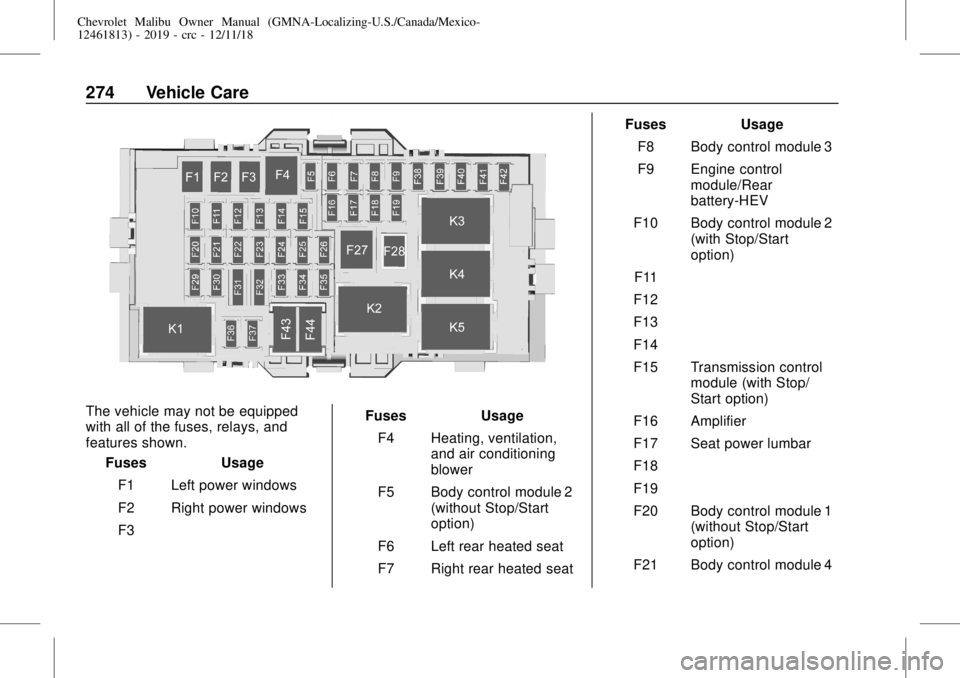
The vehicle may not be equipped
with all of the fuses, relays, and
features shown.
Fuses Usage
F1 Left power windows
F2 Right power windows
F3–Fuses Usage
F4 Heating, ventilation,
and air conditioning
blower
F5 Body control module 2
(without Stop/Start
option)
F6 Left rear heated seat
F7 Right rear heated seatFuses Usage
F8 Body control module 3
F9 Engine control
module/Rear
battery-HEV
F10 Body control module 2
(with Stop/Start
option)
F11–
F12–
F13–
F14–
F15 Transmission control
module (with Stop/
Start option)
F16 Amplifier
F17 Seat power lumbar
F18–
F19–
F20 Body control module 1
(without Stop/Start
option)
F21 Body control module 4