engine CHEVROLET MONTE CARLO 1973 2.G User Guide
[x] Cancel search | Manufacturer: CHEVROLET, Model Year: 1973, Model line: MONTE CARLO, Model: CHEVROLET MONTE CARLO 1973 2.GPages: 86, PDF Size: 33.46 MB
Page 11 of 86
Downloaded from www.Manualslib.com manuals search engine • To fasten the shoulder belt, un
stow it and place the knob on
the shoulder belt end in the
keyhole on the lap belt latch
plate. (The latch
is designed so
that this attachment can only be
completed before fastening the
lap belt.) Tilt the knob as neces
sary, to pass
it through the slot.
Pull the knob firmly upward to
seat it at the narrow end of the
keyhole, then fasten the lap belt.
• Shoulder belts are lengthened
and shortened in the same man
ner
as center seat lap belts.
• Shoulder belt should have suf
ficient slack to insert a fist's
width between your chest and
the belt. This can be checked
by inserting a clenched
fist be
tween the belt and your chest
with thumb against chest and
back of hand facing upward.
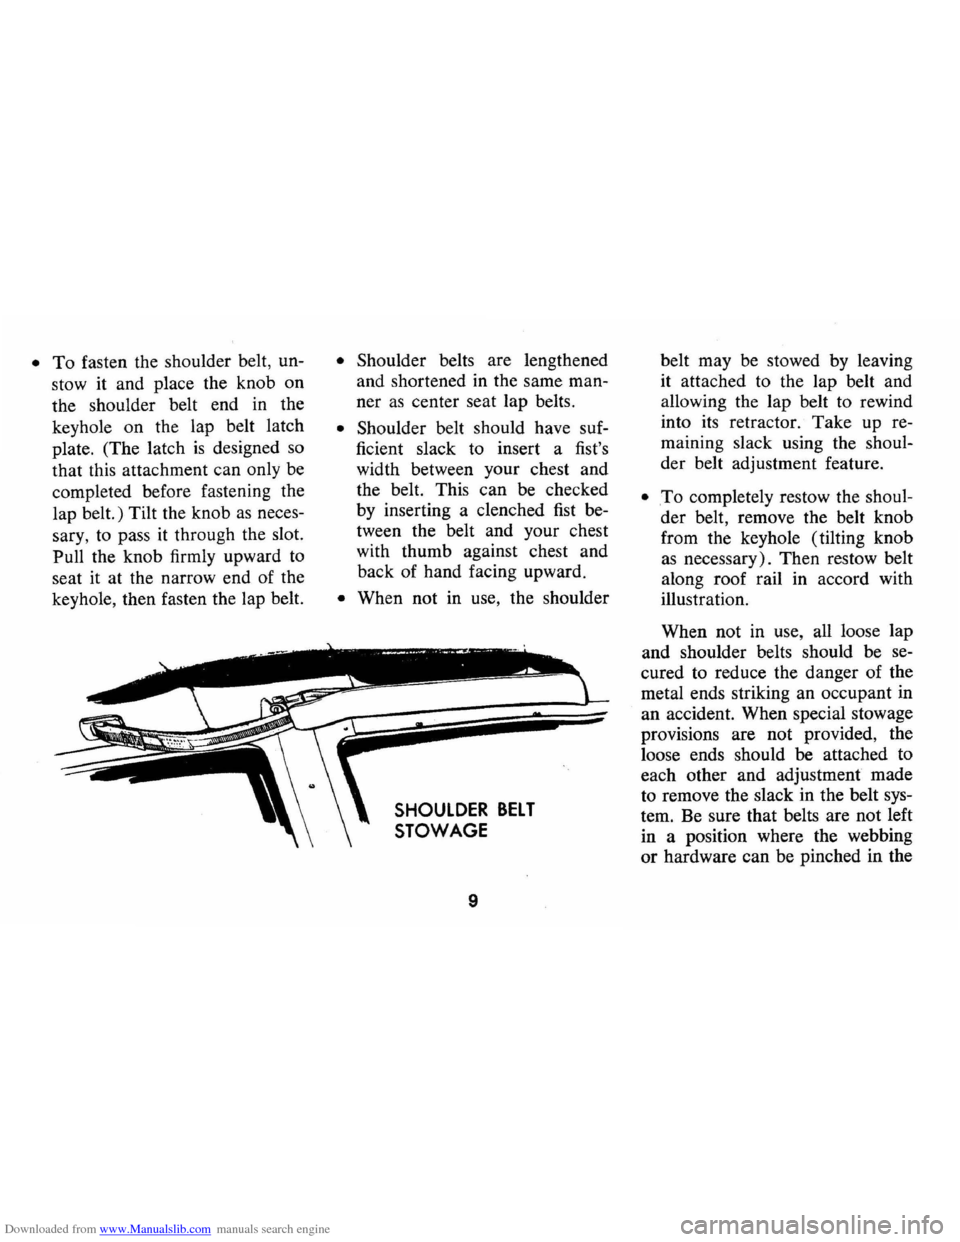
• When not in use, the shoulder
SHOULDER BELT
STOWAGE
9
belt may be stowed by leaving
it attached to the lap belt and
allowing the lap belt to rewind
into its retractor.
Take up re
maining slack using the shoul
der belt adjustment feature.
• .To completely restow the shoul
der belt, remove the belt knob
from the keyhole (tilting knob
as necessary). Then restow belt
along roof rail in accord with
illustration.
When not in use, all loose lap
and shoulder belts should be se
cured to reduce the danger of the
metal ends striking an occupant in
an accident. When special stowage
provisions are not provided, the
loose ends should be attached to
each other and adjustment made
to remove the slack in the belt sys
tem. Be sure that belts are not left
in a position where the webbing
or hardware can be pinched in the
Page 12 of 86
Downloaded from www.Manualslib.com manuals search engine seat structure or door, and thus
become damaged.
Seat Belt Inspection
• Periodically inspect belts, buck
les, retractors , and anchors for
damage that could lessen the
effectiveness of the restraint
system.
• Keep sharp edges and damaging
objects away from belts.
• Replace belts if cut, weakened,
frayed ,
or subjected to collision
loads.
• Check that anchor mounting
bolts are tight.
• Have questionable parts re
placed.
• Keep seat belts clean and dry.
• Clean only with mild soap solu
tion
and lukewarm water.
• Do not bleach or dye belts since
this may severely weaken belts.
Head Restraints
• Head restraints are designed to
help reduce injuries due to
"whiplash ."
• Select
one of the three positions
-full up, intermediate , or full
down-which places the top of
the head restraint closest to the
top of your ears.
• Do not use head restraint above
the full up
"detent" position.
• Head restraint can be raised by
pulling up until you feel it click
into the
"detent" at the inter
mediate position.
• To raise further, or to lower,
release latch at base of support
ing rod and push up
or down on
restraint.
• Do not operate vehicle with head
restraints removed, since occu
pants lose the protection pro
vided.
10
Child Restraint
Children in automobiles should
be restrained to lessen the risk of
injury in accidents, sudden stops
or other hazardous situations. Gen
eral motors dealers offer restraint
systems designed specifically for
use with infants.
In using any in
fant
or child restraint system, read
. and comply with all installation
'and usage instructions.
All unused seat belts near the
child should be stowed properly
to help prevent them from striking
him in the event of an accident.
Lap belts and shoulder belts with
out stowage provisions should
have buckles latched and belts
adjusted to remove slack.
Cars Not Equipped With
Special Child Restraints
If a child is traveling in a ve
hicle not equipped with a General
Motors infant restraint
or other
Page 13 of 86
Downloaded from www.Manualslib.com manuals search engine safe infant or child restraint sys
tem, the following precautions
should be taken:
1. Infants unable to sit up by them
selves should be restrained by
placing them in a covered,
padded bassinet which is placed
crossways in the vehicle (width
wise) on the rear seat. The
bassinet should be securely
restrained with the regular
ve
hicle seat belts. An alternate
method
is to position the bas
sinet so that it rests against the
front seat, again crossways in
Trailer Hauling
Since passenger cars are de
signed and intended to be used pri
marily as passenger conveyances,
towing a trailer will affect handling,
durability
and economy. Maximum
safety and satisfaction depends the
vehicle.
2. Children able to sit up by them
selves should be placed on a
seat and lap belted, preferably
in the rear seat. Never allow a
child to stand
or kneel on any
seat.
If the child cannot see out
the car windows he should sit
on a firm cushion with the regu
lar lap belt restraining him at
the hips. The cushion should be
as firm as practical and just high
enough to enable the child to
look horizontally out of the car
windows. The use of the cush-
upon proper use of correct equip
ment and avoiding overloads and
other abusive operation.
The maximum loaded trailer
weight which you can pull with
your Monte Carlo depends on what
special equipment has been in
stalled on your car. Chevrolet does
11
ion should be discontinued as
soon as the child is old enough
to see out of the car windows
without it.
3. General Motors recommends
that children be restrained prop
erly when riding. However, if
unusual conditions prohibit use
of restraints and require that a
child must stand, he should
stand on the floor directly be
hind the front seat. This will
help minimize the possibility of
injury from frontal impacts
III
the event of an accident.
not recommend towing any trailer
unless the car
is properly equipped.
Information on trailer hauling
capabilities, special equipment re
quired, and optional equipment
offered by Chevrolet
is available
from your Chevrolet Dealer
or by
writing Chevrolet Motor Division,
Page 14 of 86
Downloaded from www.Manualslib.com manuals search engine Detroit, Michigan 48202 (or in
Canada by writing to General
Moto rs of Canada Limited,
Owner
Relations Department , Oshawa,
Ontario) .
To assist in attaining good han
dling of the car-trailer combina
tion, it
is important that the trailer
tongue load be maintained at ap
proximately
10% of the loaded
trailer weight. Tongue loads can be
adjusted by proper distribution of
the load in the trailer, and can be
checked by weighing separately the
loaded trailer and then the tongue.
When towing trailers, tires
should be inflated to the highest inflation
pressures shown on the
placard affixed to the left front
door . The allowable passenger and
cargo load, also shown on the same
placard ,
is reduced by an amount
equal to
the trailer tongue load on
the trailer hitch.
Maintenance
More frequent vehicle mainte
nance
is required when using your
car to pull a trailer. Change the:
• Automatic transmission fluid
each
12 ,000 miles ,
• Rear axle fluid each 12,000
miles,
• Engine oil each 60 days or 3,000
12
miles , whichever occurs first.
• Positive crankcase ventilation
valve each 12 months or
12,000
miles, whichever occurs first.
Break-in Schedule
In addition to the new ca r
break-in instructions in this man
ual, it
is recommended that your
new Monte Carlo be operated for
500 miles before trailer towing. If
it is necessary to tow during this
period , avoid speeds over
50 MPH
and full throttle starts. The same
precautions should be observed
whenever a new engine, transmis
sion or axle
is installed in your car.
Page 15 of 86
Downloaded from www.Manualslib.com manuals search engine •
Operation in Foreign Countries
Your Monte Carlo is designed
to operate on fuel of approximately
91 research octane number or
higher, sold in the United States
and Canada.
If you plan to operate your
Monte Carlo outside the continen
tal limits of the United States
or
Canada, there is a possibility that
the best fuels available in some
countries are so low in anti-knock
quality that excessive knocking and
serious engine damage may result
from their use. To minimize this
possibility, write to Chevrolet Divi-sion,
Service Department, Detroit,
Michigan 48202,
(or in Canada
write to General Motors of Can
ada Limited,
Owner Relations De
partment, Oshawa, Ontario),
giving:
• The vehicle identification num
ber ( on plate
on instrument
panel ahead of the steering
wheel and visible through the
windshield, or from registration
slip
or title).
• The country or countries in
which you plan to traveL
You will be furnished informa-
13
tion on the quality of fuels avail
able in the countries in which you
plan to traveL
It is recommended
that you not operate your Monte
Carlo in any country not having
fuels meeting the requirements of
your Chevrolet engine. Engine
modifications are not available to
compensate for low anti-knock
quality fuels. Operation of your car
under conditions of continuous
or
excessive knocking constitutes mis
use of the engine for which the
Chevrolet Division
is not responsi
ble under the terms of the Chev
rolet New Vehicle Warranty.
Page 16 of 86
Downloaded from www.Manualslib.com manuals search engine STARTING AND OPERATING
Engine Exhaust Gas Caution (Carbon Monoxide)
Allold inhaling exhaust gases because
they contain carbon monoxide, which by
Itsell is colorless and odorless. Carbon
monoxide is a dangerous gas that can cause unconsciousness and is potentially
lethal.
II at any time you suspect that exhaust fumes are entering the passenger compartment, have the cause determined and corrected as soon as possible. II you must
drive under these conditions, drive only
with
all windows fully open.
The best protection against carbon
monoxide entry into the car body is a properly
maintained exhaust system, car body and body ventilation system. It is recommended that the exhaust system and body
be inspected by a competent mechanic:
• Each time the IIehicie is raised for oil change. > •
Wheneller a change
is noticed In the
sound of the exhaust system.
• Wheneller the exhaust system, under
body or rear of the vehicle is damaged.
See your Maintenance Schedule folder
for inspection procedure.
To allow proper operation of the car's
IIentilation system, keep front ventilation
inlet
grille clear of snow, leaves or other obstruction at all times.
SITTING IN A PARKED CAR WITH
ENGINE RUNNING FOR AN EXTENDED PERIOD IS NOT RECOMMENDED.
Do
not run engine in confined areas such as garages any more than needed to mOlle IIehicle In or out of area. When IIehlcle is stopped In an UNCONFINED area with the engine running for any more than a short period, adJust heating or cooling system to force outside air Into car as follows:
14
1. On cars not equipped with air condi
tioning, set fan to medium or high
speed and upper control leller to any
position except OFF.
2. On cars equipped with manual air conditioning, set fan to medium or high speed, upper control lever to any
position except OFF, and lower control lever to any position except extreme left COLD.
The trunk lid should be closed while
drilling to help prellent inadllertently drawIng exhaust gases Into the car. If Is unwise to drive at high speeds for long durations
with the trunk lid open. Howeller, If lor some reason the trunk must remain open lor a period while mOiling, or electrical wiring or other cable connections to a trailer must pass through the seal between
trunk lid and body, the lol/owlng precau
tions should be observed:
• Close all windows.
• Ad/ust heating or cooling system to
force outside air into car as described In items 1 and 2 abolle but with Ian set at high speed.
• On cars equipped with outside aIr IIents In or under Instrument panel, open IIents lully.
Page 17 of 86
Downloaded from www.Manualslib.com manuals search engine STEERING COLUMN CONTROLS
Anti-Theft Steering
Column Lock
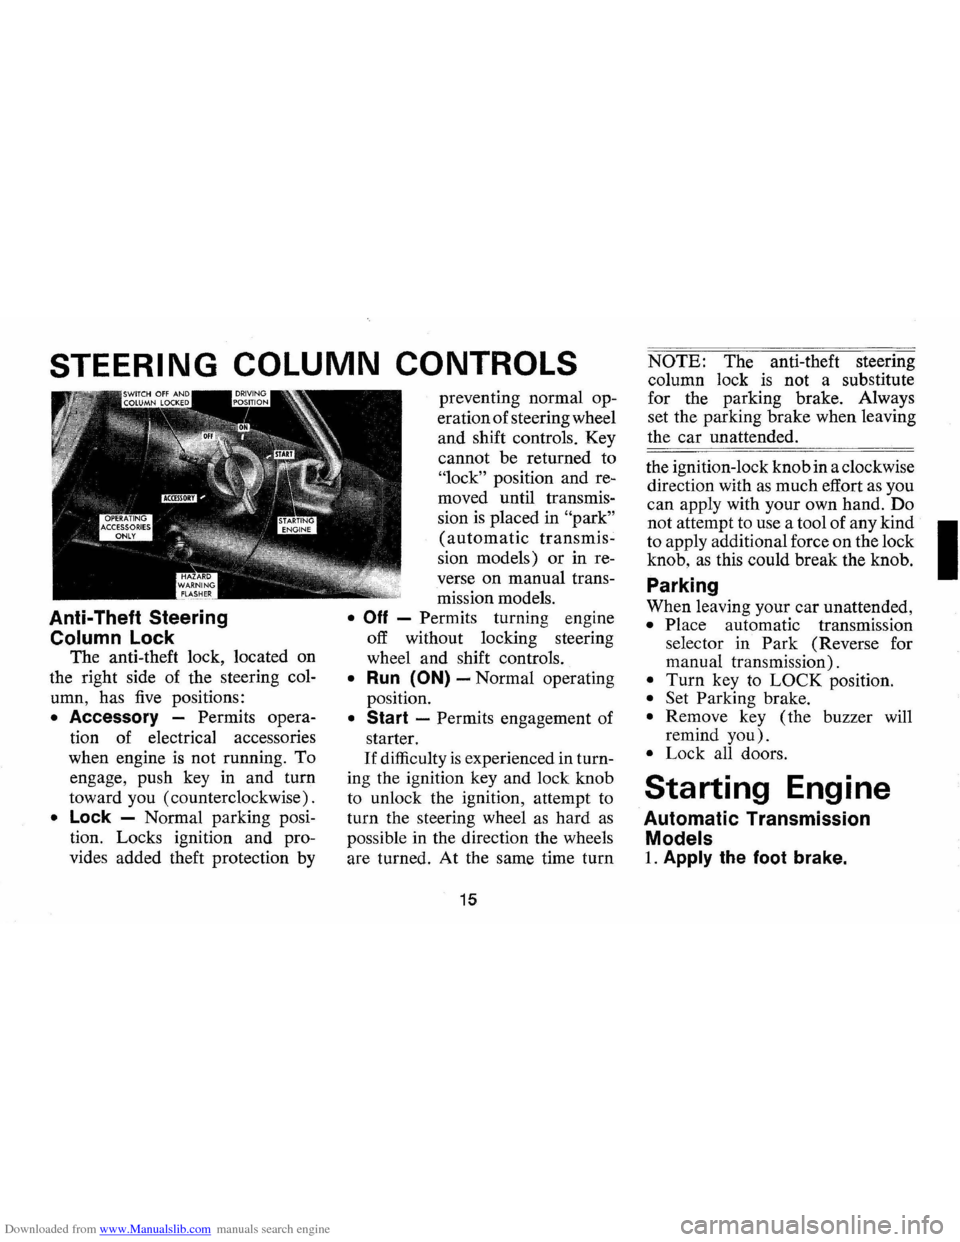
The anti-theft lock, located on
the right side of the steering col
umn, has
five positions:
• Accessory -Permits opera
tion of electrical accessories
when engine
is not running. To
engage, push key in and turn
toward you (counterclockwise).
• Lock -Normal parking posi
tion. Locks ignition and pro
vides added theft protection by preventing
normal op
eration of steering wheel
and shift controls. Key
cannot be returned to
"lock" position and re
moved until transmis
sion
is placed in "park"
(automatic transmis
sion models) or in re
verse
on manual trans
mission models.
• Off - Permits turning engine
off without locking steering
wheel and shift controls.
• Run (ON) -Normal operating
position.
• Start -Permits engagement of
starter.
If difficulty is experienced in turn
ing the ignition key and lock knob
to unlock the ignition, attempt to
turn the steering wheel
as hard as
possible in the direction the wheels
are turned.
At the same time turn
15
NOTE: The anti-theft steering
column lock
is not a substitute
for the parking brake. Always
set the parking brake when leaving
the car unattended.
the ignition-lock knob in a clockwise
direction with
as much effort as you
can apply with your own hand.
Do
not attempt to use a tool of any kind I
to apply additional force on the lock
knob,
as this could break the knob.
Parking
When leaving your car unattended,
• Place automatic transmission
selector in
Park (Reverse for
manual transmission).
• Turn key to LOCK position.
• Set Parking brake.
• Remove key ( the buzzer will
remind
you).
• Lock all doors.
Starting Engine
Automatic Transmission
Models
1. Apply the foot brake.
Page 18 of 86
Downloaded from www.Manualslib.com manuals search engine 2. Place transmission selector
in uP" or uN" (UP" preferred).
A starter safety switch prevents
starter operation while the trans
mission selector
is in any drive
position.
(If it is necessary to
re-start the engine with the car
moving, place the selector lever
in
"N".)
3. Depress accelerator pedal and
activate starter
as outlined be
low for different conditions.
• Cold Engine -Fully de
press
accelerator pedal and
slowly release.
With foot off
the pedal, crank the engine
by turning the ignition key
to the Start position-release
when engine starts.
If engine starts, but fails to
run, repeat this procedure.
When engine is running
smoothly (approximately 30
seconds), the idle speed may
be reduced by slightly de- pressing
the accelerator pedal
and then slowly releasing.
• Warm Engine -Depress ac
celerator
pedal about halfway
and hold while cranking the
engine.
• Extremely Cold Weather
(Below 0° F.) Or After Car
Has Been Standing
Idle
Several
Oays-
Fully depress and release
accelerator pedal two or three
times before cranking the
engine.
With foot off the ac
celerator pedal,
crank the
engine by turning the key to
the Start position and release
when engine starts.
Manual Transmission Models
1. Apply parking brake and shift
16
transmission to neutral.
2.
Hold clutch pedal to floor
throughout the starting proce
dure.
A starter interlock pre
vents starter operation when
clutch
is not fully depressed.
(Select the proper gear position
before releasing the clutch pedal.)
3. Operate accelerator pedal and
starter
as outlined in step 3
(under Automatic Transmission
Models).
Engine Flooded
Depress accelerator pedal aJ;ld
hold to floor while starting until
engine
is cleared of excess fuel
and
is running smoothly. Never
"pump" the accelerator pedal.
Warm-Up
Always let the engine idle for
20 to 30 seconds after starting
and drive at moderate speeds for
several miles, especially during
cold weather.
Page 19 of 86
Downloaded from www.Manualslib.com manuals search engine Driving with the Chevrolet Automatic Transmissions
The Turbo Hydra-matic 350
and 400 are completely automatic
transmissions which replace the
standard clutch and transmission.
After starting the engine with the
selector lever in N (Neutral) or
P (Park) position, select the range
desired (see table) and depress
the accelerator. A gradual start
with a steady increase in accelera
tor pressure will result in best pos
sible fuel economy. Rapid acceler
ation for fast starts will result
in
greater fuel consumption.
Automatic transmission shift
quadrants of
all GM cars continue
the uniform sequence of selector
positions. This particularly bene
fits multicar families and those who
occasionally drive other cars.
Shift indicators are arranged with
"Park" position at one end, fol
lowed
in sequence by "Reverse",
"Neutral"
and the forward driv
ing ranges. All automatic trans
missions are equipped with a
starter safety switch designed to
permit starting the engine only
when the transmission selector
is
in the "Park" or "Neutral" posi
tion. For additional engine brak
ing effect,
as sometimes needed in
mountainous driving, place the
transmission in an intermediate
or
low range.
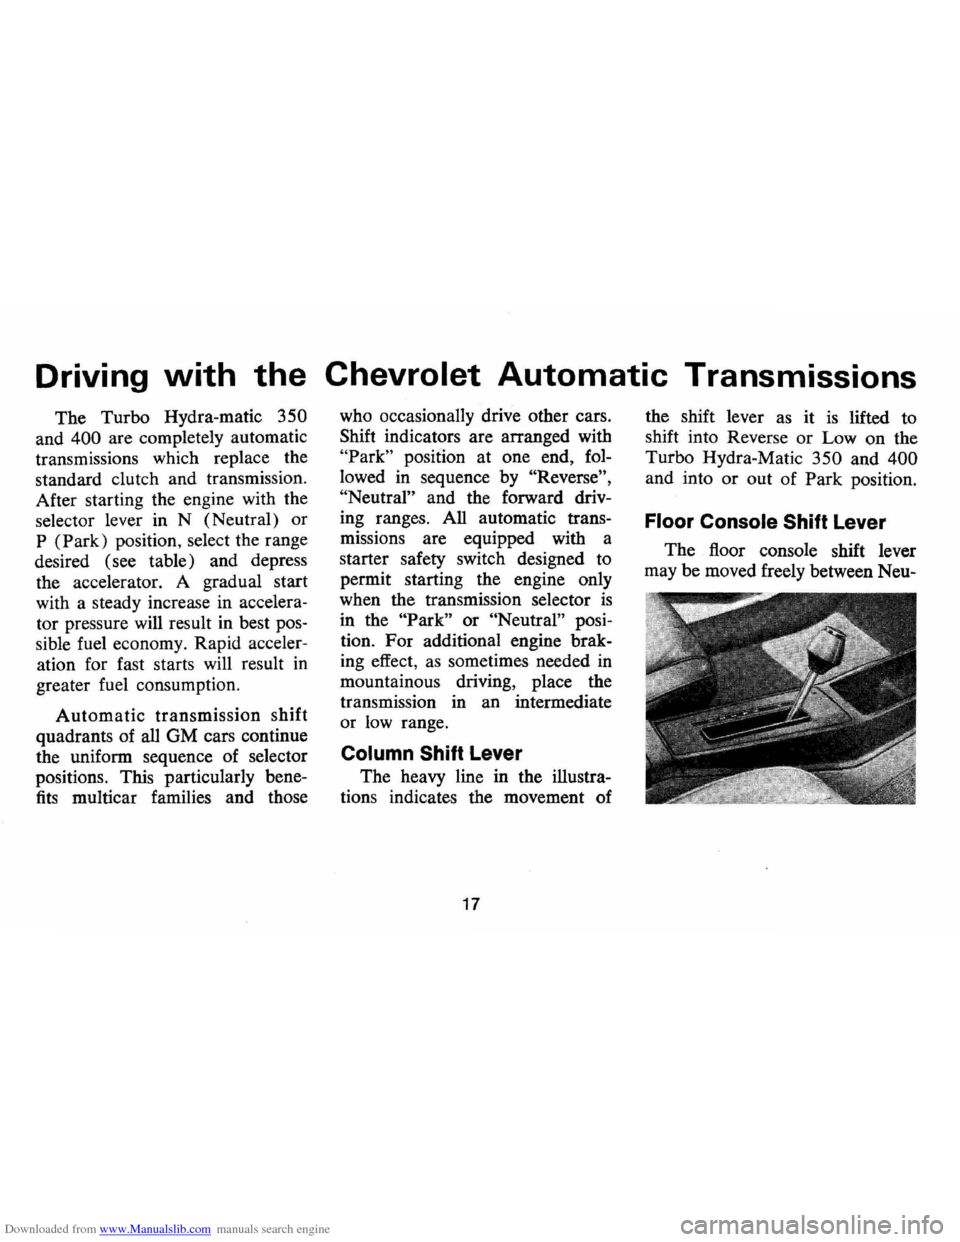
Column Shift Lever
The heavy line in the illustra
tions indicates the movement of
17
the shift lever as it is lifted to
shift into Reverse
or Low on the
Turbo Hydra-Matic
350 and 400
and into or out of Park position.
Floor Console Shift Lever
The floor console shift lever
may be moved freely between Neu-
Page 20 of 86
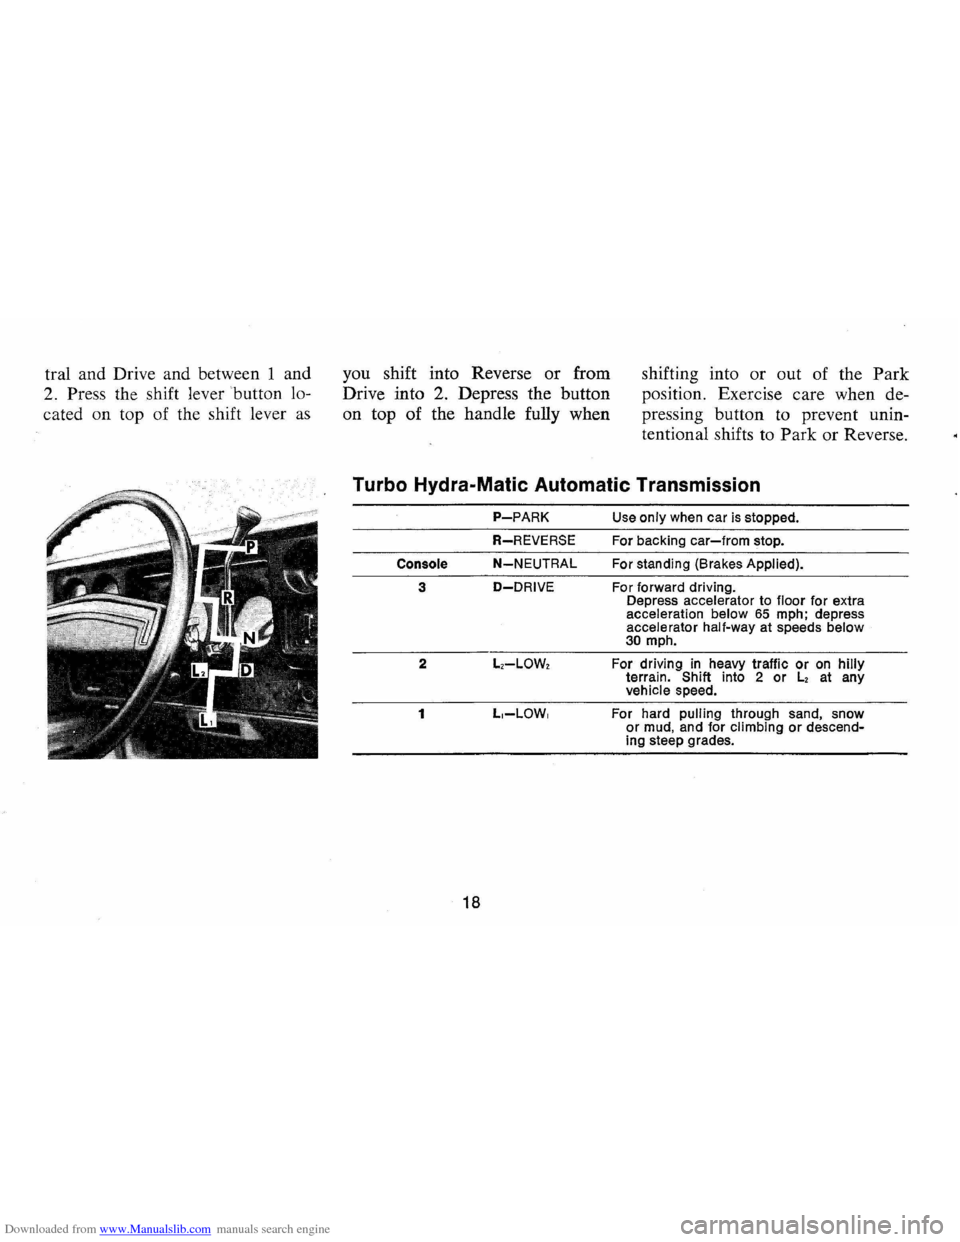
Downloaded from www.Manualslib.com manuals search engine tral and Drive and between 1 and
2. Press the shift lever button lo
cated on top of the shift lever
as
you shift into Reverse or from
Drive into 2. Depress the button
on top of the handle fully when shifting
into or out of the Park
position. Exercise care when de
pressing button to prevent unin
tentional shifts to
Park or Reverse.
Turbo Hydra-Matic Automatic Transmission
P-PARK
R-REVERSE
Console N-NEUTRAL
3 O-DRIVE
2 L,-LOW,
1 L,-LOW,
18
Use only when car is stopped.
For backing
car-from stop.
For standing (Brakes
Applied).
For forward driving.
Depress accelerator to floor for extra
acceleration below
65 mph; depress
accelerator half-way at speeds below
30 mph.
For driving
in heavy traffic or on hilly terrain. Shift into 2 or L, at any
vehicle speed.
For hard pulling through sand, snow
or mud, and for climbing or descend
ing steep grades.