buttons CHEVROLET MONTE CARLO 2004 User Guide
[x] Cancel search | Manufacturer: CHEVROLET, Model Year: 2004, Model line: MONTE CARLO, Model: CHEVROLET MONTE CARLO 2004Pages: 416, PDF Size: 4.56 MB
Page 111 of 416
3. Scroll, using the 1 PREV or 2 NEXT buttons,
through the modes to change the current mode.
4. With your preference displayed, press the TUNE
DISP button to select. A chime will be heard to
verify the new setting. The new selection will
be displayed with an asterisk (*) for one second.
If your vehicle has the optional content theft-deterrent
system, the �rst time a remote UNLOCK command
is received, three �ashes will be seen and three horn
chirps heard to indicate an alarm condition has occurred
since last arming. SeeContent Theft-Deterrent on
page 2-15.
The mode you selected is now set. You can either exit
the programming mode by following the instructions
later in this section or program the next feature available
on your vehicle.
ALARM (Content Theft Operation)
This feature allows the content theft-deterrent system to
be turned on or off.
Programmable Modes
Mode 1:ALRM OFF
Mode 2:ALRM ONBefore your vehicle was shipped from the factory, it was
programmed to Mode 2. The mode to which your
vehicle was programmed may have been changed since
it left the factory. To determine the mode to which
your vehicle is programmed or to program your vehicle
to a different mode, do the following:
1. Scroll, using the SEEK PSCAN up or down arrows,
until ALARM appears on the display.
2. Press the 1 PREV or 2 NEXT button to enter the
submenu. The current selection will have an
asterisk (*) next to it. If you do not wish to change
the current mode, you can either exit the
programming mode by following the directions later
in this section or program the next feature
available on your vehicle.
3. Scroll, using the 1 PREV or 2 NEXT buttons,
through the modes to change the current mode.
4. With your preference displayed, press the TUNE
DISP button to select. A chime will be heard to
verify the new setting. The new selection will
be displayed with an asterisk (*) for one second.
The mode you selected is now set. You can either exit
the programming mode by following the instructions
later in this section or program the next feature available
on your vehicle.
2-47
Page 112 of 416
TRNKJAMB (Trunk Jamb)
This feature allows the content theft system trunk lock
sensor to be disabled or enabled.
Programmable Modes
Mode 1:TRNK OFF
Mode 2:TRNK ON
Your vehicle was originally programmed to Mode 2. The
mode may have been changed since then. To determine
the current mode, or to change the mode, do the
following:
1. Scroll, using the SEEK PSCAN up or down arrows,
until TRNKJAMB appears on the display.
2. Press the 1 PREV or 2 NEXT button to enter the
submenu. The current selection will have an
asterisk (*) next to it. If you do not wish to change
the current mode, you can either exit the
programming mode by following the directions later
in this section or program the next feature
available on your vehicle.3. Scroll, using the 1 PREV or 2 NEXT buttons,
through the modes to change the current mode.
4. With your preference displayed, press the TUNE
DISP button to select. A chime will be heard to
verify the new setting. The new selection will
be displayed with an asterisk (*) for one second.
The mode you selected is now set. You can either exit
the programming mode by following the instructions
later in this section or program the next feature available
on your vehicle.
CHIRP (Horn Chirp Timer)
This feature allows you to choose between short or long
horn chirp sounds when the remote keyless entry
transmitter is used.
Programmable Modes
Mode 1:SHORT
Mode 2:LONG
2-48
Page 113 of 416
Your vehicle was originally programmed to Mode 1. The
mode may have been changed since then. To determine
the current mode, or to change the mode, do the
following:
1. Scroll, using the SEEK PSCAN up or down arrows,
until CHIRP appears on the display.
2. Press the 1 PREV or 2 NEXT button to enter the
submenu. The current selection will have an
asterisk (*) next to it. If you do not wish to change
the current mode, you can either exit the
programming mode by following the directions later
in this section or program the next feature
available on your vehicle.
3. Scroll, using the 1 PREV or 2 NEXT buttons,
through the modes to change the current mode.
4. With your preference displayed, press the TUNE
DISP button to select. A chime will be heard to
verify the new setting. The new selection will
be displayed with an asterisk (*) for one second.
The mode you selected is now set. You can either exit
the programming mode by following the instructions
later in this section or program the next feature available
on your vehicle.ORIG. SET (Return to the Original
Settings)
This feature allows you to return all customization
feature settings back to their original factory settings.
To reset do the following:
1. Scroll, using the SEEK PSCAN up or down arrows,
until ORIG. SET appears on the display.
2. Press the 1 PREV or 2 NEXT button to enter the
submenu. SET ALL will appear.
3. With your preference displayed, press the TUNE
DISP button to select. A chime will be heard to
verify the new setting. The new selection will
be displayed with an asterisk (*) for one second.
The original factory settings are now reset. You can
either exit the programming mode by following the
instructions later in this section or program the next
feature available on your vehicle.
2-49
Page 114 of 416
FOB PROG (Remote Keyless Entry
Transmitter Programming)
This feature allows you to match the remote keyless
entry transmitter to your vehicle. To match the
transmitter do the following:
1. Scroll, using the SEEK PSCAN up or down arrows,
until FOB PROG appears on the display.
2. Press the 1 PREV or 2 NEXT button to enter the
submenu. BEGIN will be displayed.
3. Press the TUNE DISP button to start programming.
When the message PUSH FOB �ashes, press and
hold the LOCK and UNLOCK buttons on the
�rst transmitter at the same time for 15 seconds.
A chime will be heard to verify the transmitter
is learned.
4. Repeat Step 3 for each additional transmitter.
The transmitter is programmed now. You can either exit
the programming mode by following the instructions
later in this section or program the next feature available
on your vehicle.
EXIT (Exit Feature
Customization Mode)
This feature allows you to exit the vehicle customization
programming. To exit do the following:
Scroll until EXIT appears on the display.
Press the TUNE DISP button to exit programming.
A chime will be heard to verify the exit.
2-50
Page 166 of 416
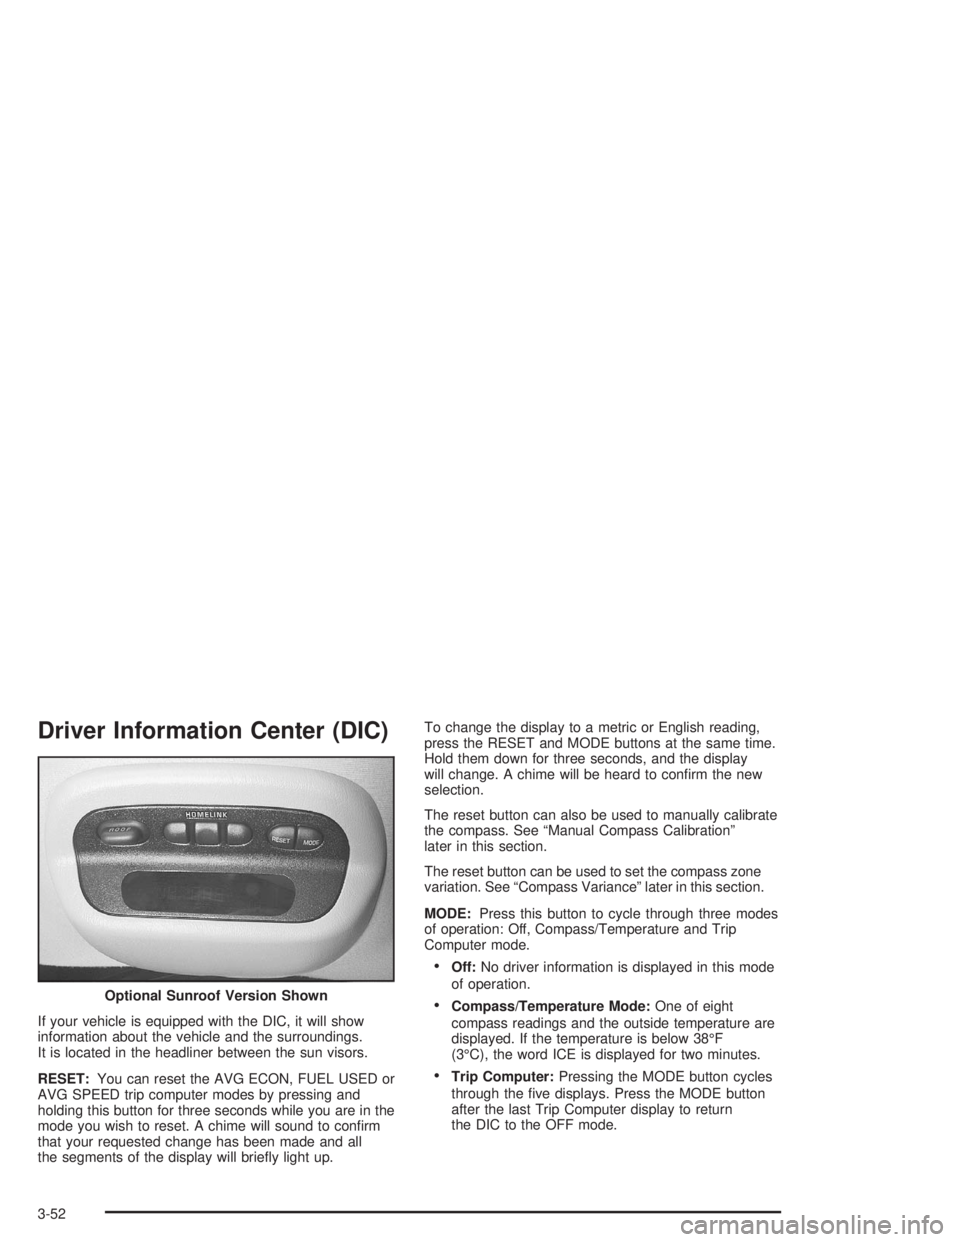
Driver Information Center (DIC)
If your vehicle is equipped with the DIC, it will show
information about the vehicle and the surroundings.
It is located in the headliner between the sun visors.
RESET:You can reset the AVG ECON, FUEL USED or
AVG SPEED trip computer modes by pressing and
holding this button for three seconds while you are in the
mode you wish to reset. A chime will sound to con�rm
that your requested change has been made and all
the segments of the display will brie�y light up.To change the display to a metric or English reading,
press the RESET and MODE buttons at the same time.
Hold them down for three seconds, and the display
will change. A chime will be heard to con�rm the new
selection.
The reset button can also be used to manually calibrate
the compass. See “Manual Compass Calibration”
later in this section.
The reset button can be used to set the compass zone
variation. See “Compass Variance” later in this section.
MODE:Press this button to cycle through three modes
of operation: Off, Compass/Temperature and Trip
Computer mode.
Off:No driver information is displayed in this mode
of operation.
Compass/Temperature Mode:One of eight
compass readings and the outside temperature are
displayed. If the temperature is below 38°F
(3°C), the word ICE is displayed for two minutes.
Trip Computer:Pressing the MODE button cycles
through the �ve displays. Press the MODE button
after the last Trip Computer display to return
the DIC to the OFF mode. Optional Sunroof Version Shown
3-52
Page 169 of 416
Audio System(s)
Notice:Before you add any sound equipment to
your vehicle – like a tape player, CB radio, mobile
telephone or two-way radio – be sure you can
add what you want. If you can, it’s very important to
do it properly. Added sound equipment may
interfere with the operation of your vehicle’s engine,
radio or other systems, and even damage them.
Your vehicle’s systems may interfere with the
operation of sound equipment that has been added
improperly.
So, before adding sound equipment, check with
your dealer and be sure to check federal rules
covering mobile radio and telephone units.
Your audio system has been designed to operate easily
and to give years of listening pleasure. You will get
the most enjoyment out of it if you acquaint yourself with
it �rst. Figure out which radio you have in your vehicle,
�nd out what your audio system can do and how to
operate all of its controls to be sure you’re getting the
most out of the advanced engineering that went into it.
Your vehicle has a feature called Retained Accessory
Power (RAP). With RAP, you can play your audio
system even after the ignition is turned off. See
“Retained Accessory Power (RAP)” underIgnition
Positions on page 2-17.
Setting the Time
Press and hold the HR or MN buttons for two seconds.
Then press and hold HR until the correct hour
appears on the display. AM or PM will appear for
morning or evening hours. Press and hold MN until the
correct minute appears on the display. The time
may be set with the ignition on or off. The clock symbol
will appear on the display in time-set mode.
To synchronize the time with an FM station broadcasting
Radio Data System (RDS) information, press and
hold HR and MN at the same time for two seconds until
UPDATED and the clock symbol appear on the
display. If the time is not available from the station,
NO UPDAT will appear on the display.
RDS time is broadcast once a minute. Once you have
tuned to an RDS broadcast station, it may take a
few minutes for your time to update.
3-55
Page 172 of 416
Finding a Station
BAND:Press this button to switch between FM1,
FM2, AM, or XM1 or XM2 (48 contiguous US states,
if equipped). The display will show your selection.
TUNE:Turn this knob to select radio stations.
qSEEKr:Press the right or the left arrow to seek
to the next or to the previous station and stay there.
The radio will seek only to stations that are in the
selected band and only to those with a strong signal.
qPSCANr(Preset Scan):Press and hold
either arrow for more than two seconds until you hear a
beep. The radio will go to the �rst preset station
stored on your pushbuttons, play for a few seconds,
then go on to the next preset station. SCAN will appear
on the display. Press either arrow again or one of
the pushbuttons to stop scanning presets.
The radio will scan only to the preset stations that are in
the selected band and only to those with a strong signal.
Setting Preset Stations
The six numbered pushbuttons let you return to your
favorite stations. You can set up to 30 stations
(six FM1, six FM2, and six AM, six XM1 and six XM2
(48 contiguous US states, if equipped), by performing
the following steps:
1. Turn the radio on.
2. Press BAND to select FM1, FM2, AM, or XM1
or XM2.
3. Tune in the desired station.
4. Press AUTO TONE to select the equalization.
5. Press and hold one of the six numbered
pushbuttons until you hear a beep. Whenever you
press that numbered pushbutton, the station
you set will return and the equalization that you
selected will be automatically stored for that
pushbutton.
6. Repeat the steps for each pushbutton.
3-58
Page 183 of 416
Finding a Station
BAND:Press this button to switch between FM1,
FM2, AM, or XM1 or XM2 (48 contiguous US states,
if equipped). The display will show your selection.
TUNE:Turn this knob to select radio stations.
qSEEKr:Press the right or the left arrow to seek
to the next or to the previous station and stay there.
The radio will seek only to stations that are in the
selected band and only to those with a strong signal.
qPSCAN (Preset Scan)r:Press and hold
either arrow for more than two seconds and the radio
will produce one beep. The radio will scan to the
�rst preset station stored on the pushbuttons, play for a
few seconds, then go on to the next preset station.
SCAN will appear on the display. Press either arrow
again or one of the pushbuttons to stop scanning
presets.
The radio will scan only to the preset stations that are in
the selected band and only to those with a strong signal.
Setting Preset Stations
The six numbered pushbuttons let you return to your
favorite stations. You can set up to 30 stations
(six FM1, six FM2, and six AM, six XM1 and six XM2
(48 contiguous US states, if equipped), by performing
the following steps:
1. Turn the radio on.
2. Press BAND to select FM1, FM2, AM, or XM1
or XM2.
3. Tune in the desired station.
4. Press AUTO TONE to select the equalization.
5. Press and hold one of the six numbered
pushbuttons until you hear a beep. Whenever you
press that numbered pushbutton, the station
you set will return and the equalization that you
selected will be automatically stored for that
pushbutton.
6. Repeat the steps for each pushbutton.
3-69
Page 194 of 416
Finding a Station
BAND:Press this button to switch between FM1,
FM2, AM, or XM1 or XM2 (48 contiguous US states,
if equipped). The display will show your selection.
TUNE:Turn this knob to select radio stations.
qSEEKr:Press the right or the left arrow to seek
to the next or to the previous station and stay there.
The radio will seek only to stations that are in the
selected band and only to those with a strong signal.
qPSCAN (Preset Scan)r:Press and hold
either arrow for more than two seconds and the radio
will produce one beep. The radio will scan to the
�rst preset station stored on the pushbuttons, play for a
few seconds, then go on to the next preset station.
SCAN will appear on the display. Press either arrow
again or one of the pushbuttons to stop scanning
presets.
The radio will scan only to the preset stations that are in
the selected band and only to those with a strong signal.
Setting Preset Stations
The six numbered pushbuttons let you return to your
favorite stations. You can set up to 30 stations
(six FM1, six FM2, and six AM, six XM1 and six XM2
(48 contiguous US states, if equipped), by performing
the following steps:
1. Turn the radio on.
2. Press BAND to select FM1, FM2, AM, or XM1
or XM2.
3. Tune in the desired station.
4. Press AUTO TONE to select the equalization.
5. Press and hold one of the six numbered
pushbuttons until you hear a beep. Whenever you
press that numbered pushbutton, the station
you set will return and the equalization that you
selected will be automatically stored for that
pushbutton.
6. Repeat the steps for each pushbutton.
3-80
Page 206 of 416
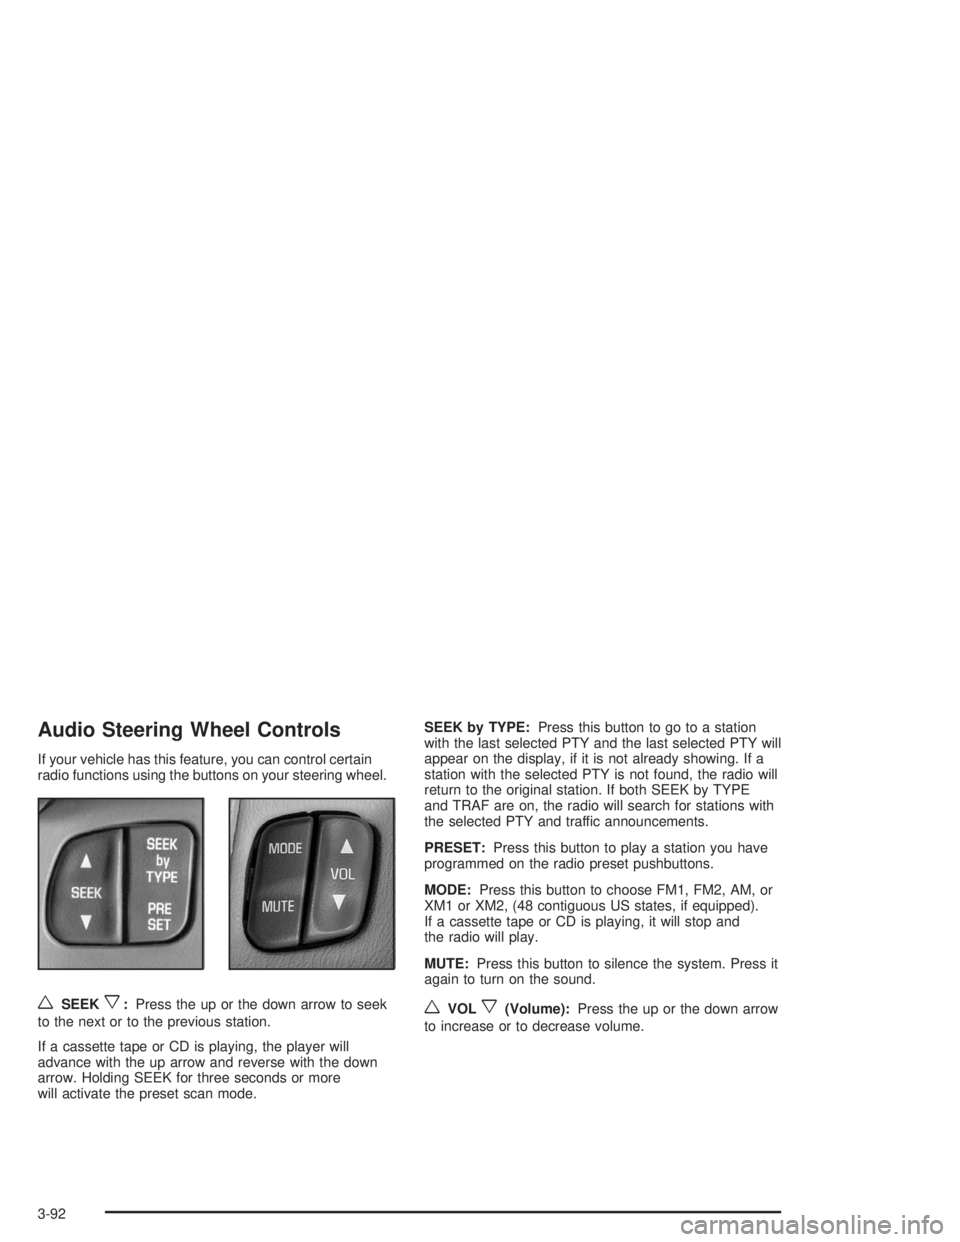
Audio Steering Wheel Controls
If your vehicle has this feature, you can control certain
radio functions using the buttons on your steering wheel.
wSEEKx:Press the up or the down arrow to seek
to the next or to the previous station.
If a cassette tape or CD is playing, the player will
advance with the up arrow and reverse with the down
arrow. Holding SEEK for three seconds or more
will activate the preset scan mode.SEEK by TYPE:Press this button to go to a station
with the last selected PTY and the last selected PTY will
appear on the display, if it is not already showing. If a
station with the selected PTY is not found, the radio will
return to the original station. If both SEEK by TYPE
and TRAF are on, the radio will search for stations with
the selected PTY and traffic announcements.
PRESET:Press this button to play a station you have
programmed on the radio preset pushbuttons.
MODE:Press this button to choose FM1, FM2, AM, or
XM1 or XM2, (48 contiguous US states, if equipped).
If a cassette tape or CD is playing, it will stop and
the radio will play.
MUTE:Press this button to silence the system. Press it
again to turn on the sound.wVOLx(Volume):Press the up or the down arrow
to increase or to decrease volume.
3-92