radio CHEVROLET OPTRA 5 2007 1.G Owners Manual
[x] Cancel search | Manufacturer: CHEVROLET, Model Year: 2007, Model line: OPTRA 5, Model: CHEVROLET OPTRA 5 2007 1.GPages: 422, PDF Size: 2.39 MB
Page 91 of 422
Remote Keyless Entry (RKE)
System
If the vehicle has the Remote Keyless Entry (RKE)
system, it operates on a radio frequency subject
to Federal Communications Commission (FCC)
Rules and with Industry Canada.
This device complies with Part 15 of the FCC
Rules. Operation is subject to the following
two conditions:
1. This device may not cause interference.
2. This device must accept any interference
received, including interference that may
cause undesired operation of the device.
This device complies with RSS-210 of Industry
Canada. Operation is subject to the following
two conditions:
1. This device may not cause interference.
2. This device must accept any interference
received, including interference that may
cause undesired operation of the device.Changes or modifications to this system by other
than an authorized service facility could void
authorization to use this equipment.
At times you may notice a decrease in range. This
is normal for any RKE system. If the transmitter
does not work or if you have to stand closer
to your vehicle for the transmitter to work, try this:
•Check the distance. You may be too far
from your vehicle. You may need to stand
closer during rainy or snowy weather.
•Check the location. Other vehicles or objects
may be blocking the signal. Take a few steps
to the left or right, hold the transmitter
higher, and try again.
•Check to determine if battery replacement is
necessary. See “Battery Replacement”
underRemote Keyless Entry (RKE) System
Operation on page 92.
•If you are still having trouble, see your dealer
or a qualified technician for service.
91
Page 107 of 422
LOCK:This position locks the steering wheel,
ignition, shift lever and transaxle. This is the only
position in which you can insert or remove the
key. If the steering wheel is locked, move it from
right to left and turn the key to ACC (Accessory).
ACC (Accessory):This position operates
some of the electrical accessories, such as the
radio, but not the climate control system.
ON:This is the position the switch returns after you
start the engine and release the key. The switch
stays in ON when the engine is running. But even
when the engine is not running, you can use ON to
operate the electrical accessories, and to display
some instrument panel warning lights.
START:This position starts the engine. When
the engine starts, release the key. The switch
returns to ON for normal driving. Do not turn
the key to START if the engine is running.
Even if the engine is not running, ACC and ON
allow you to operate electrical accessories,
such as the radio.Starting the Engine
Automatic Transaxle
Move the shift lever to PARK (P) or NEUTRAL (N).
Your engine does not start in any other
position — that is a safety feature. To restart
when the vehicle is already moving, use
NEUTRAL (N) only.
Notice:Shifting into PARK (P) with the vehicle
moving could damage the transaxle. Shift
into PARK (P) only when your vehicle is
stopped.
Manual Transaxle
The gear selector should be in NEUTRAL and the
parking brake engaged. Hold the clutch pedal
to the floor and start the engine. Your vehicle will
not start if the clutch pedal is not all the way
down — that is a safety feature.
107
Page 134 of 422
Hold Mode Light........................................ 170
Engine Coolant Temperature Gage............ 171
Tire Pressure Light.................................... 171
Malfunction Indicator Lamp........................ 172
Oil Pressure Light..................................... 175
Fog Lamp Light......................................... 176
Cruise Control Light.................................. 176
Highbeam On Light................................... 176
Daytime Running Lamps (DRL)
Indicator Light........................................ 176
Door Ajar Light.......................................... 177
Trunk Ajar Light (Hatchback Only)............. 177
Fuel Gage................................................. 177
Low Fuel Warning Light............................ 178Audio System(s)......................................... 178
Radio with CD (MP3/WMA)....................... 180
Radio with Six-Disc CD (MP3/WMA)......... 186
Using an MP3 (Radio with CD Player)...... 194
Using an MP3 (Radio with Six-Disc
Player)................................................... 198
Audio Steering Wheel Controls.................. 202
Radio Reception........................................ 203
Care of Your CDs..................................... 203
Care of the CD Player.............................. 204
Integrated Windshield Antenna.................. 204
Section 3 Instrument Panel
134
Page 152 of 422
Inadvertent Power Battery Saver
This feature is designed to protect your vehicle’s
battery against drainage from the taillamps, license
plate lamps, instrument panel lights, and parking
lamps. When the ignition is turned off, the power to
these features will automatically turn off after
5 seconds once the driver’s door is closed.
Accessory Power Outlet(s)
Accessory power outlets can be used to connect
auxiliary electrical equipment such as a cellular
telephone or CB radio.
One accessory power outlet is located on the front
of the center console below the front ashtray. For
wagon models, there may be another outlet in the
rear luggage compartment on the driver’s side.
To use the outlet, remove the protective cap.
When not in use, always cover the outlet with the
protective cap. The accessory power outlet is
operational when the ignition is turned to ACC
or ON.Notice:Leaving electrical equipment on for
extended periods will drain the battery.
Always turn off electrical equipment when not
in use and do not plug in equipment that
exceeds the maximum amperage rating.
Certain electrical accessories may not be
compatible with the accessory power outlet and
could result in blown vehicle or adapter fuses.
If you experience a problem, see your dealer for
additional information on the accessory
power outlet.
Notice:Adding any electrical equipment to
your vehicle may damage it or keep other
components from working as they should.
The repairs would not be covered by your
warranty. Do not use equipment exceeding
maximum amperage rating of 20 amperes.
Check with your dealer before adding
electrical equipment.
152
Page 167 of 422
{CAUTION:
If the airbag readiness light in the
instrument panel cluster ever comes on
and stays on, it means that something may
be wrong with the airbag system. If this
ever happens, have the vehicle serviced
promptly, because an adult-size person
sitting in the right front passenger’s seat
may not have the protection of the frontal
airbag and side airbag (if equipped).
SeeAirbag Readiness Light on page 164
for more on this, including important safety
information.
Charging System Light
The charging system
light will come on briefly
when you turn on the
ignition, and the engine
is not running, as a
check to show you it
is working.
Then it should go out when the engine is started.
If it stays on, or comes on while you are driving, you
may have a problem with the electrical charging
system. Have it checked by your dealer. Driving
while this light is on could drain your battery.
If you must drive a short distance with the light on,
be certain to turn off all your accessories, such
as the radio and air conditioner.
167
Page 178 of 422
Here are four things that some owners ask about.
None of these show a problem with your fuel gage:
•At the service station, the gas pump shuts off
before the gage reads full.
•It takes a little more or less fuel to fill up than
the gage indicated. For example, the gage may
have indicated the tank was half full, but it
actually took a little more or less than half the
tank’s capacity to fill the tank.
•The indicator moves a little when you turn a
corner or speed up.
•The gage goes back to empty when you turn off
the ignition.
Low Fuel Warning Light
This light comes on
when the fuel tank is
low on fuel.The low fuel warning light comes on when there is
about 2.0 gallons (7.5 liters) of fuel remaining in
the tank.
To turn the light off, add fuel to the fuel tank.
SeeFilling the Tank on page 254.
Audio System(s)
Determine which radio your vehicle has and then
read the pages following to familiarize yourself
with its features.
Driving without distraction is a necessity for a
safer driving experience. SeeDefensive Driving on
page 206. By taking a few moments to read this
manual and get familiar with your vehicle’s
audio system, you can use it with less effort, as
well as take advantage of its features. While your
vehicle is parked, set up your audio system by
presetting your favorite radio stations, setting the
tone and adjusting the speakers. Then, when
driving conditions permit, you can tune to
your favorite stations using the presets and
steering wheel controls if the vehicle has them.
178
Page 179 of 422
{CAUTION:
This system provides you with a far greater
access to audio stations and song listings.
Giving extended attention to entertainment
tasks while driving can cause a crash and
you or others can be injured or killed.
Always keep your eyes on the road and
your mind on the drive — avoid engaging
in extended searching while driving.
Keeping your mind on the drive is important for
safe driving. Here are some ways in which you can
help avoid distraction while driving.
While your vehicle is parked:
•Familiarize yourself with all of its controls.
•Familiarize yourself with its operation.
•Set up your audio system by presetting your
favorite radio stations, setting the tone, and
adjusting the speakers. Then, when driving
conditions permit, you can tune to your favorite
radio stations using the presets and steering
wheel controls if the vehicle has them.
Notice:Before adding any sound equipment
to your vehicle, such as an audio system,
CD player, CB radio, mobile telephone,
or two-way radio, make sure that it can be
added by checking with your dealer. Also,
check federal rules covering mobile radio and
telephone units. If sound equipment can be
added, it is very important to do it properly.
Added sound equipment can interfere with the
operation of your vehicle’s engine, radio, or
other systems, and even damage them.
Your vehicle’s systems can interfere with the
operation of sound equipment that has
been added.
179
Page 180 of 422
Radio with CD (MP3/WMA)
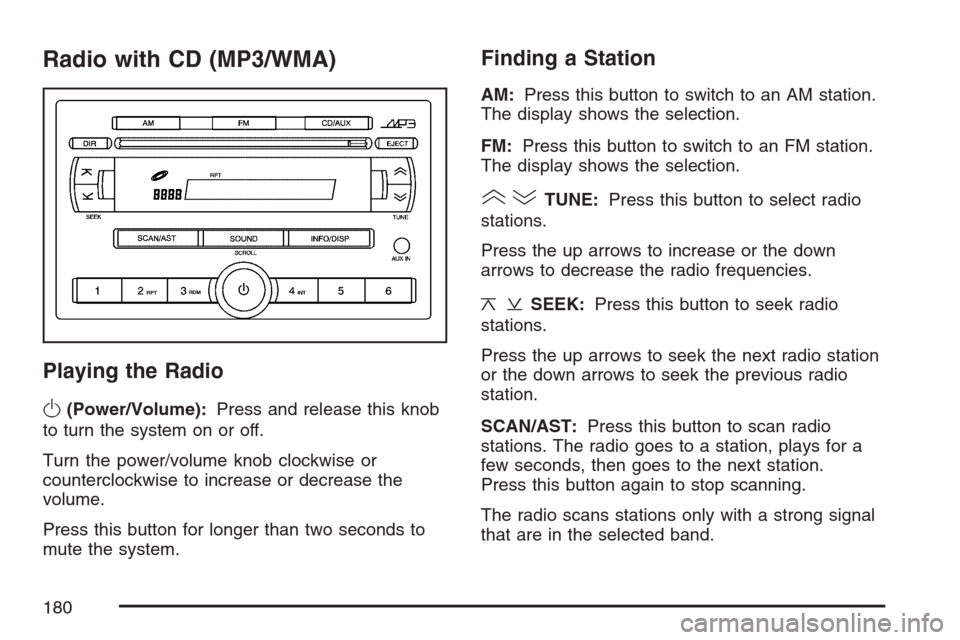
Playing the Radio
O
(Power/Volume):Press and release this knob
to turn the system on or off.
Turn the power/volume knob clockwise or
counterclockwise to increase or decrease the
volume.
Press this button for longer than two seconds to
mute the system.
Finding a Station
AM:Press this button to switch to an AM station.
The display shows the selection.
FM:Press this button to switch to an FM station.
The display shows the selection.
()TUNE:Press this button to select radio
stations.
Press the up arrows to increase or the down
arrows to decrease the radio frequencies.
¦¥SEEK:Press this button to seek radio
stations.
Press the up arrows to seek the next radio station
or the down arrows to seek the previous radio
station.
SCAN/AST:Press this button to scan radio
stations. The radio goes to a station, plays for a
few seconds, then goes to the next station.
Press this button again to stop scanning.
The radio scans stations only with a strong signal
that are in the selected band.
180
Page 181 of 422
AST (Automatic Store)
Six FM1 preset stations with the strongest reception
in the region can be automatically stored. Press the
AST button for more than two seconds. The display
shows AUTO SCANNING and then SCANNING
flashes on the display. Once the stations are stored,
the radio switches to FM1 and the first preset
station begins to play. FM-A displays while listening
to the automatic stored stations. Press the AM or
FM button to cancel automatic store.
Setting Preset Stations
Up to 24 stations (six FM1, six FM2, six AM1, and
six AM2), can be programmed on the six numbered
buttons, by performing the following steps:
1. Turn the radio on.
2. Press the AM or FM button to select FM1,
FM2, AM1 or AM2.3. Tune in the desired station.
4. Press and hold one of the six numbered
buttons for more than two seconds. The
preset button number one through six flashes
on the display when the station has been
set. Whenever that numbered preset button is
pressed, that preset station returns.
5. Repeat the Steps 1 through 4 for each preset
button.
Order of Sound Function
The order for displayed sound function is
BASS, TRE, BAL, FADE, EQ OFF, and VOL
(Bass, Treble, Fade, Balance, Equalization Off,
and Volume).
181
Page 183 of 422
Playing a CD
Insert a CD partway into the slot, label side up.
The player pulls it in and the CD should begin
playing. Insert a CD with the ignition off.
When a CD is inserted, CDP displays. As the CD is
loading, Filecheck displays. As each new track
starts to play, Track and the track number displays.
If the ignition or radio is turned off with a CD in
the player, it stays in the player. When a CD is in
the player and the ignition is turned on, the
radio must be turned on before the CD starts
playback. When the ignition and radio are turned
on, the CD starts playing where it stopped, if it
was the last selected audio source.
The CD player can play the smaller 3 inch (8 cm)
single CDs with an adapter ring. Full-size CDs
and the smaller CDs are loaded in the same
manner.
If playing a CD-R, the sound quality can be
reduced due to CD-R quality, the method of
recording, the quality of the music that has been
recorded, and the way the CD-R has been
handled. There can be an increase in skipping,
difficulty in finding tracks, and/or difficulty in loadingand ejecting. If these problems occur, check the
bottom surface of the CD. If the surface of the CD
is damaged, such as cracked, broken, or
scratched, the CD will not play properly. If the
surface of the CD is soiled, seeCare of Your CDs
on page 203for more information.
If there is no apparent damage, try a known
good CD.
Do not add any label to a CD, it could get caught
in the CD player. If a CD is recorded on a
personal computer and a description label is
needed, try labeling the top of the recorded CD
with a marking pen.
Notice:If a label is added to a CD, or more
than one CD is inserted into the slot at a time,
or an attempt is made to play scratched or
damaged CDs, the CD player could be
damaged. While using the CD player, use only
CDs in good condition without any label,
load one CD at a time, and keep the CD player
and the loading slot free of foreign materials,
liquids, and debris.
If an error displays, see “CD Messages” later in
this section.
183