CHEVROLET PLYMOUTH ACCLAIM 1993 Service Manual
Manufacturer: CHEVROLET, Model Year: 1993, Model line: PLYMOUTH ACCLAIM, Model: CHEVROLET PLYMOUTH ACCLAIM 1993Pages: 2438, PDF Size: 74.98 MB
Page 241 of 2438
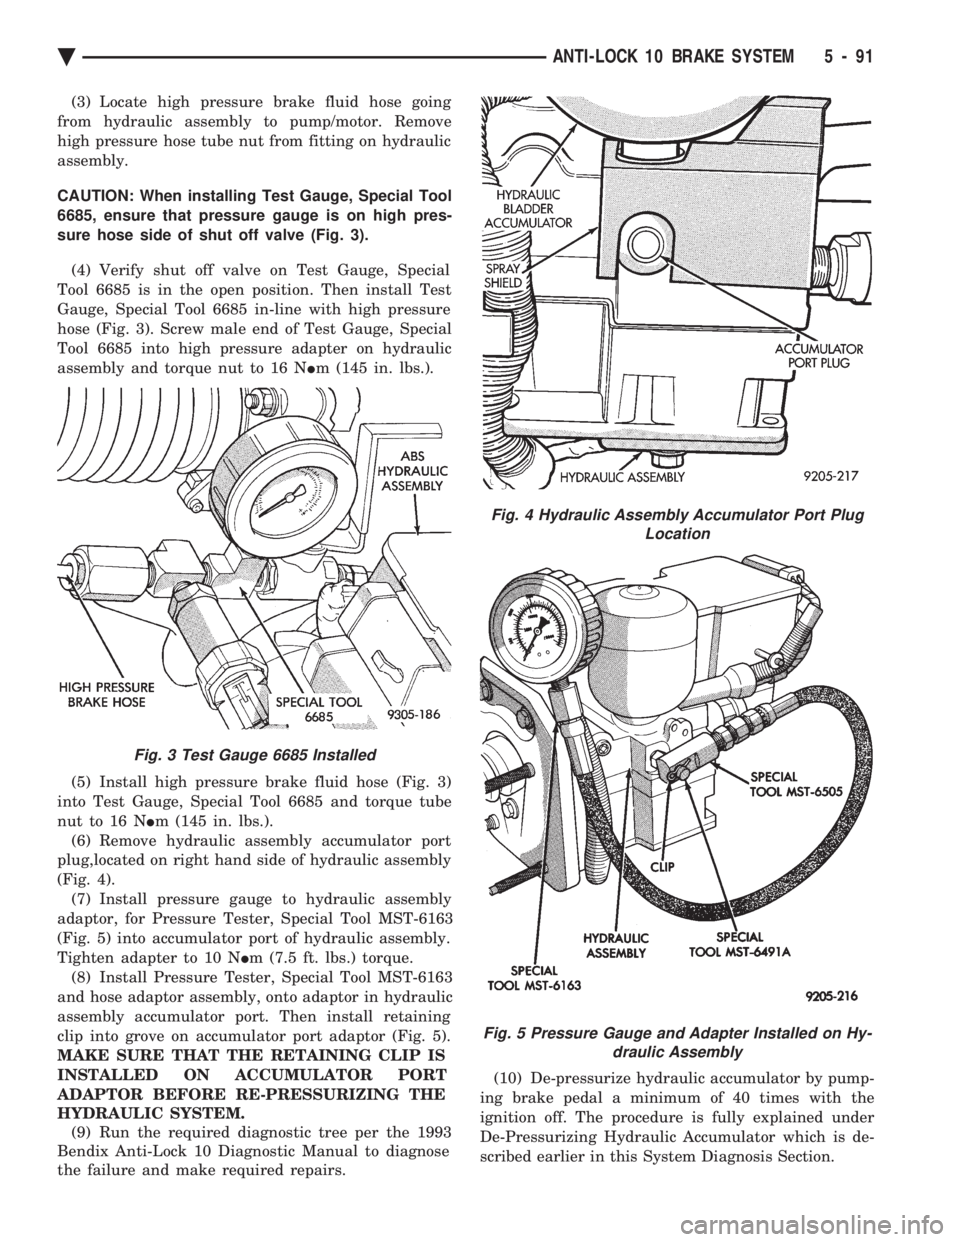
(3) Locate high pressure brake fluid hose going
from hydraulic assembly to pump/motor. Remove
high pressure hose tube nut from fitting on hydraulic
assembly.
CAUTION: When installing Test Gauge, Special Tool
6685, ensure that pressure gauge is on high pres-
sure hose side of shut off valve (Fig. 3).
(4) Verify shut off valve on Test Gauge, Special
Tool 6685 is in the open position. Then install Test
Gauge, Special Tool 6685 in-line with high pressure
hose (Fig. 3). Screw male end of Test Gauge, Special
Tool 6685 into high pressure adapter on hydraulic
assembly and torque nut to 16 N Im (145 in. lbs.).
(5) Install high pressure brake fluid hose (Fig. 3)
into Test Gauge, Special Tool 6685 and torque tube
nut to 16 N Im (145 in. lbs.).
(6) Remove hydraulic assembly accumulator port
plug,located on right hand side of hydraulic assembly
(Fig. 4). (7) Install pressure gauge to hydraulic assembly
adaptor, for Pressure Tester, Special Tool MST-6163
(Fig. 5) into accumulator port of hydraulic assembly.
Tighten adapter to 10 N Im (7.5 ft. lbs.) torque.
(8) Install Pressure Tester, Special Tool MST-6163
and hose adaptor assembly, onto adaptor in hydraulic
assembly accumulator port. Then install retaining
clip into grove on accumulator port adaptor (Fig. 5).
MAKE SURE THAT THE RETAINING CLIP IS
INSTALLED ON ACCUMULATOR PORT
ADAPTOR BEFORE RE-PRESSURIZING THE
HYDRAULIC SYSTEM. (9) Run the required diagnostic tree per the 1993
Bendix Anti-Lock 10 Diagnostic Manual to diagnose
the failure and make required repairs. (10) De-pressurize hydraulic accumulator by pump-
ing brake pedal a minimum of 40 times with the
ignition off. The procedure is fully explained under
De-Pressurizing Hydraulic Accumulator which is de-
scribed earlier in this System Diagnosis Section.
Fig. 3 Test Gauge 6685 Installed
Fig. 4 Hydraulic Assembly Accumulator Port Plug Location
Fig. 5 Pressure Gauge and Adapter Installed on Hy-draulic Assembly
Ä ANTI-LOCK 10 BRAKE SYSTEM 5 - 91
Page 242 of 2438
(11) Remove all special tools previously installed,
from the ABS hydraulic assembly. (12) Install accumulator port plug into hydraulic
assembly. Torque accumulator port plug to 12 N Im(9
ft. lbs.). (13) Install high pressure brake hose from the
pump motor assembly into hydraulic fitting on ABS
hydraulic assembly. Torque high pressure brake hose
tube nut to 16 N Im (145 in. lbs.).
(14) Turn ignition switch to the run position to en-
ergize the pump/motor assembly and pressurize hy-
draulic system. Check for leakage at the hydraulic
assembly to hydraulic bladder accumulator fitting. (15) Again de-pressurize accumulator by pumping
brake pedal a minimum of 40 times. Use procedure
described in De-Pressurizing Hydraulic Accumulator
in this section of the service manual. (16) Then check the brake fluid level in the hy-
draulic assembly reservoir. If brake fluid level is low,
fill reservoir to proper level with Mopar tbrake fluid
or equivalent conforming to DOT 3 requirements.
INTERMITTENT FAULTS
As with almost any electronic system, intermittent
faults in the ABS system may be difficult to accu-
rately diagnose. Most intermittent faults are caused by faulty elec-
trical connections or wiring. When an intermittent
fault is encountered, check suspect circuits for: (1) Poor mating of electrical connector halves, or
electrical terminals not fully seated in the connector
body. (2) Improperly formed or damaged electrical termi-
nals. All connector terminals in a suspect circuit
should be carefully reformed to increase contact ten-
sion. (3) Poor terminal to wire connection. This requires
removing the terminal from the connector body and
inspecting for proper terminal to wire connection. If a visual check does not find the cause of the
problem, operate the vehicle in an attempt to dupli-
cate the condition and record the Fault Code. Most failures of the ABS system will disable the
Anti-Lock function for the entire ignition cycle even
if the fault clears before ignition key-off. There are
some failure conditions however, which will allow
ABS operation to resume during the ignition cycle in
which a failure occurred. If the failure conditions are
no longer present. The following conditions may result in intermittent
illumination of the Red Brake Warning Lamp and/or
Amber Anti-Lock Warning Lamp. All other failures
will cause the lamp(s) to remain on until the ignition
switch is turned off. Circuits and or components in-
volving these inputs to the (CAB) should be investi-
gated if a complaint of intermittent warning system
operation is encountered. ²
Low system voltage. If low system voltage is de-
tected by the (CAB), the (CAB) will turn on the Am-
ber Anti-Lock Warning Lamp until normal system
voltage is achieved. Once normal voltage is seen at
the (CAB), normal operation resumes.
² Low Brake Fluid. A low brake fluid condition will
cause the Red Brake Warning Lamp to illuminate.
When the fluid sensor again indicates an acceptable
fluid level, the Red Brake Warning Lamp will go out.
This condition may exist during hard cornering or
while the vehicle is on a grade. If the vehicle is in
motion above 3 M.P.H. the Amber Anti-Lock Warn-
ing Lamp will also be turned on.
² Low Accumulator Pressure. Low Accumulator
Pressure will cause both the Red Brake Warning and
Amber Anti-Lock Warning Lamps to illuminate.
Once normal operating pressure is achieved, the
lamps will extinguish and the system will return to
normal operation. Additionally, any condition that results in an inter-
ruption of power to the (CAB) or hydraulic assembly.
May cause the Red Brake Warning and Amber Anti-
Lock Warning Lamps to illuminate intermittently. All the conditions (or faults) mentioned above, can
store a fault code in the (CAB) module.
ABS BRAKE SYSTEM DIAGNOSTIC FEATURES
SYSTEM SELF DIAGNOSIS
The ABS system is equipped with a diagnostic ca-
pability that may be used to assist in isolation of
ABS faults. The features of the diagnostics system
are described below.
CONTROLLER ANTI-LOCK BRAKE (CAB)
Fault codes are kept in a Non-Volatile memory un-
til either erased by the technician using the DRB II
or erased automatically after 50 ignition cycles (key
ON-OFF cycles). The only fault that will not be
erased after 50 (KEY CYCLES) is the (CAB) fault.
The (CAB) fault can only be erased by using the
DRB II diagnostic tester. More than one fault can be
stored at a time. The number of key cycles since the
most recent fault was stored is also displayed. Most
functions of the (CAB) and (ABS) system can be ac-
cessed by the technician for testing and diagnostic
purposes by using the DRB II Diagnostic Tester.
START-UP CYCLE
The START-UP CYCLE takes place immediately
after the ignition switch is turned on. It is an elec-
trical check of basic electrical functions such as the
System Relay and Anti-Lock Warning Lamp Relay.
During this check, the Amber Anti-Lock Warning
Lamp is turned on, then turned off at the end of the
test. The test takes approximatel y1-2seconds to
complete.
5 - 92 ANTI-LOCK 10 BRAKE SYSTEM Ä
Page 243 of 2438
DRIVE-OFF CYCLE
The DRIVE-OFF CYCLE takes place when the ve-
hicle reaches about 3 miles per hour the first time af-
ter an ignition reset. During this test, the modulator
solenoid valves are activated briefly to test their
function. The DRIVE-OFF CYCLE will be bypassed
if you drive-off with the service brake pedal de-
pressed.
LATCHING VERSUS NON-LATCHING FAULTS
Some faults detected by the (CAB) are latching.
The fault is latched and (ABS) function is disabled
until the ignition switch is reset (turned OFF/ON).
Thus (ABS) function is disabled even if the original
fault has disappeared during the ignition cycle in
which it occurred. Other faults are non-latching; any
warning lights that are turned on are only on as long
as the fault condition exists. As soon as the condition
goes away. The Amber Anti-Lock Warning Light is
turned off. Although a fault code will be set in most
cases. (Example:low accumulator fault will not be
stored for a time of 2 minutes after the fault is de-
tected).
BENDIX ABS SYSTEMS DIAGNOSTICS
The Bendix Anti-Lock 10 Brake System diagnos-
tics. Beyond the basic mechanical diagnostics, sys-
tems and components covered earlier in this section,
is accomplished by using the DRB II diagnostic
tester. See testing procedures outlined in the Bendix
Anti-Lock 10 Diagnostics Manual for the 1993 M.Y. Please reference the above mentioned manual. For
any further diagnostic service procedures that are re-
quired on the Bendix Anti-Lock 10 Brake System, re-
quiring the use of the DRB II diagnostic tester.
ON CAR HYDRAULIC ABS COMPONENT SERVICE
WARNING: FAILURE TO FULLY DE-PRESSURIZE
THE HYDRAULIC ACCUMULATOR BEFORE PER-
FORMING HYDRAULIC SYSTEM SERVICE OPERA-
TIONS. COULD RESULT IN INJURY TO SERVICE
PERSONNEL AND OR DAMAGE TO PAINTED SUR-
FACES. SEE SECTION 2 FOR ADDITIONAL WARN-
INGS AND CAUTIONS.
GENERAL SERVICE PRECAUTIONS
The following are general precautions that should
be observed when servicing the Anti-Lock Brake Sys-
tem and/or other vehicle systems. Failure to observe
these precautions may result in Anti-Lock brake sys-
tem damage. If welding work is to be performed on the vehicle,
using an electric arc welder, the (CAB) connector
should be disconnected during the welding operation. The (CAB) or hydraulic assembly connector should
never be connected or disconnected with the ignition
switch in the ONposition.
Many components of the Anti-Lock brake system are
not serviceable and must be replaced as an assembly.
Do not attempt to disassemble any component
that is not designed to be a serviced component.
DE-PRESSURIZING HYDRAULIC ACCUMULA- TOR
The pump/motor assembly will keep the hydraulic
accumulator charged to approximately 11,032 and
13,790 kPa (1600 and 2000 psi) any time that the
ignition is in the ON position. The pump/motor assem-
bly cannot run if the ignition is off or if either battery
cable is disconnected. Unless otherwise specified, the hydraulic accumula-
tor should be de-pressurized before disassembling any
portion of the hydraulic system. The following proce-
dure should be used to relieve the pressure in the
hydraulic accumulator: (1) With ignition off, or either battery cable discon-
nected, pump the brake pedal a minimum of 40 times,
using approximately 222 N (50 lbs.) pedal force. A
noticeable change in pedal feel will occur, when the
accumulator is discharged. (2) When a definite increase in pedal effort is felt,
pump pedal a few additional times. This will insure
removal of all hydraulic pressure from the brake sys-
tem.
CHECKING BRAKE FLUID LEVEL
CAUTION: Use only brake fluid conforming to DOT 3
specifications such as Mopar Tor Equivalent. Do not
use any fluid in the brake hydraulic system, which
contains a petroleum base. Do not use a container
which has been used for petroleum based fluids or a
container that is wet with water. Petroleum based
fluids will cause swelling and distortion of rubber
parts in the hydraulic brake system and water will mix
with brake fluid, lowering the fluid boiling point. Keep
all brake fluid containers tightly capped to prevent
contamination.
The hydraulic assembly is equipped with a plastic
fluid reservoir, with a filter/strainer located in the filler
neck of each reservoir section. The Anti-Lock brake system requires that the hy-
draulic accumulator be de-pressurized when checking
the fluid level. To check the brake fluid level, the
following procedure should be used: (1) With the ignition off, de-pressurize the hydraulic
accumulator by applying the brake pedal approxi-
mately 40 times, using a pedal force of approximately
220 N (50 lbs.). A noticeable change in pedal feel will
occur when the accumulator is de-
Ä ANTI-LOCK 10 BRAKE SYSTEM 5 - 93
Page 244 of 2438
pressurized. When a definite increase in pedal effort
is felt, pump pedal a few additional times. This will
insure removal of all hydraulic pressure from the
brake system.(2) Thoroughly clean both reservoir caps and sur-
rounding area of reservoir before cap removal. This
will avoid getting dirt into the reservoir and brake
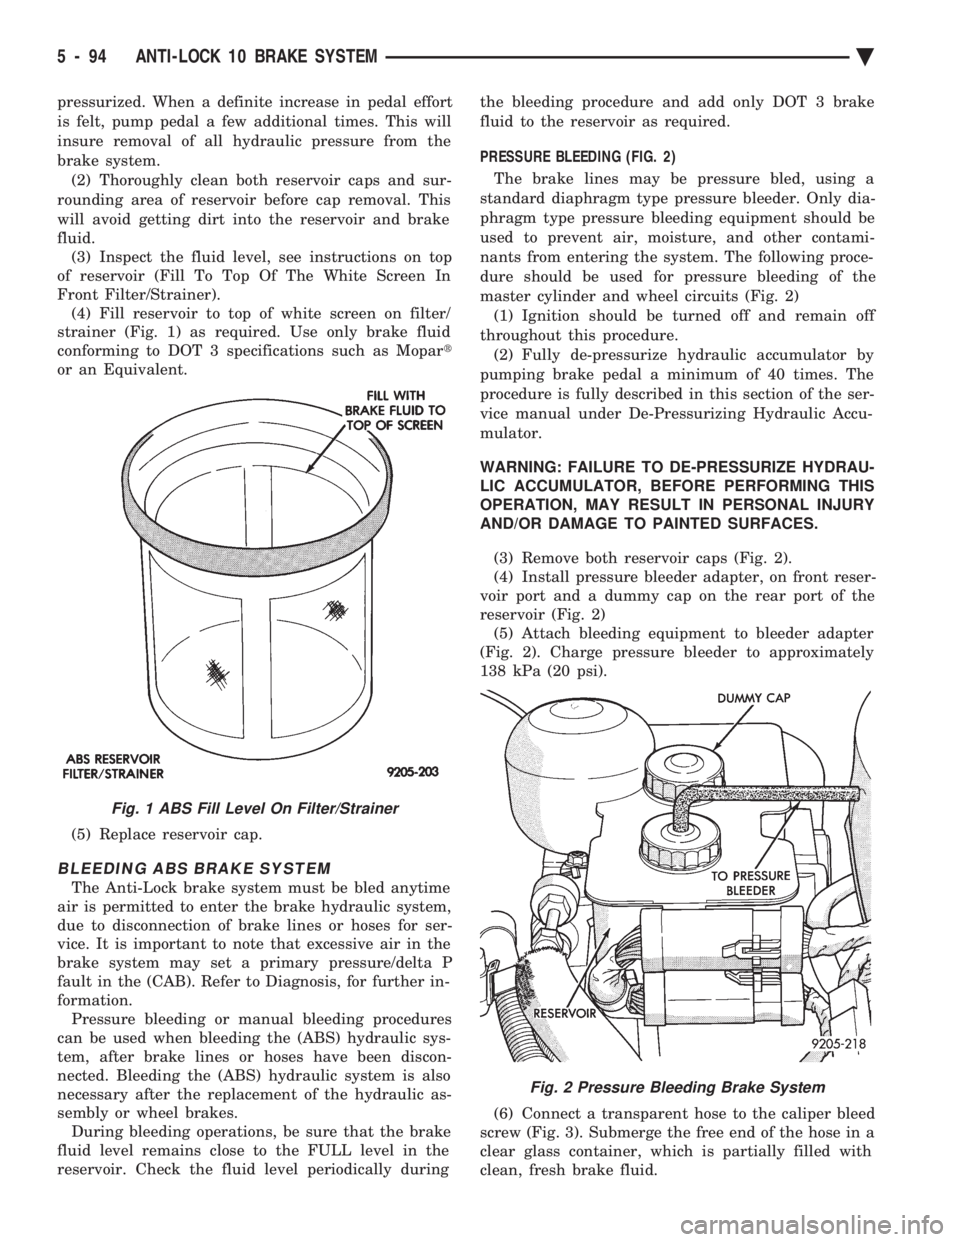
fluid. (3) Inspect the fluid level, see instructions on top
of reservoir (Fill To Top Of The White Screen In
Front Filter/Strainer). (4) Fill reservoir to top of white screen on filter/
strainer (Fig. 1) as required. Use only brake fluid
conforming to DOT 3 specifications such as Mopar t
or an Equivalent.
(5) Replace reservoir cap.
BLEEDING ABS BRAKE SYSTEM
The Anti-Lock brake system must be bled anytime
air is permitted to enter the brake hydraulic system,
due to disconnection of brake lines or hoses for ser-
vice. It is important to note that excessive air in the
brake system may set a primary pressure/delta P
fault in the (CAB). Refer to Diagnosis, for further in-
formation. Pressure bleeding or manual bleeding procedures
can be used when bleeding the (ABS) hydraulic sys-
tem, after brake lines or hoses have been discon-
nected. Bleeding the (ABS) hydraulic system is also
necessary after the replacement of the hydraulic as-
sembly or wheel brakes. During bleeding operations, be sure that the brake
fluid level remains close to the FULL level in the
reservoir. Check the fluid level periodically during the bleeding procedure and add only DOT 3 brake
fluid to the reservoir as required.
PRESSURE BLEEDING (FIG. 2)
The brake lines may be pressure bled, using a
standard diaphragm type pressure bleeder. Only dia-
phragm type pressure bleeding equipment should be
used to prevent air, moisture, and other contami-
nants from entering the system. The following proce-
dure should be used for pressure bleeding of the
master cylinder and wheel circuits (Fig. 2) (1) Ignition should be turned off and remain off
throughout this procedure. (2) Fully de-pressurize hydraulic accumulator by
pumping brake pedal a minimum of 40 times. The
procedure is fully described in this section of the ser-
vice manual under De-Pressurizing Hydraulic Accu-
mulator.
WARNING: FAILURE TO DE-PRESSURIZE HYDRAU-
LIC ACCUMULATOR, BEFORE PERFORMING THIS
OPERATION, MAY RESULT IN PERSONAL INJURY
AND/OR DAMAGE TO PAINTED SURFACES.
(3) Remove both reservoir caps (Fig. 2).
(4) Install pressure bleeder adapter, on front reser-
voir port and a dummy cap on the rear port of the
reservoir (Fig. 2) (5) Attach bleeding equipment to bleeder adapter
(Fig. 2). Charge pressure bleeder to approximately
138 kPa (20 psi).
(6) Connect a transparent hose to the caliper bleed
screw (Fig. 3). Submerge the free end of the hose in a
clear glass container, which is partially filled with
clean, fresh brake fluid.
Fig. 1 ABS Fill Level On Filter/Strainer
Fig. 2 Pressure Bleeding Brake System
5 - 94 ANTI-LOCK 10 BRAKE SYSTEM Ä
Page 245 of 2438
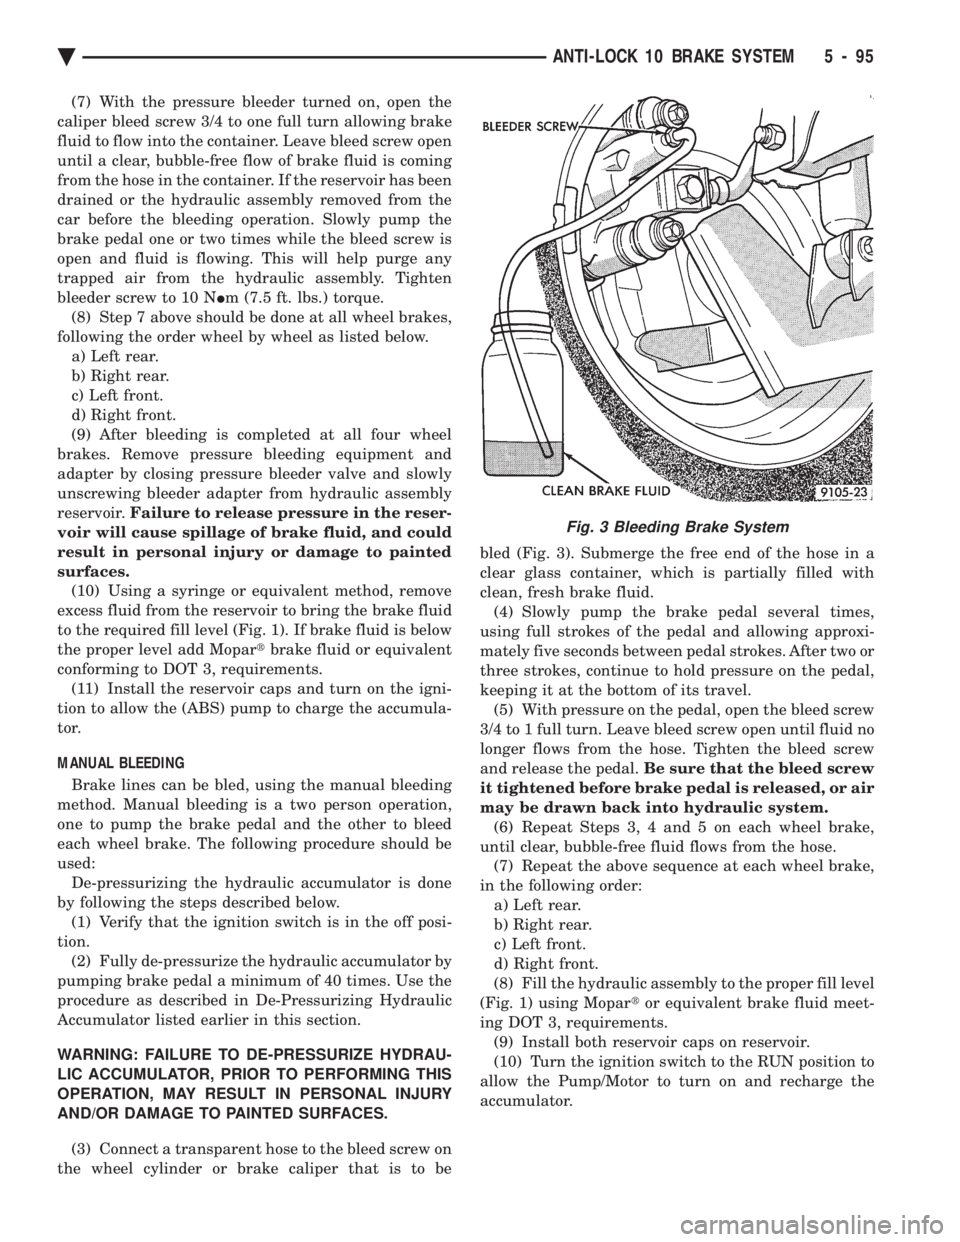
(7) With the pressure bleeder turned on, open the
caliper bleed screw 3/4 to one full turn allowing brake
fluid to flow into the container. Leave bleed screw open
until a clear, bubble-free flow of brake fluid is coming
from the hose in the container. If the reservoir has been
drained or the hydraulic assembly removed from the
car before the bleeding operation. Slowly pump the
brake pedal one or two times while the bleed screw is
open and fluid is flowing. This will help purge any
trapped air from the hydraulic assembly. Tighten
bleeder screw to 10 N Im (7.5 ft. lbs.) torque.
(8) Step 7 above should be done at all wheel brakes,
following the order wheel by wheel as listed below. a) Left rear.
b) Right rear.
c) Left front.
d) Right front.
(9) After bleeding is completed at all four wheel
brakes. Remove pressure bleeding equipment and
adapter by closing pressure bleeder valve and slowly
unscrewing bleeder adapter from hydraulic assembly
reservoir. Failure to release pressure in the reser-
voir will cause spillage of brake fluid, and could
result in personal injury or damage to painted
surfaces. (10) Using a syringe or equivalent method, remove
excess fluid from the reservoir to bring the brake fluid
to the required fill level (Fig. 1). If brake fluid is below
the proper level add Mopar tbrake fluid or equivalent
conforming to DOT 3, requirements. (11) Install the reservoir caps and turn on the igni-
tion to allow the (ABS) pump to charge the accumula-
tor.
MANUAL BLEEDING
Brake lines can be bled, using the manual bleeding
method. Manual bleeding is a two person operation,
one to pump the brake pedal and the other to bleed
each wheel brake. The following procedure should be
used: De-pressurizing the hydraulic accumulator is done
by following the steps described below. (1) Verify that the ignition switch is in the off posi-
tion. (2) Fully de-pressurize the hydraulic accumulator by
pumping brake pedal a minimum of 40 times. Use the
procedure as described in De-Pressurizing Hydraulic
Accumulator listed earlier in this section.
WARNING: FAILURE TO DE-PRESSURIZE HYDRAU-
LIC ACCUMULATOR, PRIOR TO PERFORMING THIS
OPERATION, MAY RESULT IN PERSONAL INJURY
AND/OR DAMAGE TO PAINTED SURFACES.
(3) Connect a transparent hose to the bleed screw on
the wheel cylinder or brake caliper that is to be bled (Fig. 3). Submerge the free end of the hose in a
clear glass container, which is partially filled with
clean, fresh brake fluid.
(4) Slowly pump the brake pedal several times,
using full strokes of the pedal and allowing approxi-
mately five seconds between pedal strokes. After two or
three strokes, continue to hold pressure on the pedal,
keeping it at the bottom of its travel. (5) With pressure on the pedal, open the bleed screw
3/4 to 1 full turn. Leave bleed screw open until fluid no
longer flows from the hose. Tighten the bleed screw
and release the pedal. Be sure that the bleed screw
it tightened before brake pedal is released, or air
may be drawn back into hydraulic system. (6) Repeat Steps 3, 4 and 5 on each wheel brake,
until clear, bubble-free fluid flows from the hose. (7) Repeat the above sequence at each wheel brake,
in the following order: a) Left rear.
b) Right rear.
c) Left front.
d) Right front.
(8) Fill the hydraulic assembly to the proper fill level
(Fig. 1) using Mopar tor equivalent brake fluid meet-
ing DOT 3, requirements. (9) Install both reservoir caps on reservoir.
(10) Turn the ignition switch to the RUN position to
allow the Pump/Motor to turn on and recharge the
accumulator.
Fig. 3 Bleeding Brake System
Ä ANTI-LOCK 10 BRAKE SYSTEM 5 - 95
Page 246 of 2438
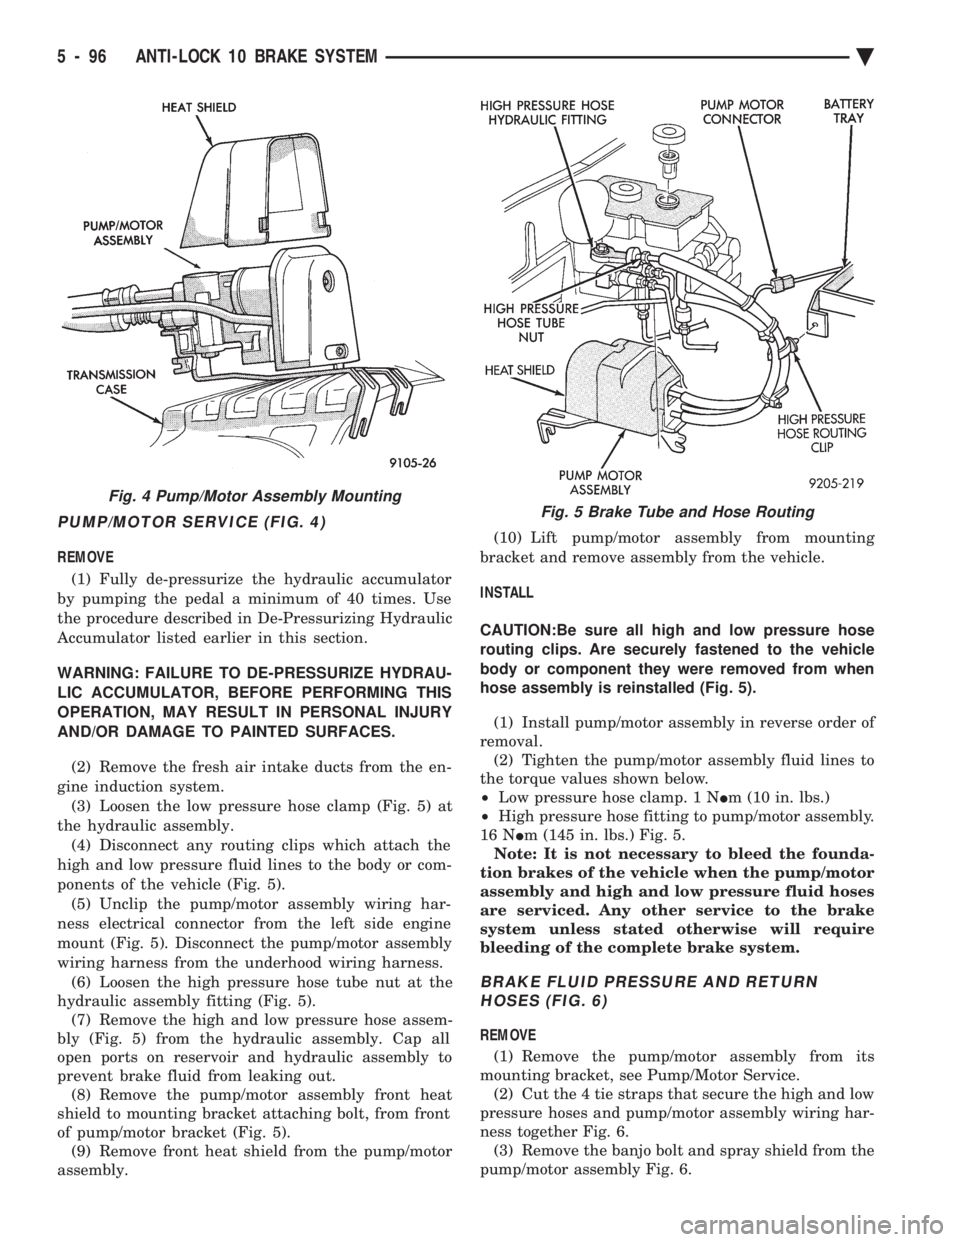
PUMP/MOTOR SERVICE (FIG. 4)
REMOVE (1) Fully de-pressurize the hydraulic accumulator
by pumping the pedal a minimum of 40 times. Use
the procedure described in De-Pressurizing Hydraulic
Accumulator listed earlier in this section.
WARNING: FAILURE TO DE-PRESSURIZE HYDRAU-
LIC ACCUMULATOR, BEFORE PERFORMING THIS
OPERATION, MAY RESULT IN PERSONAL INJURY
AND/OR DAMAGE TO PAINTED SURFACES.
(2) Remove the fresh air intake ducts from the en-
gine induction system. (3) Loosen the low pressure hose clamp (Fig. 5) at
the hydraulic assembly. (4) Disconnect any routing clips which attach the
high and low pressure fluid lines to the body or com-
ponents of the vehicle (Fig. 5). (5) Unclip the pump/motor assembly wiring har-
ness electrical connector from the left side engine
mount (Fig. 5). Disconnect the pump/motor assembly
wiring harness from the underhood wiring harness. (6) Loosen the high pressure hose tube nut at the
hydraulic assembly fitting (Fig. 5). (7) Remove the high and low pressure hose assem-
bly (Fig. 5) from the hydraulic assembly. Cap all
open ports on reservoir and hydraulic assembly to
prevent brake fluid from leaking out. (8) Remove the pump/motor assembly front heat
shield to mounting bracket attaching bolt, from front
of pump/motor bracket (Fig. 5). (9) Remove front heat shield from the pump/motor
assembly. (10) Lift pump/motor assembly from mounting
bracket and remove assembly from the vehicle.
INSTALL
CAUTION:Be sure all high and low pressure hose
routing clips. Are securely fastened to the vehicle
body or component they were removed from when
hose assembly is reinstalled (Fig. 5).
(1) Install pump/motor assembly in reverse order of
removal. (2) Tighten the pump/motor assembly fluid lines to
the torque values shown below.
² Low pressure hose clamp. 1 N Im (10 in. lbs.)
² High pressure hose fitting to pump/motor assembly.
16 N Im (145 in. lbs.) Fig. 5.
Note: It is not necessary to bleed the founda-
tion brakes of the vehicle when the pump/motor
assembly and high and low pressure fluid hoses
are serviced. Any other service to the brake
system unless stated otherwise will require
bleeding of the complete brake system.
BRAKE FLUID PRESSURE AND RETURN HOSES (FIG. 6)
REMOVE
(1) Remove the pump/motor assembly from its
mounting bracket, see Pump/Motor Service. (2) Cut the 4 tie straps that secure the high and low
pressure hoses and pump/motor assembly wiring har-
ness together Fig. 6. (3) Remove the banjo bolt and spray shield from the
pump/motor assembly Fig. 6.
Fig. 4 Pump/Motor Assembly MountingFig. 5 Brake Tube and Hose Routing
5 - 96 ANTI-LOCK 10 BRAKE SYSTEM Ä
Page 247 of 2438
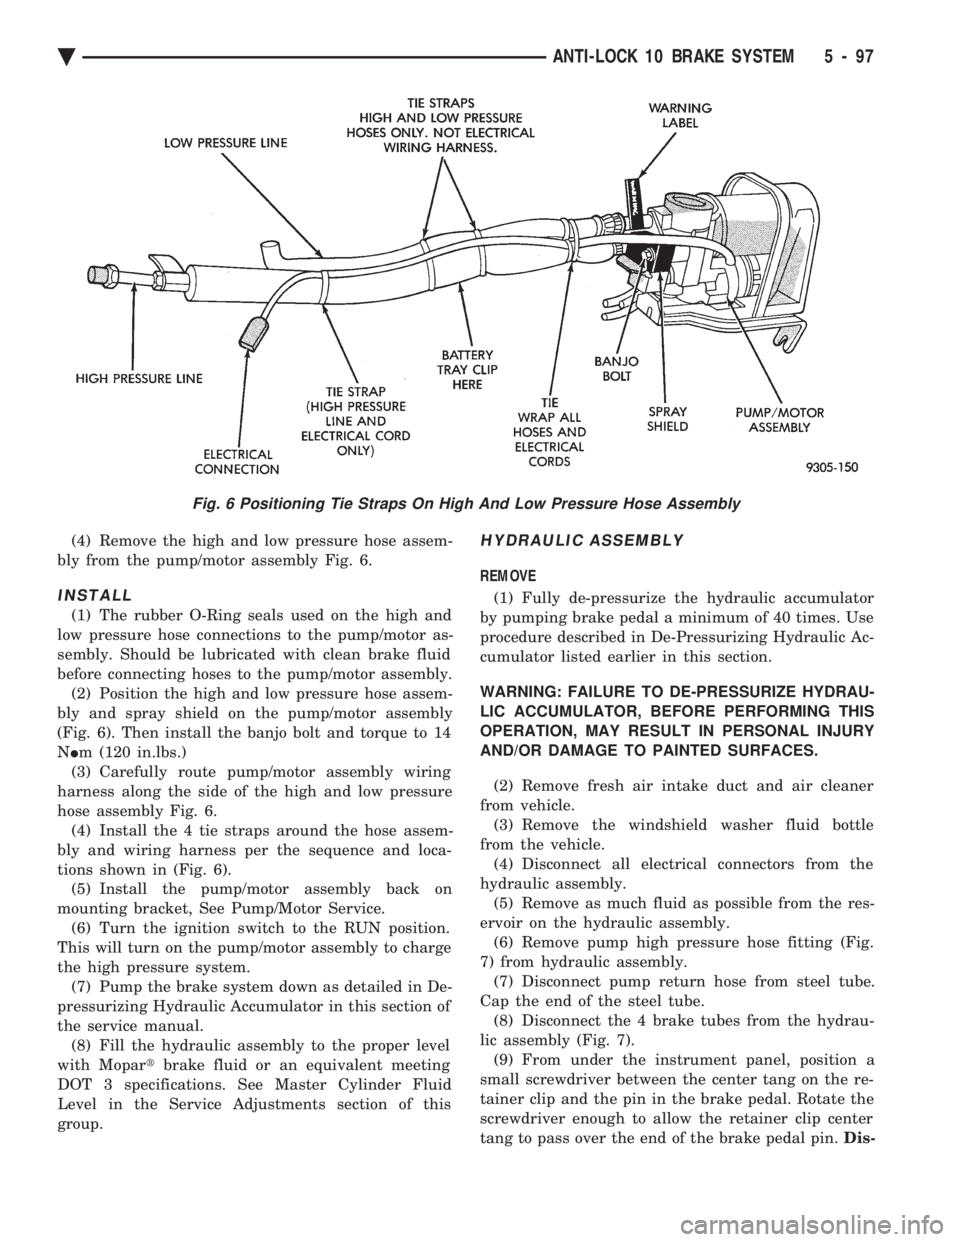
(4) Remove the high and low pressure hose assem-
bly from the pump/motor assembly Fig. 6.
INSTALL
(1) The rubber O-Ring seals used on the high and
low pressure hose connections to the pump/motor as-
sembly. Should be lubricated with clean brake fluid
before connecting hoses to the pump/motor assembly. (2) Position the high and low pressure hose assem-
bly and spray shield on the pump/motor assembly
(Fig. 6). Then install the banjo bolt and torque to 14
N Im (120 in.lbs.)
(3) Carefully route pump/motor assembly wiring
harness along the side of the high and low pressure
hose assembly Fig. 6. (4) Install the 4 tie straps around the hose assem-
bly and wiring harness per the sequence and loca-
tions shown in (Fig. 6). (5) Install the pump/motor assembly back on
mounting bracket, See Pump/Motor Service. (6) Turn the ignition switch to the RUN position.
This will turn on the pump/motor assembly to charge
the high pressure system. (7) Pump the brake system down as detailed in De-
pressurizing Hydraulic Accumulator in this section of
the service manual. (8) Fill the hydraulic assembly to the proper level
with Mopar tbrake fluid or an equivalent meeting
DOT 3 specifications. See Master Cylinder Fluid
Level in the Service Adjustments section of this
group.
HYDRAULIC ASSEMBLY
REMOVE
(1) Fully de-pressurize the hydraulic accumulator
by pumping brake pedal a minimum of 40 times. Use
procedure described in De-Pressurizing Hydraulic Ac-
cumulator listed earlier in this section.
WARNING: FAILURE TO DE-PRESSURIZE HYDRAU-
LIC ACCUMULATOR, BEFORE PERFORMING THIS
OPERATION, MAY RESULT IN PERSONAL INJURY
AND/OR DAMAGE TO PAINTED SURFACES.
(2) Remove fresh air intake duct and air cleaner
from vehicle. (3) Remove the windshield washer fluid bottle
from the vehicle. (4) Disconnect all electrical connectors from the
hydraulic assembly. (5) Remove as much fluid as possible from the res-
ervoir on the hydraulic assembly. (6) Remove pump high pressure hose fitting (Fig.
7) from hydraulic assembly. (7) Disconnect pump return hose from steel tube.
Cap the end of the steel tube. (8) Disconnect the 4 brake tubes from the hydrau-
lic assembly (Fig. 7). (9) From under the instrument panel, position a
small screwdriver between the center tang on the re-
tainer clip and the pin in the brake pedal. Rotate the
screwdriver enough to allow the retainer clip center
tang to pass over the end of the brake pedal pin. Dis-
Fig. 6 Positioning Tie Straps On High And Low Pressure Hose Assembly
Ä ANTI-LOCK 10 BRAKE SYSTEM 5 - 97
Page 248 of 2438
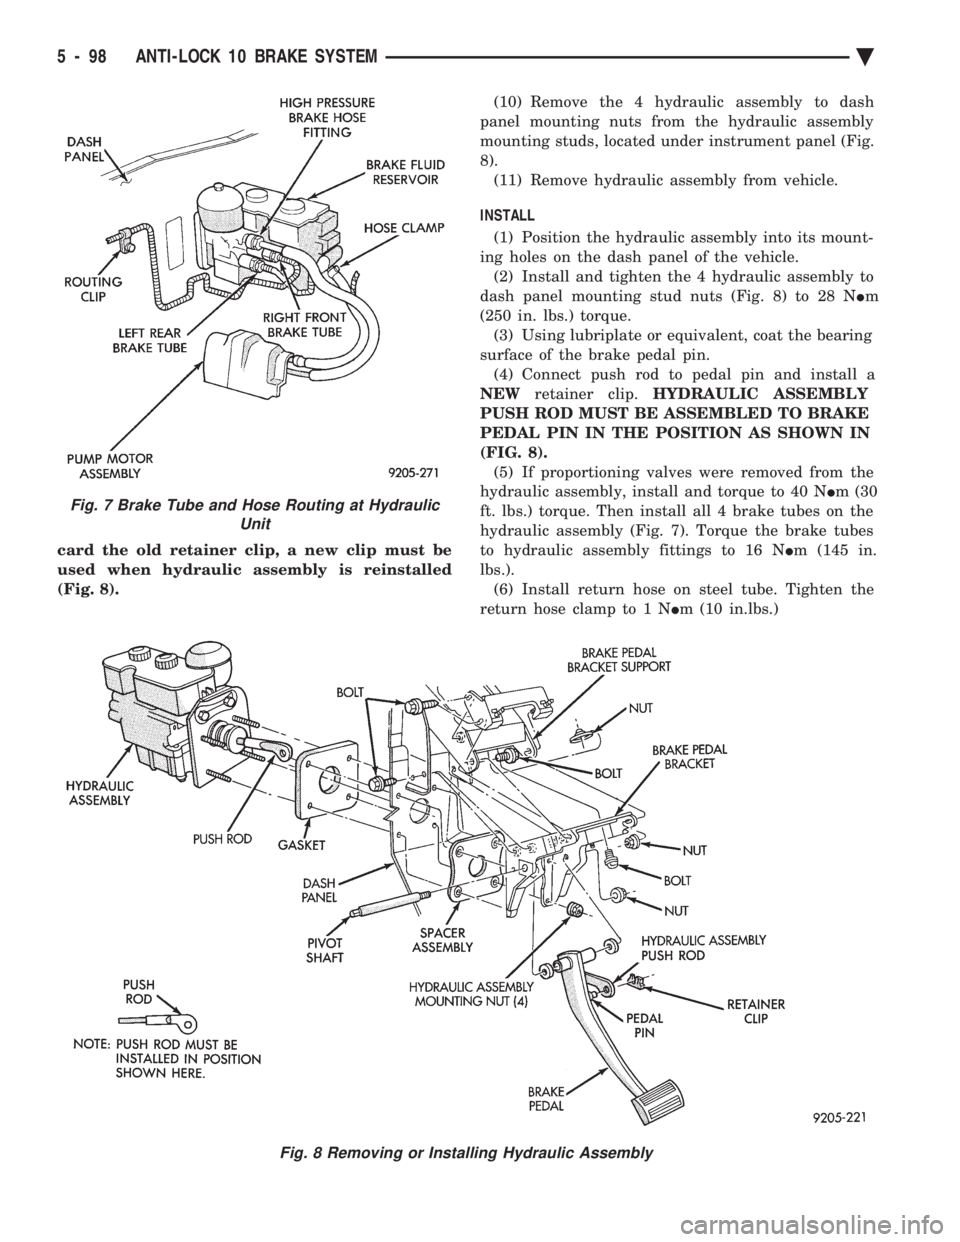
card the old retainer clip, a new clip must be
used when hydraulic assembly is reinstalled
(Fig. 8). (10) Remove the 4 hydraulic assembly to dash
panel mounting nuts from the hydraulic assembly
mounting studs, located under instrument panel (Fig.
8). (11) Remove hydraulic assembly from vehicle.
INSTALL (1) Position the hydraulic assembly into its mount-
ing holes on the dash panel of the vehicle. (2) Install and tighten the 4 hydraulic assembly to
dash panel mounting stud nuts (Fig. 8) to 28 N Im
(250 in. lbs.) torque. (3) Using lubriplate or equivalent, coat the bearing
surface of the brake pedal pin. (4) Connect push rod to pedal pin and install a
NEW retainer clip. HYDRAULIC ASSEMBLY
PUSH ROD MUST BE ASSEMBLED TO BRAKE
PEDAL PIN IN THE POSITION AS SHOWN IN
(FIG. 8). (5) If proportioning valves were removed from the
hydraulic assembly, install and torque to 40 N Im (30
ft. lbs.) torque. Then install all 4 brake tubes on the
hydraulic assembly (Fig. 7). Torque the brake tubes
to hydraulic assembly fittings to 16 N Im (145 in.
lbs.). (6) Install return hose on steel tube. Tighten the
return hose clamp to 1 N Im (10 in.lbs.)
Fig. 7 Brake Tube and Hose Routing at Hydraulic
Unit
Fig. 8 Removing or Installing Hydraulic Assembly
5 - 98 ANTI-LOCK 10 BRAKE SYSTEM Ä
Page 249 of 2438
(7) Install high pressure hose to hydraulic assem-
bly (Fig. 7). Tighten the hose, to hydraulic assembly
fitting to 16 N Im (145 in. lbs)
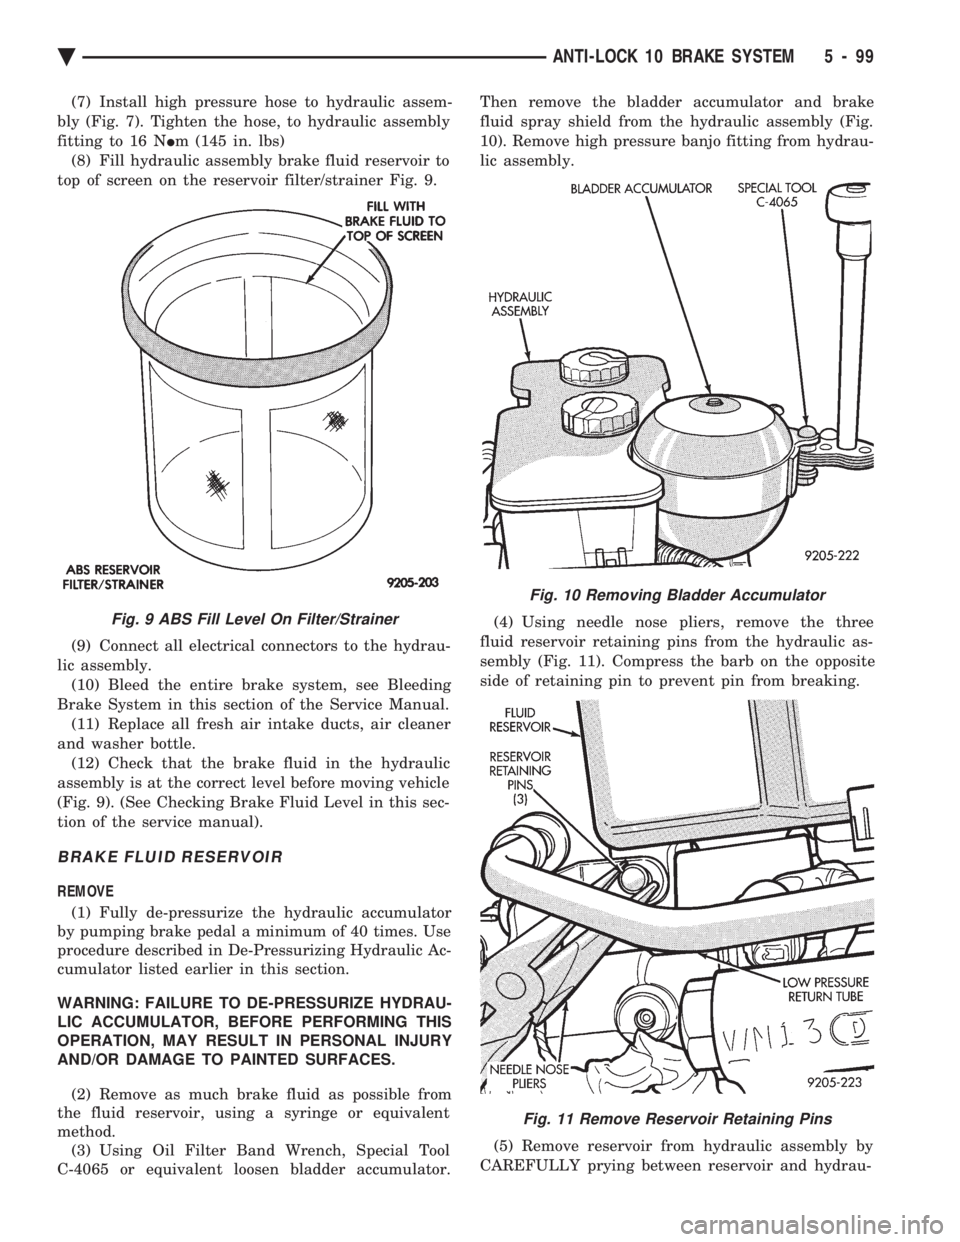
(8) Fill hydraulic assembly brake fluid reservoir to
top of screen on the reservoir filter/strainer Fig. 9.
(9) Connect all electrical connectors to the hydrau-
lic assembly. (10) Bleed the entire brake system, see Bleeding
Brake System in this section of the Service Manual. (11) Replace all fresh air intake ducts, air cleaner
and washer bottle. (12) Check that the brake fluid in the hydraulic
assembly is at the correct level before moving vehicle
(Fig. 9). (See Checking Brake Fluid Level in this sec-
tion of the service manual).
BRAKE FLUID RESERVOIR
REMOVE
(1) Fully de-pressurize the hydraulic accumulator
by pumping brake pedal a minimum of 40 times. Use
procedure described in De-Pressurizing Hydraulic Ac-
cumulator listed earlier in this section.
WARNING: FAILURE TO DE-PRESSURIZE HYDRAU-
LIC ACCUMULATOR, BEFORE PERFORMING THIS
OPERATION, MAY RESULT IN PERSONAL INJURY
AND/OR DAMAGE TO PAINTED SURFACES.
(2) Remove as much brake fluid as possible from
the fluid reservoir, using a syringe or equivalent
method. (3) Using Oil Filter Band Wrench, Special Tool
C-4065 or equivalent loosen bladder accumulator. Then remove the bladder accumulator and brake
fluid spray shield from the hydraulic assembly (Fig.
10). Remove high pressure banjo fitting from hydrau-
lic assembly.
(4) Using needle nose pliers, remove the three
fluid reservoir retaining pins from the hydraulic as-
sembly (Fig. 11). Compress the barb on the opposite
side of retaining pin to prevent pin from breaking.
(5) Remove reservoir from hydraulic assembly by
CAREFULLY prying between reservoir and hydrau-
Fig. 9 ABS Fill Level On Filter/Strainer
Fig. 10 Removing Bladder Accumulator
Fig. 11 Remove Reservoir Retaining Pins
Ä ANTI-LOCK 10 BRAKE SYSTEM 5 - 99
Page 250 of 2438
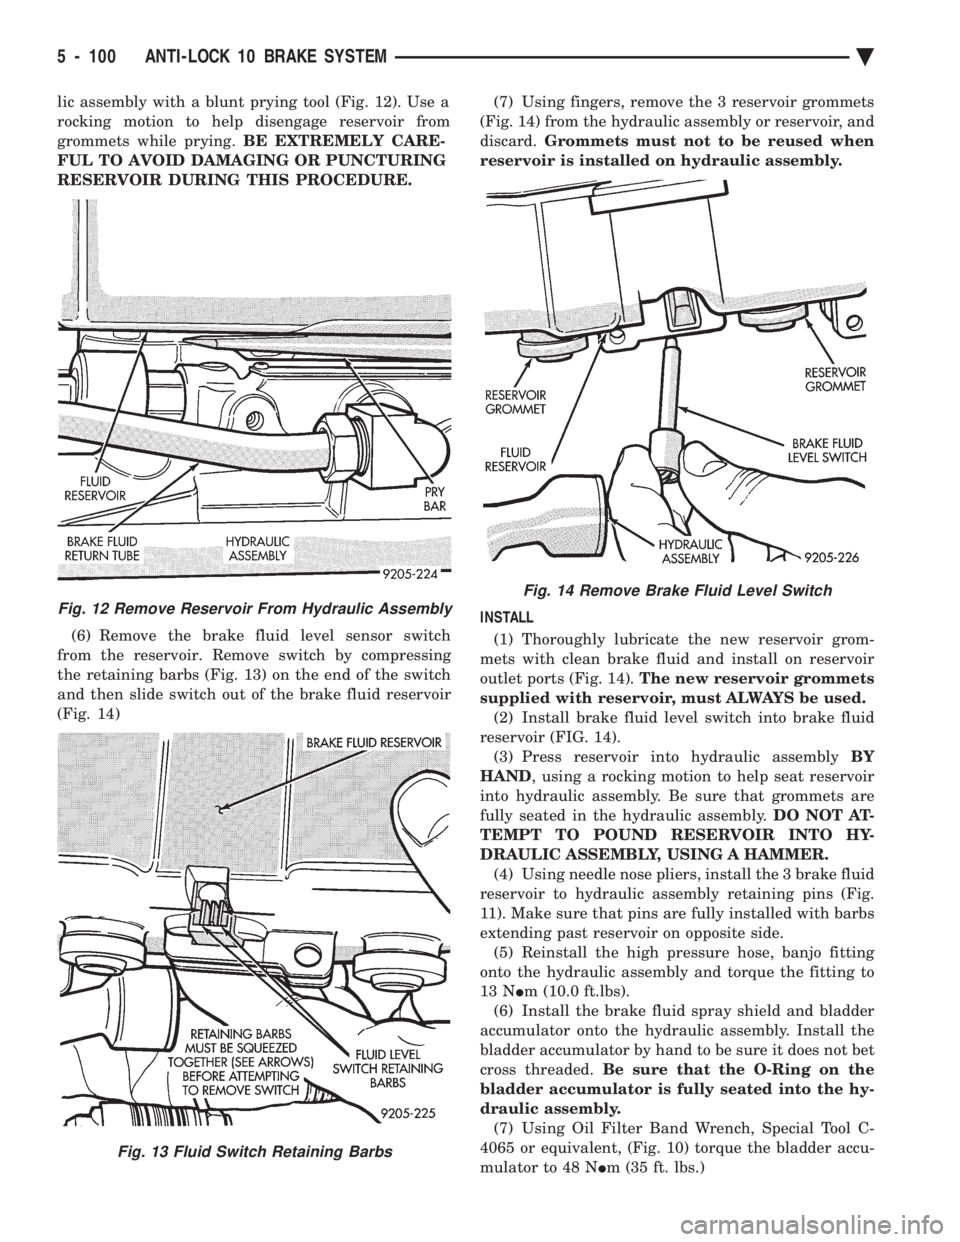
lic assembly with a blunt prying tool (Fig. 12). Use a
rocking motion to help disengage reservoir from
grommets while prying. BE EXTREMELY CARE-
FUL TO AVOID DAMAGING OR PUNCTURING
RESERVOIR DURING THIS PROCEDURE.
(6) Remove the brake fluid level sensor switch
from the reservoir. Remove switch by compressing
the retaining barbs (Fig. 13) on the end of the switch
and then slide switch out of the brake fluid reservoir
(Fig. 14) (7) Using fingers, remove the 3 reservoir grommets
(Fig. 14) from the hydraulic assembly or reservoir, and
discard. Grommets must not to be reused when
reservoir is installed on hydraulic assembly.
INSTALL (1) Thoroughly lubricate the new reservoir grom-
mets with clean brake fluid and install on reservoir
outlet ports (Fig. 14). The new reservoir grommets
supplied with reservoir, must ALWAYS be used. (2) Install brake fluid level switch into brake fluid
reservoir (FIG. 14). (3) Press reservoir into hydraulic assembly BY
HAND , using a rocking motion to help seat reservoir
into hydraulic assembly. Be sure that grommets are
fully seated in the hydraulic assembly. DO NOT AT-
TEMPT TO POUND RESERVOIR INTO HY-
DRAULIC ASSEMBLY, USING A HAMMER. (4) Using needle nose pliers, install the 3 brake fluid
reservoir to hydraulic assembly retaining pins (Fig.
11). Make sure that pins are fully installed with barbs
extending past reservoir on opposite side. (5) Reinstall the high pressure hose, banjo fitting
onto the hydraulic assembly and torque the fitting to
13 N Im (10.0 ft.lbs).
(6) Install the brake fluid spray shield and bladder
accumulator onto the hydraulic assembly. Install the
bladder accumulator by hand to be sure it does not bet
cross threaded. Be sure that the O-Ring on the
bladder accumulator is fully seated into the hy-
draulic assembly. (7) Using Oil Filter Band Wrench, Special Tool C-
4065 or equivalent, (Fig. 10) torque the bladder accu-
mulator to 48 N Im (35 ft. lbs.)
Fig. 12 Remove Reservoir From Hydraulic Assembly
Fig. 13 Fluid Switch Retaining Barbs
Fig. 14 Remove Brake Fluid Level Switch
5 - 100 ANTI-LOCK 10 BRAKE SYSTEM Ä