Service CHEVROLET SILVERADO 1500 2021 Owner's Manual
[x] Cancel search | Manufacturer: CHEVROLET, Model Year: 2021, Model line: SILVERADO 1500, Model: CHEVROLET SILVERADO 1500 2021Pages: 463, PDF Size: 9.65 MB
Page 374 of 463
 - 2021 - CRC - 11/9/20
Vehicle Care 371
If the TPMS is not functioning properly, it
cannot detect or signa")
Chevrolet Silverado 1500 Owner Manual (GMNA-Localizing-U.S./Canada/
Mexico/Paraguay-14632303) - 2021 - CRC - 11/9/20
Vehicle Care 371
If the TPMS is not functioning properly, it
cannot detect or signal a low tire pressure
condition. See your dealer for service if the
TPMS malfunction light and DIC message
come on and stay on.
Tire Fill Alert (If Equipped)
This feature provides visual and audible
alerts outside the vehicle to help when
inflating an underinflated tire to the
recommended cold tire pressure.
When the low tire pressure warning light
comes on:1. Park the vehicle in a safe, level place.
2. Set the parking brake firmly.
3. Place the vehicle in P (Park).
4. Add air to the tire that is underinflated. The turn signal lamp will flash.
When the recommended pressure is
reached, the horn sounds once and the
turn signal lamp will stop flashing and
briefly turn solid.
Repeat these steps for all underinflated tires
that have illuminated the low tire pressure
warning light.
{Warning
Overinflating a tire could cause the tire
to rupture and you or others could be
injured. Do not exceed the maximum
pressure listed on the tire sidewall. See
Tire Sidewall Labeling 0362 and
Vehicle Load Limits 0222.
If the tire is overinflated by more than
35 kPa (5 psi), the horn will sound multiple
times and the turn signal lamp will continue
to flash for several seconds after filling
stops. To release and correct the pressure,
while the turn signal lamp is still flashing,
briefly press the center of the valve stem.
When the recommended pressure is reached,
the horn sounds once.
If the turn signal lamp does not flash within
15 seconds after starting to inflate the tire,
the tire fill alert has not been activated or is
not working.
If the hazard warning flashers are on, the
tire fill alert visual feedback will not work
properly.
The TPMS will not activate the tire fill alert
properly under the following conditions:
.There is interference from an external
device or transmitter.
.The air pressure from the inflation device
is not sufficient to inflate the tire.
.There is a malfunction in the TPMS.
.There is a malfunction in the horn or turn
signal lamps.
.The identification code of the TPMS
sensor is not registered to the system.
.The battery of the TPMS sensor is low.
If the tire fill alert does not operate due to
TPMS interference, move the vehicle about
1 m (3 ft) back or forward and try again.
If the tire fill alert feature is not working,
use a tire pressure gauge.
TPMS Sensor Matching Process
Each TPMS sensor has a unique
identification code. The identification code
needs to be matched to a new tire/wheel
position after rotating the vehicle’s tires or
replacing one or more of the TPMS sensors.
Also, the TPMS sensor matching process
should be performed after replacing a spare
tire with a road tire containing the TPMS
sensor. The malfunction light and the DIC
message should go off at the next ignition
cycle. The sensors are matched to the tire/
wheel positions, using a TPMS relearn tool,
Page 375 of 463
 - 2021 - CRC - 11/9/20
372 Vehicle Care
in the following order: driver side front tire,
passenger side fro")
Chevrolet Silverado 1500 Owner Manual (GMNA-Localizing-U.S./Canada/
Mexico/Paraguay-14632303) - 2021 - CRC - 11/9/20
372 Vehicle Care
in the following order: driver side front tire,
passenger side front tire, passenger side rear
tire, and driver side rear. See your dealer for
service or to purchase a relearn tool.
A TPMS relearn tool can also be purchased.
See Tire Pressure Monitor Sensor Activation
Tool at www.gmtoolsandequipment.com or
call 1-800-GM TOOLS (1-800-468-6657).
There are two minutes to match the first
tire/wheel position, and five minutes overall
to match all four tire/wheel positions. If it
takes longer, the matching process stops
and must be restarted.
The TPMS sensor matching process is:1. Set the parking brake.
2. Turn the ignition on without starting the vehicle.
3. Uplevel DIC Only: Make sure the Tire Pressure info page option is turned on.
The info pages on the DIC can be turned
on and off through the Options menu.
See Driver Information Center (DIC) (Base
Level) 0124 or
Driver Information Center (DIC) (Midlevel
and Uplevel) 0125. 4. If the vehicle has an uplevel DIC, use the
DIC controls on the right side of the
steering wheel to scroll to the Tire
Pressure screen under the DIC info page.
If the vehicle has a base level DIC, use
the trip odometer reset stem to scroll to
the Tire Pressure screen.
5. If the vehicle has an uplevel DIC, press and hold the thumbwheel located in the
center of the DIC controls on the right
side of the steering wheel.
If the vehicle has a base level DIC, press
and hold the trip odometer reset stem
for about five seconds. A message asking
if the process should begin should
appear. Select yes and press the trip
odometer reset stem to confirm the
selection.
The horn sounds twice to signal the
receiver is in relearn mode and the TIRE
LEARNING ACTIVE message displays on
the DIC screen.
6. Start with the driver side front tire.
7. Place the relearn tool against the tire sidewall, near the valve stem. Then press
the button to activate the TPMS sensor.
A horn chirp confirms that the sensor
identification code has been matched to
this tire and wheel position. 8. Proceed to the passenger side front tire,
and repeat the procedure in Step 7.
9. Proceed to the passenger side rear tire, and repeat the procedure in Step 7.
10. Proceed to the driver side rear tire, and repeat the procedure in Step 7. The horn
sounds two times to indicate the sensor
identification code has been matched to
the driver side rear tire, and the TPMS
sensor matching process is no longer
active. The TIRE LEARNING ACTIVE
message on the DIC display screen
goes off.
11. Turn the vehicle off.
12. Set all four tires to the recommended air pressure level as indicated on the Tire
and Loading Information label.
Trailer Tire Pressure Monitoring
Operation
If equipped, the Trailer Tire Pressure
Monitoring System (TTPMS) is designed to
monitor the pressure of the trailer tires and
warn the driver when a low pressure
condition exists. TTPMS sensors for four tires
are provided. The system can accommodate
a trailer with up to six tires if additional
Page 376 of 463
 - 2021 - CRC - 11/9/20
Vehicle Care 373
sensors are purchased from the dealer. Also,
the system can be pai")
Chevrolet Silverado 1500 Owner Manual (GMNA-Localizing-U.S./Canada/
Mexico/Paraguay-14632303) - 2021 - CRC - 11/9/20
Vehicle Care 373
sensors are purchased from the dealer. Also,
the system can be paired with up to five
individual trailers.
Prior to use, the vehicle must learn the
sensors by following the learning process.
SeeTrailering App 0306.
Contact your trailer service center or tire
service center to have the pressure sensors
installed inside the trailer tires. The
technician should insert the sensor stem
through the hole in the trailer wheel. When
the sensor is correctly positioned, the nut on
the sensor stem should be tightened to
8Y (6 lb ft). When mounting the trailer
tire onto the trailer wheel be careful not to
damage the sensor. The Trailering App can be used to view the
tire pressures after the recommended trailer
tire pressures have been entered. Refer to
the trailer tire placard on the trailer or the
trailer tire sidewall for the recommended
tire pressure.
The system is compatible with trailer tires
that have placard pressure values from 103 -
689 kpa (15 - 100 psi). The hole in the wheel
for the tire stem must be 11.43 mm
(0.453 in) in diameter. Use of the pressure
sensors on a wheel with a different stem
hole size could result in loss of air from
the tire.
If a low trailer tire pressure condition is
detected, the TTPMS displays a warning
message on the DIC. If the warning message
is displayed, stop as soon as possible and
inflate the tires to the recommended
pressure shown on the tire placard on the
trailer.
In addition, the TTPMS monitors the
temperature of the trailer tires. If the
system detects a high temperature on one
or more of the trailer tires, a warning
message will be displayed on the DIC. If this
warning message is displayed, stop as soon
as possible, and inspect the overheated
trailer tire. Common causes for high trailer
tire temperature are underinflation,
overloading, or tire damage.
TTPMS Malfunction Message
The TTPMS will not function properly if one
or more of the trailer tire sensors are
missing or inoperable. If the system detects
a malfunction, a DIC message indicates that
the system requires service. Some of the
conditions that can cause the service
message to occur are:
.One of the trailer tires has been replaced
with the spare tire which does not have a
learned TTPMS sensor. The DIC message
should turn off after the pressure sensor
is installed in the tire, and the learning
process is performed successfully. See
"TTPMS Sensor Learning Process" under
Trailering App
0306.
.The TTPMS sensor learning process was
not done or not completed successfully.
The DIC message should go off after
successfully completing the sensor
learning process. See "TTPMS Sensor
Learning Process" under Trailering App
0 306.
.One or more TTPMS sensors are missing
or damaged. The DIC message should go
off when the TTPMS sensors are installed
Page 377 of 463
Chevrolet Silverado 1500 Owner Manual (GMNA-Localizing-U.S./Canada/
Mexico/Paraguay-14632303) - 2021 - CRC - 11/9/20
374 Vehicle Care
and the sensor learning process is
performed successfully. See "TTPMS
Sensor Learning Process" underTrailering
App 0306.
.Operating electronic devices or being near
facilities using radio wave frequencies
similar to the TTPMS could cause
interference to the TTPMS which could
cause loss of signal reception from the
sensor.
.If the system does not receive the signal
from an individual sensor, an error
message may not occur until the vehicle
has been driver for a period of time.
If the TTPMS is not functioning properly, it
cannot detect or signal a low tire condition.
See your dealer for service if the DIC
message comes on and stays on when the
trailer tire pressures have been checked and
determined to be correct.
Tire Inspection
We recommend that the tires, including
the spare tire, if the vehicle has one, be
inspected for signs of wear or damage
at least once a month. Replace the tire if:
.The indicators at three or more
places around the tire can be seen.
.There is cord or fabric showing
through the tire's rubber.
.The tread or sidewall is cracked, cut,
or snagged deep enough to show
cord or fabric.
.The tire has a bump, bulge, or split.
.The tire has a puncture, cut, or other
damage that cannot be repaired well
because of the size or location of the
damage.
Tire Rotation
Tires should be rotated every 12 000 km
(7,500 mi). See
Maintenance Schedule
0 409.
Tires are rotated to achieve a more
uniform wear for all tires. The first
rotation is the most important.
Anytime unusual wear is noticed, rotate
the tires as soon as possible, check for
proper tire inflation pressure, and check
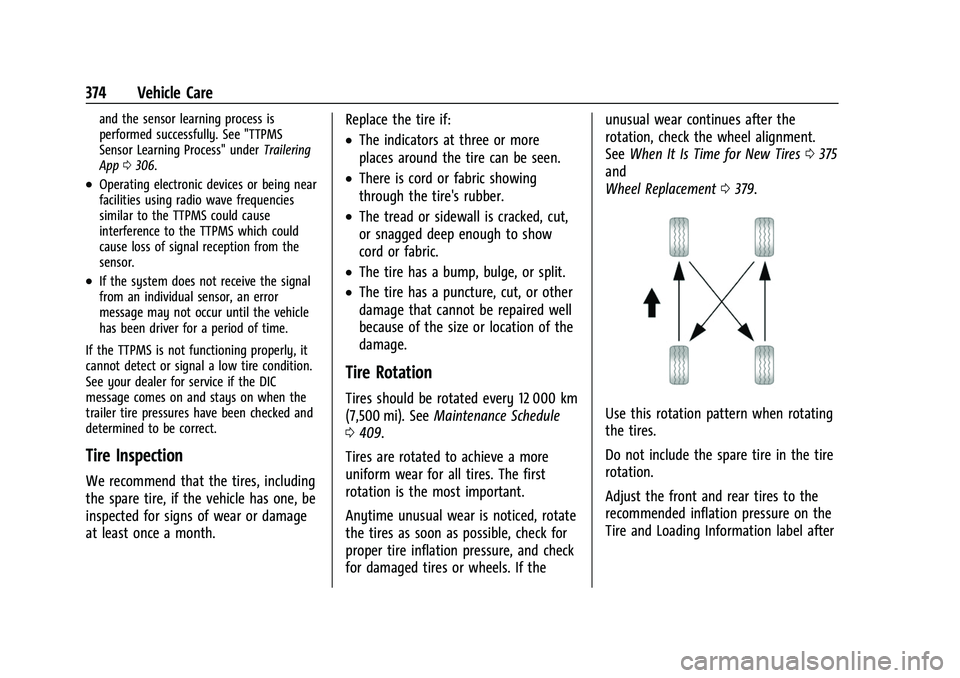
for damaged tires or wheels. If the unusual wear continues after the
rotation, check the wheel alignment.
See
When It Is Time for New Tires 0375
and
Wheel Replacement 0379.Use this rotation pattern when rotating
the tires.
Do not include the spare tire in the tire
rotation.
Adjust the front and rear tires to the
recommended inflation pressure on the
Tire and Loading Information label after
Page 379 of 463
 - 2021 - CRC - 11/9/20
376 Vehicle Care
four digits of the DOT Tire Identification
Number (TIN) molded int")
Chevrolet Silverado 1500 Owner Manual (GMNA-Localizing-U.S./Canada/
Mexico/Paraguay-14632303) - 2021 - CRC - 11/9/20
376 Vehicle Care
four digits of the DOT Tire Identification
Number (TIN) molded into one side of the
tire sidewall. The last four digits of the TIN
indicate the tire manufactured date. The
first two digits represent the week and the
last two digits, the year. For example, the
third week of the year 2020 would have a
4-digit DOT date of 0320. Week 01 is the
first full week (Sunday through Saturday) of
each year.
Vehicle Storage
Tires age when stored normally mounted on
a parked vehicle. Park a vehicle that will be
stored for at least a month in a cool, dry,
clean area away from direct sunlight to slow
aging. This area should be free of grease,
gasoline, or other substances that can
deteriorate rubber.
Parking for an extended period can cause
flat spots on the tires that may result in
vibrations while driving. When storing a
vehicle for at least a month, remove the
tires or raise the vehicle to reduce the
weight from the tires.
Buying New Tires
GM has developed and matched specific
tires for the vehicle. The original
equipment tires installed were designed
to meet General Motors Tire
Performance Criteria Specification (TPC
Spec) system rating. When replacement
tires are needed, GM strongly
recommends buying tires with the same
TPC Spec rating.
GM's exclusive TPC Spec system
considers over a dozen critical
specifications that impact the overall
performance of the vehicle, including
brake system performance, ride and
handling, traction control, and tire
pressure monitoring performance. GM's
TPC Spec number is molded onto the
tire's sidewall near the tire size. If the
tires have an all-season tread design,
the TPC Spec number will be followed
by MS for mud and snow. SeeTire
Sidewall Labeling 0362 for additional
information. GM recommends replacing worn tires in
complete sets of four. Uniform tread
depth on all tires will help to maintain
the performance of the vehicle. Braking
and handling performance may be
adversely affected if all the tires are not
replaced at the same time. If proper
rotation and maintenance have been
done, all four tires should wear out at
about the same time. However, if it is
necessary to replace only one axle set
of worn tires, place the new tires on
the rear axle. See
Tire Rotation0374.
{Warning
Tires could explode during improper
service. Attempting to mount or
dismount a tire could cause injury or
death. Only your dealer or authorized
tire service center should mount or
dismount the tires.
Page 381 of 463
 - 2021 - CRC - 11/9/20
378 Vehicle Care
tires with nominal rim diameters of
10 to 12 inches (25 to 30 cm),")
Chevrolet Silverado 1500 Owner Manual (GMNA-Localizing-U.S./Canada/
Mexico/Paraguay-14632303) - 2021 - CRC - 11/9/20
378 Vehicle Care
tires with nominal rim diameters of
10 to 12 inches (25 to 30 cm), or to some
limited-production tires.
While the tires available on General
Motors passenger cars and light trucks
may vary with respect to these grades,
they must also conform to federal
safety requirements and additional
General Motors Tire Performance
Criteria (TPC) standards.
Quality grades can be found where
applicable on the tire sidewall between
tread shoulder and maximum section
width. For example:
Treadwear 200 Traction AA Temperature A
All Passenger Car Tires Must Conform to
Federal Safety Requirements In Addition
To These Grades.
Treadwear
The treadwear grade is a comparative
rating based on the wear rate of the
tire when tested under controlled
conditions on a specified government
test course. For example, a tire graded
150 would wear one and one-half (1½)times as well on the government course
as a tire graded 100. The relative
performance of tires depends upon the
actual conditions of their use, however,
and may depart significantly from the
norm due to variations in driving habits,
service practices and differences in road
characteristics and climate.
Traction
The traction grades, from highest to
lowest, are AA, A, B, and C. Those
grades represent the tire's ability to
stop on wet pavement as measured
under controlled conditions on specified
government test surfaces of asphalt and
concrete. A tire marked C may have
poor traction performance. Warning:
The traction grade assigned to this tire
is based on straight-ahead braking
traction tests, and does not include
acceleration, cornering, hydroplaning,
or peak traction characteristics.
Temperature
The temperature grades are A (the
highest), B, and C, representing the
tire's resistance to the generation of
heat and its ability to dissipate heat
when tested under controlled conditions
on a specified indoor laboratory test
wheel. Sustained high temperature can
cause the material of the tire to
degenerate and reduce tire life, and
excessive temperature can lead to
sudden tire failure. The grade C
corresponds to a level of performance
which all passenger car tires must meet
under the Federal Motor Safety
Standard No. 109. Grades B and A
represent higher levels of performance
on the laboratory test wheel than the
minimum required by law. Warning:
The temperature grade for this tire is
established for a tire that is properly
inflated and not overloaded. Excessive
speed, underinflation, or excessive
loading, either separately or in
combination, can cause heat buildup
and possible tire failure.
Page 383 of 463
 - 2021 - CRC - 11/9/20
380 Vehicle Care
Warning (Continued)
instructions. To avoid vehicle damage,
drive s")
Chevrolet Silverado 1500 Owner Manual (GMNA-Localizing-U.S./Canada/
Mexico/Paraguay-14632303) - 2021 - CRC - 11/9/20
380 Vehicle Care
Warning (Continued)
instructions. To avoid vehicle damage,
drive slow and readjust or remove the
traction device if it is contacting the
vehicle. Do not spin the wheels.
If traction devices are used, install them
on the rear tires.
Caution
If the vehicle is equipped with a tire size
other than 275/50R22, 275/60R20,
LT265/60R20, LT265/70R17, or LT275/65R18
use tire chains only where legal and only
when necessary. Use chains that are the
proper size for the tires. Install them on
the tires of the rear axle. Do not use
chains on the tires of the front axle.
Tighten them as tightly as possible with
the ends securely fastened. Drive slowly
and follow the chain manufacturer's
instructions. If the chains contact the
vehicle, stop and retighten them. If the
contact continues, slow down until it
stops. Driving too fast or spinning the
wheels with chains on will damage the
vehicle.
If a Tire Goes Flat
It is unusual for a tire to blowout while
driving, especially if the tires are maintained
properly. If air goes out of a tire, it is much
more likely to leak out slowly. But if there
ever is a blowout, here are a few tips about
what to expect and what to do:
If a front tire fails, the flat tire creates a
drag that pulls the vehicle toward that side.
Take your foot off the accelerator pedal and
grip the steering wheel firmly. Steer to
maintain lane position, and then gently
brake to a stop, well off the road,
if possible.
A rear blowout, particularly on a curve, acts
much like a skid and may require the same
correction as used in a skid. Stop pressing
the accelerator pedal and steer to straighten
the vehicle. It may be very bumpy and
noisy. Gently brake to a stop, well off the
road, if possible.
{Warning
Driving on a flat tire will cause
permanent damage to the tire.
Re-inflating a tire after it has been driven
on while severely underinflated or flat(Continued)
Warning (Continued)
may cause a blowout and a serious crash.
Never attempt to re-inflate a tire that has
been driven on while severely
underinflated or flat. Have your dealer or
an authorized tire service center repair or
replace the flat tire as soon as possible.
{Warning
Lifting a vehicle and getting under it to
do maintenance or repairs is dangerous
without the appropriate safety equipment
and training. If a jack is provided with
the vehicle, it is designed only for
changing a flat tire. If it is used for
anything else, you or others could be
badly injured or killed if the vehicle slips
off the jack. If a jack is provided with the
vehicle, only use it for changing a
flat tire.
If a tire goes flat, avoid further tire and
wheel damage by driving slowly to a level
place, well off the road, if possible. Turn on
the hazard warning flashers. See Hazard
Warning Flashers 0142.
Page 393 of 463
 - 2021 - CRC - 11/9/20
390 Vehicle Care
9. Make sure the tire is stored securely.Push, pull, and then try")
Chevrolet Silverado 1500 Owner Manual (GMNA-Localizing-U.S./Canada/
Mexico/Paraguay-14632303) - 2021 - CRC - 11/9/20
390 Vehicle Care
9. Make sure the tire is stored securely.Push, pull, and then try to turn the tire.
If the tire moves, use the wheel wrench
to tighten the cable.
If equipped with a spare tire cable,
reattach the clip to the frame
attachment bracket. Note that there may
be slack in the cable.
Repeat this tightness check procedure
when checking the spare tire pressure
according to the scheduled maintenance
information or any time the spare tire is
handled due to service of other
components.
Correctly Stored
Incorrectly Stored
10. Reinstall the spare tire lock, if the vehicle has one.
Return the jack and tools to their original
location in the vehicle. See “Removing the
Spare Tire and Tools.”
Page 397 of 463
 - 2021 - CRC - 11/9/20
394 Vehicle Care
vehicle has one. Negative (−) will go to a
heavy, unpainted meta")
Chevrolet Silverado 1500 Owner Manual (GMNA-Localizing-U.S./Canada/
Mexico/Paraguay-14632303) - 2021 - CRC - 11/9/20
394 Vehicle Care
vehicle has one. Negative (−) will go to a
heavy, unpainted metal engine part or to
a remote negative (−) terminal if the
vehicle has one.
Do not connect positive (+) to negative
(−) or you will get a short that would
damage the battery and maybe other
parts too. And do not connect the
negative (−) cable to the negative (−)
terminal on the dead battery because
this can cause sparks.
7. Connect one end of the red positive (+) cable to the remote positive (+) terminal
of the vehicle with the discharged
battery.
8. Do not let the other end touch metal. Connect it to the positive (+) terminal of
the good battery. Use a remote
positive (+) terminal if the vehicle
has one.
9. Connect one end of the black negative (−) cable to the negative (−) terminal of
the good battery. Use a remote negative
(−) terminal if the vehicle has one.
Do not let the other end touch anything
until the next step. 10. Connect the other end of the negative
(−) cable to the remote negative (−)
terminal to the discharged battery.
11. Start the vehicle with the good battery and run the engine for a while.
12. Try to start the vehicle that had the dead battery. If it will not start after a
few tries, it probably needs service.
Caution
If the jumper cables are connected or
removed in the wrong order, electrical
shorting may occur and damage the
vehicle. The repairs would not be covered
by the vehicle warranty. Always connect
and remove the jumper cables in the
correct order, making sure that the cables
do not touch each other or other metal.
Jumper Cable Removal
Reverse the sequence exactly when
removing the jumper cables.
After starting the disabled vehicle and
removing the jumper cables, allow it to idle
for several minutes.
Towing the Vehicle
Caution
Incorrectly towing a disabled vehicle may
cause damage. The damage would not be
covered by the vehicle warranty. Do not
lash or hook to suspension components.
Use the proper straps around the tires to
secure the vehicle. Do not drag a locked
wheel/tire. Use tire skates or dollies
under any locked wheel/tire while
loading the vehicle. Do not use a sling
type lift to tow the vehicle. This could
damage the vehicle.
Caution
Improper use of the tow eye can damage
the vehicle. If equipped, use the tow eye
to load a disabled vehicle onto a flatbed
tow truck from a flat road surface, or to
move the vehicle a short distance. Use
caution and low speeds. The transmission
must be in (N) Neutral when moving the
vehicle.
Page 398 of 463
 - 2021 - CRC - 11/9/20
Vehicle Care 395
GM recommends a flatbed tow truck to
transport a disabled vehicle.")
Chevrolet Silverado 1500 Owner Manual (GMNA-Localizing-U.S./Canada/
Mexico/Paraguay-14632303) - 2021 - CRC - 11/9/20
Vehicle Care 395
GM recommends a flatbed tow truck to
transport a disabled vehicle. Use ramps to
help reduce approach angles, if necessary.
A towed vehicle should have its drive wheels
off the ground. Contact Roadside Assistance
or a professional towing service if the
disabled vehicle must be towed.
Front Attachment Points
The vehicle is equipped with specific
attachment points to be used to pull the
vehicle onto a flatbed car carrier from a flat
road surface. Do not use these attachment
points to pull the vehicle from snow, mud
or sand.
Recreational Vehicle Towing
Recreational vehicle towing means towing
the vehicle behind another vehicle, such as a
motor home. The two most common types
of recreational vehicle towing are dinghy
and dolly towing. Dinghy towing is towing
the vehicle with all four wheels on the
ground. Dolly towing is towing the vehicle
with two wheels on the ground and two
wheels on a dolly.
Here are some important things to consider
before recreational vehicle towing:
.Before towing the vehicle, become
familiar with the local laws that apply to
recreational vehicle towing. These laws
may vary by region.
.The towing capacity of the towing
vehicle. Read the tow vehicle
manufacturer's recommendations.
.How far the vehicle can be towed. Some
vehicles have restrictions on how far and
how long the vehicle can be towed.
.Whether the vehicle has the proper
towing equipment. See your dealer or
trailering professional for additional
advice and equipment recommendations.
.Whether the vehicle is ready to be towed.
Just as preparing the vehicle for a long
trip, make sure the vehicle is prepared to
be towed.
Follow the tow vehicle manufacturer’s
instructions. See your dealer or trailering
professional for additional advice and
equipment recommendations.
Caution
Use of a shield mounted in front of the
vehicle grille could restrict airflow and
cause damage to the transmission. The
repairs would not be covered by the
vehicle warranty. If using a shield, only
use one that attaches to the towing
vehicle.