turn signal CHEVROLET SILVERADO 1500 2023 Service Manual
[x] Cancel search | Manufacturer: CHEVROLET, Model Year: 2023, Model line: SILVERADO 1500, Model: CHEVROLET SILVERADO 1500 2023Pages: 463, PDF Size: 19.26 MB
Page 358 of 463
Chevrolet Silverado 1500 Owner Manual (GMNA-Localizing-U.S./Canada/
Mexico/Paraguay-16515119) - 2023 - CRC - 6/2/22
Vehicle Care 357
Bulb Replacement
For the proper type of replacement bulbs,
or any bulb changing procedure not listed in
this section, contact your dealer.
Caution
Do not replace incandescent bulbs with
aftermarket LED replacement bulbs. This
can cause damage to the vehicle electrical
system.
Halogen Bulbs
{Warning
Halogen bulbs have pressurized gas inside
and can burst if you drop or scratch the
bulb. You or others could be injured. Be
sure to read and follow the instructions
on the bulb package.
LED Lighting
This vehicle has several LED lamps. For
replacement of any LED lighting assembly,
contact your dealer.
Headlamps, Front Turn Signal,
Sidemarker, and Parking Lamps
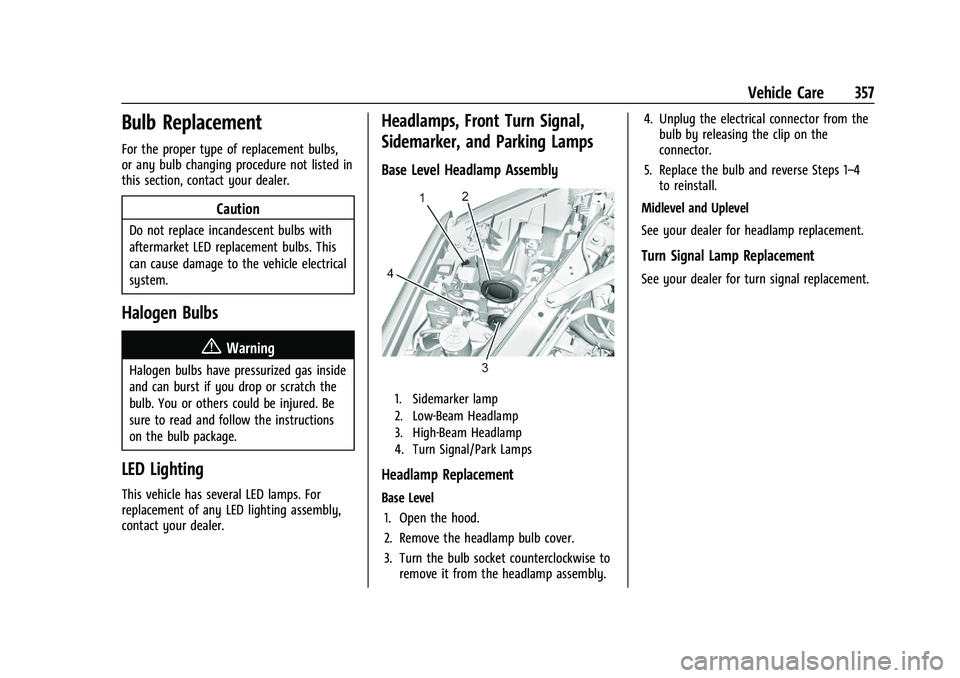
Base Level Headlamp Assembly
1. Sidemarker lamp
2. Low-Beam Headlamp
3. High-Beam Headlamp
4. Turn Signal/Park Lamps
Headlamp Replacement
Base Level1. Open the hood.
2. Remove the headlamp bulb cover.
3. Turn the bulb socket counterclockwise to remove it from the headlamp assembly. 4. Unplug the electrical connector from the
bulb by releasing the clip on the
connector.
5. Replace the bulb and reverse Steps 1–4 to reinstall.
Midlevel and Uplevel
See your dealer for headlamp replacement.
Turn Signal Lamp Replacement
See your dealer for turn signal replacement.
Page 359 of 463
Chevrolet Silverado 1500 Owner Manual (GMNA-Localizing-U.S./Canada/
Mexico/Paraguay-16515119) - 2023 - CRC - 6/2/22
358 Vehicle Care
Taillamps, Turn Signal, Stoplamps,
and Back-Up Lamps
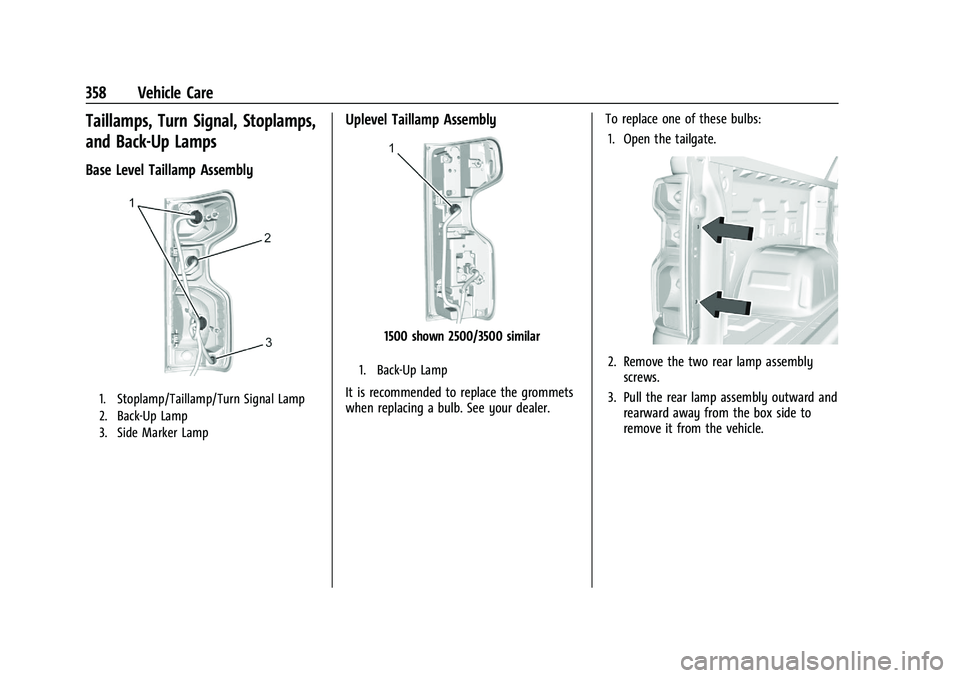
Base Level Taillamp Assembly
1. Stoplamp/Taillamp/Turn Signal Lamp
2. Back-Up Lamp
3. Side Marker Lamp
Uplevel Taillamp Assembly
1500 shown 2500/3500 similar
1. Back-Up Lamp
It is recommended to replace the grommets
when replacing a bulb. See your dealer.To replace one of these bulbs:
1. Open the tailgate.
2. Remove the two rear lamp assembly screws.
3. Pull the rear lamp assembly outward and rearward away from the box side to
remove it from the vehicle.
Page 380 of 463
Chevrolet Silverado 1500 Owner Manual (GMNA-Localizing-U.S./Canada/
Mexico/Paraguay-16515119) - 2023 - CRC - 6/2/22
Vehicle Care 379
.The TPMS sensor matching process was
not done or not completed successfully
after rotating the tires. The malfunction
light and the DIC message should go off
after successfully completing the sensor
matching process. See "TPMS Sensor
Matching Process" later in this section.
.One or more TPMS sensors are missing or
damaged. The malfunction light and the
DIC message should go off when the
TPMS sensors are installed and the sensor
matching process is performed
successfully. See your dealer for service.
.Replacement tires or wheels do not match
the original equipment tires or wheels.
Tires and wheels other than those
recommended could prevent the TPMS
from functioning properly. SeeBuying
New Tires 0383.
.Operating electronic devices or being near
facilities using radio wave frequencies
similar to the TPMS could cause the TPMS
sensors to malfunction.
If the TPMS is not functioning properly, it
cannot detect or signal a low tire pressure
condition. See your dealer for service if the
TPMS malfunction light and DIC message
come on and stay on.
Tire Fill Alert (If Equipped)
This feature provides visual and audible
alerts outside the vehicle to help when
inflating an underinflated tire to the
recommended cold tire pressure.
When the low tire pressure warning light
comes on: 1. Park the vehicle in a safe, level place.
2. Set the parking brake firmly.
3. Place the vehicle in P (Park).
4. Add air to the tire that is underinflated. The turn signal lamp will flash.
When the recommended pressure is
reached, the horn sounds once and the
turn signal lamp will stop flashing and
briefly turn solid.
Repeat these steps for all underinflated tires
that have illuminated the low tire pressure
warning light.
{Warning
Overinflating a tire could cause the tire
to rupture and you or others could be
injured. Do not exceed the maximum (Continued)
Warning (Continued)
pressure listed on the tire sidewall. See
Tire Sidewall Labeling0371 and
Vehicle Load Limits 0204.
If the tire is overinflated by more than
35 kPa (5 psi), the horn will sound multiple
times and the turn signal lamp will continue
to flash for several seconds after filling
stops. To release and correct the pressure,
while the turn signal lamp is still flashing,
briefly press the center of the valve stem.
When the recommended pressure is reached,
the horn sounds once.
If the turn signal lamp does not flash within
15 seconds after starting to inflate the tire,
the tire fill alert has not been activated or is
not working.
If the hazard warning flashers are on, the
tire fill alert visual feedback will not work
properly.
The TPMS will not activate the tire fill alert
properly under the following conditions:
.There is interference from an external
device or transmitter.
.The air pressure from the inflation device
is not sufficient to inflate the tire.
Page 381 of 463
Chevrolet Silverado 1500 Owner Manual (GMNA-Localizing-U.S./Canada/
Mexico/Paraguay-16515119) - 2023 - CRC - 6/2/22
380 Vehicle Care
.There is a malfunction in the TPMS.
.There is a malfunction in the horn or turn
signal lamps.
.The identification code of the TPMS
sensor is not registered to the system.
.The battery of the TPMS sensor is low.
If the tire fill alert does not operate due to
TPMS interference, move the vehicle about
1 m (3 ft) back or forward and try again.
If the tire fill alert feature is not working,
use a tire pressure gauge.
TPMS Sensor Matching Process —Auto
Learn Function
Each TPMS sensor has a unique
identification code. The identification code
needs to be matched to a new tire/wheel
position after rotating the tires or replacing
one or more of the TPMS sensors. When a
tire is installed, the vehicle must be
stationary for about 20 minutes before the
system recalculates. The following relearn
process takes up to 10 minutes, driving at a
minimum speed of 20 km/h (12 mph).
A dash (-) or pressure value will display in
the DIC. See Driver Information Center (DIC)
(Base Level) 0126 or Driver Information Center (DIC) (Uplevel)
0
127. A warning message displays in the
DIC if a problem occurs during the relearn
process.
Trailer Tire Pressure Monitoring
Operation
If equipped, the Trailer Tire Pressure
Monitoring System (TTPMS) is designed to
monitor the pressure of the trailer tires and
warn the driver when a low pressure
condition exists. TTPMS sensors for four tires
are provided. The system can accommodate
a trailer with up to six tires if additional
sensors are purchased from the dealer. Also,
the system can be paired with up to five
individual trailers.
Prior to use, the vehicle must learn the
sensors by following the learning process.
See Trailering App 0318.
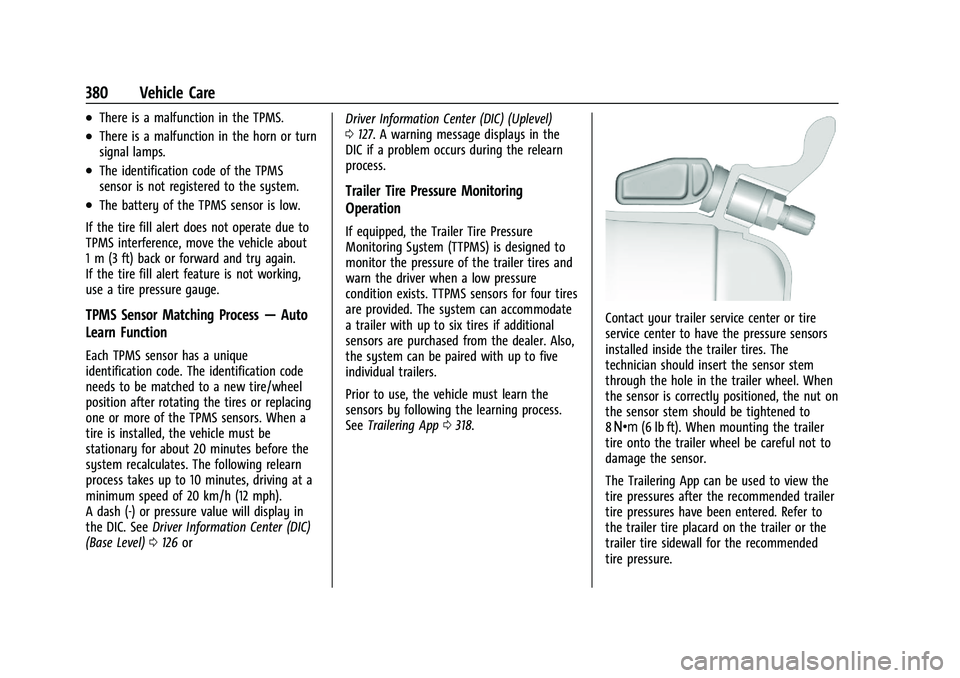
Contact your trailer service center or tire
service center to have the pressure sensors
installed inside the trailer tires. The
technician should insert the sensor stem
through the hole in the trailer wheel. When
the sensor is correctly positioned, the nut on
the sensor stem should be tightened to
8Y (6 lb ft). When mounting the trailer
tire onto the trailer wheel be careful not to
damage the sensor.
The Trailering App can be used to view the
tire pressures after the recommended trailer
tire pressures have been entered. Refer to
the trailer tire placard on the trailer or the
trailer tire sidewall for the recommended
tire pressure.
Page 382 of 463
Chevrolet Silverado 1500 Owner Manual (GMNA-Localizing-U.S./Canada/
Mexico/Paraguay-16515119) - 2023 - CRC - 6/2/22
Vehicle Care 381
The system is compatible with trailer tires
that have placard pressure values from 103 -
689 kpa (15 - 100 psi). The hole in the wheel
for the tire stem must be either 11.43 mm
(0.453 in) or 15.88 mm (0.625 in) in
diameter. Use of the pressure sensors on a
wheel with a different stem hole size could
result in loss of air from the tire.
If a low trailer tire pressure condition is
detected, the TTPMS displays a warning
message on the DIC. If the warning message
is displayed, stop as soon as possible and
inflate the tires to the recommended
pressure shown on the tire placard on the
trailer.
In addition, the TTPMS monitors the
temperature of the trailer tires. If the
system detects a high temperature on one
or more of the trailer tires, a warning
message will be displayed on the DIC. If this
warning message is displayed, stop as soon
as possible, and inspect the overheated
trailer tire. Common causes for high trailer
tire temperature are underinflation,
overloading, or tire damage.TTPMS Malfunction Message
The TTPMS will not function properly if one
or more of the trailer tire sensors are
missing or inoperable. If the system detects
a malfunction, a DIC message indicates that
the system requires service. Some of the
conditions that can cause the service
message to occur are:
.One of the trailer tires has been replaced
with the spare tire which does not have a
learned TTPMS sensor. The DIC message
should turn off after the pressure sensor
is installed in the tire, and the learning
process is performed successfully. See
"TTPMS Sensor Learning Process" under
Trailering App0318.
.The TTPMS sensor learning process was
not done or not completed successfully.
The DIC message should go off after
successfully completing the sensor
learning process. See "TTPMS Sensor
Learning Process" under Trailering App
0 318.
.One or more TTPMS sensors are missing
or damaged. The DIC message should go
off when the TTPMS sensors are installed
and the sensor learning process is performed successfully. See "TTPMS
Sensor Learning Process" under
Trailering
App 0318.
.Operating electronic devices or being near
facilities using radio wave frequencies
similar to the TTPMS could cause
interference to the TTPMS which could
cause loss of signal reception from the
sensor.
.If the system does not receive the signal
from an individual sensor, an error
message may not occur until the vehicle
has been driver for a period of time.
If the TTPMS is not functioning properly, it
cannot detect or signal a low tire condition.
See your dealer for service if the DIC
message comes on and stays on when the
trailer tire pressures have been checked and
determined to be correct.
Tire Inspection
We recommend that the tires, including
the spare tire, if the vehicle has one, be
inspected for signs of wear or damage
at least once a month.
Replace the tire if:
.The indicators at three or more
places around the tire can be seen.
Page 444 of 463
Chevrolet Silverado 1500 Owner Manual (GMNA-Localizing-U.S./Canada/
Mexico/Paraguay-16515119) - 2023 - CRC - 6/2/22
OnStar 443
.After change in ownership and at
90 days.
Transferring Service
PressQto request account transfer
eligibility information. The Advisor can
cancel or change account information.
Selling/Transferring the Vehicle
Call 1-888-4ONSTAR (1-888-466-7827)
immediately to terminate your OnStar or
connected services if the vehicle is disposed
of, sold, transferred, or if the lease ends.
Reactivation for Subsequent Owners
PressQand follow the prompts to speak to
an Advisor as soon as possible. The Advisor
will update vehicle records and explain
OnStar or connected service options.
How OnStar Service Works
Automatic Crash Response, Emergency
Services, Crisis Assist, Stolen Vehicle
Assistance, Remote Services, and Roadside
Assistance are available on most vehicles.
Not all OnStar services are available
everywhere or on all vehicles. For more
information, a full description of OnStar services, system limitations, and OnStar User
Terms, Privacy Statement, and Software
Terms:
.Call 1-888-4ONSTAR (1-888-466-7827).
.See www.onstar.com (U.S.).
.See www.onstar.ca (Canada).
.Call TTY 1-877-248-2080.
.PressQto speak with an Advisor.
OnStar or connected services cannot work
unless the vehicle is in a place where OnStar
has an agreement with a wireless service
provider for service in that area. The
wireless service provider must also have
coverage, network capacity, reception, and
technology compatible with OnStar or
connected services. Service involving location
information about the vehicle cannot work
unless GPS signals are available,
unobstructed, and compatible with the
OnStar hardware. OnStar or connected
services may not work if the OnStar
equipment is not properly installed or it has
not been properly maintained. If equipment
or software is added, connected,
or modified, OnStar or connected services
may not work. Other problems beyond the
control of OnStar —such as hills, tall
buildings, tunnels, weather, electrical system
design and architecture of the vehicle, damage to the vehicle in a crash, or wireless
phone network congestion or jamming
—
may prevent service.
See Radio Frequency Statement 0438.
Services for People with Disabilities
Advisors provide services to help with
physical disabilities and medical conditions.
Press
Qto help:
.Locate a gas station with an attendant to
pump gas.
.Find a hotel, restaurant, etc., that meets
accessibility needs.
.Provide directions to the closest hospital
or pharmacy in urgent situations.
TTY Users
OnStar has the ability to communicate to
deaf, hard-of-hearing, or speech-impaired
customers while in the vehicle. The available
TTY system can provide in-vehicle access to
all OnStar services, except Virtual Advisor
and OnStar Turn-by-Turn Navigation.
If equipped, TTY mode can be turned on or
off by touching Settings, then Apps, and
then Phone. When TTY mode is on, phone
calls can be made or received with OnStar
using the infotainment display.
Page 445 of 463
Chevrolet Silverado 1500 Owner Manual (GMNA-Localizing-U.S./Canada/
Mexico/Paraguay-16515119) - 2023 - CRC - 6/2/22
444 OnStar
OnStar Personal Identification
Number (PIN)
A PIN is needed to access some OnStar
services. The PIN will need to be changed
the first time when speaking with an
Advisor. To change the OnStar PIN, contact
an OnStar Advisor by pressing
Qor calling
1-888-4ONSTAR.
Warranty
OnStar equipment may be warranted as part
of the vehicle warranty.
Languages
The vehicle can be programmed to respond
in multiple languages. Press
Qand ask for
an Advisor. Advisors are available in English,
Spanish, and French. Available languages
may vary by country.
Potential Issues
OnStar cannot perform Remote Door Unlock
or Stolen Vehicle Assistance after the vehicle
has been off continuously for an extended
period of time without an ignition cycle. To
find out the duration of time that applies
for the vehicle, contact an OnStar Advisor by
pressing
Qor calling 1-888-4ONSTAR. If the
vehicle has not been started for an extended period of time, OnStar can contact Roadside
Assistance or a locksmith to help gain access
to the vehicle.
Global Positioning System (GPS)
.Obstruction of the GPS can occur in a
large city with tall buildings; in parking
garages; around airports; in tunnels and
underpasses; or in an area with very
dense trees. If GPS signals are not
available, the OnStar system should still
operate to call OnStar. However, OnStar
could have difficulty identifying the exact
location.
.In emergency situations, OnStar can use
the last stored GPS location to send to
emergency responders.
A temporary loss of GPS can cause loss of
the ability to send a Turn-by-Turn
Navigation route. The Advisor may give a
verbal route or may ask for a call back after
the vehicle is driven into an open area.
Cellular and GPS Antennas
Cellular reception is required for OnStar to
send remote signals to the vehicle. Do not
place items over or near the antenna to
prevent blocking cellular and GPS signal
reception.
Unable to Connect to OnStar Message
If there is limited cellular coverage or the
cellular network has reached maximum
capacity, this message may come on. Press
Qto try the call again or try again after
driving a few miles into another
cellular area.
Vehicle and Power Issues
OnStar services require a vehicle electrical
system, wireless service, and GPS satellite
technologies to be available and operating
for features to function properly. These
systems may not operate if the battery is
discharged or disconnected.
Add-on Electrical Equipment
The OnStar system is integrated into the
electrical architecture of the vehicle. Do not
add any electrical equipment. See Add-On
Electrical Equipment 0328. Added electrical
equipment may interfere with the operation
of the OnStar system and cause it to not
operate.
Vehicle Software Updates
OnStar or GM may remotely deliver
software updates or changes to the vehicle
without further notice or consent. These
Page 448 of 463
Chevrolet Silverado 1500 Owner Manual (GMNA-Localizing-U.S./Canada/
Mexico/Paraguay-16515119) - 2023 - CRC - 6/2/22
Connected Services 447
Ensuring Security
.Change the default passwords for the
Wi-Fi hotspot and myChevrolet mobile
application. Make these passwords
different from each other and use a
combination of letters and numbers to
increase the security.
.Change the default name of the SSID
(Service Set Identifier). This is your
network’s name that is visible to other
wireless devices. Choose a unique name
and avoid family names or vehicle
descriptions.
Wi-Fi Hotspot (If Equipped)
The vehicle may have a built-in Wi-Fi
hotspot that provides access to the Internet
and web content at 4G LTE speed. Up to
seven mobile devices can be connected.
A data plan is required. Use the in-vehicle
controls only when it is safe to do so. 1. To retrieve Wi-Fi hotspot information, press
=to open the OnStar app on the
infotainment display, then select Wi-Fi
Hotspot. On some vehicles, touch Wi-Fi
or Wi-Fi Settings on the screen.
2. The Wi-Fi settings will display the Wi-Fi hotspot name (SSID), password, and on
some vehicles, the connection type (no Internet connection, 3G, 4G, 4G LTE), and
signal quality (poor, good, excellent). The
LTE icon shows connection to Wi-Fi. It is
possible that the icon may not illuminate
even though the vehicle has an active
connection.
3. To change the SSID or password, press
Qor call 1-888-4ONSTAR to connect
with an Advisor. On some vehicles, the
SSID and password can be changed in
the Wi-Fi Hotspot menu.
After initial set-up, your vehicle’s Wi-Fi
hotspot will connect automatically to your
mobile devices. Manage data usage by
turning Wi-Fi on or off on your mobile
device, using the myChevrolet mobile app,
or by contacting an OnStar Advisor. On
some vehicles, Wi-Fi can also be managed
from the Wi-Fi Hotspot menu.
MyChevrolet Mobile App (If Available)
Download the myChevrolet mobile app to
compatible Apple and Android smartphones.
Chevrolet users can access the following
services from a smartphone:
.Remotely start/stop the vehicle,
if factory-equipped.
.Lock/unlock doors, if equipped with
automatic locks.
.Activate the horn and lamps.
.Check the vehicle’s fuel level, oil life,
or tire pressure, if factory-equipped with
the Tire Pressure Monitor System.
.Send destinations to the vehicle.
.Locate the vehicle on a map (U.S.
market only).
.Turn the vehicle's Wi-Fi hotspot on/off,
manage settings, and monitor data
consumption, if equipped.
.Locate a dealer and schedule service.
.Request Roadside Assistance.
.Set a parking reminder with pin drop,
take a photo, make a note, and set a
timer.
.Connect with Chevrolet on social media.
Features are subject to change. For
myChevrolet mobile app information and
compatibility, see my.chevrolet.com.
An active OnStar or connected service plan
may be required. A compatible device,
factory-installed remote start, and power
locks are required. Data rates apply. See
www.onstar.com for details and system
limitations.
Page 451 of 463
Chevrolet Silverado 1500 Owner Manual (GMNA-Localizing-U.S./Canada/-
Mexico/Paraguay-16515119) - 2023 - CRC - 6/2/22
450 Index
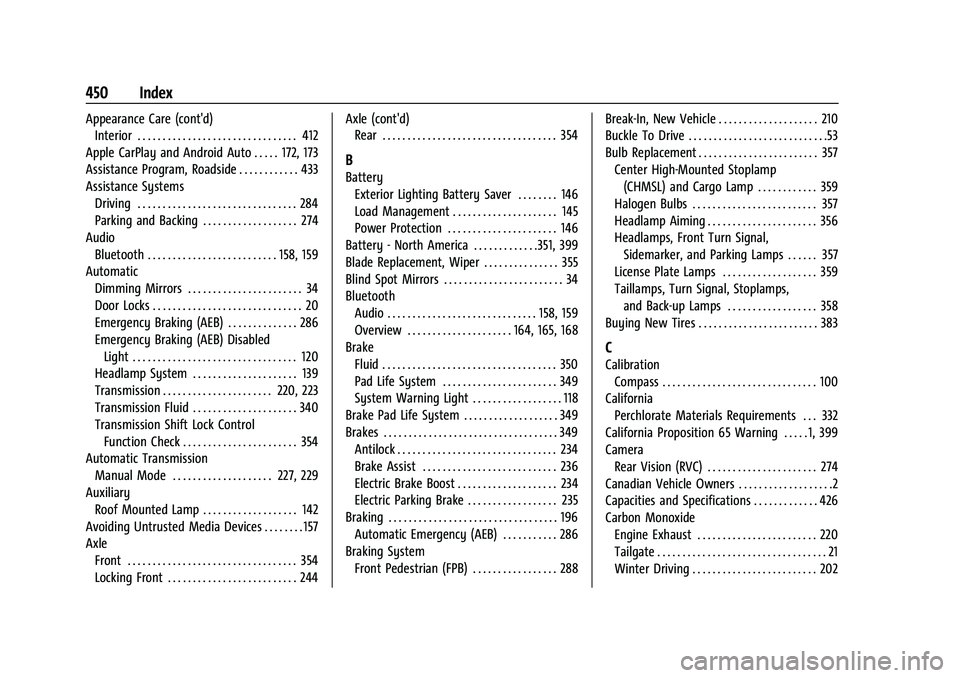
Appearance Care (cont'd)Interior . . . . . . . . . . . . . . . . . . . . . . . . . . . . . . . . 412
Apple CarPlay and Android Auto . . . . . 172, 173
Assistance Program, Roadside . . . . . . . . . . . . 433
Assistance Systems Driving . . . . . . . . . . . . . . . . . . . . . . . . . . . . . . . . 284
Parking and Backing . . . . . . . . . . . . . . . . . . . 274
Audio Bluetooth . . . . . . . . . . . . . . . . . . . . . . . . . . 158, 159
Automatic Dimming Mirrors . . . . . . . . . . . . . . . . . . . . . . . 34
Door Locks . . . . . . . . . . . . . . . . . . . . . . . . . . . . . . 20
Emergency Braking (AEB) . . . . . . . . . . . . . . 286
Emergency Braking (AEB) DisabledLight . . . . . . . . . . . . . . . . . . . . . . . . . . . . . . . . . 120
Headlamp System . . . . . . . . . . . . . . . . . . . . . 139
Transmission . . . . . . . . . . . . . . . . . . . . . . 220, 223
Transmission Fluid . . . . . . . . . . . . . . . . . . . . . 340
Transmission Shift Lock Control
Function Check . . . . . . . . . . . . . . . . . . . . . . . 354
Automatic Transmission
Manual Mode . . . . . . . . . . . . . . . . . . . . 227, 229
Auxiliary Roof Mounted Lamp . . . . . . . . . . . . . . . . . . . 142
Avoiding Untrusted Media Devices . . . . . . . . 157
Axle Front . . . . . . . . . . . . . . . . . . . . . . . . . . . . . . . . . . 354
Locking Front . . . . . . . . . . . . . . . . . . . . . . . . . . 244 Axle (cont'd)
Rear . . . . . . . . . . . . . . . . . . . . . . . . . . . . . . . . . . . 354
B
Battery
Exterior Lighting Battery Saver . . . . . . . . 146
Load Management . . . . . . . . . . . . . . . . . . . . . 145
Power Protection . . . . . . . . . . . . . . . . . . . . . . 146
Battery - North America . . . . . . . . . . . . .351, 399
Blade Replacement, Wiper . . . . . . . . . . . . . . . 355
Blind Spot Mirrors . . . . . . . . . . . . . . . . . . . . . . . . 34
Bluetooth Audio . . . . . . . . . . . . . . . . . . . . . . . . . . . . . . 158, 159
Overview . . . . . . . . . . . . . . . . . . . . . 164, 165, 168
Brake Fluid . . . . . . . . . . . . . . . . . . . . . . . . . . . . . . . . . . . 350
Pad Life System . . . . . . . . . . . . . . . . . . . . . . . 349
System Warning Light . . . . . . . . . . . . . . . . . . 118
Brake Pad Life System . . . . . . . . . . . . . . . . . . . 349
Brakes . . . . . . . . . . . . . . . . . . . . . . . . . . . . . . . . . . . 349 Antilock . . . . . . . . . . . . . . . . . . . . . . . . . . . . . . . . 234
Brake Assist . . . . . . . . . . . . . . . . . . . . . . . . . . . 236
Electric Brake Boost . . . . . . . . . . . . . . . . . . . . 234
Electric Parking Brake . . . . . . . . . . . . . . . . . . 235
Braking . . . . . . . . . . . . . . . . . . . . . . . . . . . . . . . . . . 196 Automatic Emergency (AEB) . . . . . . . . . . . 286
Braking System Front Pedestrian (FPB) . . . . . . . . . . . . . . . . . 288 Break-In, New Vehicle . . . . . . . . . . . . . . . . . . . . 210
Buckle To Drive . . . . . . . . . . . . . . . . . . . . . . . . . . . .53
Bulb Replacement . . . . . . . . . . . . . . . . . . . . . . . . 357
Center High-Mounted Stoplamp(CHMSL) and Cargo Lamp . . . . . . . . . . . . 359
Halogen Bulbs . . . . . . . . . . . . . . . . . . . . . . . . . 357
Headlamp Aiming . . . . . . . . . . . . . . . . . . . . . . 356
Headlamps, Front Turn Signal, Sidemarker, and Parking Lamps . . . . . . 357
License Plate Lamps . . . . . . . . . . . . . . . . . . . 359
Taillamps, Turn Signal, Stoplamps, and Back-up Lamps . . . . . . . . . . . . . . . . . . 358
Buying New Tires . . . . . . . . . . . . . . . . . . . . . . . . 383
C
Calibration Compass . . . . . . . . . . . . . . . . . . . . . . . . . . . . . . . 100
California Perchlorate Materials Requirements . . . 332
California Proposition 65 Warning . . . . . 1, 399
Camera Rear Vision (RVC) . . . . . . . . . . . . . . . . . . . . . . 274
Canadian Vehicle Owners . . . . . . . . . . . . . . . . . . .2
Capacities and Specifications . . . . . . . . . . . . . 426
Carbon Monoxide Engine Exhaust . . . . . . . . . . . . . . . . . . . . . . . . 220
Tailgate . . . . . . . . . . . . . . . . . . . . . . . . . . . . . . . . . . 21
Winter Driving . . . . . . . . . . . . . . . . . . . . . . . . . 202
Page 455 of 463
Chevrolet Silverado 1500 Owner Manual (GMNA-Localizing-U.S./Canada/-
Mexico/Paraguay-16515119) - 2023 - CRC - 6/2/22
454 Index
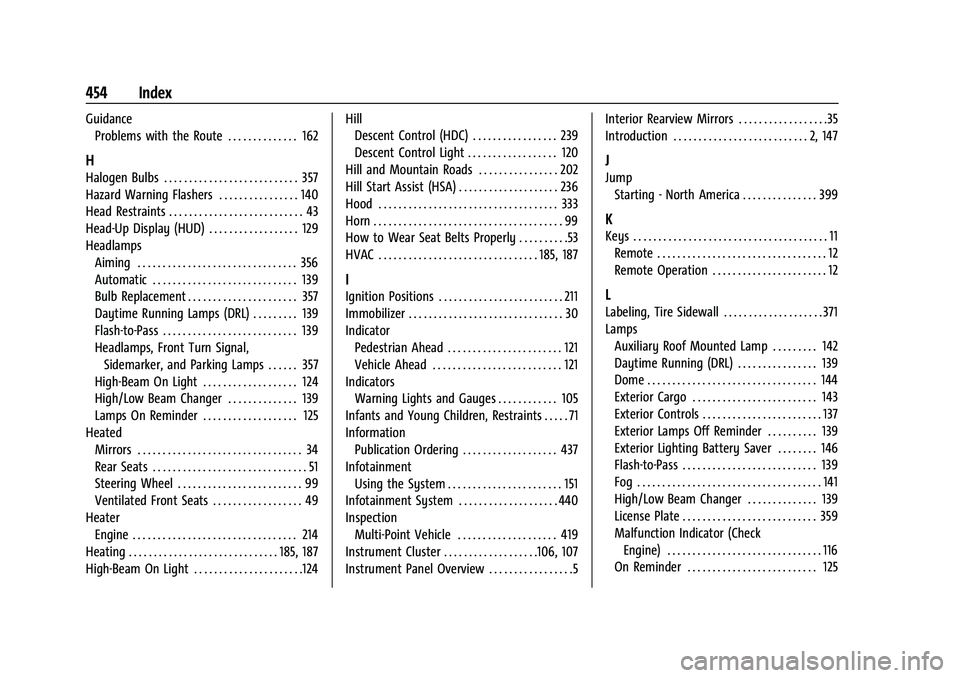
GuidanceProblems with the Route . . . . . . . . . . . . . . 162
H
Halogen Bulbs . . . . . . . . . . . . . . . . . . . . . . . . . . . 357
Hazard Warning Flashers . . . . . . . . . . . . . . . . 140
Head Restraints . . . . . . . . . . . . . . . . . . . . . . . . . . . 43
Head-Up Display (HUD) . . . . . . . . . . . . . . . . . . 129
Headlamps
Aiming . . . . . . . . . . . . . . . . . . . . . . . . . . . . . . . . 356
Automatic . . . . . . . . . . . . . . . . . . . . . . . . . . . . . 139
Bulb Replacement . . . . . . . . . . . . . . . . . . . . . . 357
Daytime Running Lamps (DRL) . . . . . . . . . 139
Flash-to-Pass . . . . . . . . . . . . . . . . . . . . . . . . . . . 139
Headlamps, Front Turn Signal,Sidemarker, and Parking Lamps . . . . . . 357
High-Beam On Light . . . . . . . . . . . . . . . . . . . 124
High/Low Beam Changer . . . . . . . . . . . . . . 139
Lamps On Reminder . . . . . . . . . . . . . . . . . . . 125
Heated Mirrors . . . . . . . . . . . . . . . . . . . . . . . . . . . . . . . . . 34
Rear Seats . . . . . . . . . . . . . . . . . . . . . . . . . . . . . . . 51
Steering Wheel . . . . . . . . . . . . . . . . . . . . . . . . . 99
Ventilated Front Seats . . . . . . . . . . . . . . . . . . 49
Heater Engine . . . . . . . . . . . . . . . . . . . . . . . . . . . . . . . . . 214
Heating . . . . . . . . . . . . . . . . . . . . . . . . . . . . . . 185, 187
High-Beam On Light . . . . . . . . . . . . . . . . . . . . . .124 Hill
Descent Control (HDC) . . . . . . . . . . . . . . . . . 239
Descent Control Light . . . . . . . . . . . . . . . . . . 120
Hill and Mountain Roads . . . . . . . . . . . . . . . . 202
Hill Start Assist (HSA) . . . . . . . . . . . . . . . . . . . . 236
Hood . . . . . . . . . . . . . . . . . . . . . . . . . . . . . . . . . . . . 333
Horn . . . . . . . . . . . . . . . . . . . . . . . . . . . . . . . . . . . . . . 99
How to Wear Seat Belts Properly . . . . . . . . . .53
HVAC . . . . . . . . . . . . . . . . . . . . . . . . . . . . . . . . 185, 187
I
Ignition Positions . . . . . . . . . . . . . . . . . . . . . . . . . 211
Immobilizer . . . . . . . . . . . . . . . . . . . . . . . . . . . . . . . 30
Indicator Pedestrian Ahead . . . . . . . . . . . . . . . . . . . . . . . 121
Vehicle Ahead . . . . . . . . . . . . . . . . . . . . . . . . . . 121
Indicators
Warning Lights and Gauges . . . . . . . . . . . . 105
Infants and Young Children, Restraints . . . . . 71
Information Publication Ordering . . . . . . . . . . . . . . . . . . . 437
Infotainment Using the System . . . . . . . . . . . . . . . . . . . . . . . 151
Infotainment System . . . . . . . . . . . . . . . . . . . . 440
Inspection Multi-Point Vehicle . . . . . . . . . . . . . . . . . . . . 419
Instrument Cluster . . . . . . . . . . . . . . . . . . .106, 107
Instrument Panel Overview . . . . . . . . . . . . . . . . .5 Interior Rearview Mirrors . . . . . . . . . . . . . . . . . .35
Introduction . . . . . . . . . . . . . . . . . . . . . . . . . . . 2, 147
J
Jump
Starting - North America . . . . . . . . . . . . . . . 399
K
Keys . . . . . . . . . . . . . . . . . . . . . . . . . . . . . . . . . . . . . . . 11Remote . . . . . . . . . . . . . . . . . . . . . . . . . . . . . . . . . . 12
Remote Operation . . . . . . . . . . . . . . . . . . . . . . . 12
L
Labeling, Tire Sidewall . . . . . . . . . . . . . . . . . . . . 371
LampsAuxiliary Roof Mounted Lamp . . . . . . . . . 142
Daytime Running (DRL) . . . . . . . . . . . . . . . . 139
Dome . . . . . . . . . . . . . . . . . . . . . . . . . . . . . . . . . . 144
Exterior Cargo . . . . . . . . . . . . . . . . . . . . . . . . . 143
Exterior Controls . . . . . . . . . . . . . . . . . . . . . . . . 137
Exterior Lamps Off Reminder . . . . . . . . . . 139
Exterior Lighting Battery Saver . . . . . . . . 146
Flash-to-Pass . . . . . . . . . . . . . . . . . . . . . . . . . . . 139
Fog . . . . . . . . . . . . . . . . . . . . . . . . . . . . . . . . . . . . . 141
High/Low Beam Changer . . . . . . . . . . . . . . 139
License Plate . . . . . . . . . . . . . . . . . . . . . . . . . . . 359
Malfunction Indicator (CheckEngine) . . . . . . . . . . . . . . . . . . . . . . . . . . . . . . . 116
On Reminder . . . . . . . . . . . . . . . . . . . . . . . . . . 125