tire pressure CHEVROLET SILVERADO 2003 1.G Owners Manual
[x] Cancel search | Manufacturer: CHEVROLET, Model Year: 2003, Model line: SILVERADO, Model: CHEVROLET SILVERADO 2003 1.GPages: 556, PDF Size: 3.56 MB
Page 290 of 556
The anti-lock system can change the brake pressure
faster than any driver could. The computer is
programmed to make the most of available tire and road
conditions. This can help you steer around the obstacle
while braking hard.
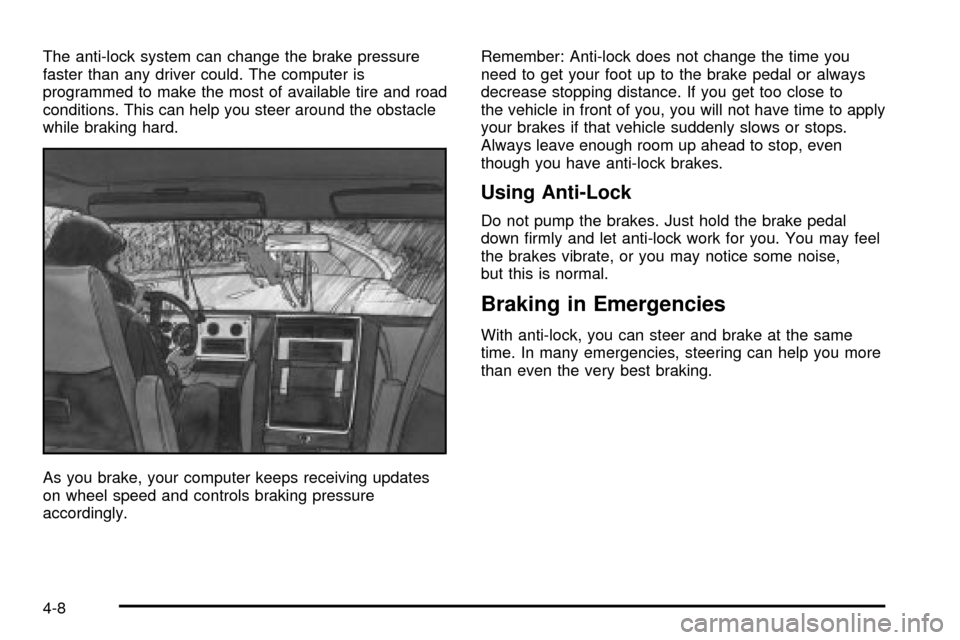
As you brake, your computer keeps receiving updates
on wheel speed and controls braking pressure
accordingly.Remember: Anti-lock does not change the time you
need to get your foot up to the brake pedal or always
decrease stopping distance. If you get too close to
the vehicle in front of you, you will not have time to apply
your brakes if that vehicle suddenly slows or stops.
Always leave enough room up ahead to stop, even
though you have anti-lock brakes.
Using Anti-Lock
Do not pump the brakes. Just hold the brake pedal
down ®rmly and let anti-lock work for you. You may feel
the brakes vibrate, or you may notice some noise,
but this is normal.
Braking in Emergencies
With anti-lock, you can steer and brake at the same
time. In many emergencies, steering can help you more
than even the very best braking.
4-8
Page 323 of 556
Hydroplaning
Hydroplaning is dangerous. So much water can build up
under your tires that they can actually ride on the
water. This can happen if the road is wet enough and
you're going fast enough. When your vehicle is
hydroplaning, it has little or no contact with the road.
Hydroplaning doesn't happen often. But it can if
your tires do not have much tread or if the pressure in
one or more is low. It can happen if a lot of water is
standing on the road. If you can see re¯ections
from trees, telephone poles or other vehicles, and
raindrops ªdimpleº the water's surface, there could be
hydroplaning.
Hydroplaning usually happens at higher speeds. There
just isn't a hard and fast rule about hydroplaning.
The best advice is to slow down when it is raining.
Driving Through Deep Standing Water
Notice:If you drive too quickly through deep
puddles or standing water, water can come in
through your engine's air intake and badly damage
your engine. Never drive through water that is
slightly lower than the underbody of your vehicle. If
you can not avoid deep puddles or standing
water, drive through them very slowly.
Driving Through Flowing Water
{CAUTION:
Flowing or rushing water creates strong
forces. If you try to drive through ¯owing
water, as you might at a low water crossing,
your vehicle can be carried away. As little as
six inches of ¯owing water can carry away a
smaller vehicle. If this happens, you and other
vehicle occupants could drown. Do not ignore
police warning signs, and otherwise be very
cautious about trying to drive through ¯owing
water.
4-41
Page 327 of 556

Here are some things you can check before a trip:
·Windshield Washer Fluid:Is the reservoir full? Are
all windows clean inside and outside?
·Wiper Blades:Are they in good shape?
·Fuel, Engine Oil, Other Fluids:Have you checked
all levels?
·Lamps:Are they all working? Are the lenses clean?
·Tires:They are vitally important to a safe,
trouble-free trip. Is the tread good enough for
long-distance driving? Are the tires all in¯ated to the
recommended pressure?
·Weather Forecasts:What's the weather outlook
along your route? Should you delay your trip a
short time to avoid a major storm system?
·Maps:Do you have up-to-date maps?
Highway Hypnosis
Is there actually such a condition as ªhighway
hypnosisº? Or is it just plain falling asleep at the wheel?
Call it highway hypnosis, lack of awareness, or
whatever.
There is something about an easy stretch of road with
the same scenery, along with the hum of the tires on the
road, the drone of the engine, and the rush of the
wind against the vehicle that can make you sleepy. Don't
let it happen to you! If it does, your vehicle can leave
the road in
less than a second,and you could crash and
be injured.
What can you do about highway hypnosis? First, be
aware that it can happen.
Then here are some tips:
·Make sure your vehicle is well ventilated, with a
comfortably cool interior.
·Keep your eyes moving. Scan the road ahead and
to the sides. Check your mirrors and your
instruments frequently.
·If you get sleepy, pull off the road into a rest,
service or parking area and take a nap, get some
exercise, or both. For safety, treat drowsiness
on the highway as an emergency.
4-45
Page 340 of 556
Loading Your Vehicle
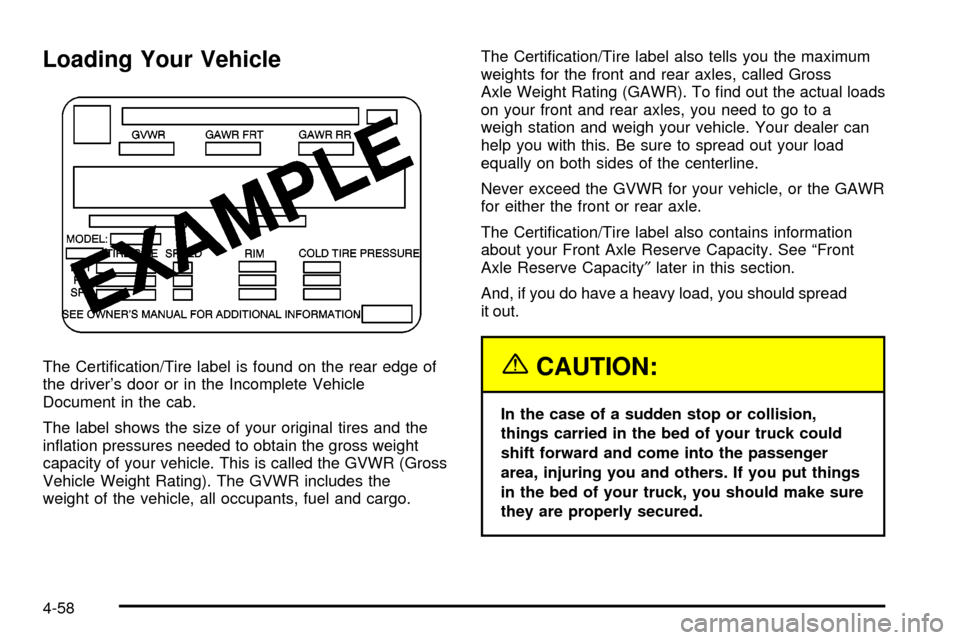
The Certi®cation/Tire label is found on the rear edge of
the driver's door or in the Incomplete Vehicle
Document in the cab.
The label shows the size of your original tires and the
in¯ation pressures needed to obtain the gross weight
capacity of your vehicle. This is called the GVWR (Gross
Vehicle Weight Rating). The GVWR includes the
weight of the vehicle, all occupants, fuel and cargo.The Certi®cation/Tire label also tells you the maximum
weights for the front and rear axles, called Gross
Axle Weight Rating (GAWR). To ®nd out the actual loads
on your front and rear axles, you need to go to a
weigh station and weigh your vehicle. Your dealer can
help you with this. Be sure to spread out your load
equally on both sides of the centerline.
Never exceed the GVWR for your vehicle, or the GAWR
for either the front or rear axle.
The Certi®cation/Tire label also contains information
about your Front Axle Reserve Capacity. See ªFront
Axle Reserve Capacity²later in this section.
And, if you do have a heavy load, you should spread
it out.{CAUTION:
In the case of a sudden stop or collision,
things carried in the bed of your truck could
shift forward and come into the passenger
area, injuring you and others. If you put things
in the bed of your truck, you should make sure
they are properly secured.
4-58
Page 382 of 556

Bulb Replacement..........................................5-59
Halogen Bulbs..............................................5-59
Headlamps..................................................5-59
Front Turn Signal, Sidemarker and Daytime
Running Lamps.........................................5-61
Roof Marker Lamps......................................5-62
Center High-Mounted Stoplamp (CHMSL) and
Cargo Lamp.............................................5-63
Pickup Box Identi®cation and Fender Marker
Lamps.....................................................5-65
Taillamps.....................................................5-65
Replacement Bulbs.......................................5-67
Windshield Wiper Blade Replacement..............5-68
Tires..............................................................5-69
In¯ation -- Tire Pressure................................5-69
Dual Tire Operation.......................................5-70
Tire Inspection and Rotation...........................5-71
When It Is Time for New Tires.......................5-73
Buying New Tires.........................................5-74
Uniform Tire Quality Grading..........................5-75
Wheel Alignment and Tire Balance..................5-76
Wheel Replacement......................................5-76
Tire Chains..................................................5-78
If a Tire Goes Flat........................................5-79
Changing a Flat Tire.....................................5-80Appearance Care..........................................5-100
Cleaning the Inside of Your Vehicle...............5-100
Care of Safety Belts....................................5-103
Weatherstrips.............................................5-103
Cleaning the Outside of Your Vehicle.............5-103
Sheet Metal Damage...................................5-105
Finish Damage...........................................5-106
Underbody Maintenance...............................5-106
Chemical Paint Spotting...............................5-106
Vehicle Care/Appearance Materials................5-107
Vehicle Identi®cation.....................................5-108
Vehicle Identi®cation Number (VIN)................5-108
Service Parts Identi®cation Label...................5-109
Electrical System..........................................5-109
Add-On Electrical Equipment.........................5-109
Windshield Wiper Fuses...............................5-109
Power Windows and Other Power Options......5-109
Fuses and Circuit Breakers..........................5-110
Capacities and Speci®cations........................5-118
Capacities and Speci®cations........................5-118
Normal Maintenance Replacement Parts.........5-121
Section 5 Service and Appearance Care
5-2
Page 449 of 556
Tires
Your new vehicle comes with high-quality tires made by
a leading tire manufacturer. If you ever have questions
about your tire warranty and where to obtain service,
see your Chevrolet Warranty booklet for details.
{CAUTION:
Poorly maintained and improperly used tires
are dangerous.
·Overloading your tires can cause
overheating as a result of too much
friction. You could have an air-out and a
serious accident. See ªLoading Your
Vehicleº in the Index.
·Underin¯ated tires pose the same danger
as overloaded tires. The resulting accident
could cause serious injury. Check all tires
frequently to maintain the recommended
pressure. Tire pressure should be checked
when your tires are cold.
CAUTION: (Continued)
CAUTION: (Continued)
·
Overin¯ated tires are more likely to be cut,
punctured or broken by a sudden
impact Ð such as when you hit a pothole.
Keep tires at the recommended pressure.
·Worn, old tires can cause accidents. If your
tread is badly worn, or if your tires have
been damaged, replace them.
In¯ation -- Tire Pressure
The Certi®cation/Tire label or Tire and Loading
Information label shows the correct in¯ation pressures
for your tires when they're cold. ªColdº means your
vehicle has been sitting for at least three hours or driven
no more than 1 mile (1.6 km). See
Loading Your
Vehicle on page 4-58.
Notice:Don't let anyone tell you that underin¯ation
or overin¯ation is all right. It's not. If your tires
don't have enough air (underin¯ation), you can get
the following:
·Too much ¯exing
·Too much heat
5-69
Page 450 of 556

·Tire overloading
·Bad wear
·Bad handling
·Bad fuel economy
If your tires have too much air (overin¯ation), you
can get the following:
·Unusual wear
·Bad handling
·Rough ride
·Needless damage from road hazards
When to Check
Check your tires once a month or more.
Also, check the tire pressure of the spare tire.
How to Check
Use a good quality pocket-type gage to check tire
pressure. You can't tell if your tires are properly in¯ated
simply by looking at them. Radial tires may look
properly in¯ated even when they're underin¯ated.Remove the valve cap from the tire valve stem. Press
the tire gage ®rmly onto the valve to get a pressure
measurement. If the cold tire in¯ation pressure is low,
add air until you reach the recommended amount.
If you over®ll the tire, release air by pushing on the metal
stem in the center of the tire valve. Recheck the tire
pressure with the tire gage.
Be sure to put the valve caps back on the valve stems.
They help prevent leaks by keeping out dirt and
moisture.
Dual Tire Operation
When the vehicle is new, or whenever a wheel, wheel
bolt or wheel nut is replaced, check the wheel nut torque
after 100, 1,000 and 6,000 miles (160, 1 600 and
10 000 km) of driving. For proper torque and wheel nut
tightening information, see ªRemoving the Flat Tire
and Installing the Spare Tireº in the index.
The outer tire on a dual wheel setup generally wears
faster than the inner tire. Your tires will wear more
evenly and last longer if you rotate the tires periodically.
See ªTire Inspection and Rotationº earlier in this
section. Also see ªScheduled Maintenance Servicesº in
the Index for scheduled rotation intervals
5-70
Page 451 of 556
{CAUTION:
If you operate your vehicle with a tire that is
badly underin¯ated, the tire can overheat. An
overheated tire can lose air suddenly or catch
®re. You or others could be injured. Be sure all
tires (including the spare) are properly in¯ated.
See ªTiresº and ªIn¯ation ± Tire Pressureº in the Index
for more information on proper tire in¯ation.
Tire Inspection and Rotation
Tires should be rotated every 7,500 miles (12 500 km).
Any time you notice unusual wear, rotate your tires
as soon as possible and check wheel alignment. Also
check for damaged tires or wheels. See
When It Is Time
for New Tires on page 5-73andWheel Replacement
on page 5-76for more information.
Make sure the spare tire is stored securely. Push, pull,
and then try to rotate or turn the tire. If it moves,
use the wheel wrench/hoist shaft to tighten the cable.
See
Changing a Flat Tire on page 5-80.
If your vehicle has dual rear wheels, also see
Dual Tire
Operation on page 5-70.The purpose of regular rotation is to achieve more
uniform wear for all tires on the vehicle. The ®rst rotation
is the most important. See ªPart A: Scheduled
Maintenance Services,º in Section 6, for scheduled
rotation intervals.
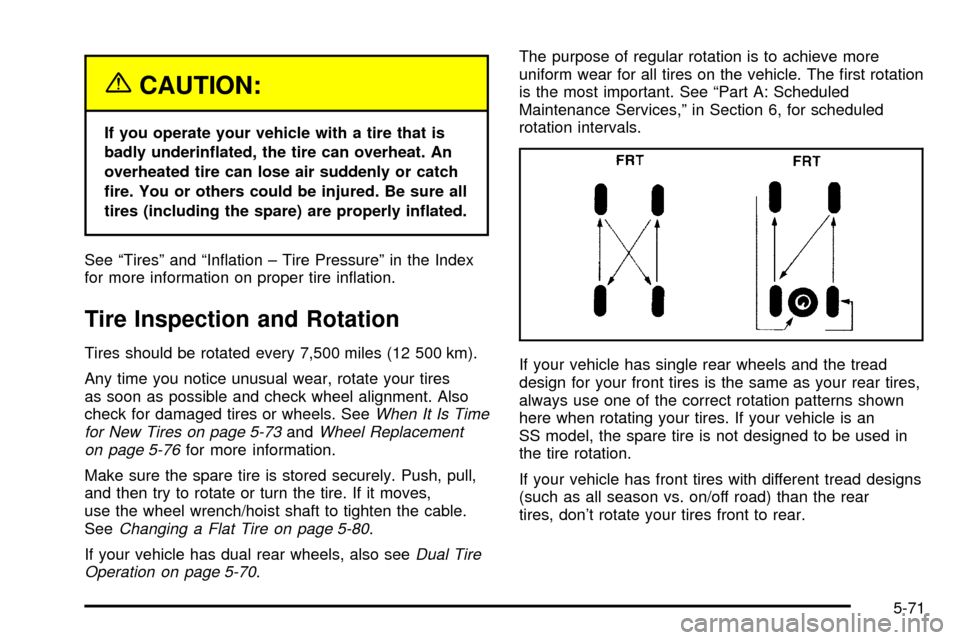
If your vehicle has single rear wheels and the tread
design for your front tires is the same as your rear tires,
always use one of the correct rotation patterns shown
here when rotating your tires. If your vehicle is an
SS model, the spare tire is not designed to be used in
the tire rotation.
If your vehicle has front tires with different tread designs
(such as all season vs. on/off road) than the rear
tires, don't rotate your tires front to rear.
5-71
Page 452 of 556

If your vehicle has dual rear wheels and the tread
design for your front tires is the same as your rear tires,
always use one of the correct rotation patterns shown
here when rotating your tires.If your vehicle has dual rear
wheels and the tread
design for the front tires is
different from the dual rear
tires, always use the
correct rotation pattern
shown here when rotating
your tires. The dual tires
are rotated as a pair, and
the inside rear tires became
the outside rear tires.
When you install dual wheels, be sure the vent holes in
the inner and outer wheels on each side are lined up.
After the tires have been rotated, adjust the front and
rear in¯ation pressures as shown on the
Certi®cation/Tire label. Make certain that all wheel nuts
are properly tightened. See ªWheel Nut Torqueº
under
Capacities and Speci®cations on page 5-118.
5-72
Page 498 of 556
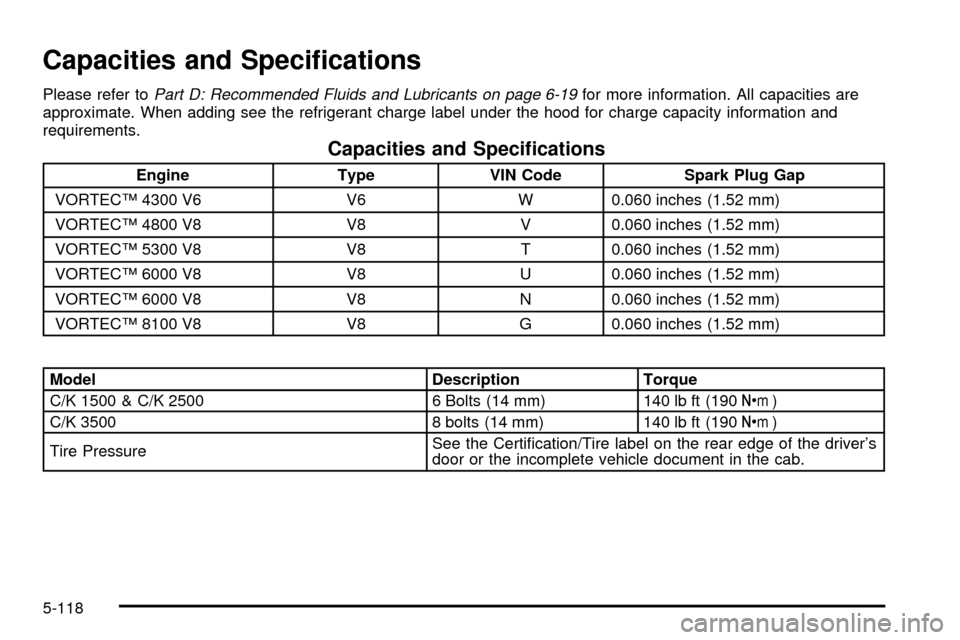
Capacities and Speci®cations
Please refer toPart D: Recommended Fluids and Lubricants on page 6-19for more information. All capacities are
approximate. When adding see the refrigerant charge label under the hood for charge capacity information and
requirements.
Capacities and Speci®cations
Engine Type VIN Code Spark Plug Gap
VORTECŸ 4300 V6 V6 W 0.060 inches (1.52 mm)
VORTECŸ 4800 V8 V8 V 0.060 inches (1.52 mm)
VORTECŸ 5300 V8 V8 T 0.060 inches (1.52 mm)
VORTECŸ 6000 V8 V8 U 0.060 inches (1.52 mm)
VORTECŸ 6000 V8 V8 N 0.060 inches (1.52 mm)
VORTECŸ 8100 V8 V8 G 0.060 inches (1.52 mm)
Model Description Torque
C/K 1500 & C/K 2500 6 Bolts (14 mm) 140 lb ft (190Y)
C/K 3500 8 bolts (14 mm) 140 lb ft (190Y)
Tire PressureSee the Certi®cation/Tire label on the rear edge of the driver's
door or the incomplete vehicle document in the cab.
5-118