CHEVROLET SILVERADO 2012 2.G Owners Manual
Manufacturer: CHEVROLET, Model Year: 2012, Model line: SILVERADO, Model: CHEVROLET SILVERADO 2012 2.GPages: 584, PDF Size: 8.03 MB
Page 351 of 584
Black plate (65,1)Chevrolet Silverado Owner Manual - 2012
Driving and Operating 9-65
If traction control is turned off,
only the brake-traction control
portion of traction control will work.
The engine speed management will
be disabled. In this mode, engine
power is not reduced automatically
and the driven wheels can spin
more freely. This can cause the
brake-traction control to activate
constantly.
Notice:If the wheel(s) of one axle
is allowed to spin excessively
while the StabiliTrak
®, ABS, brake
warning lights, and any relevant
DIC messages are displayed, the
transfer case could be damaged.
The repairs would not be covered
by the vehicle warranty. Reduce
engine power and do not spin the
wheel(s) excessively while these
lights and messages are
displayed.
The TCS may activate on dry or
rough roads or under conditions
such as heavy acceleration while turning or abrupt upshifts/downshifts
of the transmission. When this
happens, a reduction in acceleration
may be noticed, or a noise or
vibration may be heard. This is
normal.
If cruise control is being used when
the system activates, the StabiliTrak
light will flash and cruise control
will automatically disengage.
Cruise control may be reengaged
when road conditions allow.
See
Cruise Control on page 9‑66.
StabiliTrak may also turn off
automatically if it determines that a
problem exists with the system.
If the problem does not clear itself
after restarting the vehicle, see your
dealer for service.
Non-hybrid vehicles with StabiliTrak
have a Trailer Sway Control (TSC)
feature. See Trailer Sway Control
(TSC) on page 9‑114. Non-hybrid vehicles with StabiliTrak
have a Hill Start Assist (HSA)
feature. See
Hill Start Assist (HSA)
on page 9‑62.
Adding non‐dealer accessories can
affect the vehicle's performance.
See Accessories and Modifications
on page 10‑3.
Locking Rear Axle
Vehicles with a locking rear axle can
give more traction on snow, mud,
ice, sand, or gravel. It works like a
standard axle most of the time, but
when traction is low, this feature will
allow the rear wheel with the most
traction to move the vehicle.
Page 352 of 584
Black plate (66,1)Chevrolet Silverado Owner Manual - 2012
9-66 Driving and Operating
Cruise Control
{WARNING
Cruise control can be dangerous
where you cannot drive safely at
a steady speed. So, do not use
the cruise control on winding
roads or in heavy traffic.
Cruise control can be dangerous
on slippery roads. On such roads,
fast changes in tire traction can
cause excessive wheel slip, and
you could lose control. Do not use
cruise control on slippery roads.
For vehicles with cruise control, a
speed of about 40 km/h (25 mph) or
more can be maintained without
keeping your foot on the
accelerator. Cruise control does not
work at speeds below about 40 km/h
(25 mph). When the brakes are applied, cruise
control is turned off.
For vehicles with an Allison or
Hydra‐Matic 6‐speed automatic
transmission, see
“Grade Braking”
under Tow/Haul Mode on page 9‑43
for an explanation of how cruise
control interacts with the Range
Selection Mode, tow/haul and grade
braking systems.
For vehicles with the StabiliTrak
system that begins to limit wheel
spin while you are using cruise
control, the cruise control will
automatically disengage. See
StabiliTrak
®System on page 9‑62.
When road conditions allow the
cruise control to be safely used
again, it can be turned back on.
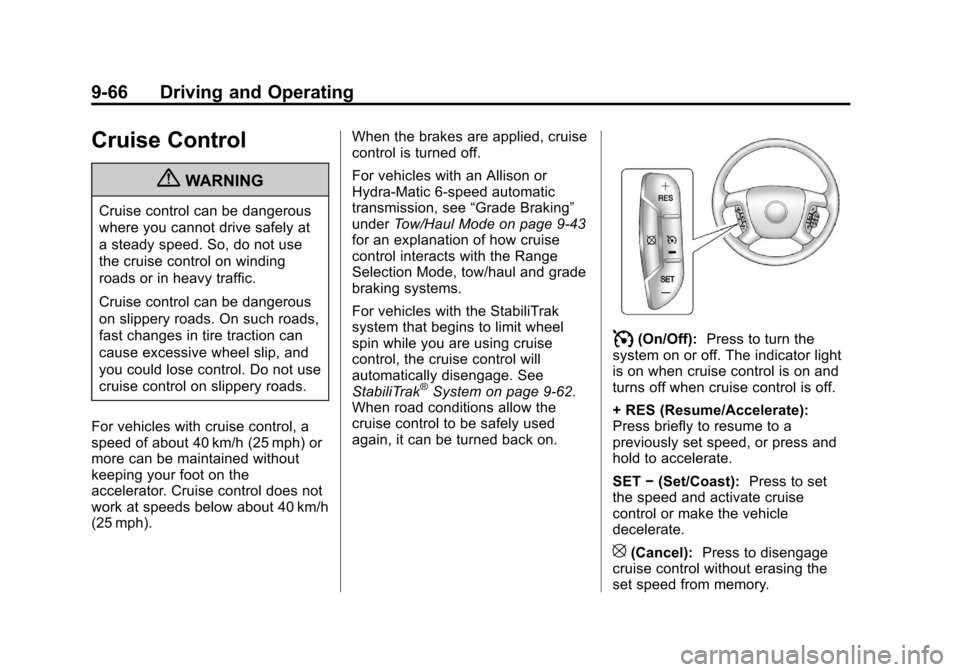
I(On/Off): Press to turn the
system on or off. The indicator light
is on when cruise control is on and
turns off when cruise control is off.
+ RES (Resume/Accelerate):
Press briefly to resume to a
previously set speed, or press and
hold to accelerate.
SET −(Set/Coast): Press to set
the speed and activate cruise
control or make the vehicle
decelerate.
[(Cancel): Press to disengage
cruise control without erasing the
set speed from memory.
Page 353 of 584
Black plate (67,1)Chevrolet Silverado Owner Manual - 2012
Driving and Operating 9-67
Setting Cruise Control
If the cruise button is on when not in
use, it could get bumped and go into
cruise when not desired. Keep the
cruise control switch off when cruise
is not being used.
The cruise control light on the
instrument panel cluster will come
on after the cruise control has been
set to the desired speed.
1. Press
I.
2. Get up to the desired speed.
3. Press the SET− button located
on the steering wheel and
release it.
4. Take your foot off the accelerator. Resuming a Set Speed
If the cruise control is set at a
desired speed and then the brakes
are applied, the cruise control is
disengaged without erasing the set
speed from memory.
Once the vehicle speed reaches
about 40 km/h (25 mph) or more,
press the +RES button on the
steering wheel. The vehicle returns
to the previous set speed and stays
there.
Increasing Speed While Using
Cruise Control
If the cruise control system is
already activated,
.Press and hold the +RES button
on the steering wheel until the
desired speed is reached, then
release it.
.To increase vehicle speed in
small amounts, press the +RES
button. Each time this is done,
the vehicle goes about 1.6 km/h
(1 mph) faster.Reducing Speed While Using
Cruise Control
If the cruise control system is
already activated,
.Press and hold the SET–
button
on the steering wheel until the
desired lower speed is reached,
then release it.
.To slow down in small amounts,
press the SET– button on the
steering wheel briefly. Each time
this is done, the vehicle goes
about 1.6 km/h (1 mph) slower.
Passing Another Vehicle While
Using Cruise Control
Use the accelerator pedal to
increase the vehicle speed.
When you take your foot off the
pedal, the vehicle will slow down
to the previous set cruise speed.
Page 354 of 584
Black plate (68,1)Chevrolet Silverado Owner Manual - 2012
9-68 Driving and Operating
Using Cruise Control on Hills
How well the cruise control works
on hills depends on the vehicle
speed, the load, and the steepness
of the hills. When going up steep
hills, pressing the accelerator pedal
may be necessary to maintain
vehicle speed.
While going downhill:
.Vehicles with a four speed
automatic transmission may
need to have the brakes applied
or the transmission shifted to
a lower gear to keep the
speed down.
.Vehicles with a six speed
automatic transmission have a
Cruise Grade Braking feature
that may automatically shift to a
lower gear to keep the speed
down. It may be necessary to
apply the brake or manually shift
the transmission to a lower
gear. The vehicle may shift to a
higher gear when grade braking
assistance is no longer required.Cruise Grade Braking is not
available while in Range
Selection Mode. This feature is
active when the exhaust brake
is enabled (if equipped). See
"Range Selection Mode" under
Manual Mode on page 9‑42.
When the brakes are manually
applied the cruise control is
disengaged.
Ending Cruise Control
There are three ways to end cruise
control:
.To disengage cruise control;
step lightly on the brake pedal.
.Press[on the steering wheel.
.To turn off the cruise control,
press
Ion the steering wheel.
Erasing Speed Memory
The cruise control set speed is
erased from memory by pressing
Ior if the ignition is turned off.
Object Detection
Systems
Ultrasonic Parking Assist
If available, the Ultrasonic Rear
Parking Assist (URPA) system
assists the driver with parking
and avoiding objects while in
R (Reverse). URPA operates at
speeds less than 8 km/h (5 mph).
The sensors on the rear bumper
detect objects up to 2.5 m (8 ft)
behind the vehicle, and at least
25 cm (10 in) off the ground.
{WARNING
The URPA system does not
detect pedestrians, bicyclists,
animals, or any other objects
located below the bumper or that
are too close or too far from the
vehicle. To prevent injury, death, (Continued)
Page 355 of 584
Black plate (69,1)Chevrolet Silverado Owner Manual - 2012
Driving and Operating 9-69
WARNING (Continued)
or vehicle damage, even with
URPA, always check behind the
vehicle and check all mirrors
before backing.
How the System Works
URPA comes on automatically
when the shift lever is moved into
R (Reverse). A single tone sounds
to indicate the system is working.
URPA operates only at speeds less
than 8 km/h (5 mph).
An obstacle is indicated by audible
beeps. The interval between the
beeps becomes shorter as the
vehicle gets closer to the obstacle.
When the distance is less than
30 cm (12 in) the beeping is a
continuous tone for five seconds.To be detected, objects must be at
least 25 cm (10 in) off the ground
and below tailgate level. Objects
must also be within 2.5 m (8 ft) from
the rear bumper. This distance may
be less during warmer or humid
weather.
Turning the System On and Off
The URPA system can be turned on
and off using the rear park aid
disable button located next to the
radio.
The indicator light comes on when
the system is disabled and turns off
when the system is on.
When the system is off, PARK
ASSIST OFF displays on the
Driver Information Center (DIC).
The message disappears after a
short period of time.
URPA defaults to the on setting
each time the vehicle is started.
Notice:
If you use URPA while the
tailgate is lowered, it may not
detect an object behind your
vehicle, and you might back into
the object and damage your
vehicle. Always verify the tailgate
is closed when using URPA or
turn off URPA when driving with
the tailgate lowered.
Page 356 of 584
Black plate (70,1)Chevrolet Silverado Owner Manual - 2012
9-70 Driving and Operating
When the System Does Not
Seem to Work Properly
The following messages may be
displayed on the DIC:
SERVICE PARK ASSIST:If this
message occurs, take the vehicle to
your dealer to repair the system.
PARK ASST BLOCKED SEE
OWNERS MANUAL: This
message can occur under the
following conditions:
.The ultrasonic sensors are not
clean. Keep the vehicle's rear
bumper free of mud, dirt, snow,
ice, and slush. For cleaning
instructions, see Exterior Care
on page 10‑102.
.The park assist sensors are
covered by frost or ice. Frost or
ice can form around and behind
the sensors and may not always
be seen; this can occur after
washing the vehicle in cold
weather. The message may not
clear until the frost or ice has
melted.
.A trailer was attached to the
vehicle, or an object was
hanging out of the tailgate during
the last drive cycle. Once the
object is removed and the
tailgate is raised, URPA will
return to normal operation.
.A tow bar is attached to the
vehicle.
.The bumper is damaged.
Take the vehicle to your dealer
to repair the system.
.Other conditions, such as
vibrations from a jackhammer or
the compression of air brakes on
a very large truck, are affecting
system performance.
Rear Vision
Camera (RVC)
If available, the Rear Vision Camera
(RVC) system displays part of the
scene behind the vehicle.
{WARNING
The RVC system does not display
pedestrians, bicyclists, animals,
or any other object located
outside the camera's field of view,
below the bumper, or under the
vehicle.
Do not back the vehicle using
only the RVC screen or by
using the screen during
longer, higher speed backing
maneuvers, or where there could
be cross-traffic. Perceived
distances may be different from
actual distances.
(Continued)
Page 357 of 584
Black plate (71,1)Chevrolet Silverado Owner Manual - 2012
Driving and Operating 9-71
WARNING (Continued)
Failure to use proper care before
backing may result in injury,
death, or vehicle damage. Always
check before backing by checking
behind and around the vehicle.
Vehicles without Navigation
System
The RVC system displays a view
of the area behind the vehicle.
When the vehicle is on and shifted
into R (Reverse) the video image
appears on the inside rearview
mirror. The video image disappears
after the vehicle is shifted out of
R (Reverse).Turning the RVC System On or Off
To turn off the RVC system,
press and hold
z, located on the
inside rearview mirror, until the left
indicator light turns off. The RVC
display is now disabled.
To turn the RVC system on, press
and hold
zuntil the left indicator
light comes on. The RVC system
display will appear in the mirror.
Vehicles with Navigation
System
The RVC system is designed to
help the driver when backing up by
displaying a view of the area behind
the vehicle. When the vehicle is
shifted into R (Reverse), the video
image appears on the navigation
screen. After a delay, the navigation
screen displays the last screen
after the vehicle is shifted out of
R (Reverse). Turning the RVC System On or Off
To turn the RVC system on or off:
1. Shift into P (Park).
2. Press MENU to enter the
configure menu options. Turn
the Multifunction knob until the
Display feature is highlighted
and press the Multifunction
knob. Or press the Display
screen button
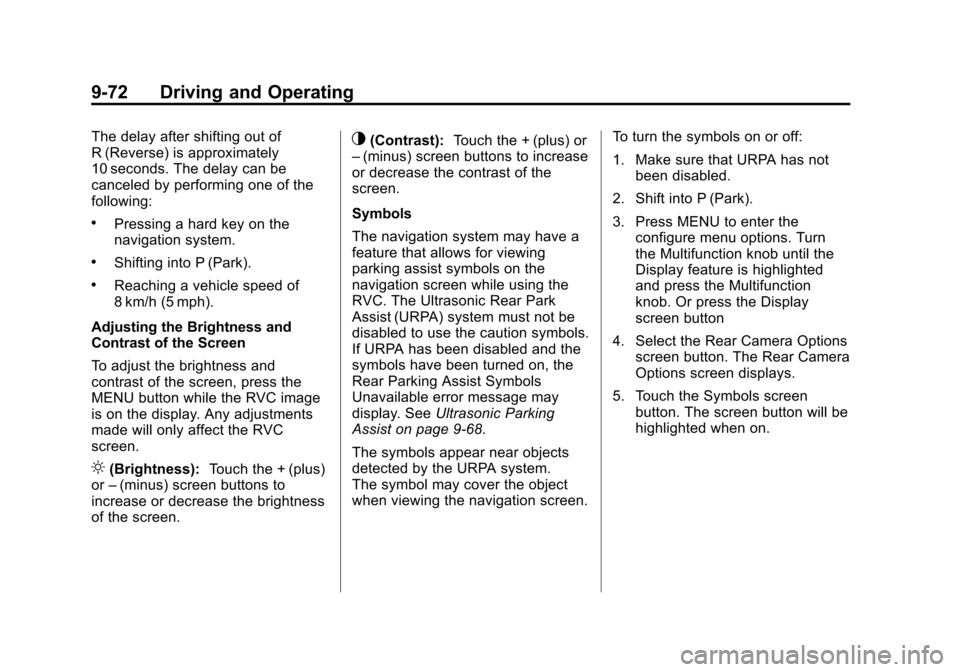
3. Select the Rear Camera Options screen button. The Rear Camera
Options screen displays.
4. Select the Video screen button.When the Video screen button is
highlighted the RVC
system is on.
Page 358 of 584
Black plate (72,1)Chevrolet Silverado Owner Manual - 2012
9-72 Driving and Operating
The delay after shifting out of
R (Reverse) is approximately
10 seconds. The delay can be
canceled by performing one of the
following:
.Pressing a hard key on the
navigation system.
.Shifting into P (Park).
.Reaching a vehicle speed of
8 km/h (5 mph).
Adjusting the Brightness and
Contrast of the Screen
To adjust the brightness and
contrast of the screen, press the
MENU button while the RVC image
is on the display. Any adjustments
made will only affect the RVC
screen.
](Brightness): Touch the + (plus)
or –(minus) screen buttons to
increase or decrease the brightness
of the screen.
_(Contrast): Touch the + (plus) or
– (minus) screen buttons to increase
or decrease the contrast of the
screen.
Symbols
The navigation system may have a
feature that allows for viewing
parking assist symbols on the
navigation screen while using the
RVC. The Ultrasonic Rear Park
Assist (URPA) system must not be
disabled to use the caution symbols.
If URPA has been disabled and the
symbols have been turned on, the
Rear Parking Assist Symbols
Unavailable error message may
display. See Ultrasonic Parking
Assist on page 9‑68.
The symbols appear near objects
detected by the URPA system.
The symbol may cover the object
when viewing the navigation screen. To turn the symbols on or off:
1. Make sure that URPA has not
been disabled.
2. Shift into P (Park).
3. Press MENU to enter the configure menu options. Turn
the Multifunction knob until the
Display feature is highlighted
and press the Multifunction
knob. Or press the Display
screen button
4. Select the Rear Camera Options screen button. The Rear Camera
Options screen displays.
5. Touch the Symbols screen button. The screen button will be
highlighted when on.
Page 359 of 584
Black plate (73,1)Chevrolet Silverado Owner Manual - 2012
Driving and Operating 9-73
Guidelines
The RVC system has a guideline
overlay that can help the driver align
the vehicle when backing into a
parking spot.
If the vehicle has dual rear wheels,
this feature will not be available.
To turn the guidelines on or off:
1. Make sure that URPA has notbeen disabled.
2. Shift into P (Park).
3. Press MENU to enter the configure menu options. Turn
the Multifunction knob until the
Display feature is highlighted
and press the Multifunction
knob. Or press the Display
screen button
4. Select the Rear Camera Options screen button. The Rear Camera
Options screen displays.
5. Touch the Guidelines screen button. The screen button will be
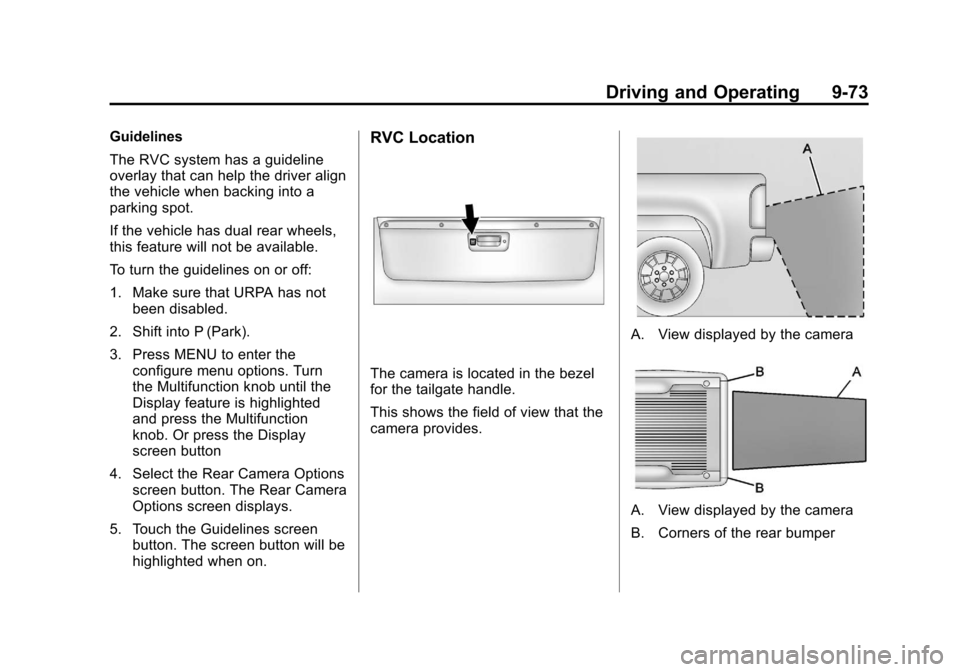
highlighted when on.RVC Location
The camera is located in the bezel
for the tailgate handle.
This shows the field of view that the
camera provides.
A. View displayed by the camera
A. View displayed by the camera
B. Corners of the rear bumper
Page 360 of 584
Black plate (74,1)Chevrolet Silverado Owner Manual - 2012
9-74 Driving and Operating
Displayed images may be further or
closer than they appear. The area
displayed is limited and objects
which are close to either corner of
the bumper or under the bumper do
not display.
Disconnecting the RVC
The rear vision camera must be
disconnected if the tailgate needs to
be removed.
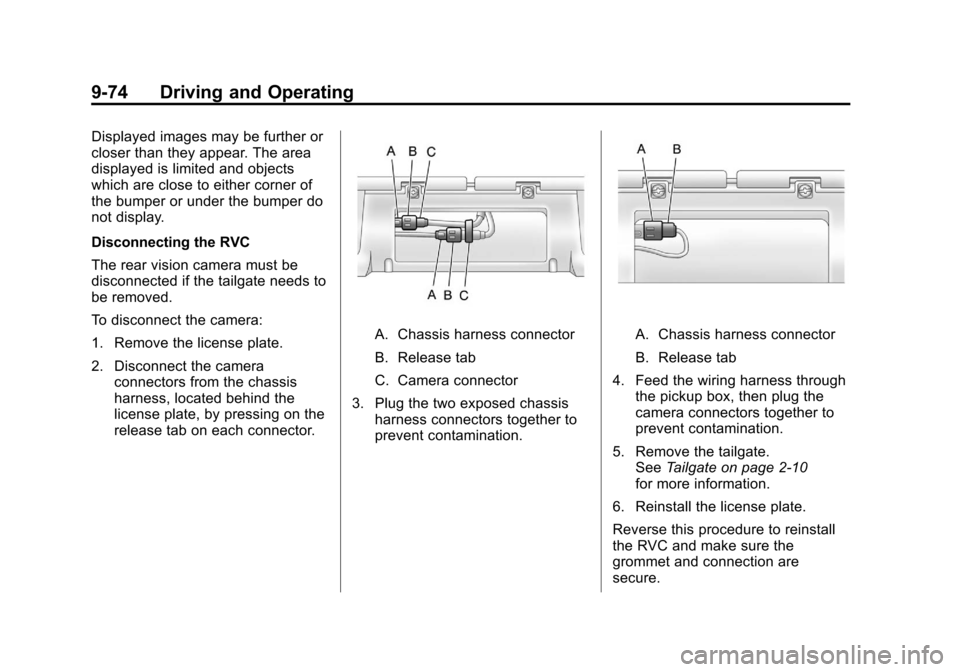
To disconnect the camera:
1. Remove the license plate.
2. Disconnect the cameraconnectors from the chassis
harness, located behind the
license plate, by pressing on the
release tab on each connector.
A. Chassis harness connector
B. Release tab
C. Camera connector
3. Plug the two exposed chassis harness connectors together to
prevent contamination.A. Chassis harness connector
B. Release tab
4. Feed the wiring harness through the pickup box, then plug the
camera connectors together to
prevent contamination.
5. Remove the tailgate. See Tailgate on page 2‑10
for more information.
6. Reinstall the license plate.
Reverse this procedure to reinstall
the RVC and make sure the
grommet and connection are
secure.