buttons CHEVROLET SILVERADO 2014 2.G Owners Manual
[x] Cancel search | Manufacturer: CHEVROLET, Model Year: 2014, Model line: SILVERADO, Model: CHEVROLET SILVERADO 2014 2.GPages: 546, PDF Size: 8.08 MB
Page 16 of 546
Black plate (10,1)Chevrolet Silverado Owner Manual (GMNA-Localizing-U.S./Canada/Mexico-
5853506) - 2014 - crc 2nd - 5/15/13
1-10 In Brief
To return the seatback to the upright
position:
1. Lift the lever fully withoutapplying pressure to the
seatback, and the seatback will
return to the upright position.
2. Push and pull on the seatback to make sure it is locked.
See Reclining Seatbacks on
page 3-5. Power Reclining Seatbacks
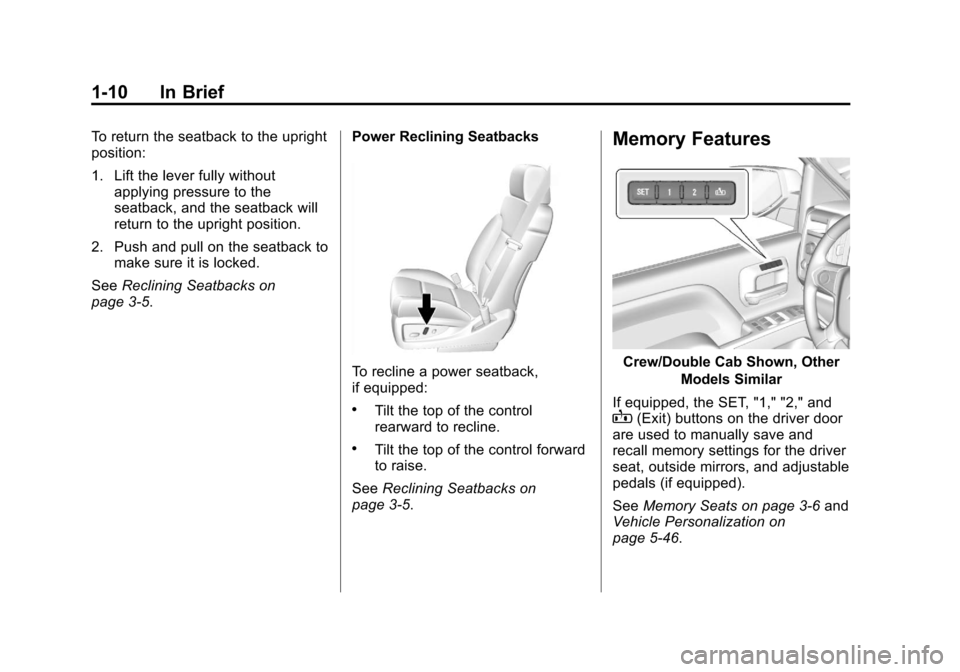
To recline a power seatback,
if equipped:
.Tilt the top of the control
rearward to recline.
.Tilt the top of the control forward
to raise.
See Reclining Seatbacks on
page 3-5.
Memory Features
Crew/Double Cab Shown, Other
Models Similar
If equipped, the SET, "1," "2," and
B(Exit) buttons on the driver door
are used to manually save and
recall memory settings for the driver
seat, outside mirrors, and adjustable
pedals (if equipped).
See Memory Seats on page 3-6 and
Vehicle Personalization on
page 5-46.
Page 17 of 546
Black plate (11,1)Chevrolet Silverado Owner Manual (GMNA-Localizing-U.S./Canada/Mexico-
5853506) - 2014 - crc 2nd - 5/15/13
In Brief 1-11
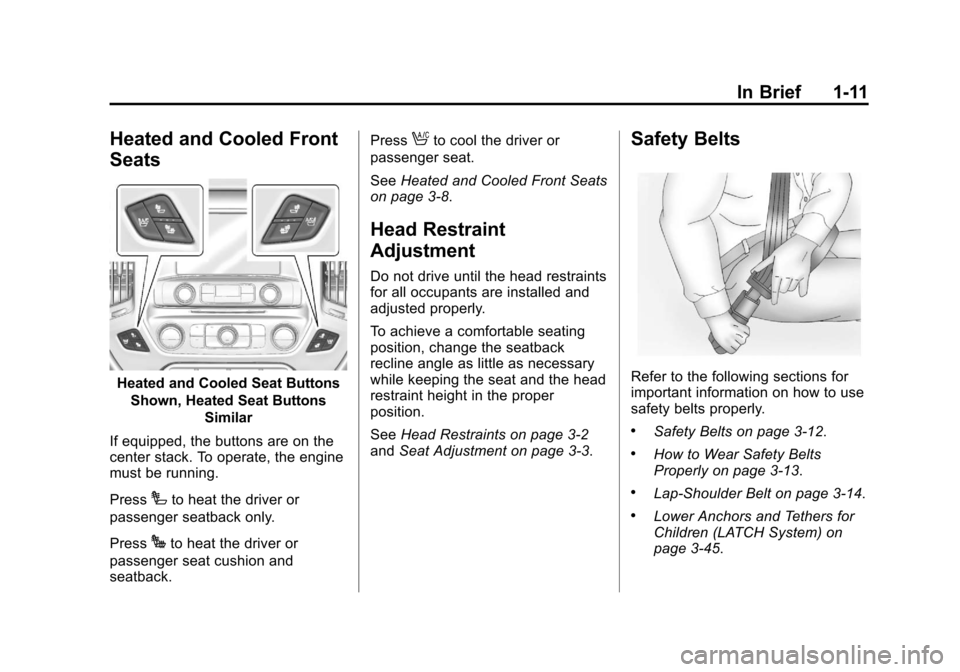
Heated and Cooled Front
Seats
Heated and Cooled Seat ButtonsShown, Heated Seat Buttons Similar
If equipped, the buttons are on the
center stack. To operate, the engine
must be running.
Press
Ito heat the driver or
passenger seatback only.
Press
Jto heat the driver or
passenger seat cushion and
seatback. Press
Ato cool the driver or
passenger seat.
See Heated and Cooled Front Seats
on page 3-8.
Head Restraint
Adjustment
Do not drive until the head restraints
for all occupants are installed and
adjusted properly.
To achieve a comfortable seating
position, change the seatback
recline angle as little as necessary
while keeping the seat and the head
restraint height in the proper
position.
See Head Restraints on page 3-2
and Seat Adjustment on page 3-3.
Safety Belts
Refer to the following sections for
important information on how to use
safety belts properly.
.Safety Belts on page 3-12.
.How to Wear Safety Belts
Properly on page 3-13.
.Lap-Shoulder Belt on page 3-14.
.Lower Anchors and Tethers for
Children (LATCH System) on
page 3-45.
Page 26 of 546
Black plate (20,1)Chevrolet Silverado Owner Manual (GMNA-Localizing-U.S./Canada/Mexico-
5853506) - 2014 - crc 2nd - 5/15/13
1-20 In Brief
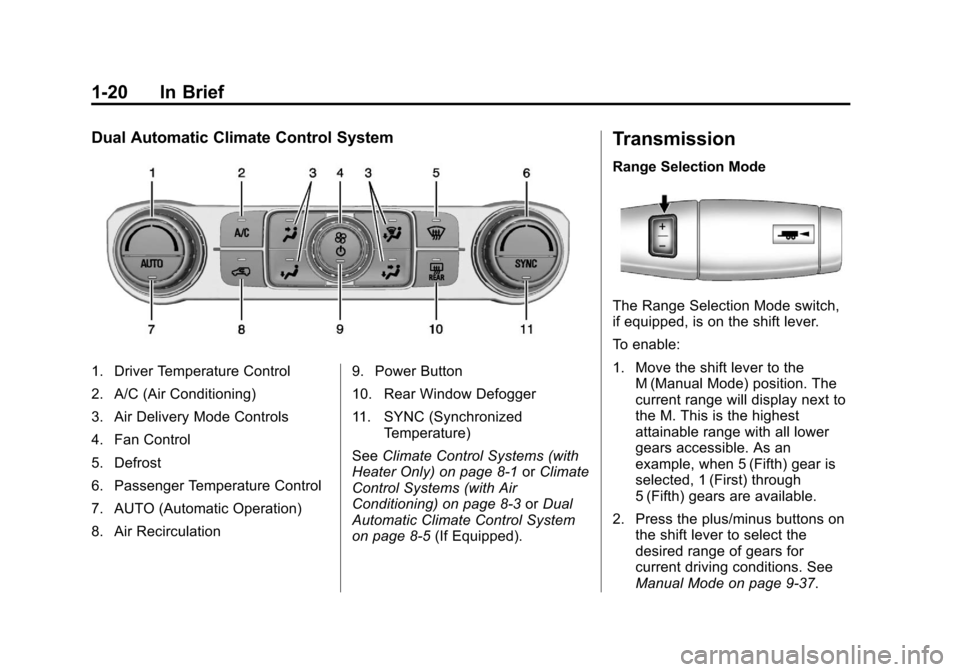
Dual Automatic Climate Control System
1. Driver Temperature Control
2. A/C (Air Conditioning)
3. Air Delivery Mode Controls
4. Fan Control
5. Defrost
6. Passenger Temperature Control
7. AUTO (Automatic Operation)
8. Air Recirculation9. Power Button
10. Rear Window Defogger
11. SYNC (Synchronized
Temperature)
See Climate Control Systems (with
Heater Only) on page 8-1 orClimate
Control Systems (with Air
Conditioning) on page 8-3 orDual
Automatic Climate Control System
on page 8-5 (If Equipped).
Transmission
Range Selection Mode
The Range Selection Mode switch,
if equipped, is on the shift lever.
To enable:
1. Move the shift lever to the
M (Manual Mode) position. The
current range will display next to
the M. This is the highest
attainable range with all lower
gears accessible. As an
example, when 5 (Fifth) gear is
selected, 1 (First) through
5 (Fifth) gears are available.
2. Press the plus/minus buttons on the shift lever to select the
desired range of gears for
current driving conditions. See
Manual Mode on page 9-37.
Page 33 of 546
Black plate (27,1)Chevrolet Silverado Owner Manual (GMNA-Localizing-U.S./Canada/Mexico-
5853506) - 2014 - crc 2nd - 5/15/13
In Brief 1-27
to provide the object distance. In
addition, multiple beeps or seat
pulses may occur if very close to an
object.
The vehicle may also have the Front
Parking Assist system.
SeeAssistance Systems for Parking
or Backing on page 9-64.
Power Outlets
Accessory power outlets can be
used to plug in electrical equipment,
such as a cell phone, MP3
player, etc.
The vehicle may have up to four
accessory power outlets.
Vehicle with Center Console
.One or two in front of the cup
holders on the center console.
.One inside the center storage
console.
.One on the rear of the center
storage console. Vehicle with Bench Seats
.One on the center stack below
the climate control system.
.One or two in the storage area
on the bench seat.
Lift the cover to access and replace
when not in use.
See Power Outlets on page 5-6.
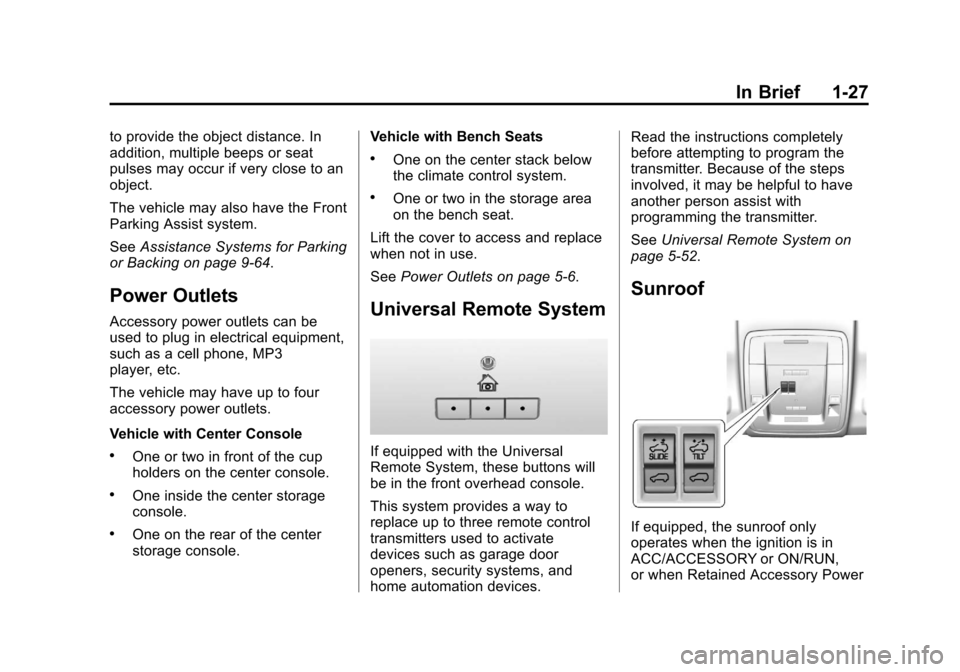
Universal Remote System
If equipped with the Universal
Remote System, these buttons will
be in the front overhead console.
This system provides a way to
replace up to three remote control
transmitters used to activate
devices such as garage door
openers, security systems, and
home automation devices. Read the instructions completely
before attempting to program the
transmitter. Because of the steps
involved, it may be helpful to have
another person assist with
programming the transmitter.
See
Universal Remote System on
page 5-52.
Sunroof
If equipped, the sunroof only
operates when the ignition is in
ACC/ACCESSORY or ON/RUN,
or when Retained Accessory Power
Page 36 of 546
Black plate (30,1)Chevrolet Silverado Owner Manual (GMNA-Localizing-U.S./Canada/Mexico-
5853506) - 2014 - crc 2nd - 5/15/13
1-30 In Brief
Resetting the Oil Life System
To reset the Engine Oil Life System:
1. Display OIL LIFE REMAININGon the DIC. See Driver
Information Center (DIC) (Base
Level) on page 5-30 orDriver
Information Center (DIC)
(Uplevel) on page 5-32. If the
vehicle does not have DIC
buttons, the vehicle must be in
P (Park) to access this display.
2. Press and hold the
Vbutton on
the DIC, or the trip odometer
reset stem if the vehicle does
not have DIC buttons, for
several seconds. The oil life will
change to 100%.
The oil life system can also be reset
as follows:
1. Turn the ignition to ON/RUN with the engine off.
2. Fully press the accelerator pedal slowly three times within
five seconds. 3. Display OIL LIFE REMAINING
on the DIC. If the display shows
100%, the system is reset.
See Engine Oil Life System on
page 10-13.
E85 or FlexFuel
Vehicles with a yellow fuel cap can
use either unleaded gasoline or
ethanol fuel containing up to 85%
ethanol (E85). See E85 or FlexFuel
on page 9-74. For all other vehicles,
use only the unleaded gasoline
described under Fuel on page 9-72.
Driving for Better Fuel
Economy
Driving habits can affect fuel
mileage. Here are some driving tips
to get the best fuel economy
possible.
.Avoid fast starts and accelerate
smoothly.
.Brake gradually and avoid
abrupt stops.
.Avoid idling the engine for long
periods of time.
.When road and weather
conditions are appropriate, use
cruise control.
.Always follow posted speed
limits or drive more slowly when
conditions require.
.Keep vehicle tires properly
inflated.
.Combine several trips into a
single trip.
.Replace the vehicle's tires with
the same TPC Spec number
molded into the tire's sidewall
near the size.
.Follow recommended scheduled
maintenance.
Page 56 of 546
Black plate (18,1)Chevrolet Silverado Owner Manual (GMNA-Localizing-U.S./Canada/Mexico-
5853506) - 2014 - crc 2nd - 5/15/13
2-18 Keys, Doors, and Windows
adjacent lane, behind your
vehicle. Check the blind spot
mirror for a vehicle in the blind
zone. Then, glance over your
shoulder to double check before
moving slowly into the
adjacent lane.
Reverse Tilt Mirrors
If equipped with the memory
package, the passenger and/or
driver mirror tilts to a preselected
position when the vehicle is in
R (Reverse). This feature allows the
driver to view the curb when parallel
parking. The mirror(s) return to the
original position when the vehicle is
shifted out of R (Reverse), the
ignition is turned off or to OFF/
LOCK, or if the vehicle is driven in
reverse above a predetermined
speed.
Turn this feature on or off through
vehicle personalization. SeeVehicle
Personalization on page 5-46.
Interior Mirrors
Interior Rearview Mirrors
Adjust the rearview mirror for a clear
view of the area behind your
vehicle.
If equipped with OnStar, the vehicle
may have three control buttons at
the bottom of the mirror. See your
dealer for more information about
OnStar and how to subscribe to it.
See OnStar Overview on page 14-1.
Do not spray glass cleaner directly
on the mirror. Use a soft towel
dampened with water.
Manual Rearview Mirror
If equipped, push the tab forward for
daytime use and pull it rearward for
nighttime use to avoid glare from
the headlamps from behind.
Automatic Dimming
Rearview Mirror
If equipped, the mirror will
automatically reduce the glare of the
headlamps from behind. The
dimming feature comes on each
time the vehicle is started.
Page 68 of 546
Black plate (6,1)Chevrolet Silverado Owner Manual (GMNA-Localizing-U.S./Canada/Mexico-
5853506) - 2014 - crc 2nd - 5/15/13
3-6 Seats and Restraints
To adjust a manual seatback:
1. Lift the lever.The seatback will automatically
fold forward.
2. To recline, move the seatback rearward to the desired position,
then release the lever to lock the
seatback in place.
3. Push and pull on the seatback to make sure it is locked. To return the seatback to the upright
position:
1. Lift the lever fully without
applying pressure to the
seatback, and the seatback will
return to the upright position.
2. Push and pull on the seatback to make sure it is locked.
Power Reclining Seatbacks
To recline a power seatback,
if equipped:
.Tilt the top of the control
rearward to recline.
.Tilt the top of the control forward
to raise.
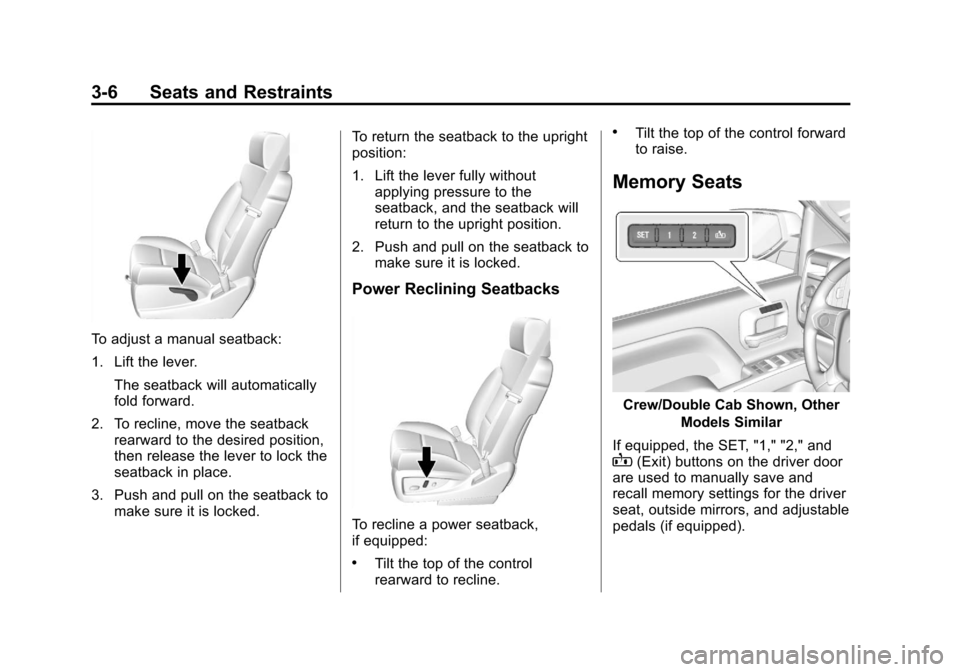
Memory Seats
Crew/Double Cab Shown, Other
Models Similar
If equipped, the SET, "1," "2," and
B(Exit) buttons on the driver door
are used to manually save and
recall memory settings for the driver
seat, outside mirrors, and adjustable
pedals (if equipped).
Page 69 of 546
Black plate (7,1)Chevrolet Silverado Owner Manual (GMNA-Localizing-U.S./Canada/Mexico-
5853506) - 2014 - crc 2nd - 5/15/13
Seats and Restraints 3-7
Storing Memory Positions
To save positions to the“1”and “2”
buttons:
1. Adjust the driver seat, outside mirrors, and adjustable pedals (if
equipped) to the desired driving
positions.
2. Press and hold SET and “1”at
the same time until a beep
sounds.
3. Repeat Steps 1 and 2 for a second driver using “2.”
To save positions to the
B(Exit)
button and easy exit features:
1. Adjust the driver seat, adjustable pedals (if equipped), and the
outside mirrors on some vehicles
to the desired positions for
getting out of the vehicle.
2. Press and hold SET and
Bat
the same time until a beep
sounds. Manually Recalling Memory
Positions
If the vehicle is off, or in ON/RUN/
START but not in P (Park), press
and hold "1," "2," or
Bto manually
recall the previously stored memory
positions. Releasing "1,” "2," or
B
before the stored positions are
reached stops the recall.
If the vehicle is in ON/RUN/START
and in P (Park), press and release
“1,” “2,”or
Bto manually recall the
previously stored memory positions.
Placing the ignition in OFF/LOCK
before the stored positions are
reached stops the recall.
If something has blocked the driver
seat and/or adjustable pedals while
recalling a memory position, the
recall may stop. Remove the
obstruction; then press and hold the
appropriate manual control for the
memory item that is not recalling for
two seconds. Try recalling the
memory position again by pressing
the appropriate memory button. If the memory position is still not
recalling, see your dealer for
service.
Automatically Recalling Memory
Positions (Auto Memory Recall)
The Auto (Automatic) Memory
Recall feature automatically recalls
the current driver
’s previously stored
“1” or“2” position when entering the
vehicle.
If the Auto Memory Recall feature is
enabled in the vehicle
personalization menu, memory “1”
or “2” positions are recalled in the
following ways:
.PressKon the RKE transmitter
and open the driver door.
.PressKon the RKE transmitter
when the driver door is
already open.
See Vehicle Personalization on
page 5-46.
Page 71 of 546
Black plate (9,1)Chevrolet Silverado Owner Manual (GMNA-Localizing-U.S./Canada/Mexico-
5853506) - 2014 - crc 2nd - 5/15/13
Seats and Restraints 3-9
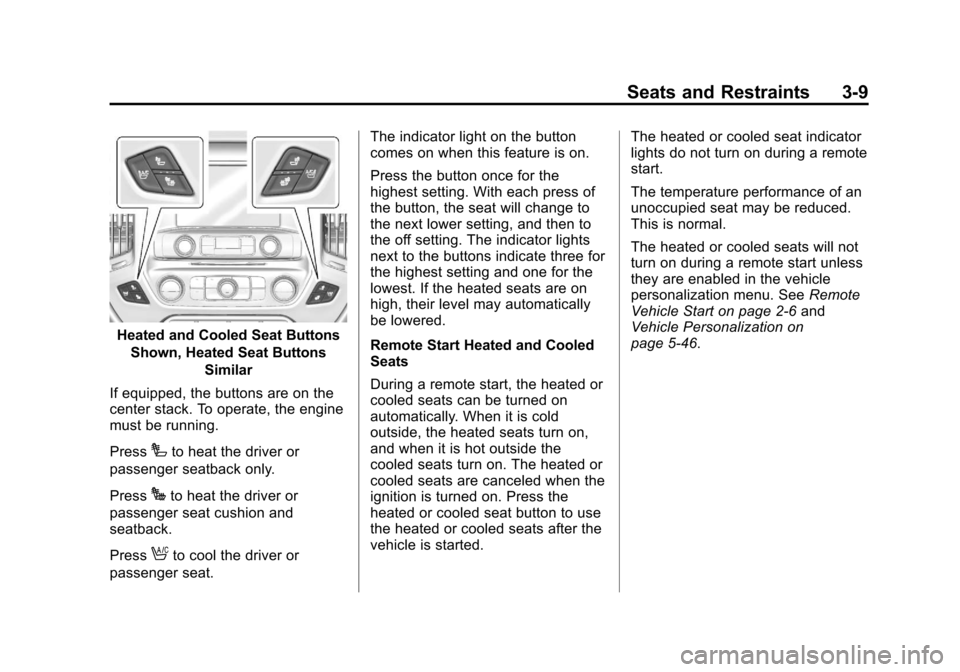
Heated and Cooled Seat ButtonsShown, Heated Seat Buttons Similar
If equipped, the buttons are on the
center stack. To operate, the engine
must be running.
Press
Ito heat the driver or
passenger seatback only.
Press
Jto heat the driver or
passenger seat cushion and
seatback.
Press
Ato cool the driver or
passenger seat. The indicator light on the button
comes on when this feature is on.
Press the button once for the
highest setting. With each press of
the button, the seat will change to
the next lower setting, and then to
the off setting. The indicator lights
next to the buttons indicate three for
the highest setting and one for the
lowest. If the heated seats are on
high, their level may automatically
be lowered.
Remote Start Heated and Cooled
Seats
During a remote start, the heated or
cooled seats can be turned on
automatically. When it is cold
outside, the heated seats turn on,
and when it is hot outside the
cooled seats turn on. The heated or
cooled seats are canceled when the
ignition is turned on. Press the
heated or cooled seat button to use
the heated or cooled seats after the
vehicle is started.
The heated or cooled seat indicator
lights do not turn on during a remote
start.
The temperature performance of an
unoccupied seat may be reduced.
This is normal.
The heated or cooled seats will not
turn on during a remote start unless
they are enabled in the vehicle
personalization menu. See
Remote
Vehicle Start on page 2-6 and
Vehicle Personalization on
page 5-46.
Page 118 of 546
Black plate (56,1)Chevrolet Silverado Owner Manual (GMNA-Localizing-U.S./Canada/Mexico-
5853506) - 2014 - crc 2nd - 5/15/13
3-56 Seats and Restraints
5. Before placing a child in thechild restraint, make sure it is
securely held in place. To check,
grasp the child restraint at the
LATCH path and attempt to
move it side to side and back
and forth. There should be no
more than 2.5 cm (1 in) of
movement for proper installation.
Headrest Removal and
Reinstallation
Crew Cab Models
For outboard rear seating positions,
if the child restraint cannot be
installed properly with the headrest
in place, the headrest may be
removed. See your dealer for
assistance with removal.
Store the removed headrests in a
secure place. Reinstall the headrest
before the seating position is
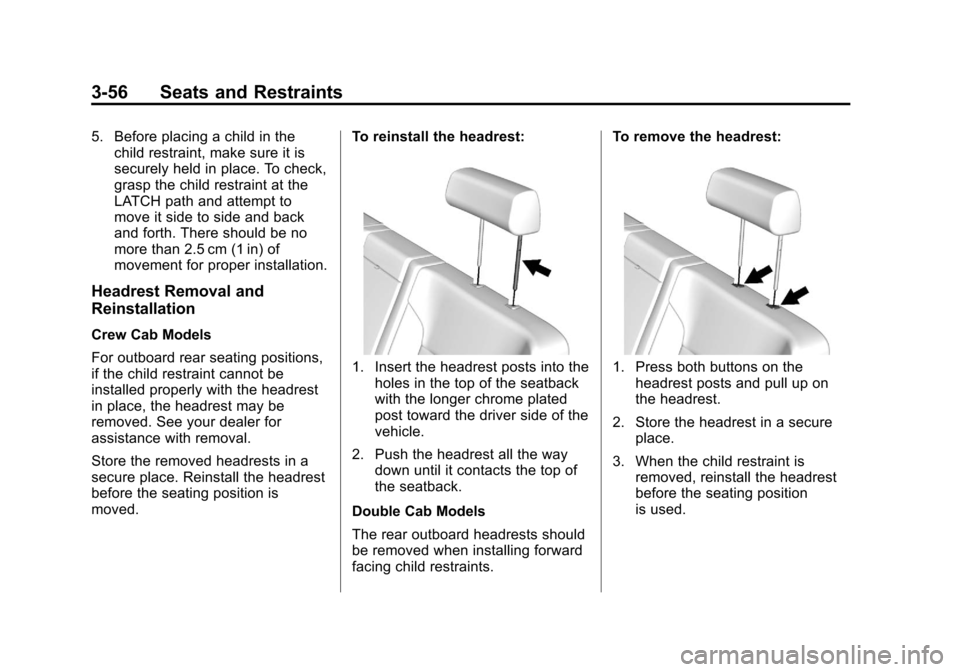
moved. To reinstall the headrest:
1. Insert the headrest posts into the
holes in the top of the seatback
with the longer chrome plated
post toward the driver side of the
vehicle.
2. Push the headrest all the way down until it contacts the top of
the seatback.
Double Cab Models
The rear outboard headrests should
be removed when installing forward
facing child restraints. To remove the headrest:1. Press both buttons on the
headrest posts and pull up on
the headrest.
2. Store the headrest in a secure place.
3. When the child restraint is removed, reinstall the headrest
before the seating position
is used.