change time CHEVROLET SILVERADO 2014 2.G Owners Manual
[x] Cancel search | Manufacturer: CHEVROLET, Model Year: 2014, Model line: SILVERADO, Model: CHEVROLET SILVERADO 2014 2.GPages: 546, PDF Size: 8.08 MB
Page 36 of 546
Black plate (30,1)Chevrolet Silverado Owner Manual (GMNA-Localizing-U.S./Canada/Mexico-
5853506) - 2014 - crc 2nd - 5/15/13
1-30 In Brief
Resetting the Oil Life System
To reset the Engine Oil Life System:
1. Display OIL LIFE REMAININGon the DIC. See Driver
Information Center (DIC) (Base
Level) on page 5-30 orDriver
Information Center (DIC)
(Uplevel) on page 5-32. If the
vehicle does not have DIC
buttons, the vehicle must be in
P (Park) to access this display.
2. Press and hold the
Vbutton on
the DIC, or the trip odometer
reset stem if the vehicle does
not have DIC buttons, for
several seconds. The oil life will
change to 100%.
The oil life system can also be reset
as follows:
1. Turn the ignition to ON/RUN with the engine off.
2. Fully press the accelerator pedal slowly three times within
five seconds. 3. Display OIL LIFE REMAINING
on the DIC. If the display shows
100%, the system is reset.
See Engine Oil Life System on
page 10-13.
E85 or FlexFuel
Vehicles with a yellow fuel cap can
use either unleaded gasoline or
ethanol fuel containing up to 85%
ethanol (E85). See E85 or FlexFuel
on page 9-74. For all other vehicles,
use only the unleaded gasoline
described under Fuel on page 9-72.
Driving for Better Fuel
Economy
Driving habits can affect fuel
mileage. Here are some driving tips
to get the best fuel economy
possible.
.Avoid fast starts and accelerate
smoothly.
.Brake gradually and avoid
abrupt stops.
.Avoid idling the engine for long
periods of time.
.When road and weather
conditions are appropriate, use
cruise control.
.Always follow posted speed
limits or drive more slowly when
conditions require.
.Keep vehicle tires properly
inflated.
.Combine several trips into a
single trip.
.Replace the vehicle's tires with
the same TPC Spec number
molded into the tire's sidewall
near the size.
.Follow recommended scheduled
maintenance.
Page 45 of 546
Black plate (7,1)Chevrolet Silverado Owner Manual (GMNA-Localizing-U.S./Canada/Mexico-
5853506) - 2014 - crc 2nd - 5/15/13
Keys, Doors, and Windows 2-7
When the remote start is extended,
the second 10 minute period is
added on to the first 10 minutes for
a total of 20 minutes.
A maximum of two remote starts,
or a remote start with an extension,
are allowed between ignition cycles.
The vehicle's ignition must be
changed to ON/RUN/START and
then back to OFF before the remote
start procedure can be used again.
Canceling a Remote Start
.Aim the RKE transmitter at the
vehicle and press and hold
/
until the parking lamps turn off.
.Turn on the hazard warning
flashers.
.Turn the ignition on and then
back off.
The vehicle can be remote started
two separate times between driving
sequences. The engine will run for
10 minutes after each remote start. Once two remote starts, or a single
remote start with one time extension
has been done, the vehicle must be
started with the key. After the key is
removed from the ignition, the
vehicle can be remote started again.
The vehicle cannot be remote
started if the key is in the ignition,
if the hood is not closed, or if there
is an emission control system
malfunction and the malfunction
indicator lamp is on.
Also, the engine will turn off during a
remote vehicle start if the coolant
temperature gets too high or if the
oil pressure gets low.
Door Locks
{Warning
Unlocked doors can be
dangerous.
.Passengers, especially
children, can easily open the
doors and fall out of a moving
vehicle. When a door is
locked, the handle will not
open it. The chance of being
thrown out of the vehicle in a
crash is increased if the
doors are not locked. So, all
passengers should wear
safety belts properly and the
doors should be locked
whenever the vehicle is
driven.
.Young children who get into
unlocked vehicles may be
unable to get out. A child can
be overcome by extreme heat
and can suffer permanent
(Continued)
Page 54 of 546
Black plate (16,1)Chevrolet Silverado Owner Manual (GMNA-Localizing-U.S./Canada/Mexico-
5853506) - 2014 - crc 2nd - 5/15/13
2-16 Keys, Doors, and Windows
The mirrors may also include a
memory function that works with the
memory seats. SeeMemory Seats
on page 3-6.
Resetting the Power Folding
Mirrors
Reset the power folding mirrors if:
.The mirrors are accidentally
obstructed while folding.
.They are accidentally manually
folded/unfolded.
.The mirrors will not stay in the
unfolded position.
.The mirrors vibrate at normal
driving speeds.
Fold and unfold the mirrors three
times using the mirror controls to
reset them to their normal position.
A popping noise may be heard. This
sound is normal after a manual
folding operation.
Manual Folding
If equipped, push the mirror toward
the vehicle to fold. Push the mirror
outward to return to its original
position.
Manually fold the mirrors inward to
prevent damage when going
through an automatic car wash.
Auto Mirror Folding
If equipped, with the ignition off,
press and hold
Qon the RKE
transmitter for approximately
one second to automatically fold the
exterior mirrors. Press and hold
K
on the RKE transmitter for
approximately one second to unfold.
See Remote Keyless Entry (RKE)
System Operation on page 2-3.
This feature is turned on or off
through Vehicle Personalization.
See Vehicle Personalization on
page 5-46.
Turn Signal Indicator
If equipped, indicator lights on the
mirror flash in the direction of the
turn or lane change.
Heated Mirrors
1
(Rear Window Defogger):
If equipped, the Rear Window
Defogger also heats the side
mirrors. If the vehicle has trailer-tow
mirrors, only the upper glass of the
mirror is heated. The lower convex
part of the towing mirrors is not
heated.
See “Rear Window Defogger” under
Climate Control Systems (with
Heater Only) on page 8-1 orClimate
Control Systems (with Air
Conditioning) on page 8-3 orDual
Automatic Climate Control System
on page 8-5.
Page 70 of 546
Black plate (8,1)Chevrolet Silverado Owner Manual (GMNA-Localizing-U.S./Canada/Mexico-
5853506) - 2014 - crc 2nd - 5/15/13
3-8 Seats and Restraints
To stop recall movement, press one
of the memory, power mirror or
power seat controls; or press the
adjustable pedal control (if
equipped).
If something has blocked the driver
seat and/or the adjustable pedals (if
equipped) while recalling a memory
position, the recall may stop.
Remove the obstruction; then press
and hold the appropriate manual
control for the memory item that is
not recalling for two seconds. Try
recalling the memory position again
by opening the driver door and
pressing
Kon the RKE transmitter.
If the memory position is still not
recalling, see your dealer for
service.
Easy Exit Recall
If programmed on in the vehicle
personalization menu, the easy exit
feature automatically moves the
driver seat, adjustable pedals (if
equipped), and outside mirrors on
some vehicles to the memory
positions saved to the
B(Exit) button. See
“Storing Memory
Positions” listed previously. See
also Vehicle Personalization on
page 5-46.
Easy exit recall automatically
activates when one of the following
occurs:
.The vehicle is turned off and the
driver door is opened within a
short time.
.The vehicle is turned off with the
driver door open.
If something has blocked the driver
seat and/or adjustable pedals (if
equipped) while recalling the exit
position, the recall may stop.
Remove the obstruction; then press
and hold the appropriate manual
control for the exit feature not
recalling for two seconds. Try
recalling the exit position again.
If the exit position is still not
recalling, see your dealer for
service.
Heated and Cooled Front
Seats
{Warning
If you cannot feel temperature
change or pain to the skin, the
seat heater may cause burns. To
reduce the risk of burns, people
with such a condition should use
care when using the seat heater,
especially for long periods of
time. Do not place anything on
the seat that insulates against
heat, such as a blanket, cushion,
cover, or similar item. This may
cause the seat heater to
overheat. An overheated seat
heater may cause a burn or may
damage the seat.
Page 143 of 546
Black plate (5,1)Chevrolet Silverado Owner Manual (GMNA-Localizing-U.S./Canada/Mexico-
5853506) - 2014 - crc 2nd - 5/15/13
Instruments and Controls 5-5
Windshield Washer
{Warning
In freezing weather, do not use
the washer until the windshield is
warmed. Otherwise the washer
fluid can form ice on the
windshield, blocking your vision.
Lm(Washer Fluid): Push the
paddle marked with the windshield
washer symbol at the top of the turn
signal lever, to spray washer fluid
and activate the wipers. The wipers
will continue until the paddle is
released or the maximum wash time
is reached. When the paddle is
released, additional wipes may
occur depending on how long the
windshield washer had been
activated. See Washer Fluid on
page 10-28 for information on filling
the windshield washer fluid
reservoir.
Compass
The vehicle may have a compass
display on the Driver Information
Center (DIC). The compass receives
its heading and other information
from the Global Positioning
System (GPS) antenna,
StabiliTrak
®, and vehicle speed
information.
The compass system is designed to
operate for a certain number of
miles or degrees of turn before
needing a signal from the GPS
satellites. When the compass
display shows CAL, drive the
vehicle for a short distance in an
open area where it can receive a
GPS signal. The compass system
will automatically determine when a
GPS signal is restored and provide
a heading again. See Compass
Messages on page 5-36 for the
messages that may be displayed for
the compass.
Clock
Setting the Time and Date With
Faceplate Controls
To set the time or date:
1. Select SETTINGS from the
Home Page, then select Time
and Date.
2. Select the desired function.
3. Turn the MENU knob to increase or decrease the value.
4. Press the MENU knob to go to the next value. After the last
value is selected the system will
update and return to the Settings
menu. Press
oBACK to go to
the last menu and save the
changes.
If auto timing is set, the time
displayed on the clock may not
update immediately when driving
into a new time zone.
Page 144 of 546
Black plate (6,1)Chevrolet Silverado Owner Manual (GMNA-Localizing-U.S./Canada/Mexico-
5853506) - 2014 - crc 2nd - 5/15/13
5-6 Instruments and Controls
To set the clock display:
1. Select SETTINGS from theHome Page, then select Time
and Date.
2. Select Clock Display.
3. Turn the MENU knob to Off or On.
4. Press the MENU knob to select.
Press
oBACK to go to the last
menu and save the changes.
Setting the Time and Date With
Touchscreen Controls
To set the time:
1. Press the SETTINGS screen button from the Home Page,
then press Time and Date.
2. Press Set Time and press
«or
ªto increase or decrease
hours, minutes, and AM or PM.
Press 12Hr or 24Hr for 12 or
24 hour clock.
3. Press the
}screen button to go
back to the previous menu. If auto timing is set, the time
displayed on the clock may not
update immediately when driving
into a new time zone.
To set the date:
1. Press the SETTINGS screen
button from the Home Page,
then press Time and Date.
2. Press Set Date and press
«or
ªto increase or decrease
month, day, or year.
3. Press the
}screen button to go
back to the previous menu.
To set the clock display:
1. Press the SETTINGS screen button and press Time and Date.
2. Press Clock Display and press OFF or ON to turn the clock
display off or on.
3. Press the
}screen button to go
back to the previous menu.
Power Outlets
Accessory power outlets can be
used to plug in electrical equipment,
such as a cell phone, MP3
player, etc.
The vehicle may have up to four
accessory power outlets.
Vehicle with Center Console
.One or two in front of the cup
holders on the center console.
.One inside the center storage
console.
.One on the rear of the center
storage console.
Vehicle with Bench Seats
.One on the center stack below
the climate control system.
.One or two in the storage area
on the bench seat.
Lift the cover to access and replace
when not in use.
Page 169 of 546

Black plate (31,1)Chevrolet Silverado Owner Manual (GMNA-Localizing-U.S./Canada/Mexico-
5853506) - 2014 - crc 2nd - 5/15/13
Instruments and Controls 5-31
recent driving history and the
amount of fuel remaining in the fuel
tank. Fuel range cannot be reset.
Average Fuel Economy
The Average Fuel Economy display
shows the approximate average
liters per 100 kilometers (L/100 km)
or miles per gallon (mpg). This
number is based on the number of
L/100 km (mpg) recorded since the
last time this menu item was reset.
Reset this display by pressing the
trip odometer reset stem.
Tire Pressure
Turn the trip odometer reset stem
until a vehicle with the approximate
pressures of all four tires displays.
Tire pressure is displayed in either
kilopascal (kPa) or in pounds per
square inch (psi).
SeeTire Pressure Monitor System
on page 10-65 andTire Pressure
Monitor Operation on page 10-66. Remaining Oil Life
Turn the trip odometer reset stem
until REMAINING OIL LIFE
displays. An estimate of the oil's
remaining useful life is shown.
REMAINING OIL LIFE 99% means
99% of the current oil life remains.
When the remaining oil life is low,
the CHANGE ENGINE OIL SOON
message will appear on the display.
See
Engine Oil Messages on
page 5-38. The oil should be
changed as soon as possible. See
Engine Oil on page 10-10. In
addition to the engine oil life system
monitoring the oil life, additional
maintenance is recommended in the
Maintenance Schedule. See
Maintenance Schedule on
page 11-3.
The Oil Life display must be reset
after each oil change. It will not
reset itself. Do not to reset the Oil
Life display at any time other than
when the oil has just been changed.
It cannot be reset accurately until the next oil change. To reset the
engine oil life system, see
Engine
Oil Life System on page 10-13.
Transmission Fluid Temperature
The temperature of the automatic
transmission fluid displays in either
degrees Celsius (°C) or degrees
Fahrenheit (°F).
Trailer Brake
On vehicles with the Integrated
Trailer Brake Control (ITBC) system,
turn the trip odometer reset stem
until TRAILER GAIN and TRAILER
OUTPUT displays.
TRAILER GAIN shows the Trailer
Gain setting. This setting can be
adjusted from 0.0 to 10.0 with either
a trailer connected or disconnected.
TRAILER OUTPUT shows the
power output to the trailer any time
a trailer with electric brakes is
connected. Output is displayed as a
bar graph. Dashes may appear in
the TRAILER OUTPUT display.
Page 171 of 546
Black plate (33,1)Chevrolet Silverado Owner Manual (GMNA-Localizing-U.S./Canada/Mexico-
5853506) - 2014 - crc 2nd - 5/15/13
Instruments and Controls 5-33
6. PressVwhile an item is
highlighted to select or deselect
that item. When an item is
selected, a checkmark will
appear next to it.
DIC Info Pages
The following is the list of all
possible DIC info page displays.
Some may not be available for your
particular vehicle. Some items may
not be turned on by default but can
be turned on through the Settings
app. See “DIC Info Page Options”
earlier in this section.
Speed: Shows the vehicle speed in
either kilometers per hour (km/h) or
miles per hour (mph).
Trip A or Trip B: Shows the
current distance traveled, in either
kilometers (km) or miles (mi), since
the trip odometer was last reset. Also shows the approximate
average liters per 100 kilometers
(L/100 km) or miles per
gallon (mpg). This number is
calculated based on the number of
L/100 km (mpg) recorded since the
last time this menu item was reset.
Press and holdVwhile this display
is active to reset the trip odometer
and the average fuel economy.
Fuel Range: Shows the
approximate distance the vehicle
can be driven without refueling.
LOW will be displayed when the
vehicle is low on fuel. The fuel
range estimate is based on an
average of the vehicle's fuel
economy over recent driving history
and the amount of fuel remaining in
the fuel tank.
Oil Life: Shows an estimate of the
oil's remaining useful life.
If REMAINING OIL LIFE 99% is
displayed, that means 99% of the
current oil life remains. When the remaining oil life is low,
the CHANGE ENGINE OIL SOON
message will appear on the display.
See
Engine Oil Messages on
page 5-38. The oil should be
changed as soon as possible. See
Engine Oil on page 10-10. In
addition to the engine oil life system
monitoring the oil life, additional
maintenance is recommended in the
Maintenance Schedule. See
Maintenance Schedule on
page 11-3.
The Oil Life display must be reset
after each oil change. It will not
reset itself. Do not to reset the Oil
Life display at any time other than
when the oil has just been changed.
It cannot be reset accurately until
the next oil change. To reset the
engine oil life system, press and
hold
Vfor several seconds while
the Oil Life display is active. See
Engine Oil Life System on
page 10-13.
Page 176 of 546
Black plate (38,1)Chevrolet Silverado Owner Manual (GMNA-Localizing-U.S./Canada/Mexico-
5853506) - 2014 - crc 2nd - 5/15/13
5-38 Instruments and Controls
Engine Oil Messages
CHANGE ENGINE OIL SOON
This message displays when the
engine oil needs to be changed.
When you change the engine oil, be
sure to reset the CHANGE ENGINE
OIL SOON message. SeeEngine
Oil Life System on page 10-13 for
information on how to reset the
message. See Engine Oil on
page 10-10 andMaintenance
Schedule on page 11-3.
ENGINE OIL LOW ADD OIL
On some vehicles, this message
displays when the engine oil level
may be too low. Check the oil level
before filling to the recommended
level. If the oil is not low and this
message remains on, take the
vehicle to your dealer for service.
See Engine Oil on page 10-10.
ENGINE OIL HOT IDLE
ENGINE
This message displays when the
engine oil becomes hotter than the
normal operating temperature. Stop
and allow the vehicle to idle until it
cools down. See Engine Coolant
Temperature Gauge on page 5-16.
OIL PRESSURE LOW STOP
ENGINE
This message displays if low oil
pressure levels occur. Stop the
vehicle as soon as safely possible
and do not operate it until the cause
of the low oil pressure has been
corrected. Check the oil as soon as
possible and have the vehicle
serviced by your dealer. See Engine
Oil on page 10-10.
Engine Power Messages
ENGINE POWER IS REDUCED
This message displays and a chime
may sound when the cooling system
temperature gets too hot and the
engine further enters the engine
coolant protection mode. See
Engine Overheating on page 10-24
for more information.
This message also displays when
the vehicle's engine power is
reduced. Reduced engine power
can affect the vehicle's ability to
accelerate. If this message is on,
but there is no reduction in
performance, proceed to your
destination. The performance may
be reduced the next time the vehicle
is driven. The vehicle may be driven
at a reduced speed while this
message is on, but acceleration and
speed may be reduced. Anytime
this message stays on, the vehicle
should be taken to your dealer for
service as soon as possible.
Page 191 of 546
Black plate (53,1)Chevrolet Silverado Owner Manual (GMNA-Localizing-U.S./Canada/Mexico-
5853506) - 2014 - crc 2nd - 5/15/13
Instruments and Controls 5-53
2. At the same time, press andhold both the hand-held
transmitter button and one of the
three Universal Remote system
buttons to be used to operate
the garage door. Do not release
either button until the indicator
light goes from a slow to a rapid
flash light. Then release both
buttons.
Some garage door openers may
require substitution of Step 2
with the procedure under in
“Radio Signals for Canada and
Some Gate Operators” later in
this section.
3. Press and hold the newly programmed Universal Remote
system button for five seconds
while watching the indicator light
and garage door activation.
.If the indicator light stays on
continuously or the garage
door moves when the
button is pressed, then programming is complete.
There is no need to
complete Steps 4–6.
.If the indicator light does
not come on or the garage
door does not move, a
second button press may
be required. For a second
time, press and hold the
newly programmed button
for five seconds. If the light
stays on or the garage door
moves, programming is
complete.
.If the indicator light blinks
rapidly for two seconds,
then changes to a solid light
and the garage door does
not move, continue with
programming Steps 4–6.
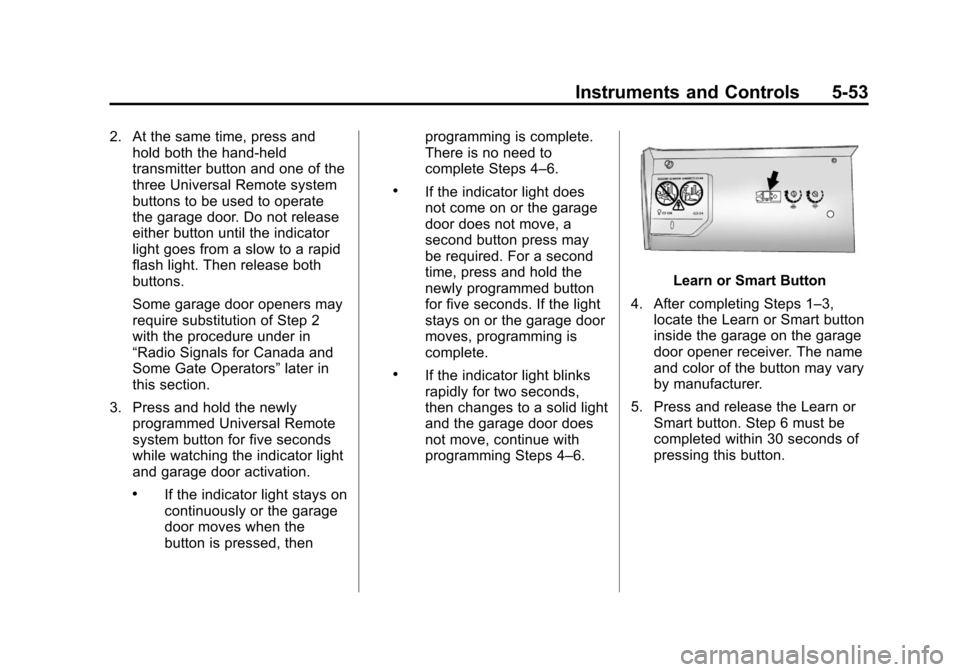
Learn or Smart Button
4. After completing Steps 1–3, locate the Learn or Smart button
inside the garage on the garage
door opener receiver. The name
and color of the button may vary
by manufacturer.
5. Press and release the Learn or Smart button. Step 6 must be
completed within 30 seconds of
pressing this button.