transmission oil CHEVROLET SILVERADO 2024 Owners Manual
[x] Cancel search | Manufacturer: CHEVROLET, Model Year: 2024, Model line: SILVERADO, Model: CHEVROLET SILVERADO 2024Pages: 433, PDF Size: 14.15 MB
Page 101 of 433
Chevrolet Silverado 2500 HD/3500 HD Owner Manual (GMNA-Localizing-U.
S./Canada/Mexico-16908339) - 2024 - CRC - 12/15/22
Instruments and Controls 99
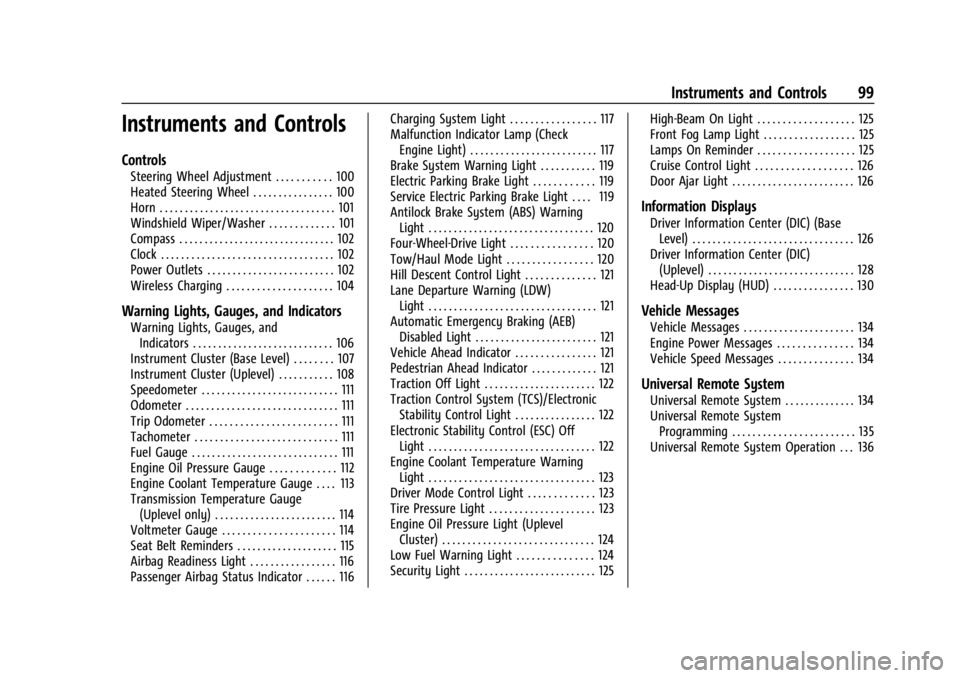
Instruments and Controls
Controls
Steering Wheel Adjustment . . . . . . . . . . . 100
Heated Steering Wheel . . . . . . . . . . . . . . . . 100
Horn . . . . . . . . . . . . . . . . . . . . . . . . . . . . . . . . . . . 101
Windshield Wiper/Washer . . . . . . . . . . . . . 101
Compass . . . . . . . . . . . . . . . . . . . . . . . . . . . . . . . 102
Clock . . . . . . . . . . . . . . . . . . . . . . . . . . . . . . . . . . 102
Power Outlets . . . . . . . . . . . . . . . . . . . . . . . . . 102
Wireless Charging . . . . . . . . . . . . . . . . . . . . . 104
Warning Lights, Gauges, and Indicators
Warning Lights, Gauges, andIndicators . . . . . . . . . . . . . . . . . . . . . . . . . . . . 106
Instrument Cluster (Base Level) . . . . . . . . 107
Instrument Cluster (Uplevel) . . . . . . . . . . . 108
Speedometer . . . . . . . . . . . . . . . . . . . . . . . . . . . 111
Odometer . . . . . . . . . . . . . . . . . . . . . . . . . . . . . . 111
Trip Odometer . . . . . . . . . . . . . . . . . . . . . . . . . 111
Tachometer . . . . . . . . . . . . . . . . . . . . . . . . . . . . 111
Fuel Gauge . . . . . . . . . . . . . . . . . . . . . . . . . . . . . 111
Engine Oil Pressure Gauge . . . . . . . . . . . . . 112
Engine Coolant Temperature Gauge . . . . 113
Transmission Temperature Gauge (Uplevel only) . . . . . . . . . . . . . . . . . . . . . . . . 114
Voltmeter Gauge . . . . . . . . . . . . . . . . . . . . . . 114
Seat Belt Reminders . . . . . . . . . . . . . . . . . . . . 115
Airbag Readiness Light . . . . . . . . . . . . . . . . . 116
Passenger Airbag Status Indicator . . . . . . 116 Charging System Light . . . . . . . . . . . . . . . . . 117
Malfunction Indicator Lamp (Check
Engine Light) . . . . . . . . . . . . . . . . . . . . . . . . . 117
Brake System Warning Light . . . . . . . . . . . 119
Electric Parking Brake Light . . . . . . . . . . . . 119
Service Electric Parking Brake Light . . . . 119
Antilock Brake System (ABS) Warning Light . . . . . . . . . . . . . . . . . . . . . . . . . . . . . . . . . 120
Four-Wheel-Drive Light . . . . . . . . . . . . . . . . 120
Tow/Haul Mode Light . . . . . . . . . . . . . . . . . 120
Hill Descent Control Light . . . . . . . . . . . . . . 121
Lane Departure Warning (LDW) Light . . . . . . . . . . . . . . . . . . . . . . . . . . . . . . . . . 121
Automatic Emergency Braking (AEB) Disabled Light . . . . . . . . . . . . . . . . . . . . . . . . 121
Vehicle Ahead Indicator . . . . . . . . . . . . . . . . 121
Pedestrian Ahead Indicator . . . . . . . . . . . . . 121
Traction Off Light . . . . . . . . . . . . . . . . . . . . . . 122
Traction Control System (TCS)/Electronic Stability Control Light . . . . . . . . . . . . . . . . 122
Electronic Stability Control (ESC) Off Light . . . . . . . . . . . . . . . . . . . . . . . . . . . . . . . . . 122
Engine Coolant Temperature Warning Light . . . . . . . . . . . . . . . . . . . . . . . . . . . . . . . . . 123
Driver Mode Control Light . . . . . . . . . . . . . 123
Tire Pressure Light . . . . . . . . . . . . . . . . . . . . . 123
Engine Oil Pressure Light (Uplevel Cluster) . . . . . . . . . . . . . . . . . . . . . . . . . . . . . . 124
Low Fuel Warning Light . . . . . . . . . . . . . . . 124
Security Light . . . . . . . . . . . . . . . . . . . . . . . . . . 125 High-Beam On Light . . . . . . . . . . . . . . . . . . . 125
Front Fog Lamp Light . . . . . . . . . . . . . . . . . . 125
Lamps On Reminder . . . . . . . . . . . . . . . . . . . 125
Cruise Control Light . . . . . . . . . . . . . . . . . . . 126
Door Ajar Light . . . . . . . . . . . . . . . . . . . . . . . . 126
Information Displays
Driver Information Center (DIC) (Base
Level) . . . . . . . . . . . . . . . . . . . . . . . . . . . . . . . . 126
Driver Information Center (DIC) (Uplevel) . . . . . . . . . . . . . . . . . . . . . . . . . . . . . 128
Head-Up Display (HUD) . . . . . . . . . . . . . . . . 130
Vehicle Messages
Vehicle Messages . . . . . . . . . . . . . . . . . . . . . . 134
Engine Power Messages . . . . . . . . . . . . . . . 134
Vehicle Speed Messages . . . . . . . . . . . . . . . 134
Universal Remote System
Universal Remote System . . . . . . . . . . . . . . 134
Universal Remote System Programming . . . . . . . . . . . . . . . . . . . . . . . . 135
Universal Remote System Operation . . . 136
Page 110 of 433
Chevrolet Silverado 2500 HD/3500 HD Owner Manual (GMNA-Localizing-U.
S./Canada/Mexico-16908339) - 2024 - CRC - 12/15/22
108 Instruments and Controls
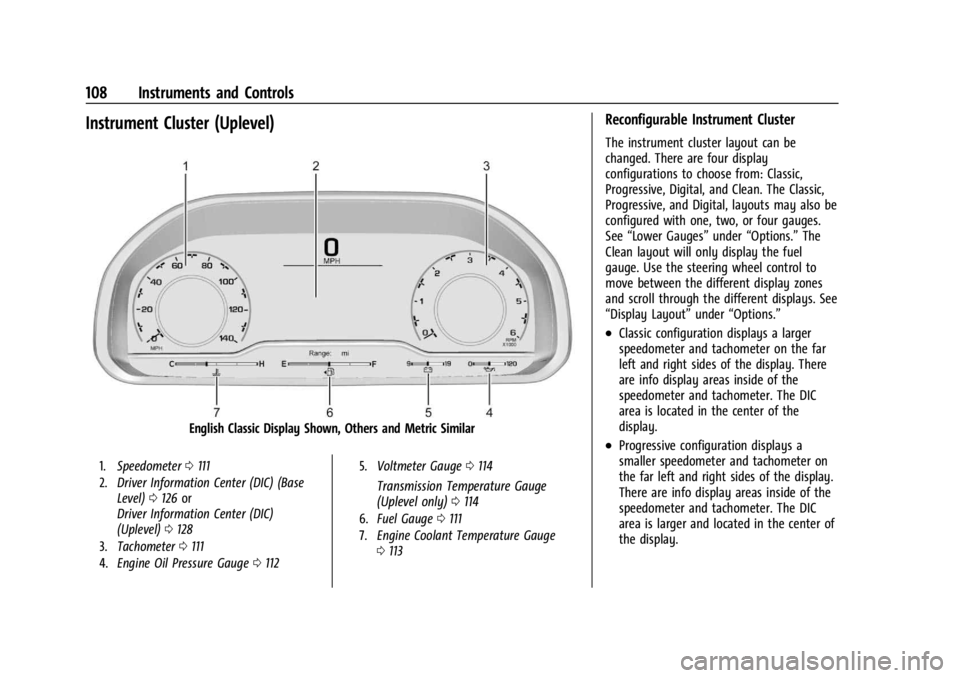
Instrument Cluster (Uplevel)
English Classic Display Shown, Others and Metric Similar
1.Speedometer 0111
2. Driver Information Center (DIC) (Base
Level) 0126 or
Driver Information Center (DIC)
(Uplevel) 0128
3. Tachometer 0111
4. Engine Oil Pressure Gauge 0112 5.
Voltmeter Gauge 0114
Transmission Temperature Gauge
(Uplevel only) 0114
6. Fuel Gauge 0111
7. Engine Coolant Temperature Gauge
0113
Reconfigurable Instrument Cluster
The instrument cluster layout can be
changed. There are four display
configurations to choose from: Classic,
Progressive, Digital, and Clean. The Classic,
Progressive, and Digital, layouts may also be
configured with one, two, or four gauges.
See “Lower Gauges” under“Options.” The
Clean layout will only display the fuel
gauge. Use the steering wheel control to
move between the different display zones
and scroll through the different displays. See
“Display Layout” under“Options.”
.Classic configuration displays a larger
speedometer and tachometer on the far
left and right sides of the display. There
are info display areas inside of the
speedometer and tachometer. The DIC
area is located in the center of the
display.
.Progressive configuration displays a
smaller speedometer and tachometer on
the far left and right sides of the display.
There are info display areas inside of the
speedometer and tachometer. The DIC
area is larger and located in the center of
the display.
Page 112 of 433
Chevrolet Silverado 2500 HD/3500 HD Owner Manual (GMNA-Localizing-U.
S./Canada/Mexico-16908339) - 2024 - CRC - 12/15/22
110 Instruments and Controls
Audio
Browse music, select from the favorites,
or change the audio source. Use the
thumbwheel to change the station or go to
the next or previous track.
Navigation
If there is an active route, the Turn-by-Turn
directions will appear on the Navigation
Page, if there is no active route a compass
will be displayed.
Phone
If there is no active phone call, view recent
calls, or scroll through contacts.
Options
Use the thumbwheel to scroll through items
in the Options menu.
Display Layout :Choose Classic, Progressive,
Digital, and Clean layout by pressing the
thumbwheel while the desired item is
highlighted. Exit the Layout menu by
pressing
o.
Left/Right Side Info : Press the thumbwheel
to select the items to be displayed in the
display areas. See "Left/Right Side Info"
previously in this section. Lower Gauges :
Choose one of three gauge
configurations by pressing the thumbwheel
while the desired item is highlighted. The
selected configuration will be displayed at
the bottom of the display.
Maximum displays fuel level, coolant
temperature, engine oil pressure, and
battery voltage. Transmission fluid
temperature displays instead of battery
voltage while in Tow Haul mode.
Medium displays fuel level, and coolant
temperature.
Minimum displays only the fuel level.
Info Page Options : Press the thumbwheel
to select the items to be displayed in the
Info app. See Driver Information Center (DIC)
(Base Level) 0126 orDriver Information
Center (DIC) (Uplevel) 0128.
Units : Choose US or metric units by
pressing the thumbwheel while the desired
item is highlighted.
Speed Warning : Allows the driver to set a
speed that they do not want to exceed. To
set the Speed Warning press the
thumbwheel when Speed Warning is
displayed. Use the thumbwheel to adjust
the value and press to set the speed. Once the speed is set, this feature can be
turned off by pressing the thumbwheel
while viewing this page. If the selected
speed limit is exceeded, a pop-up warning is
displayed with a chime.
Speed Sign Display :
Shows sign
information, which comes from a roadway
database in the onboard navigation system,
if equipped. The sign will show “− −”when
offline maps are unavailable. See Maps
0 160.
Head-up Display (HUD) : If equipped, this
feature allows for adjusting the angle of the
HUD image and changing or turning off the
Speed Limit Sign.
HUD Rotation: Press the thumbwheel while
Adjust Rotation is highlighted to enter
Adjust Mode. Scroll to adjust the angle of
the HUD display. Press the thumbwheel to
confirm and save the setting. This feature
may only be available in P (Park).
Speed Limit Style: Press the thumbwheel
while Speed Limit Style is highlighted to
change the speed sign style or to turn it off.
Software Information : Displays open source
software information.
Reset To Defaults : Allows the driver to
reset to default settings.
Page 215 of 433
Chevrolet Silverado 2500 HD/3500 HD Owner Manual (GMNA-Localizing-U.
S./Canada/Mexico-16908339) - 2024 - CRC - 12/12/22
Driving and Operating 213
Starting the Engine
If the vehicle has a diesel engine, see the
Duramax diesel supplement.
Caution
If you add electrical parts or accessories,
you could change the way the engine
operates. Any resulting damage would
not be covered by the vehicle warranty.
SeeAdd-On Electrical Equipment 0300.
Move the shift lever to P (Park) or
N (Neutral). To restart the engine when the
vehicle is already moving, use
N (Neutral) only.
Caution
Do not try to shift to P (Park) if the
vehicle is moving. If you do, you could
damage the transmission. Shift to P (Park)
only when the vehicle is stopped.
Starting Procedure
1. The remote key must be in the vehicle. Press ENGINE START/STOP with the brake
pedal applied. When the engine begins
cranking, let go of the button. The driver may observe a minor, and
temporary, brake pedal kickback when
starting the vehicle. This is normal.
The idle speed will go down as the
engine gets warm. Do not race the
engine immediately after starting it.
Operate the engine and transmission
gently to allow the oil to warm up and
lubricate all moving parts.
When the low fuel warning light is on
and the FUEL LEVEL LOW message is
displayed in the Driver Information
Center (DIC), press ENGINE START/STOP
to continue engine cranking.
Caution
Cranking the engine for long periods of
time, by returning the ignition to the
START position immediately after
cranking has ended, can overheat and
damage the cranking motor, and drain
the battery. Wait at least 15 seconds
between each try, to let the cranking
motor cool down.
2. If the engine does not start after five to 10 seconds, especially in very cold
weather (below −18 °C or 0 °F), it could
be flooded with too much gasoline. Try pushing the accelerator pedal all the way
to the floor and holding it there while
pressing ENGINE START/STOP for up to a
maximum of 15 seconds. Wait at least
15 seconds between each try, to allow
the cranking motor to cool down. When
the engine starts, let go of the button
and accelerator. If the vehicle starts
briefly but then stops again, do the
same thing. This clears the extra gasoline
from the engine. Do not race the engine
immediately after starting it. Operate
the engine and transmission gently until
the oil warms up and lubricates all
moving parts.Engine Heater
If equipped, the engine heater can provide
easier starting and better fuel economy
during engine warm-up in cold weather
conditions at or below
−18 °C (0 °F). Vehicles
with an engine heater should be plugged in
at least four hours before starting. An
internal thermostat in the plug-end of the
cord may exist, which will prevent engine
heater operation at temperatures above
−18 °C (0 °F).
Page 273 of 433
Chevrolet Silverado 2500 HD/3500 HD Owner Manual (GMNA-Localizing-U.
S./Canada/Mexico-16908339) - 2024 - CRC - 12/12/22
Driving and Operating 271
The following information has many
time-tested, important trailering tips and
safety rules. Many of these are important
for your safety and that of your passengers.
Read this section carefully before towing a
trailer.
When towing a trailer:
.Become familiar with, and follow all state
and local laws that apply to trailer
towing. These requirements vary from
state to state.
.State laws may require the use of
extended side view mirrors. If your
visibility is limited or restricted while
towing, install extended side view mirrors
on your vehicle, even if not required.
.Do not tow a trailer during the first
800 km (500 mi) of vehicle use to prevent
damage to the engine, axle, or other
parts.
.Perform the first oil change before heavy
towing.
.Do not drive over 80 km/h (50 mph) and
do not make starts at full throttle during
the first 800 km (500 mi) of trailer
towing.
.Tow in D (Drive). Tow/Haul Mode is
recommended for heavier trailers. See
Tow/Haul Mode0221. If the transmission downshifts too often, a lower gear may
be selected using Manual Mode. See
Manual Mode
0220.
The following advanced driver assistance
features should be turned off when towing
a trailer, and may turn off automatically
when a trailer is detected:
.Park Assist
.Reverse Automatic Braking (RAB)
.Rear Cross Traffic Alert (RCTA)
.Rear Cross Traffic Braking (RCTB)
.Lane Change Alert (LCA)
.Super Cruise and Adaptive Cruise Control
(ACC), unless equipped with trailering
functionality, see Adaptive Cruise Control
(Camera) 0235.
Automatic Emergency Braking (AEB) and
Front Pedestrian Braking (FPB) should be set
to Alert unless equipped with Super Cruise.
Do not use Automatic Parking Assist (APA)
while towing a trailer.
{Warning
To prevent serious injury or death from
carbon monoxide (CO), when towing a
trailer: (Continued)
Warning (Continued)
.Do not drive with the liftgate, trunk/
hatch, or rear-most window open.
.Fully open the air outlets on or under
the instrument panel.
.Adjust the climate control system to a
setting that brings in only outside air.
See“Climate Control Systems” in the
Index.
For more information about carbon
monoxide, see Engine Exhaust 0217.
Towing a trailer requires experience. The
combination of the vehicle and trailer is
longer and not as responsive as the vehicle
itself. Get used to the handling and braking
of the combination by driving on a level
road surface before driving on public roads.
The trailer structure, the tires, and the
brakes must all be rated to carry the
intended cargo. Inadequate trailer
equipment can cause the combination to
operate in an unexpected or unsafe manner.
Before driving, inspect all trailer hitch parts
and attachments, safety chains, electrical
connectors, lamps, tires, and mirrors. See
Towing Equipment 0278. If the trailer has
electric brakes, start the combination
Page 274 of 433
Chevrolet Silverado 2500 HD/3500 HD Owner Manual (GMNA-Localizing-U.
S./Canada/Mexico-16908339) - 2024 - CRC - 12/12/22
272 Driving and Operating
moving and then manually apply the trailer
brake controller to check that the trailer
brakes work. During the trip, occasionally
check that the cargo and trailer are secure
and that the lamps and any trailer brakes
are working.
Towing with a Stability Control System
When towing, the stability control system
might be heard. The system reacts to
vehicle movement caused by the trailer,
which mainly occurs during cornering. This is
normal when towing heavier trailers.
Following Distance
Stay at least twice as far behind the vehicle
ahead as you would when driving without a
trailer. This can help to avoid heavy braking
and sudden turns.
Passing
More passing distance is needed when
towing a trailer. The combination of the
vehicle and trailer will not accelerate as
quickly and is much longer than the vehicle
alone. It is necessary to go much farther
beyond the passed vehicle before returning
to the lane. Pass on level roadways. Avoid
passing on hills if possible.
Backing Up
Hold the bottom of the steering wheel with
one hand. To move the trailer to the left,
move that hand to the left. To move the
trailer to the right, move that hand to the
right. Always back up slowly and, if possible,
have someone guide you.
Making TurnsCaution
Turn more slowly and make wider arcs
when towing a trailer to prevent damage
to your vehicle. Making very sharp turns
could cause the trailer to contact the
vehicle.
Make wider turns than normal when towing,
so the trailer will not go over soft shoulders,
over curbs, or strike road signs, trees,
or other objects. Always signal turns well in
advance. Do not steer or brake suddenly.
Driving on Grades
Reduce speed and shift to a lower gear
before starting down a long or steep
downhill grade. If the transmission is not
shifted down, the brakes may overheat and
result in reduced braking efficiency. The vehicle can tow in D (Drive). Shift the
transmission to a lower gear if the
transmission shifts too often under heavy
loads and/or hilly conditions.
When towing at higher altitudes, engine
coolant will boil at a lower temperature
than at lower altitudes. If the engine is
turned off immediately after towing at high
altitude on steep uphill grades, the vehicle
could show signs similar to engine
overheating. To avoid this, let the engine
run, preferably on level ground, with the
transmission in P (Park) for a few minutes
before turning the engine off. If the
overheat warning comes on, see
Engine
Overheating 0315.
Viewing Systems
If equipped, the viewing systems on the
vehicle can improve visibility while hitching,
backing, and driving with a trailer. See
Advanced Driver Assistance Systems 0246.
Parking on Hills
{Warning
To prevent serious injury or death,
always park your vehicle and trailer on a
level surface when possible.
Page 305 of 433
Chevrolet Silverado 2500 HD/3500 HD Owner Manual (GMNA-Localizing-U.
S./Canada/Mexico-16908339) - 2024 - CRC - 12/5/22
Vehicle Care 303
Vehicle Care
General Information
General Information . . . . . . . . . . . . . . . . . . . 304
California Perchlorate MaterialsRequirements . . . . . . . . . . . . . . . . . . . . . . . 304
Accessories and Modifications . . . . . . . . . 304
Vehicle Checks
Doing Your Own Service Work . . . . . . . . 305
Hood . . . . . . . . . . . . . . . . . . . . . . . . . . . . . . . . . . 305
Engine Compartment Overview . . . . . . . . 307
Engine Oil . . . . . . . . . . . . . . . . . . . . . . . . . . . . . 308
Engine Oil Life System . . . . . . . . . . . . . . . . . 310
Automatic Transmission Fluid . . . . . . . . . . 311
Engine Air Filter Life System . . . . . . . . . . . 311
Engine Air Cleaner/Filter . . . . . . . . . . . . . . . 312
Cooling System . . . . . . . . . . . . . . . . . . . . . . . . 313
Engine Overheating . . . . . . . . . . . . . . . . . . . . 315
Overheated Engine Protection Operating Mode . . . . . . . . . . . . . . . . . . . . . 317
Engine Fan . . . . . . . . . . . . . . . . . . . . . . . . . . . . . 317
Power Steering Fluid . . . . . . . . . . . . . . . . . . . 317
Washer Fluid . . . . . . . . . . . . . . . . . . . . . . . . . . 318
Brakes . . . . . . . . . . . . . . . . . . . . . . . . . . . . . . . . . 319
Brake Pad Life System . . . . . . . . . . . . . . . . . 319
Brake Fluid . . . . . . . . . . . . . . . . . . . . . . . . . . . . 320
Battery - North America . . . . . . . . . . . . . . . 321
Four-Wheel Drive . . . . . . . . . . . . . . . . . . . . . . 323
Front Axle . . . . . . . . . . . . . . . . . . . . . . . . . . . . . 323 Rear Axle . . . . . . . . . . . . . . . . . . . . . . . . . . . . . . 323
Noise Control System . . . . . . . . . . . . . . . . . . 323
Automatic Transmission Shift Lock
Control Function Check . . . . . . . . . . . . . . 324
Park Brake and P (Park) Mechanism
Check . . . . . . . . . . . . . . . . . . . . . . . . . . . . . . . . 325
Wiper Blade Replacement . . . . . . . . . . . . . 325
Glass Replacement . . . . . . . . . . . . . . . . . . . . . 325
Windshield Replacement . . . . . . . . . . . . . . 326
Gas Strut(s) . . . . . . . . . . . . . . . . . . . . . . . . . . . 326
Headlamp Aiming
Front Headlamp Aiming . . . . . . . . . . . . . . . 327
Bulb Replacement
Bulb Replacement . . . . . . . . . . . . . . . . . . . . . 327
Halogen Bulbs . . . . . . . . . . . . . . . . . . . . . . . . . 327
LED Lighting . . . . . . . . . . . . . . . . . . . . . . . . . . . 327
Headlamps, Front Turn Signal, Sidemarker, and Parking Lamps . . . . . . 327
Taillamps, Turn Signal, Stoplamps, and Back-Up Lamps . . . . . . . . . . . . . . . . . . . . . . 328
Center High-Mounted Stoplamp (CHMSL) and Cargo Lamp . . . . . . . . . . . . 329
License Plate Lamp . . . . . . . . . . . . . . . . . . . . 330
Electrical System
Electrical System Overload . . . . . . . . . . . . 330
Fuses and Circuit Breakers . . . . . . . . . . . . . 332
Engine Compartment Fuse Block . . . . . . . 332
Instrument Panel Fuse Block (Left) . . . . . 335 Instrument Panel Fuse Block (Right) . . . 337
Wheels and Tires
Tires . . . . . . . . . . . . . . . . . . . . . . . . . . . . . . . . . . 339
All-Season Tires . . . . . . . . . . . . . . . . . . . . . . . 340
Winter Tires . . . . . . . . . . . . . . . . . . . . . . . . . . . 340
All-Terrain Tires . . . . . . . . . . . . . . . . . . . . . . . . 341
Tire Sidewall Labeling . . . . . . . . . . . . . . . . . . 341
Tire Designations . . . . . . . . . . . . . . . . . . . . . . 342
Tire Terminology and Definitions . . . . . . 342
Tire Pressure . . . . . . . . . . . . . . . . . . . . . . . . . . 344
Tire Pressure Monitor System . . . . . . . . . 345
Tire Pressure Monitor Operation . . . . . . 346
Tire Inspection . . . . . . . . . . . . . . . . . . . . . . . . . 351
Tire Rotation . . . . . . . . . . . . . . . . . . . . . . . . . . . 351
When It Is Time for New Tires . . . . . . . . 353
Buying New Tires . . . . . . . . . . . . . . . . . . . . . 354
Different Size Tires and Wheels . . . . . . . . 355
Uniform Tire Quality Grading . . . . . . . . . 356
Wheel Alignment and Tire Balance . . . . 357
Wheel Replacement . . . . . . . . . . . . . . . . . . . 357
Tire Chains . . . . . . . . . . . . . . . . . . . . . . . . . . . . 358
If a Tire Goes Flat . . . . . . . . . . . . . . . . . . . . . 358
Tire Changing . . . . . . . . . . . . . . . . . . . . . . . . . 360
Full-Size Spare Tire . . . . . . . . . . . . . . . . . . . . 370
Jump Starting
Jump Starting - North America . . . . . . . . 370
Towing the Vehicle
Transporting a Disabled Vehicle . . . . . . . 373
Page 313 of 433
Chevrolet Silverado 2500 HD/3500 HD Owner Manual (GMNA-Localizing-U.
S./Canada/Mexico-16908339) - 2024 - CRC - 12/5/22
Vehicle Care 311
The oil life system can also be reset as
follows:1. Display the oil life percentage on the DIC. See Driver Information Center (DIC)
(Base Level) 0126 orDriver Information
Center (DIC) (Uplevel) 0128.
2. Fully press the accelerator pedal slowly three times within five seconds.
3. If the display changes to 100%, the system is reset.
If the vehicle has a CHANGE ENGINE OIL
SOON message and it comes back on when
the vehicle is started and/or the oil
life percentage is near 0%, the engine oil
life system has not been reset. Repeat the
procedure.
Automatic Transmission Fluid
When to Check and Change Automatic
Transmission Fluid
It is usually not necessary to check the
transmission fluid level. The only reason for
fluid loss is a transmission leak or
overheated transmission. This vehicle is not
equipped with a transmission fluid level
dipstick. There is a special procedure for
checking and changing the transmission fluid
in these vehicles. Because this procedure is difficult, this should be done at the dealer.
Contact the dealer for additional information
or the procedure can be found in the service
manual. See
Publication Ordering
Information 0406.
Caution
Use of the incorrect automatic
transmission fluid may damage the
vehicle, and the damage may not be
covered by the vehicle warranty. Always
use the correct automatic transmission
fluid. See Recommended Fluids and
Lubricants 0392.
Change the fluid and filter at the scheduled
maintenance intervals listed in Maintenance
Schedule 0388. Be sure to use the
transmission fluid listed in Recommended
Fluids and Lubricants 0392.
Engine Air Filter Life System
This feature provides the engine air filter’s
remaining life and best timing for a change.
The timing to change and engine air filter
depends on driving and environmental
conditions.
When to Change Engine Air Filter
When the Driver Information Center (DIC)
displays a message to replace the engine air
filter at the next oil change, follow this
timing.
When the DIC displays a message to replace
the engine air filter soon, replace the engine
air filter at the earliest convenience.
The system must be reset after the engine
air filter is changed.
If the DIC displays a message to check the
engine air filter system, see your dealer.
How to Reset Engine Air Filter Life
System
To reset:
1. Place the vehicle in P (Park).
2. Display the Air Filter Life on the DIC. See Driver Information Center (DIC) (Base
Level) 0126 orDriver Information Center
(DIC) (Uplevel) 0128.
3. Press
Ton the steering wheel, or press
the trip odometer reset stem if the
vehicle does not have the DIC controls,
to move to the Reset/Disable display
Page 319 of 433
Chevrolet Silverado 2500 HD/3500 HD Owner Manual (GMNA-Localizing-U.
S./Canada/Mexico-16908339) - 2024 - CRC - 12/5/22
Vehicle Care 317
normal idle speed for at least five minutes
while the vehicle is parked. If the warning is
still there, turn off the engine and get
everyone out of the vehicle until it
cools down.
If there is no sign of steam, idle the engine
for five minutes while parked. If the warning
is still displayed, turn off the engine until it
cools down.
Overheated Engine Protection
Operating Mode
If an overheated engine condition exists and
the ENGINE POWER IS REDUCED message
displays, an overheat protection mode which
alternates firing groups of cylinders helps to
prevent engine damage. In this mode, a loss
in power and engine performance will be
noticed. This operating mode allows the
vehicle to be driven to a safe place in an
emergency. Driving extended distances and/
or towing a trailer in the overheat
protection mode should be avoided.
If the engine or transmission detects an
impending hot fluid condition, then the
transmission may force upshifts to limit
temperatures. Downshifts may also be
prevented in this instance. Normal operationmay continue unless the display indicates
there is a hot condition and engine should
be idled.
Caution
After driving in the overheated engine
protection operating mode, the engine oil
will be severely degraded. Any repairs
performed before the engine is cool may
cause engine damage. Allow the engine
to cool before attempting any repair.
Repair the cause of coolant loss, change
the oil, and reset the oil life system. See
Engine Oil
0308.
Engine Fan
If the vehicle has the Duramax diesel
engine, see the Duramax diesel supplement.
The vehicle has a clutched engine cooling
fan. When the clutch is engaged, the fan
spins faster to provide more air to cool the
engine. In most everyday driving conditions,
the fan is spinning slower and the clutch is
not fully engaged. This improves fuel
economy and reduces fan noise. Under
heavy vehicle loading, trailer towing, and/or
high outside temperatures, the fan speed
increases as the clutch more fully engages, so an increase in fan noise may be heard.
This is normal and should not be mistaken
as the transmission slipping or making extra
shifts. It is merely the cooling system
functioning properly. The fan will slow down
when additional cooling is not required and
the clutch partially disengages.
This fan noise may be heard when starting
the engine. It will go away as the fan clutch
partially disengages.
Power Steering Fluid
The power steering fluid reservoir is in the
engine compartment on the driver side of
the vehicle. See
Engine Compartment
Overview 0307 for reservoir location.
When to Check Power Steering Fluid
It is not necessary to regularly check power
steering fluid unless there is a leak
suspected in the system or an unusual noise
Page 336 of 433
Chevrolet Silverado 2500 HD/3500 HD Owner Manual (GMNA-Localizing-U.
S./Canada/Mexico-16908339) - 2024 - CRC - 12/5/22
334 Vehicle Care
FusesUsage
25 EBCM 1 –Electronic
Brake Control Module 1
26 –
27 Horn
28 Parking Lamp Mirror/ Grill (LD)/Parking Lamp
Left (HD)
29 Parking Lamp Right (HD)
30 ELM 3 –Electronic
Lighting Module 3
31 ELM 1 –Electronic
Lighting Module 1
32 –
33 Not R/C
34 Radars (LD) 37 MISC IP Headliner Ignition
38 Seat Fan Ignition
39 Trailer Ignition Module
40 Misc Ignition 41 Trailer Parking Lamp Fuses
Usage
42 Tail Lamp Left (HD)
44 DEFC/ICCM Ignition (LD/ HD)/FTZM Ignition (HD)
45 Secondary Axle Motor
46 Engine Control Module Ignition
47 –
48 –
49 Transmission Auxiliary Oil Pump (LD)
50 A/C Clutch 51 Transfer Case Control Module
52 Front Wiper
53 Center High-Mounted Stop Lamp
54 Tail Lamp Right (HD) 55 Trailer Back-up Lamp
56 SADS (LD)/Fuel Tank Zone Module 2 (HD)
57 TTPM/SBZA
58 Starter Motor (LD) Fuses
Usage
60 Powertrain Sensor 2 (DSL)
61 Active Hydraulic Steering (HD)
62 DEFC Batt 1/CVS
63 Trailer Brake
65 –
66 Cooling Fan Motor Left (LD)
67 –
68 DEFC Batt 2
69 Starter Pinion (LD Gas)/ Starter Motor (HD)
71 Cooling Fan Lower (LD)
72 Cooling Fan Right (LD)
73 Trailer Stop/Turn Lamp Left
74 Trailer Interface Module 2
75 Integrated Chassis Control Module
76 Electric RNG BDS