CHEVROLET SILVERADO 2500 2023 Owners Manual
Manufacturer: CHEVROLET, Model Year: 2023, Model line: SILVERADO 2500, Model: CHEVROLET SILVERADO 2500 2023Pages: 441, PDF Size: 14.4 MB
Page 131 of 441
Chevrolet Silverado 2500 HD/3500 HD Owner Manual (GMNA-Localizing-U.
S./Canada/Mexico-15546003) - 2022 - CRC - 5/12/21
130 Instruments and Controls
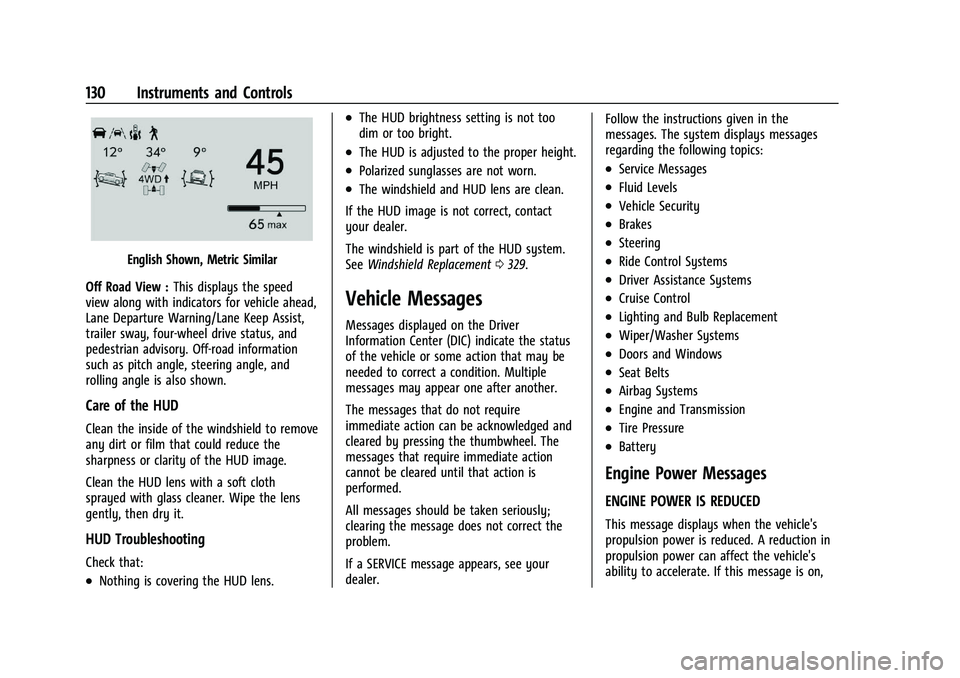
English Shown, Metric Similar
Off Road View : This displays the speed
view along with indicators for vehicle ahead,
Lane Departure Warning/Lane Keep Assist,
trailer sway, four-wheel drive status, and
pedestrian advisory. Off-road information
such as pitch angle, steering angle, and
rolling angle is also shown.
Care of the HUD
Clean the inside of the windshield to remove
any dirt or film that could reduce the
sharpness or clarity of the HUD image.
Clean the HUD lens with a soft cloth
sprayed with glass cleaner. Wipe the lens
gently, then dry it.
HUD Troubleshooting
Check that:
.Nothing is covering the HUD lens.
.The HUD brightness setting is not too
dim or too bright.
.The HUD is adjusted to the proper height.
.Polarized sunglasses are not worn.
.The windshield and HUD lens are clean.
If the HUD image is not correct, contact
your dealer.
The windshield is part of the HUD system.
See Windshield Replacement 0329.
Vehicle Messages
Messages displayed on the Driver
Information Center (DIC) indicate the status
of the vehicle or some action that may be
needed to correct a condition. Multiple
messages may appear one after another.
The messages that do not require
immediate action can be acknowledged and
cleared by pressing the thumbwheel. The
messages that require immediate action
cannot be cleared until that action is
performed.
All messages should be taken seriously;
clearing the message does not correct the
problem.
If a SERVICE message appears, see your
dealer. Follow the instructions given in the
messages. The system displays messages
regarding the following topics:
.Service Messages
.Fluid Levels
.Vehicle Security
.Brakes
.Steering
.Ride Control Systems
.Driver Assistance Systems
.Cruise Control
.Lighting and Bulb Replacement
.Wiper/Washer Systems
.Doors and Windows
.Seat Belts
.Airbag Systems
.Engine and Transmission
.Tire Pressure
.Battery
Engine Power Messages
ENGINE POWER IS REDUCED
This message displays when the vehicle's
propulsion power is reduced. A reduction in
propulsion power can affect the vehicle's
ability to accelerate. If this message is on,
Page 132 of 441
Chevrolet Silverado 2500 HD/3500 HD Owner Manual (GMNA-Localizing-U.
S./Canada/Mexico-15546003) - 2022 - CRC - 5/12/21
Instruments and Controls 131
but there is no observed reduction in
performance, proceed to your destination.
Under certain conditions the performance
may be reduced the next time the vehicle is
driven. The vehicle may be driven while this
message is on, but maximum acceleration
and speed may be reduced. Anytime this
message stays on, or displays repeatedly,
the vehicle should be taken to your dealer
for service as soon as possible.
Under certain operating conditions,
propulsion will be disabled. Try restarting
after the ignition has been off for
30 seconds.
Vehicle Speed Messages
SPEED LIMITED TO XXX KM/H (MPH)
This message shows that the vehicle speed
has been limited to the speed displayed. The
limited speed is a protection for various
propulsion and vehicle systems, such as
lubrication, thermal, brakes, suspension,
Teen Driver if equipped, or tires.
Vehicle Personalization
The following are all possible vehicle
personalization features. Depending on the
vehicle, some may not be available.For System, Apps, and Personal features and
functions, see
Settings0184.
To access the vehicle personalization menu: 1. Touch the Settings icon on the Home Page of the infotainment display.
2. Touch Vehicle to display a list of available options.
3. Touch to select the desired feature setting.
4. Touch
9orRto turn a feature off or on.
5. Touch
zto go to the top level of the
Settings menu.
The menu may contain the following:
Rear Seat Reminder
This allows for a chime and a message when
the rear door has been opened before or
during operation of the vehicle.
Touch Off or On.
Climate and Air Quality
Touch and the following may display:
.Auto Fan Speed
.Auto Defog
.Auto Rear Defog Auto Fan Speed
This setting specifies the amount of airflow
when the climate control fan setting is
Auto Fan.
Touch Low, Medium, or High.
Auto Defog
This setting automatically directs air to the
windshield to assist in defogging, based on
temperature and humidity conditions.
Touch Off or On.
Auto Rear Defog
This setting automatically turns the rear
defogger on based on temperature and
humidity conditions.
Touch Off or On.
Collision/Detection Systems
Touch and the following may display:
.Alert Type
.Forward Collision System
.Lane Change Alert
.Park Assist
.Rear Camera Park Assist Symbols
.Rear Cross Traffic Alert
Page 133 of 441
Chevrolet Silverado 2500 HD/3500 HD Owner Manual (GMNA-Localizing-U.
S./Canada/Mexico-15546003) - 2022 - CRC - 5/12/21
132 Instruments and Controls
Alert Type
This feature sets the type of alert from the
driver assistance systems to help avoid
crashes.
Touch Beeps or Safety Alert Seat.
Forward Collision System
This setting can alert of a potential crash
with a detected vehicle ahead and can apply
brakes to help reduce a collision’s severity.
Touch Off, Alert, or Alert and Brake.
Lane Change Alert
This allows the feature to be turned on or
off. SeeLane Change Alert (LCA) 0266.
Touch Off or On.
Park Assist
This allows the feature to be turned on or
off. See Assistance Systems for Parking or
Backing 0253.
Select Off, On, or On with Towbar.
Rear Camera Park Assist Symbols
This setting enables the Rear Camera Park
Assist Symbols. See Assistance Systems for
Parking or Backing 0253.
Touch Off or On. Rear Cross Traffic Alert
This allows the Rear Cross Traffic Alert
feature to be turned on or off. See
Assistance Systems for Parking or Backing
0
253.
Touch Off or On.
Comfort and Convenience
Touch and the following may display:
.Chime Volume
.Reverse Tilt Mirror
.Remote Mirror Folding
Chime Volume
This determines the chime volume level.
Touch the controls on the infotainment
display to adjust the volume.
Reverse Tilt Mirror
When on, the driver, passenger, or both
driver and passenger outside mirrors will tilt
downward when the vehicle is shifted into
R (Reverse) to improve visibility of the
ground near the rear wheels. They may
move from their tilted position when the
vehicle is shifted out of R (Reverse) or
turned off. See Reverse Tilt Mirrors 038. Touch Off, On - Driver and Passenger, On -
Driver, or On - Passenger.
Remote Mirror Folding
When on, the outside mirrors will remotely
fold or unfold when the Remote Keyless
Entry (RKE) transmitter
QorKbutton is
pressed and held. See Folding Mirrors036.
Touch Off or On.
Lighting
Touch and the following may display:
.Vehicle Locator Lights
.Exit Lighting
.Automatic High Beam Assist
Vehicle Locator Lights
This setting flashes the vehicle’s headlamps
when
Kis pressed on the Remote Keyless
Entry (RKE) transmitter.
Touch Off or On.
Exit Lighting
This setting specifies how long the
headlamps stay on after the vehicle is
turned off and exited.
Touch Off, 30 Seconds, 60 Seconds,
or 120 Seconds.
Page 134 of 441
Chevrolet Silverado 2500 HD/3500 HD Owner Manual (GMNA-Localizing-U.
S./Canada/Mexico-15546003) - 2022 - CRC - 5/12/21
Instruments and Controls 133
Automatic High Beam Assist
This setting specifies how the high beams
adjust based on the vehicle environment.
Touch IntelliBeam or Adaptive Headlight
System.
Power Door Locks
Touch and the following may display:
.Open Door Anti Lock Out
.Auto Door Unlock
.Delayed Door Lock
Open Door Anti Lock Out
This setting prevents the driver door from
locking when the door is open. If this
setting is on, the Delayed Door Lock menu
will not be available. If this setting is turned
off, the Delayed Door Lock menu may not
be available until the next ignition cycle.
Touch Off or On.
Auto Door Unlock
This setting allows selection of which doors
will automatically unlock when the vehicle is
shifted into P (Park).
Touch Off, All Doors, or Driver Door. Delayed Door Lock
When on, this feature will delay the locking
of the doors. To override the delay, press
the power door lock switch on the door.
Touch Off or On.
Remote Lock, Unlock, and Start
Touch and the following may display:
.Remote Unlock Light Feedback
.Remote Lock Feedback
.Remote Door Unlock
.Remote Start Auto Cool Seats
.Remote Start Auto Heat Seats
.Remote Window Operation
.Passive Door Unlock
.Passive Door Lock
.Remote Left in Vehicle Alert
.Remote Removed from Vehicle Alert
Remote Unlock Light Feedback
When on, the exterior lamps will flash when
unlocking the vehicle with the RKE
transmitter.
Touch Off or Flash Lights. Remote Lock Feedback
This allows selection of what type of
feedback is given when locking the vehicle
with the RKE transmitter.
Touch Off, Lights and Horn, Lights Only,
or Horn Only.
Remote Door Unlock
This allows selection of which doors will
unlock when pressing
Kon the RKE
transmitter.
Touch All Doors or Driver Door.
Remote Start Auto Cool Seats
If equipped and turned on, this feature will
turn on the ventilated seats when using
remote start on warm days. See Heated and
Ventilated Front Seats 053 and
Remote Vehicle Start 020.
Touch Off or On.
Remote Start Auto Heat Seats
If equipped and turned on, this feature will
turn on the heated seats when using remote
start on cold days. See Heated and
Ventilated Front Seats 053 and
Remote Vehicle Start 020.
Page 135 of 441
Chevrolet Silverado 2500 HD/3500 HD Owner Manual (GMNA-Localizing-U.
S./Canada/Mexico-15546003) - 2022 - CRC - 5/12/21
134 Instruments and Controls
If equipped with Auto Heated Steering
Wheel, this feature will turn on when the
Remote Start Auto Heated Seats turn on.
Touch Off or On.
Remote Window Operation
If equipped, this feature enables remote
operation of the windows with the RKE
transmitter. SeeRemote Keyless Entry (RKE)
System Operation (Key Access) 010 or
Remote Keyless Entry (RKE) System
Operation (Keyless Access) 013.
Touch Off or On.
Passive Door Unlock
This allows the selection of what doors will
unlock when using the button on the driver
door to unlock the vehicle.
Touch Off, All Doors or Driver Door Only.
Passive Door Lock
This allows passive locking to be turned on
or off and selects feedback. See Remote
Keyless Entry (RKE) System Operation (Key
Access) 010 or
Remote Keyless Entry (RKE) System
Operation (Keyless Access) 013.
Touch Off, On with Horn Chirp, or On. Remote Left in Vehicle Alert
This feature sounds an alert when the RKE
transmitter is left in the vehicle. This menu
also enables Remote No Longer In Vehicle
Alert.
Touch Off or On.
Remote Removed from Vehicle Alert
This feature beeps the horn 3 times when
exiting a running vehicle with the
remote key.
Touch Off or On.
Ride Height
Touch and the following may display:
.Automatic Entry/Egress
Automatic Entry/Egress
This feature specifies if the vehicle will
automatically lower to make it easier to
enter or exit the vehicle.
Touch Off or On.
Running Boards
Touch and the following may display:
.Automatic Running Boards
.Deploy Running Boards Automatic Running Boards
This feature specifies the position and use of
the running boards.
Touch Off or On.
Deploy Running Boards
This feature moves the running boards to a
deployed position so they can be used with
the doors closed.
Touch Off or Deploy.
Seating Position
Touch and the following may display:
.Seat Entry Memory
.Seat Exit Memory
Seat Entry Memory
This feature automatically recalls the
previously stored 1 or 2 button positions
when the ignition is changed from off to on
or ACC/ACCESSORY. See Memory Seats050.
Touch Off or On.
Page 136 of 441
Chevrolet Silverado 2500 HD/3500 HD Owner Manual (GMNA-Localizing-U.
S./Canada/Mexico-15546003) - 2022 - CRC - 5/12/21
Instruments and Controls 135
Seat Exit Memory
This feature automatically recalls the
previously stored exit button position when
the ignition is changed from on or ACC/
ACCESSORY to off and the driver door is
open. SeeMemory Seats 050.
Touch Off or On.
Suspension
Touch and the following may display:
.Service Mode
.Alignment Mode
Service Mode
This feature disables the air suspension
system and is used to prevent unintended
raising or lowering of the suspension..
Touch Off or On.
Alignment Mode
This feature will optimize the vehicle height
to provide the most accurate wheel
alignment.
Touch Off or On.
Trailering
Touch and the following may display:
.Side Trailer Camera
.Bed View Camera Lighting
Side Trailer Camera
This feature specifies if using the turn signal
during a lane change will also display an
applicable side view of the trailer and
vehicle. See Assistance Systems for Parking
or Backing 0253.
Touch Off or On.
Bed View Camera Lighting
This feature specifies if the truck bed rail
lights are turned on when the Bed View
Camera is active. See Assistance Systems for
Parking or Backing 0253.
Touch Off or On.
Teen Driver
See “Teen Driver” underSettings 0184.
Valet Mode
This will lock the infotainment system and
steering wheel controls. It may also limit
access to vehicle storage locations,
if equipped.
To enable valet mode:
1. Enter a four-digit code on the keypad.
2. Select Enter to go to the confirmation screen. 3. Re-enter the four-digit code.
Touch Lock or Unlock to lock or unlock the
system. Touch Back to go back to the
previous menu.
Universal Remote System
See Radio Frequency Statement 0417.
Universal Remote System
Programming
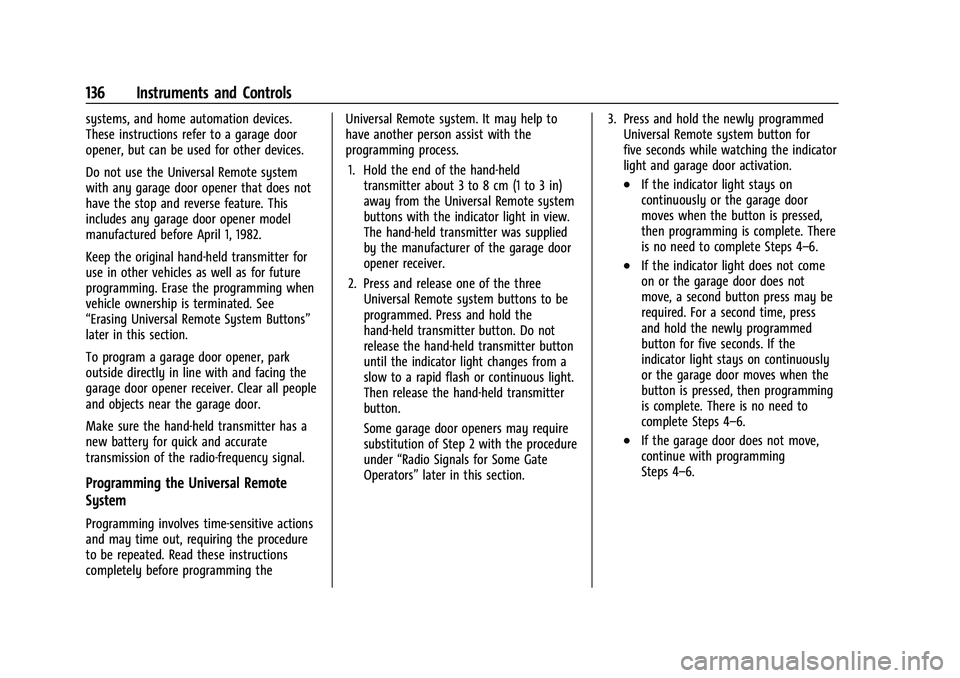
If equipped, these buttons are in the
overhead console.
This system can replace up to three remote
control transmitters used to activate devices
such as garage door openers, security
Page 137 of 441
Chevrolet Silverado 2500 HD/3500 HD Owner Manual (GMNA-Localizing-U.
S./Canada/Mexico-15546003) - 2022 - CRC - 5/12/21
136 Instruments and Controls
systems, and home automation devices.
These instructions refer to a garage door
opener, but can be used for other devices.
Do not use the Universal Remote system
with any garage door opener that does not
have the stop and reverse feature. This
includes any garage door opener model
manufactured before April 1, 1982.
Keep the original hand-held transmitter for
use in other vehicles as well as for future
programming. Erase the programming when
vehicle ownership is terminated. See
“Erasing Universal Remote System Buttons”
later in this section.
To program a garage door opener, park
outside directly in line with and facing the
garage door opener receiver. Clear all people
and objects near the garage door.
Make sure the hand-held transmitter has a
new battery for quick and accurate
transmission of the radio-frequency signal.
Programming the Universal Remote
System
Programming involves time-sensitive actions
and may time out, requiring the procedure
to be repeated. Read these instructions
completely before programming theUniversal Remote system. It may help to
have another person assist with the
programming process.
1. Hold the end of the hand-held transmitter about 3 to 8 cm (1 to 3 in)
away from the Universal Remote system
buttons with the indicator light in view.
The hand-held transmitter was supplied
by the manufacturer of the garage door
opener receiver.
2. Press and release one of the three Universal Remote system buttons to be
programmed. Press and hold the
hand-held transmitter button. Do not
release the hand-held transmitter button
until the indicator light changes from a
slow to a rapid flash or continuous light.
Then release the hand-held transmitter
button.
Some garage door openers may require
substitution of Step 2 with the procedure
under “Radio Signals for Some Gate
Operators” later in this section. 3. Press and hold the newly programmed
Universal Remote system button for
five seconds while watching the indicator
light and garage door activation.
.If the indicator light stays on
continuously or the garage door
moves when the button is pressed,
then programming is complete. There
is no need to complete Steps 4–6.
.If the indicator light does not come
on or the garage door does not
move, a second button press may be
required. For a second time, press
and hold the newly programmed
button for five seconds. If the
indicator light stays on continuously
or the garage door moves when the
button is pressed, then programming
is complete. There is no need to
complete Steps 4–6.
.If the garage door does not move,
continue with programming
Steps 4–6.
Page 138 of 441
Chevrolet Silverado 2500 HD/3500 HD Owner Manual (GMNA-Localizing-U.
S./Canada/Mexico-15546003) - 2022 - CRC - 5/12/21
Instruments and Controls 137
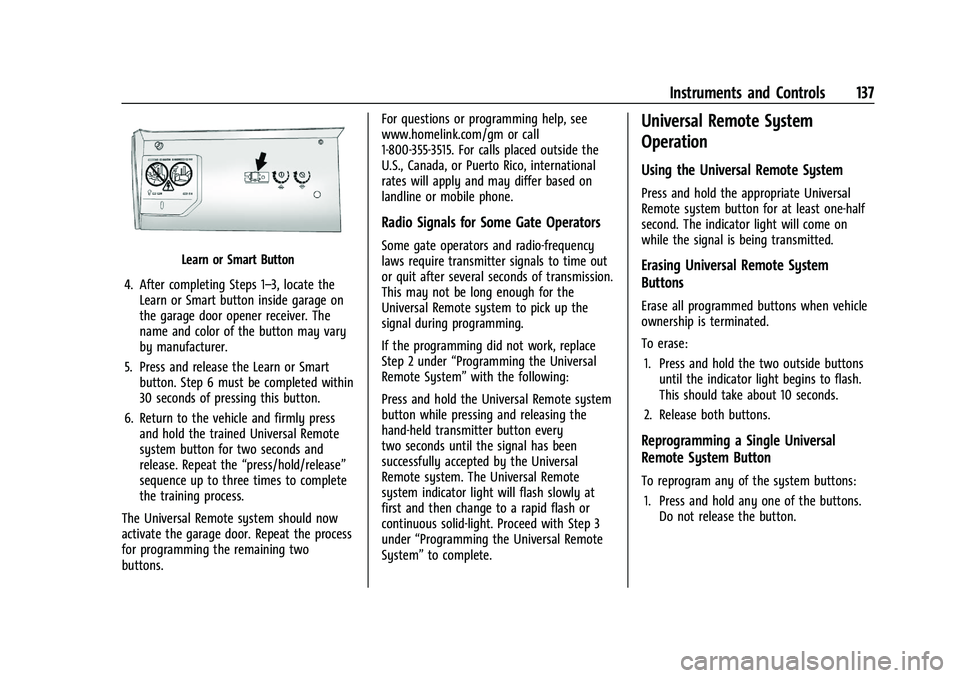
Learn or Smart Button
4. After completing Steps 1–3, locate the Learn or Smart button inside garage on
the garage door opener receiver. The
name and color of the button may vary
by manufacturer.
5. Press and release the Learn or Smart button. Step 6 must be completed within
30 seconds of pressing this button.
6. Return to the vehicle and firmly press and hold the trained Universal Remote
system button for two seconds and
release. Repeat the “press/hold/release”
sequence up to three times to complete
the training process.
The Universal Remote system should now
activate the garage door. Repeat the process
for programming the remaining two
buttons. For questions or programming help, see
www.homelink.com/gm or call
1-800-355-3515. For calls placed outside the
U.S., Canada, or Puerto Rico, international
rates will apply and may differ based on
landline or mobile phone.
Radio Signals for Some Gate Operators
Some gate operators and radio-frequency
laws require transmitter signals to time out
or quit after several seconds of transmission.
This may not be long enough for the
Universal Remote system to pick up the
signal during programming.
If the programming did not work, replace
Step 2 under
“Programming the Universal
Remote System” with the following:
Press and hold the Universal Remote system
button while pressing and releasing the
hand-held transmitter button every
two seconds until the signal has been
successfully accepted by the Universal
Remote system. The Universal Remote
system indicator light will flash slowly at
first and then change to a rapid flash or
continuous solid-light. Proceed with Step 3
under “Programming the Universal Remote
System” to complete.
Universal Remote System
Operation
Using the Universal Remote System
Press and hold the appropriate Universal
Remote system button for at least one-half
second. The indicator light will come on
while the signal is being transmitted.
Erasing Universal Remote System
Buttons
Erase all programmed buttons when vehicle
ownership is terminated.
To erase:
1. Press and hold the two outside buttons until the indicator light begins to flash.
This should take about 10 seconds.
2. Release both buttons.
Reprogramming a Single Universal
Remote System Button
To reprogram any of the system buttons: 1. Press and hold any one of the buttons. Do not release the button.
Page 139 of 441
Chevrolet Silverado 2500 HD/3500 HD Owner Manual (GMNA-Localizing-U.
S./Canada/Mexico-15546003) - 2022 - CRC - 5/12/21
138 Instruments and Controls
2. The indicator light will begin to flashafter 20 seconds. Without releasing the
button, proceed with Step 1 under
“Programming the Universal Remote
System.”
Page 140 of 441
Chevrolet Silverado 2500 HD/3500 HD Owner Manual (GMNA-Localizing-U.
S./Canada/Mexico-15546003) - 2022 - CRC - 5/5/21
Lighting 139
Lighting
Exterior Lighting
Exterior Lamp Controls . . . . . . . . . . . . . . . . 139
Exterior Lamps Off Reminder . . . . . . . . . . . 141
Headlamp High/Low-Beam Changer . . . . 141
Flash-to-Pass . . . . . . . . . . . . . . . . . . . . . . . . . . . 141
Daytime Running Lamps (DRL) . . . . . . . . . 141
Automatic Headlamp System . . . . . . . . . . 141
Hazard Warning Flashers . . . . . . . . . . . . . . 142
Turn and Lane-Change Signals . . . . . . . . . 143
Fog Lamps . . . . . . . . . . . . . . . . . . . . . . . . . . . . . 143
Task Lighting . . . . . . . . . . . . . . . . . . . . . . . . . . 144
Auxiliary Roof-Mounted Lamp . . . . . . . . . 144
Exterior Cargo Lamps . . . . . . . . . . . . . . . . . . 144
Interior Lighting
Instrument Panel IlluminationControl . . . . . . . . . . . . . . . . . . . . . . . . . . . . . . 145
Dome Lamps . . . . . . . . . . . . . . . . . . . . . . . . . . 145
Reading Lamps . . . . . . . . . . . . . . . . . . . . . . . . 146
Lighting Features
Entry Lighting . . . . . . . . . . . . . . . . . . . . . . . . . 146
Exit Lighting . . . . . . . . . . . . . . . . . . . . . . . . . . . 146
Battery Load Management . . . . . . . . . . . . 147
Battery Power Protection . . . . . . . . . . . . . . 147
Exterior Lighting Battery Saver . . . . . . . . 147
Exterior Lighting
Exterior Lamp Controls
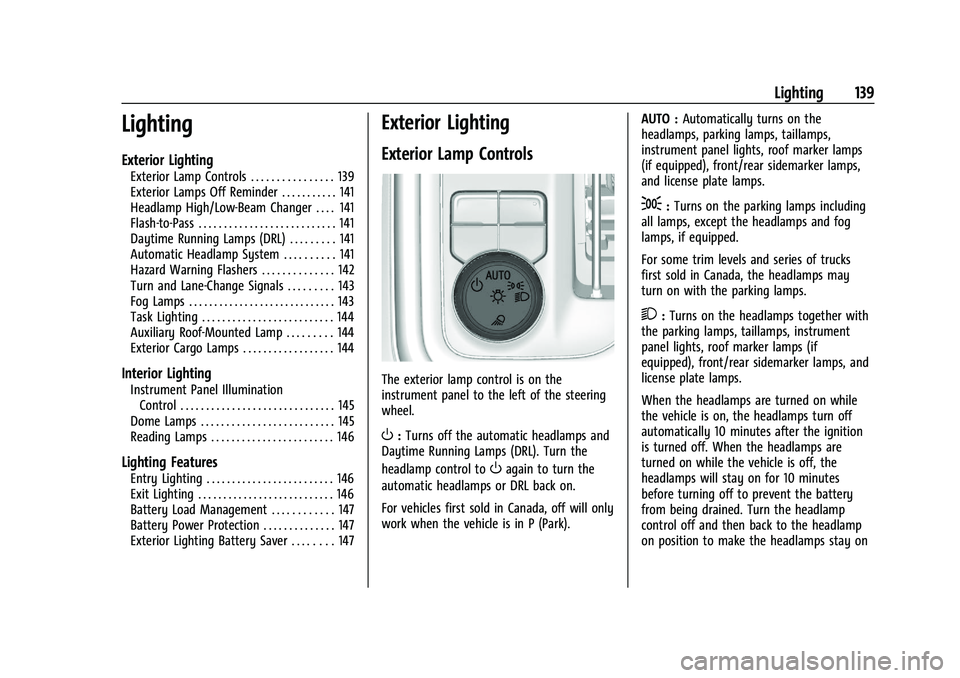
The exterior lamp control is on the
instrument panel to the left of the steering
wheel.
O: Turns off the automatic headlamps and
Daytime Running Lamps (DRL). Turn the
headlamp control to
Oagain to turn the
automatic headlamps or DRL back on.
For vehicles first sold in Canada, off will only
work when the vehicle is in P (Park). AUTO :
Automatically turns on the
headlamps, parking lamps, taillamps,
instrument panel lights, roof marker lamps
(if equipped), front/rear sidemarker lamps,
and license plate lamps.
;: Turns on the parking lamps including
all lamps, except the headlamps and fog
lamps, if equipped.
For some trim levels and series of trucks
first sold in Canada, the headlamps may
turn on with the parking lamps.
2: Turns on the headlamps together with
the parking lamps, taillamps, instrument
panel lights, roof marker lamps (if
equipped), front/rear sidemarker lamps, and
license plate lamps.
When the headlamps are turned on while
the vehicle is on, the headlamps turn off
automatically 10 minutes after the ignition
is turned off. When the headlamps are
turned on while the vehicle is off, the
headlamps will stay on for 10 minutes
before turning off to prevent the battery
from being drained. Turn the headlamp
control off and then back to the headlamp
on position to make the headlamps stay on