lock CHEVROLET SILVERADO 2500 2023 Owner's Guide
[x] Cancel search | Manufacturer: CHEVROLET, Model Year: 2023, Model line: SILVERADO 2500, Model: CHEVROLET SILVERADO 2500 2023Pages: 441, PDF Size: 14.4 MB
Page 48 of 441
Chevrolet Silverado 2500 HD/3500 HD Owner Manual (GMNA-Localizing-U.
S./Canada/Mexico-15546003) - 2022 - CRC - 5/5/21
Seats and Restraints 47
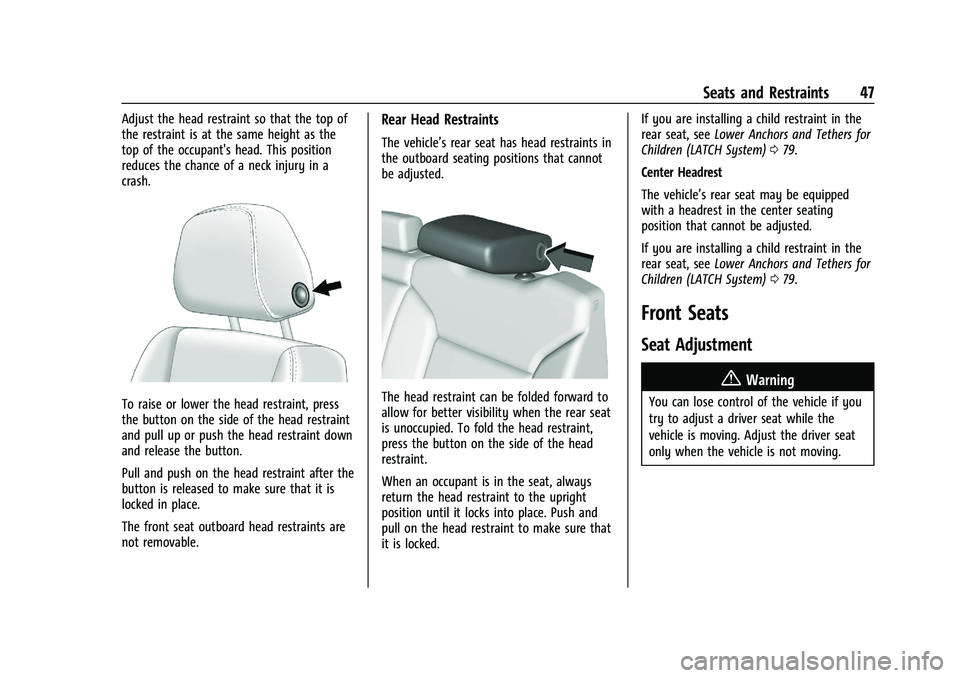
Adjust the head restraint so that the top of
the restraint is at the same height as the
top of the occupant's head. This position
reduces the chance of a neck injury in a
crash.
To raise or lower the head restraint, press
the button on the side of the head restraint
and pull up or push the head restraint down
and release the button.
Pull and push on the head restraint after the
button is released to make sure that it is
locked in place.
The front seat outboard head restraints are
not removable.
Rear Head Restraints
The vehicle’s rear seat has head restraints in
the outboard seating positions that cannot
be adjusted.
The head restraint can be folded forward to
allow for better visibility when the rear seat
is unoccupied. To fold the head restraint,
press the button on the side of the head
restraint.
When an occupant is in the seat, always
return the head restraint to the upright
position until it locks into place. Push and
pull on the head restraint to make sure that
it is locked.If you are installing a child restraint in the
rear seat, see
Lower Anchors and Tethers for
Children (LATCH System) 079.
Center Headrest
The vehicle’s rear seat may be equipped
with a headrest in the center seating
position that cannot be adjusted.
If you are installing a child restraint in the
rear seat, see Lower Anchors and Tethers for
Children (LATCH System) 079.
Front Seats
Seat Adjustment
{Warning
You can lose control of the vehicle if you
try to adjust a driver seat while the
vehicle is moving. Adjust the driver seat
only when the vehicle is not moving.
Page 49 of 441
Chevrolet Silverado 2500 HD/3500 HD Owner Manual (GMNA-Localizing-U.
S./Canada/Mexico-15546003) - 2022 - CRC - 5/5/21
48 Seats and Restraints
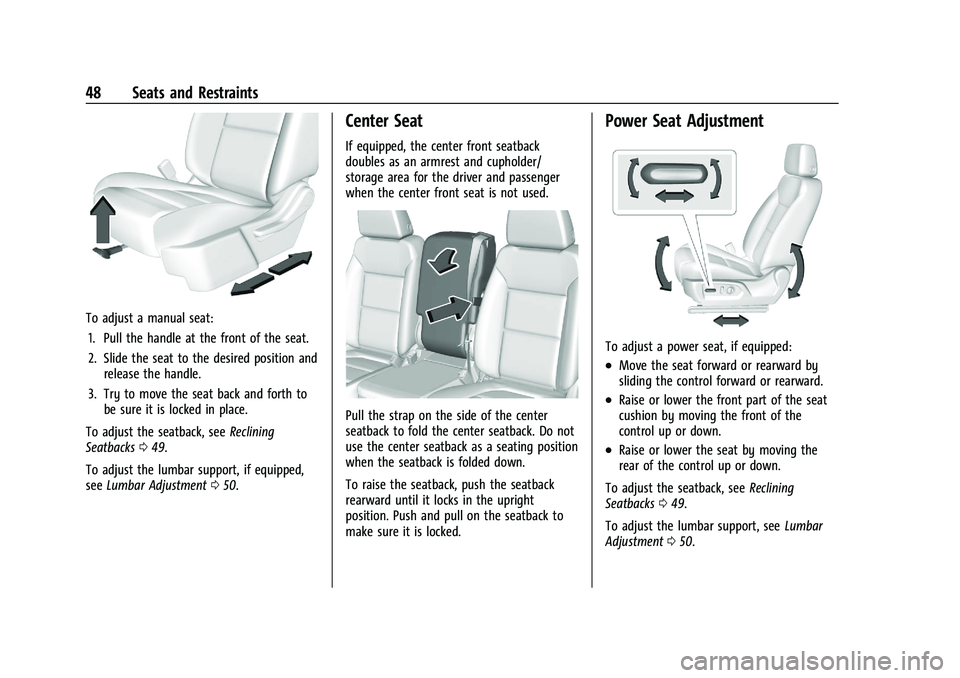
To adjust a manual seat:1. Pull the handle at the front of the seat.
2. Slide the seat to the desired position and release the handle.
3. Try to move the seat back and forth to be sure it is locked in place.
To adjust the seatback, see Reclining
Seatbacks 049.
To adjust the lumbar support, if equipped,
see Lumbar Adjustment 050.
Center Seat
If equipped, the center front seatback
doubles as an armrest and cupholder/
storage area for the driver and passenger
when the center front seat is not used.
Pull the strap on the side of the center
seatback to fold the center seatback. Do not
use the center seatback as a seating position
when the seatback is folded down.
To raise the seatback, push the seatback
rearward until it locks in the upright
position. Push and pull on the seatback to
make sure it is locked.
Power Seat Adjustment
To adjust a power seat, if equipped:
.Move the seat forward or rearward by
sliding the control forward or rearward.
.Raise or lower the front part of the seat
cushion by moving the front of the
control up or down.
.Raise or lower the seat by moving the
rear of the control up or down.
To adjust the seatback, see Reclining
Seatbacks 049.
To adjust the lumbar support, see Lumbar
Adjustment 050.
Page 50 of 441
Chevrolet Silverado 2500 HD/3500 HD Owner Manual (GMNA-Localizing-U.
S./Canada/Mexico-15546003) - 2022 - CRC - 5/5/21
Seats and Restraints 49
Some vehicles are equipped with a feature
that activates a vibrating pulse alert in the
driver seat to help the driver avoid crashes.
SeeDriver Assistance Systems 0252.
Reclining Seatbacks
{Warning
Sitting in a reclined position when the
vehicle is in motion can be dangerous.
Even when buckled up, the seat belts
cannot do their job.
The shoulder belt will not be against
your body. Instead, it will be in front of
you. In a crash, you could go into it,
receiving neck or other injuries.
The lap belt could go up over your
abdomen. The belt forces would be there,
not at your pelvic bones. This could cause
serious internal injuries.
For proper protection when the vehicle is
in motion, have the seatback upright.
Then sit well back in the seat and wear
the seat belt properly.
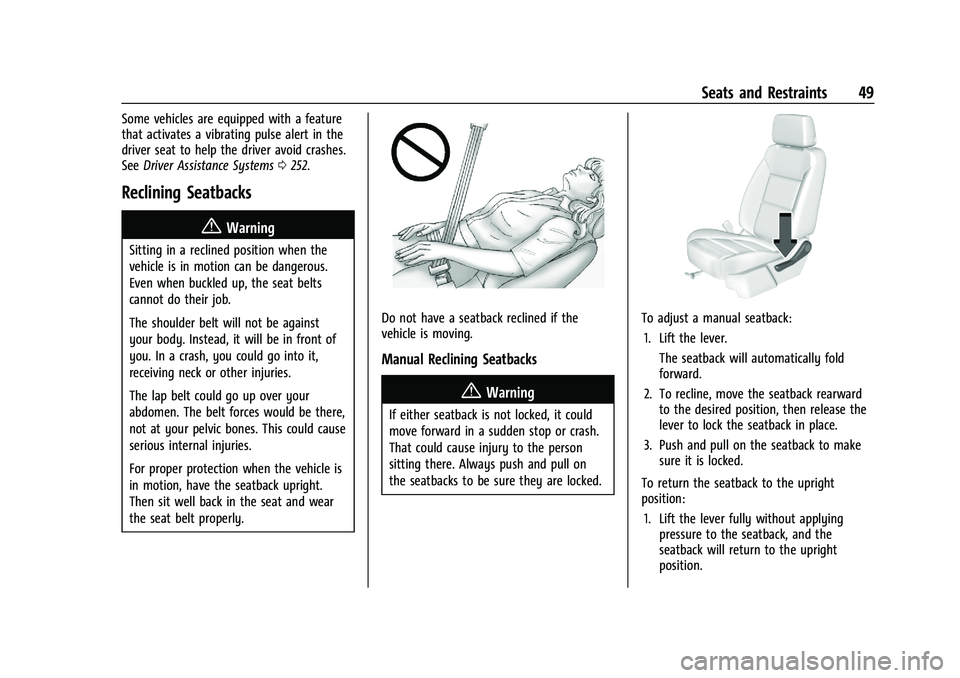
Do not have a seatback reclined if the
vehicle is moving.
Manual Reclining Seatbacks
{Warning
If either seatback is not locked, it could
move forward in a sudden stop or crash.
That could cause injury to the person
sitting there. Always push and pull on
the seatbacks to be sure they are locked.
To adjust a manual seatback:
1. Lift the lever. The seatback will automatically fold
forward.
2. To recline, move the seatback rearward to the desired position, then release the
lever to lock the seatback in place.
3. Push and pull on the seatback to make sure it is locked.
To return the seatback to the upright
position: 1. Lift the lever fully without applying pressure to the seatback, and the
seatback will return to the upright
position.
Page 51 of 441
Chevrolet Silverado 2500 HD/3500 HD Owner Manual (GMNA-Localizing-U.
S./Canada/Mexico-15546003) - 2022 - CRC - 5/5/21
50 Seats and Restraints
2. Push and pull on the seatback to makesure it is locked.
Power Reclining Seatbacks
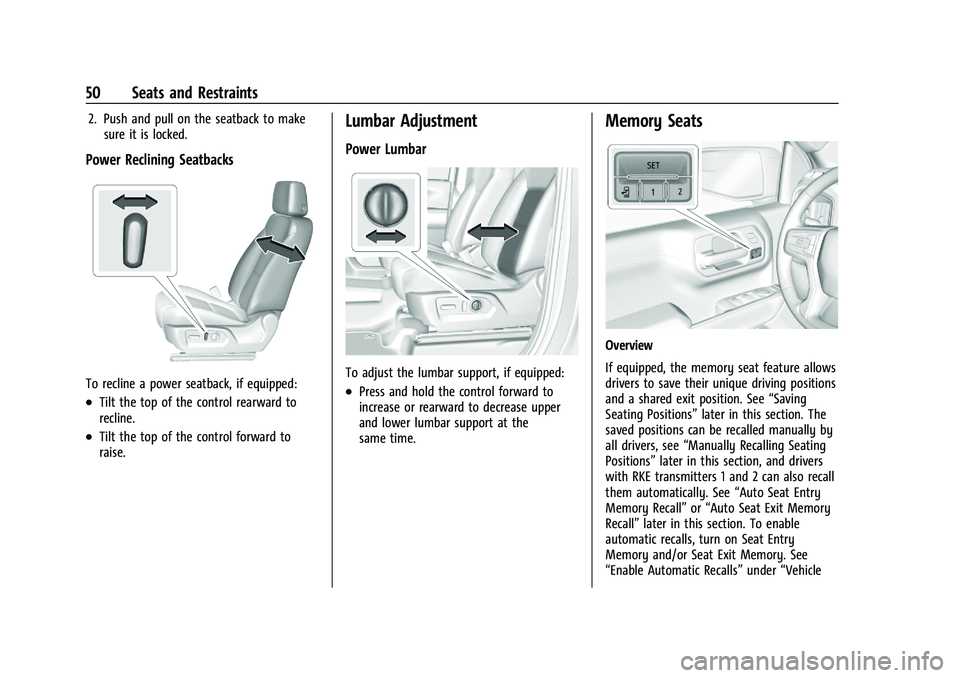
To recline a power seatback, if equipped:
.Tilt the top of the control rearward to
recline.
.Tilt the top of the control forward to
raise.
Lumbar Adjustment
Power Lumbar
To adjust the lumbar support, if equipped:
.Press and hold the control forward to
increase or rearward to decrease upper
and lower lumbar support at the
same time.
Memory Seats
Overview
If equipped, the memory seat feature allows
drivers to save their unique driving positions
and a shared exit position. See “Saving
Seating Positions” later in this section. The
saved positions can be recalled manually by
all drivers, see “Manually Recalling Seating
Positions” later in this section, and drivers
with RKE transmitters 1 and 2 can also recall
them automatically. See “Auto Seat Entry
Memory Recall” or“Auto Seat Exit Memory
Recall” later in this section. To enable
automatic recalls, turn on Seat Entry
Memory and/or Seat Exit Memory. See
“Enable Automatic Recalls” under“Vehicle
Page 54 of 441
Chevrolet Silverado 2500 HD/3500 HD Owner Manual (GMNA-Localizing-U.
S./Canada/Mexico-15546003) - 2022 - CRC - 5/5/21
Seats and Restraints 53
Cancel Memory Seating Recalls
.During any memory recall:
Press a power seat control
Press SET memory button
.During Manual memory recall:
Release 1, 2, or
Bmemory button
.During Auto Seat Entry Memory Recall:
Turn vehicle off
Press SET, 1, 2, or
Bmemory buttons
.During Auto Seat Exit Memory Recall:
Press SET, 1, 2, or
Bmemory buttons
Obstructions
If something has blocked the seat while
recalling a memory position, the recall may
stop. Remove the obstruction and try the
recall again. If the memory position still
does not recall, see your dealer.
Heated and Ventilated Front
Seats
{Warning
If temperature change or pain to the skin
cannot be felt, the seat heater may cause
burns. To reduce the risk of burns, use
care when using the seat heater,
especially for long periods of time. Do
not place anything on the seat that
insulates against heat, such as a blanket,
cushion, cover, or similar item. This may
cause the seat heater to overheat. An
overheated seat heater may cause a burn
or may damage the seat.
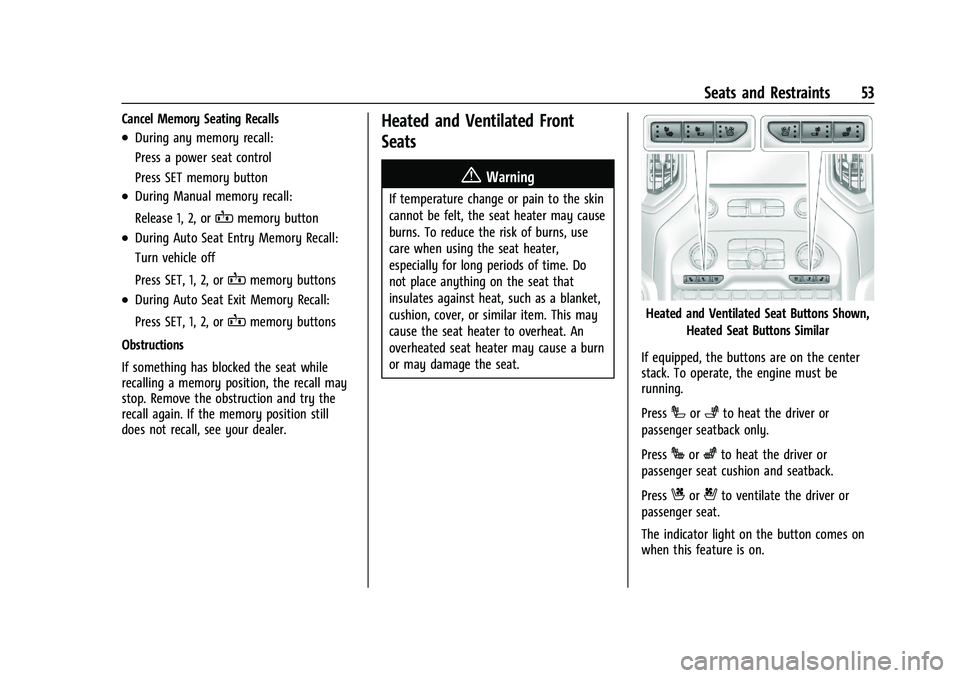
Heated and Ventilated Seat Buttons Shown, Heated Seat Buttons Similar
If equipped, the buttons are on the center
stack. To operate, the engine must be
running.
Press
Ior+to heat the driver or
passenger seatback only.
Press
Jorzto heat the driver or
passenger seat cushion and seatback.
Press
Cor{to ventilate the driver or
passenger seat.
The indicator light on the button comes on
when this feature is on.
Page 58 of 441
Chevrolet Silverado 2500 HD/3500 HD Owner Manual (GMNA-Localizing-U.
S./Canada/Mexico-15546003) - 2022 - CRC - 5/5/21
Seats and Restraints 57
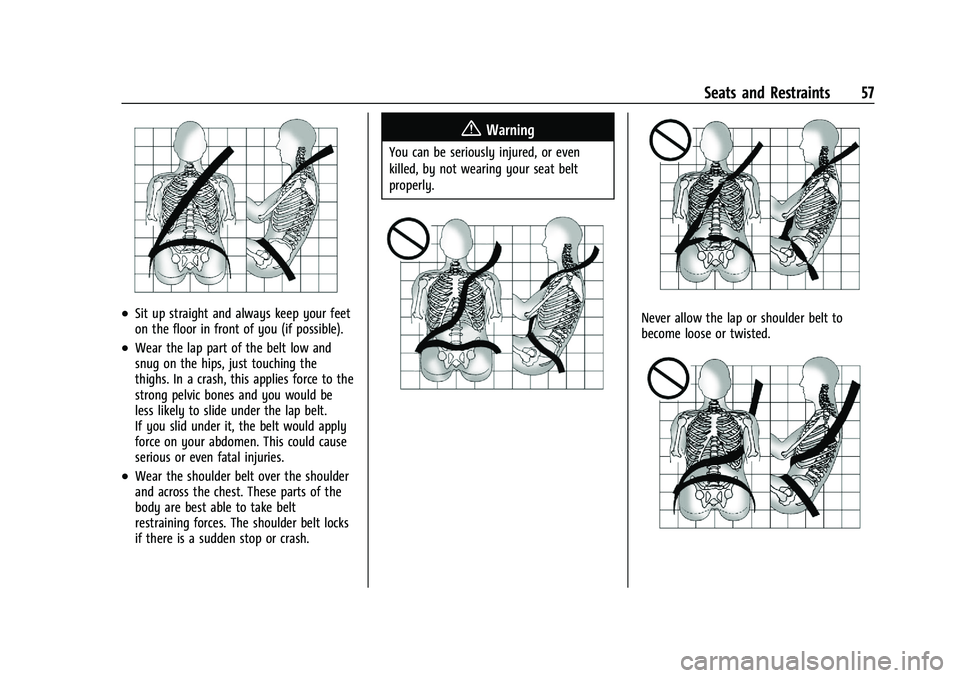
.Sit up straight and always keep your feet
on the floor in front of you (if possible).
.Wear the lap part of the belt low and
snug on the hips, just touching the
thighs. In a crash, this applies force to the
strong pelvic bones and you would be
less likely to slide under the lap belt.
If you slid under it, the belt would apply
force on your abdomen. This could cause
serious or even fatal injuries.
.Wear the shoulder belt over the shoulder
and across the chest. These parts of the
body are best able to take belt
restraining forces. The shoulder belt locks
if there is a sudden stop or crash.
{Warning
You can be seriously injured, or even
killed, by not wearing your seat belt
properly.
Never allow the lap or shoulder belt to
become loose or twisted.
Page 59 of 441
Chevrolet Silverado 2500 HD/3500 HD Owner Manual (GMNA-Localizing-U.
S./Canada/Mexico-15546003) - 2022 - CRC - 5/5/21
58 Seats and Restraints
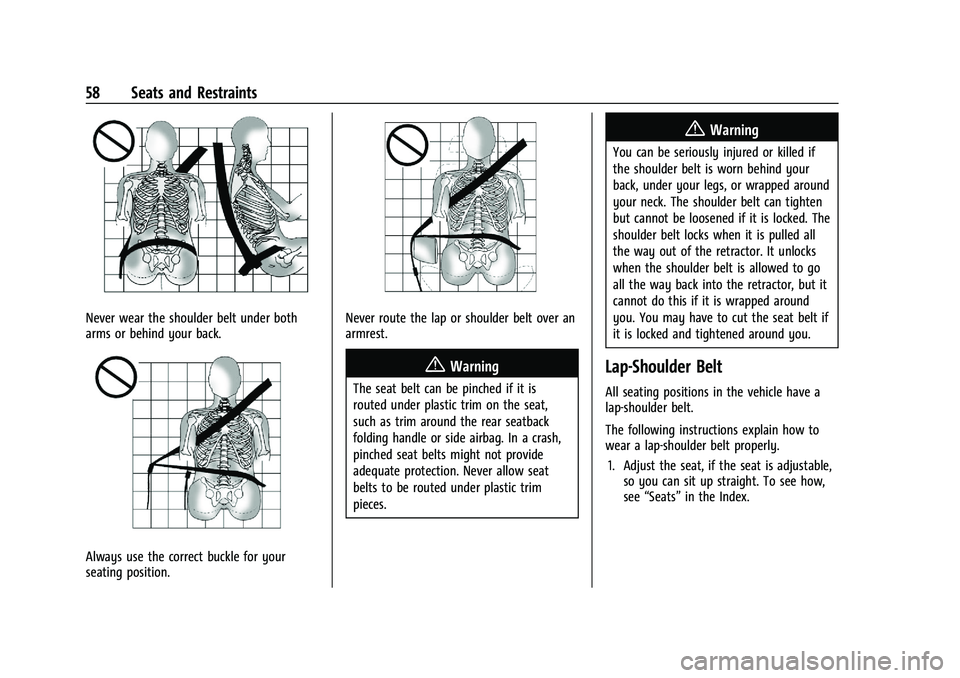
Never wear the shoulder belt under both
arms or behind your back.
Always use the correct buckle for your
seating position.
Never route the lap or shoulder belt over an
armrest.
{Warning
The seat belt can be pinched if it is
routed under plastic trim on the seat,
such as trim around the rear seatback
folding handle or side airbag. In a crash,
pinched seat belts might not provide
adequate protection. Never allow seat
belts to be routed under plastic trim
pieces.
{Warning
You can be seriously injured or killed if
the shoulder belt is worn behind your
back, under your legs, or wrapped around
your neck. The shoulder belt can tighten
but cannot be loosened if it is locked. The
shoulder belt locks when it is pulled all
the way out of the retractor. It unlocks
when the shoulder belt is allowed to go
all the way back into the retractor, but it
cannot do this if it is wrapped around
you. You may have to cut the seat belt if
it is locked and tightened around you.
Lap-Shoulder Belt
All seating positions in the vehicle have a
lap-shoulder belt.
The following instructions explain how to
wear a lap-shoulder belt properly.1. Adjust the seat, if the seat is adjustable, so you can sit up straight. To see how,
see “Seats” in the Index.
Page 60 of 441
Chevrolet Silverado 2500 HD/3500 HD Owner Manual (GMNA-Localizing-U.
S./Canada/Mexico-15546003) - 2022 - CRC - 5/5/21
Seats and Restraints 59
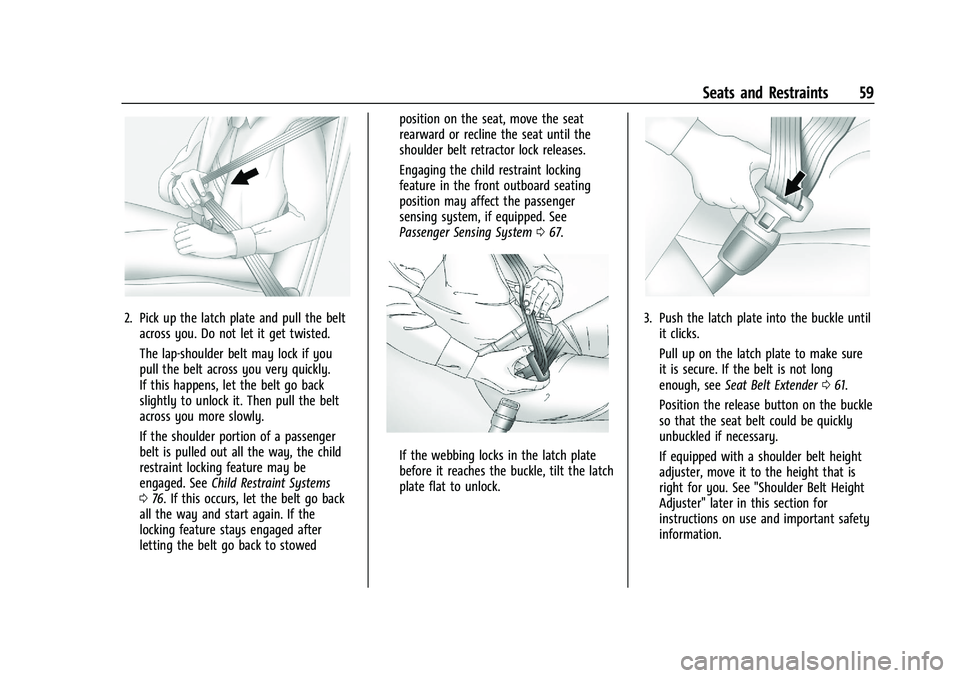
2. Pick up the latch plate and pull the beltacross you. Do not let it get twisted.
The lap-shoulder belt may lock if you
pull the belt across you very quickly.
If this happens, let the belt go back
slightly to unlock it. Then pull the belt
across you more slowly.
If the shoulder portion of a passenger
belt is pulled out all the way, the child
restraint locking feature may be
engaged. See Child Restraint Systems
0 76. If this occurs, let the belt go back
all the way and start again. If the
locking feature stays engaged after
letting the belt go back to stowed position on the seat, move the seat
rearward or recline the seat until the
shoulder belt retractor lock releases.
Engaging the child restraint locking
feature in the front outboard seating
position may affect the passenger
sensing system, if equipped. See
Passenger Sensing System
067.
If the webbing locks in the latch plate
before it reaches the buckle, tilt the latch
plate flat to unlock.
3. Push the latch plate into the buckle until
it clicks.
Pull up on the latch plate to make sure
it is secure. If the belt is not long
enough, see Seat Belt Extender 061.
Position the release button on the buckle
so that the seat belt could be quickly
unbuckled if necessary.
If equipped with a shoulder belt height
adjuster, move it to the height that is
right for you. See "Shoulder Belt Height
Adjuster" later in this section for
instructions on use and important safety
information.
Page 61 of 441
Chevrolet Silverado 2500 HD/3500 HD Owner Manual (GMNA-Localizing-U.
S./Canada/Mexico-15546003) - 2022 - CRC - 5/5/21
60 Seats and Restraints
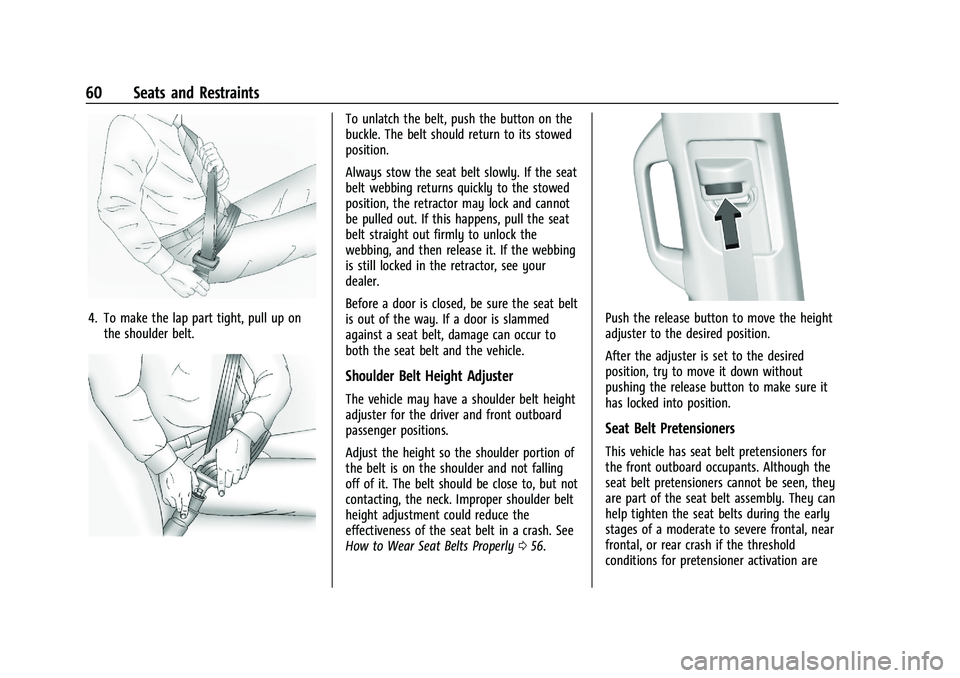
4. To make the lap part tight, pull up onthe shoulder belt.
To unlatch the belt, push the button on the
buckle. The belt should return to its stowed
position.
Always stow the seat belt slowly. If the seat
belt webbing returns quickly to the stowed
position, the retractor may lock and cannot
be pulled out. If this happens, pull the seat
belt straight out firmly to unlock the
webbing, and then release it. If the webbing
is still locked in the retractor, see your
dealer.
Before a door is closed, be sure the seat belt
is out of the way. If a door is slammed
against a seat belt, damage can occur to
both the seat belt and the vehicle.
Shoulder Belt Height Adjuster
The vehicle may have a shoulder belt height
adjuster for the driver and front outboard
passenger positions.
Adjust the height so the shoulder portion of
the belt is on the shoulder and not falling
off of it. The belt should be close to, but not
contacting, the neck. Improper shoulder belt
height adjustment could reduce the
effectiveness of the seat belt in a crash. See
How to Wear Seat Belts Properly 056.
Push the release button to move the height
adjuster to the desired position.
After the adjuster is set to the desired
position, try to move it down without
pushing the release button to make sure it
has locked into position.
Seat Belt Pretensioners
This vehicle has seat belt pretensioners for
the front outboard occupants. Although the
seat belt pretensioners cannot be seen, they
are part of the seat belt assembly. They can
help tighten the seat belts during the early
stages of a moderate to severe frontal, near
frontal, or rear crash if the threshold
conditions for pretensioner activation are
Page 66 of 441
Chevrolet Silverado 2500 HD/3500 HD Owner Manual (GMNA-Localizing-U.
S./Canada/Mexico-15546003) - 2022 - CRC - 5/5/21
Seats and Restraints 65
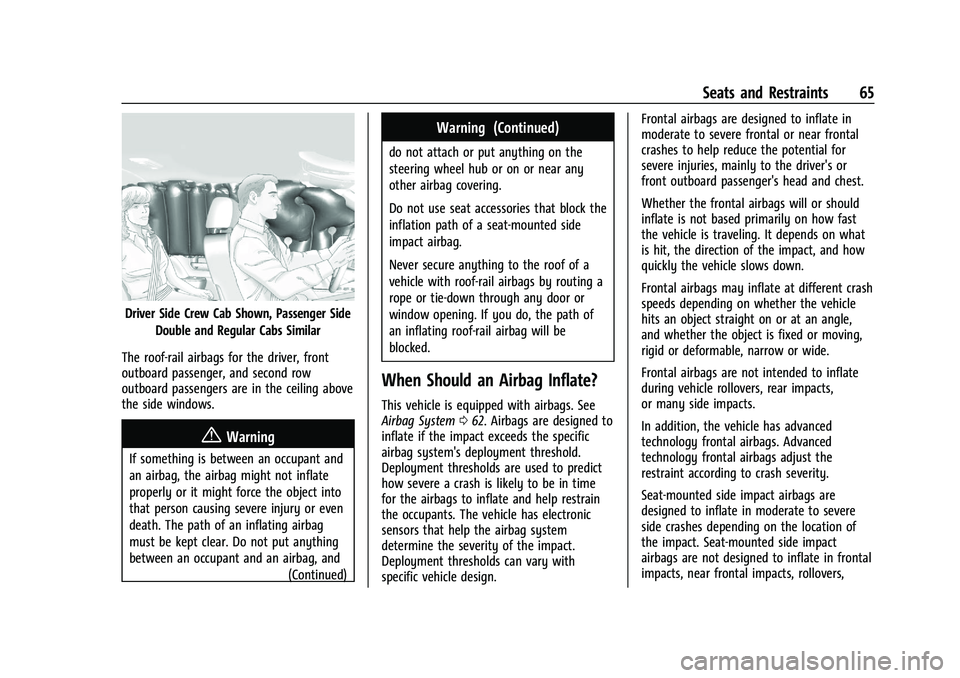
Driver Side Crew Cab Shown, Passenger SideDouble and Regular Cabs Similar
The roof-rail airbags for the driver, front
outboard passenger, and second row
outboard passengers are in the ceiling above
the side windows.
{Warning
If something is between an occupant and
an airbag, the airbag might not inflate
properly or it might force the object into
that person causing severe injury or even
death. The path of an inflating airbag
must be kept clear. Do not put anything
between an occupant and an airbag, and (Continued)
Warning (Continued)
do not attach or put anything on the
steering wheel hub or on or near any
other airbag covering.
Do not use seat accessories that block the
inflation path of a seat-mounted side
impact airbag.
Never secure anything to the roof of a
vehicle with roof-rail airbags by routing a
rope or tie‐down through any door or
window opening. If you do, the path of
an inflating roof-rail airbag will be
blocked.
When Should an Airbag Inflate?
This vehicle is equipped with airbags. See
Airbag System062. Airbags are designed to
inflate if the impact exceeds the specific
airbag system's deployment threshold.
Deployment thresholds are used to predict
how severe a crash is likely to be in time
for the airbags to inflate and help restrain
the occupants. The vehicle has electronic
sensors that help the airbag system
determine the severity of the impact.
Deployment thresholds can vary with
specific vehicle design. Frontal airbags are designed to inflate in
moderate to severe frontal or near frontal
crashes to help reduce the potential for
severe injuries, mainly to the driver's or
front outboard passenger's head and chest.
Whether the frontal airbags will or should
inflate is not based primarily on how fast
the vehicle is traveling. It depends on what
is hit, the direction of the impact, and how
quickly the vehicle slows down.
Frontal airbags may inflate at different crash
speeds depending on whether the vehicle
hits an object straight on or at an angle,
and whether the object is fixed or moving,
rigid or deformable, narrow or wide.
Frontal airbags are not intended to inflate
during vehicle rollovers, rear impacts,
or many side impacts.
In addition, the vehicle has advanced
technology frontal airbags. Advanced
technology frontal airbags adjust the
restraint according to crash severity.
Seat-mounted side impact airbags are
designed to inflate in moderate to severe
side crashes depending on the location of
the impact. Seat-mounted side impact
airbags are not designed to inflate in frontal
impacts, near frontal impacts, rollovers,