key CHEVROLET SILVERADO 2500 2023 Manual PDF
[x] Cancel search | Manufacturer: CHEVROLET, Model Year: 2023, Model line: SILVERADO 2500, Model: CHEVROLET SILVERADO 2500 2023Pages: 441, PDF Size: 14.4 MB
Page 244 of 441
Chevrolet Silverado 2500 HD/3500 HD Owner Manual (GMNA-Localizing-U.
S./Canada/Mexico-15546003) - 2022 - CRC - 5/5/21
Driving and Operating 243
With the vehicle moving less than
5 km/h (3 mph) and the transmission in
N (Neutral), attempt the shift again.
Shifting Out of 4
n
1. The vehicle must be stopped or movingless than 5 km/h (3 mph) with the
transmission in N (Neutral) and the
ignition on. It is best for the vehicle to
be moving 1.6 to 3.2 km/h (1 to 2 mph).
2. Press 4
m, AUTO, or 2m. The actual 4x4
shift request is only made after the
button is released. The 4x4 graphic will
remain flashing until the shift request
has completed. A DIC message displays
to indicate the state of the request.
Once the 4x4 shift has completed, the
DIC message disappears, the 4x4 graphic
stops flashing, and the current setting is
indicated.
If vehicle speed is higher when shift
request occurs, a DIC message displays.
Reduce vehicle speed.
If the transmission is not in N (Neutral)
when shift request occurs, DIC messages will
display. The vehicle will allow 20 seconds for
this shift to occur. After this time, a graphic
in the instrument cluster will indicate that
the transfer case is in 4
n.
Caution
Shifting the transmission into gear before
the requested mode indicator light has
stopped flashing could damage the
transfer case.
If the transmission is not shifted into
N (Neutral) or the vehicle has not slowed to
5 km/h (3 mph) within 20 seconds, the
transfer case will remain in its original state.
This will be indicated in the instrument
cluster.
With the vehicle moving less than 5 km/h
(3 mph), and the transmission in N (Neutral),
attempt the shift again.
Shifting Into N (Neutral)
To shift into N (Neutral): 1. Start the vehicle.
2. Shift the transmission to N (Neutral).
3. Shift the transfer case to 2
m.
4. Apply the parking brake and/or brake pedal.
5. Press 2
mfive times in 10 seconds until
the N (Neutral) graphic starts flashing in
the instrument cluster. When the shift is
complete, the graphic stops flashing. If the parking brake and/or brake pedal
is not applied within 20 seconds, the
transfer case will remain in the original
state.
6. If the transmission is not shifted into N (Neutral) or the vehicle has not slowed
to 5 km/h (3 mph) within 20 seconds,
the transfer case will remain in its
original state. This will be indicated in
the instrument cluster.
Shifting Out of N (Neutral)
To shift out of N (Neutral): 1. Turn the ignition on with the engine off. See Ignition Positions (Keyless Access)
0 229 or
Ignition Positions (Key Access) 0227.
2. Set the parking brake. See Electric
Parking Brake 0245.
3. Shift the transmission to N (Neutral).
4. Shift the transfer case to 2
m. Transfer
case shifts out of N (Neutral) can only be
made into 2
m. When the shift to 2mis
complete, the graphic in the instrument
cluster will stop flashing. If the transfer
case cannot complete a shift, the graphic
will return to the previously selected
setting.
Page 302 of 441
Chevrolet Silverado 2500 HD/3500 HD Owner Manual (GMNA-Localizing-U.
S./Canada/Mexico-15546003) - 2022 - CRC - 5/5/21
Driving and Operating 301
On the Learn Sensors screen. Touch Relearn
to overwrite the current sensors and begin
the relearning process. See“Trailer Tire
Pressure Setup” previously in this section.
On the Learn Sensors screen, touch Next to
go to the Edit Recommended Tire Pressure
screen.
On the Edit Recommended Tire Pressure
screen, touch a number on the keypad to
change the
Recommended Tire Pressure for the trailer’s
tires. This will change the number at which
the vehicle displays alerts related to trailer
tire pressure. Touch Done to return to the
Trailer Profile view.
Trailer Maintenance
Touch to view a list of maintenance
reminders for the Trailer Profile.
Touch a reminder to view, reset, delete,
or edit it.
Reset Reminder
Touch Maintenance Complete in the
reminder view to reset the reminder. On the
pop-up, touch Reset to reset the time and
mileage values for the reminder. Touch
Cancel to return to the previous view and
nothing will change. Edit Reminder
Touch to edit the mileage or time settings
for the reminder. Touch Save to save the
new settings to the Trailer Profile.
Delete Reminder
Touch to delete the maintenance reminder.
On the pop-up, touch Delete to delete the
reminder or touch Cancel to return to the
previous view and nothing will change.
New Maintenance Reminder
Touch + New Maintenance Reminder to set
up a new reminder. Suggested reminders
that were previously set will have
checkmarks next to them. Suggested
reminders that have not been set will have
empty boxes next to them. The maximum
number of reminders is 50.
Edit Mileage
Touch to edit the Trailer Profile’s mileage.
Touch Reset to reset trailer mileage to zero,
or enter a new value and touch Save.
Touching back will return to the Trailer
Profile view.
Effect on Maintenance Reminders
If the mileage is reset or changed, and
mileage has already accumulated, any
maintenance reminders that have been set
up will be adjusted accordingly.
Reset Average Fuel Economy
Touch to reset the average fuel economy for
the Trailer Profile. Touch Reset to change,
or touch Cancel to go back to the
previous view.
Delete/Remove Trailer
Touch to remove the Trailer Profile and all
of its settings.
On the pop-up, touch Remove to remove the
Trailer Profile from the vehicle. Touch Cancel
to dismiss the pop-up and return to the
previous view.
Remove will be displayed if there is a
connected OnStar plan active with the
vehicle. Removing a trailer profile will
remove the profile from the vehicle but the
profile will still be associated with the user
account. However, if there is not a
connected OnStar plan then the remove
button will read DELETE and the profile will
be deleted permanently.
Page 308 of 441
Chevrolet Silverado 2500 HD/3500 HD Owner Manual (GMNA-Localizing-U.
S./Canada/Mexico-15546003) - 2022 - CRC - 5/5/21
Vehicle Care 307
Towing the Vehicle
Towing the Vehicle . . . . . . . . . . . . . . . . . . . . 377
Recreational Vehicle Towing . . . . . . . . . . . 378
Appearance Care
Exterior Care . . . . . . . . . . . . . . . . . . . . . . . . . . . 381
Interior Care . . . . . . . . . . . . . . . . . . . . . . . . . . 386
Floor Mats . . . . . . . . . . . . . . . . . . . . . . . . . . . . 389
General Information
For service and parts needs, visit your
dealer. You will receive genuine GM parts
and GM-trained and supported service
people.
Genuine GM parts have one of these marks:
California Perchlorate Materials
Requirements
Certain types of automotive applications,
such as airbag initiators, seat belt
pretensioners, and lithium batteries
contained in electronic keys, may contain
perchlorate materials. Perchlorate Material–special handling may apply. See
www.dtsc.ca.gov/hazardouswaste/
perchlorate.
Accessories and Modifications
Adding non-dealer accessories or making
modifications to the vehicle can affect
vehicle performance and safety, including
such things as airbags, braking, stability,
ride and handling, emissions systems,
aerodynamics, durability, and electronic
systems like antilock brakes, traction control,
and stability control. These accessories or
modifications could even cause malfunction
or damage not covered by the vehicle
warranty.
Damage to suspension components caused
by modifying vehicle height outside of
factory settings will not be covered by the
vehicle warranty.
Damage to vehicle components resulting
from modifications or the installation or use
of non-GM certified parts, including control
module or software modifications, is not
covered under the terms of the vehicle
warranty and may affect remaining
warranty coverage for affected parts.
Page 326 of 441
Chevrolet Silverado 2500 HD/3500 HD Owner Manual (GMNA-Localizing-U.
S./Canada/Mexico-15546003) - 2022 - CRC - 5/5/21
Vehicle Care 325
Extended Storage: Remove the black,
negative (−) cable from the battery or use a
battery trickle charger.
Negative Battery Cable Disconnection
{Warning
Before disconnecting the negative battery
cable, turn off all features, turn the
ignition off, and remove the key,
if equipped, from the vehicle. If this is
not done, you or others could be injured,
and the vehicle could be damaged.
Caution
If the battery is disconnected with the
ignition on or the vehicle in Retained
Accessory Power (RAP), the OnStar
back-up battery will be permanently
discharged and will need to be replaced.
1. Make sure the lamps, features, and accessories are turned off.
2. Turn the ignition off and remove the key, if equipped.
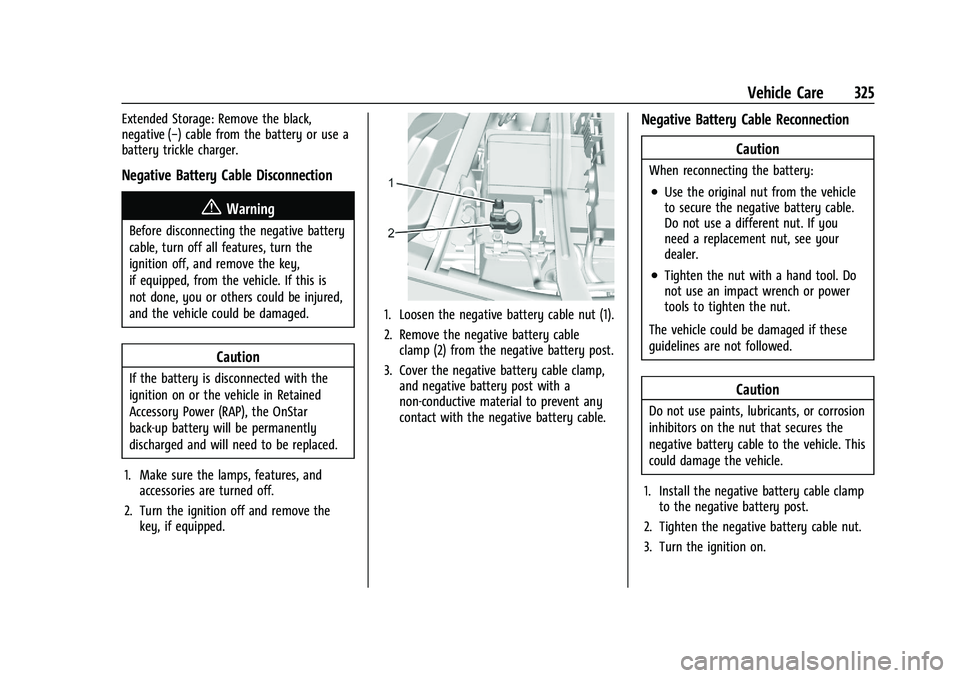
1. Loosen the negative battery cable nut (1).
2. Remove the negative battery cableclamp (2) from the negative battery post.
3. Cover the negative battery cable clamp, and negative battery post with a
non-conductive material to prevent any
contact with the negative battery cable.
Negative Battery Cable Reconnection
Caution
When reconnecting the battery:
.Use the original nut from the vehicle
to secure the negative battery cable.
Do not use a different nut. If you
need a replacement nut, see your
dealer.
.Tighten the nut with a hand tool. Do
not use an impact wrench or power
tools to tighten the nut.
The vehicle could be damaged if these
guidelines are not followed.
Caution
Do not use paints, lubricants, or corrosion
inhibitors on the nut that secures the
negative battery cable to the vehicle. This
could damage the vehicle.
1. Install the negative battery cable clamp to the negative battery post.
2. Tighten the negative battery cable nut.
3. Turn the ignition on.
Page 329 of 441
Chevrolet Silverado 2500 HD/3500 HD Owner Manual (GMNA-Localizing-U.
S./Canada/Mexico-15546003) - 2022 - CRC - 5/5/21
328 Vehicle Care
Automatic Transmission Shift Lock
Control Function Check
{Warning
When you are doing this inspection, the
vehicle could move suddenly. If the
vehicle moves, you or others could be
injured.
1. Before starting this check, be sure there is enough room around the vehicle.
It should be parked on a level surface.
2. Apply the parking brake. Be ready to apply the regular brake immediately if
the vehicle begins to move.
3. With the engine off, turn the ignition on, but do not start the engine. Without
applying the regular brake, try to move
the shift lever out of P (Park) with
normal effort. If the shift lever moves
out of P (Park), contact your dealer for
service.
Ignition Transmission Lock Check
If equipped with Key Access ignition, while
parked, and with the parking brake set, try
to turn the ignition off in each shift lever
position. The ignition should turn to off only
when the shift lever is in P (Park).
The ignition key should come out only when
the ignition is off. Contact your dealer if
service is required.
Park Brake and P (Park)
Mechanism Check
{Warning
When you are doing this check, the
vehicle could begin to move. You or
others could be injured and property
could be damaged. Make sure there is
room in front of the vehicle in case it
begins to roll. Be ready to apply the
regular brake at once should the vehicle
begin to move.
Park on a fairly steep hill, with the vehicle
facing downhill. Keeping your foot on the
regular brake, set the parking brake.
.To check the parking brake's holding
ability: With the engine running and the
transmission in N (Neutral), slowly remove
foot pressure from the regular brake
pedal. Do this until the vehicle is held by
the parking brake only.
.To check the P (Park) mechanism's holding
ability: With the engine running, shift to
P (Park). Then release the parking brake
followed by the regular brake.
Contact your dealer if service is required.
Wiper Blade Replacement
Windshield wiper blades should be replaced
periodically. See Maintenance Schedule
0 392.
Replacement blades come in different types
and are removed in different ways. For
proper type and length, see Maintenance
Replacement Parts 0402.
Caution
Allowing the wiper arm to touch the
windshield when no wiper blade is
installed could damage the windshield.
Any damage that occurs would not be
(Continued)
Page 366 of 441
Chevrolet Silverado 2500 HD/3500 HD Owner Manual (GMNA-Localizing-U.
S./Canada/Mexico-15546003) - 2022 - CRC - 5/5/21
Vehicle Care 365
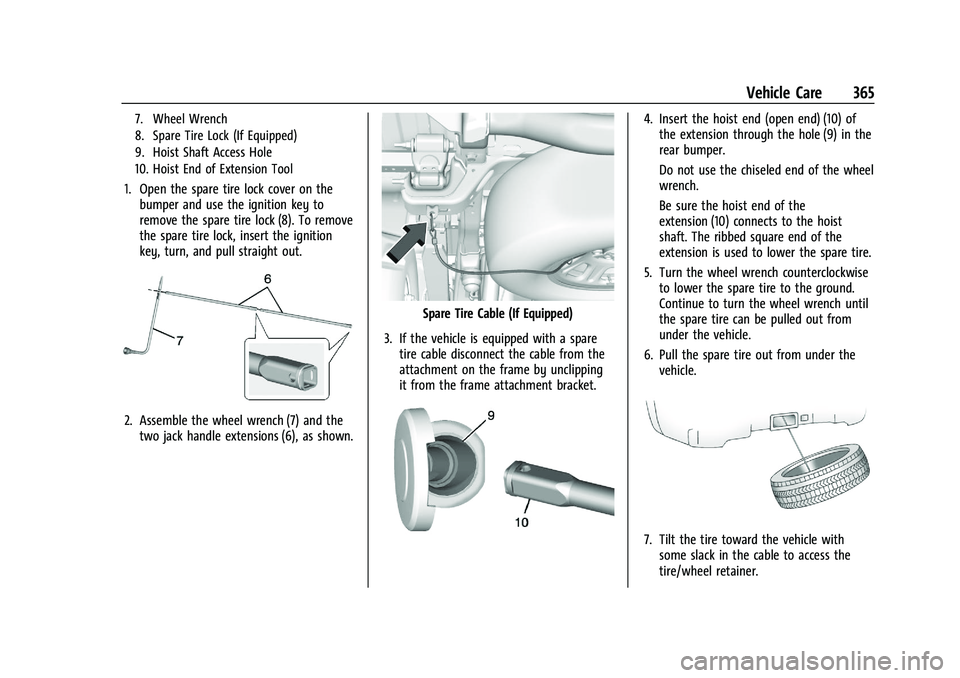
7. Wheel Wrench
8. Spare Tire Lock (If Equipped)
9. Hoist Shaft Access Hole
10. Hoist End of Extension Tool
1. Open the spare tire lock cover on thebumper and use the ignition key to
remove the spare tire lock (8). To remove
the spare tire lock, insert the ignition
key, turn, and pull straight out.
2. Assemble the wheel wrench (7) and thetwo jack handle extensions (6), as shown.
Spare Tire Cable (If Equipped)
3. If the vehicle is equipped with a spare tire cable disconnect the cable from the
attachment on the frame by unclipping
it from the frame attachment bracket.
4. Insert the hoist end (open end) (10) ofthe extension through the hole (9) in the
rear bumper.
Do not use the chiseled end of the wheel
wrench.
Be sure the hoist end of the
extension (10) connects to the hoist
shaft. The ribbed square end of the
extension is used to lower the spare tire.
5. Turn the wheel wrench counterclockwise to lower the spare tire to the ground.
Continue to turn the wheel wrench until
the spare tire can be pulled out from
under the vehicle.
6. Pull the spare tire out from under the vehicle.
7. Tilt the tire toward the vehicle withsome slack in the cable to access the
tire/wheel retainer.
Page 381 of 441
Chevrolet Silverado 2500 HD/3500 HD Owner Manual (GMNA-Localizing-U.
S./Canada/Mexico-15546003) - 2022 - CRC - 5/5/21
380 Vehicle Care
To dinghy tow:1. Position the vehicle being towed behind the tow vehicle, facing forward and on a
level surface.
2. Securely attach the vehicle being towed to the tow vehicle.
3. Apply the parking brake and start the engine.
4. Shift the transfer case to N (Neutral). See “Shifting into N (Neutral)” under
Four-Wheel Drive 0240.
5. With the engine running, release the parking brake and verify that the
transfer case is in N (Neutral) by shifting
the transmission to D (Drive) and then to
R (Reverse). There should be no
movement while shifting the
transmission.
6. Shift the transmission to D (Drive).
7. If equipped with an ignition key, turn the ignition to ACC/ACCESSORY.
If equipped with Keyless Access, turn the
engine off. Disregard the Shift to P (Park)
DIC message. See Ignition Positions
(Keyless Access) 0229 or
Ignition Positions (Key Access) 0227.{Warning
To avoid death, serious injury,
or property damage, before dinghy
towing the vehicle, always disconnect and
secure the negative battery cable and
cover the negative battery post and cable
with a non-conductive material. If the
battery is left connected or the battery
cable contacts the post, the Electric
Parking Brake may activate during
towing, which could cause a crash.
8. Disconnect the negative (–) battery cable. See “Negative Battery Cable
Disconnection” inBattery - North
America 0324.
9. Shift the transmission to P (Park).
Caution
If the steering column is locked, vehicle
damage may occur.
10. Move the steering wheel to make sure the steering column is unlocked.
11. If the vehicle has an ignition key, keep it in the towed vehicle in ACC/ACCESSORY
to prevent the steering column from
locking. If the vehicle is equipped with Keyless Access, keep the RKE transmitter
outside of the vehicle and manually lock
the doors. Access the vehicle by using
the key in the door lock. See
Door Locks
0 21.
Disconnecting the Towed Vehicle
Before disconnecting from the tow vehicle: 1. Park on a level surface. Secure the vehicle with wheel blocks.
2. Re-connect the negative (–) battery. See Battery - North America 0324.
3. Turn on the ignition with the engine off. For vehicles with a key, turn the ignition
to ON/RUN with the engine off. If the
vehicle is equipped with Keyless Access,
with your foot off the brake pedal, press
and hold ENGINE START/STOP for
five seconds until the green light comes
on in the button. See Ignition Positions
(Keyless Access) 0229 or
Ignition Positions (Key Access) 0227.
4. Set the parking brake. See Electric
Parking Brake 0245.
5. Disconnect from the tow vehicle.
6. Shift the transmission to N (Neutral).
Page 387 of 441
Chevrolet Silverado 2500 HD/3500 HD Owner Manual (GMNA-Localizing-U.
S./Canada/Mexico-15546003) - 2022 - CRC - 5/5/21
386 Vehicle Care
Visually check constant velocity joint boots
and axle seals for leaks.
2500/3500 Series vehicles, at least every
engine oil change lubricate the upper and
lower control arm ball joints.
2500/3500 Series vehicles equipped with
steering linkage, at least every engine oil
change lubricate the tie rod ball joints, idler
arm pivot shaft bearings, idler arm socket,
and pitman arm socket.
Caution
Lubrication of applicable suspension
points should not be done unless the
temperature is−12 °C (10 °F) or higher,
or damage could result.
Body Component Lubrication
Lubricate all key lock cylinders, hood hinges,
liftgate hinges, and the steel fuel door hinge
unless the components are plastic. Applying
silicone grease on weatherstrips with a clean
cloth will make them last longer, seal better,
and not stick or squeak.
Underbody Maintenance
At least twice a year, spring and fall, use
plain water to flush any corrosive materials
from the underbody. Take care to
thoroughly clean any areas where mud and
other debris can collect. If equipped with
power assist steps, extend them and then
use a high pressure wash to clean all joints
and gaps.
Do not directly power wash the transfer
case and/or front/rear axle output seals.
High pressure water can overcome the seals
and contaminate the fluid. Contaminated
fluid will decrease the life of the transfer
case and/or axles and should be replaced.
Sheet Metal Damage
If the vehicle is damaged and requires sheet
metal repair or replacement, make sure the
body repair shop applies anti-corrosion
material to parts repaired or replaced to
restore corrosion protection.
Original manufacturer replacement parts will
provide the corrosion protection while
maintaining the vehicle warranty.
Finish Damage
Quickly repair minor chips and scratches
with touch-up materials available from your
dealer to avoid corrosion. Larger areas of
finish damage can be corrected in your
dealer's body and paint shop.
Chemical Paint Spotting
Airborne pollutants can fall upon and attack
painted vehicle surfaces causing blotchy,
ring-shaped discolorations, and small,
irregular dark spots etched into the paint
surface. Refer to “Finish Care”previously in
this section.
Interior Care
To prevent dirt particle abrasions, regularly
clean the vehicle's interior. Before using
cleaners, read and follow all safety
instructions on the label. While cleaning the
interior, open the doors and windows to get
proper ventilation. Newspapers or dark
garments can transfer color to the vehicle’s
interior.
Page 395 of 441
Chevrolet Silverado 2500 HD/3500 HD Owner Manual (GMNA-Localizing-U.
S./Canada/Mexico-15546003) - 2022 - CRC - 5/5/21
394 Service and Maintenance
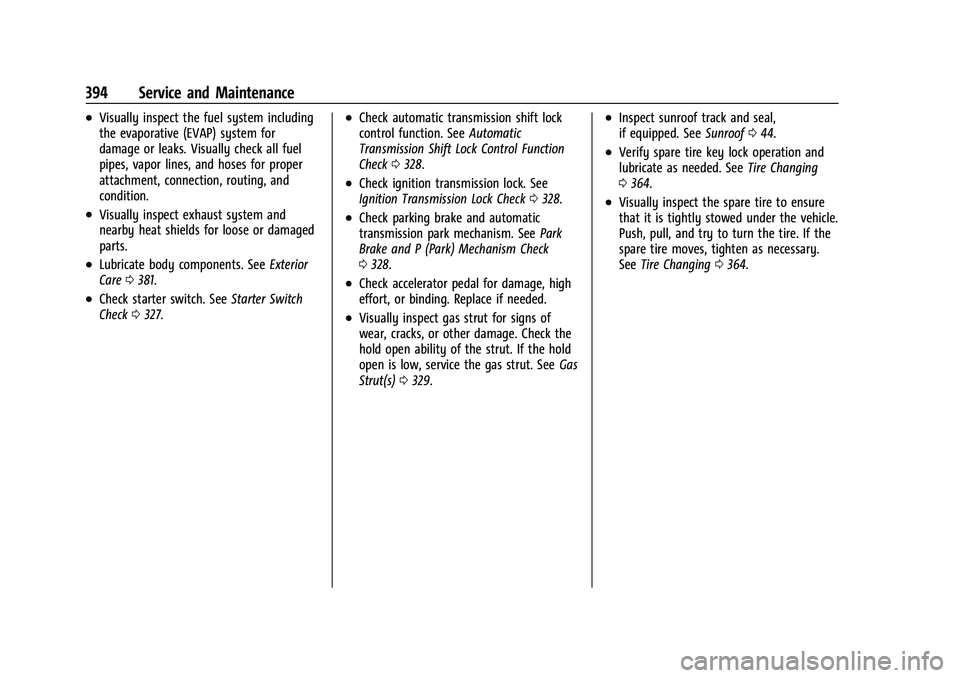
.Visually inspect the fuel system including
the evaporative (EVAP) system for
damage or leaks. Visually check all fuel
pipes, vapor lines, and hoses for proper
attachment, connection, routing, and
condition.
.Visually inspect exhaust system and
nearby heat shields for loose or damaged
parts.
.Lubricate body components. SeeExterior
Care 0381.
.Check starter switch. See Starter Switch
Check 0327.
.Check automatic transmission shift lock
control function. See Automatic
Transmission Shift Lock Control Function
Check 0328.
.Check ignition transmission lock. See
Ignition Transmission Lock Check 0328.
.Check parking brake and automatic
transmission park mechanism. See Park
Brake and P (Park) Mechanism Check
0 328.
.Check accelerator pedal for damage, high
effort, or binding. Replace if needed.
.Visually inspect gas strut for signs of
wear, cracks, or other damage. Check the
hold open ability of the strut. If the hold
open is low, service the gas strut. See Gas
Strut(s) 0329.
.Inspect sunroof track and seal,
if equipped. See Sunroof044.
.Verify spare tire key lock operation and
lubricate as needed. See Tire Changing
0 364.
.Visually inspect the spare tire to ensure
that it is tightly stowed under the vehicle.
Push, pull, and try to turn the tire. If the
spare tire moves, tighten as necessary.
See Tire Changing 0364.
Page 403 of 441
Chevrolet Silverado 2500 HD/3500 HD Owner Manual (GMNA-Localizing-U.
S./Canada/Mexico-15546003) - 2022 - CRC - 5/5/21
402 Service and Maintenance
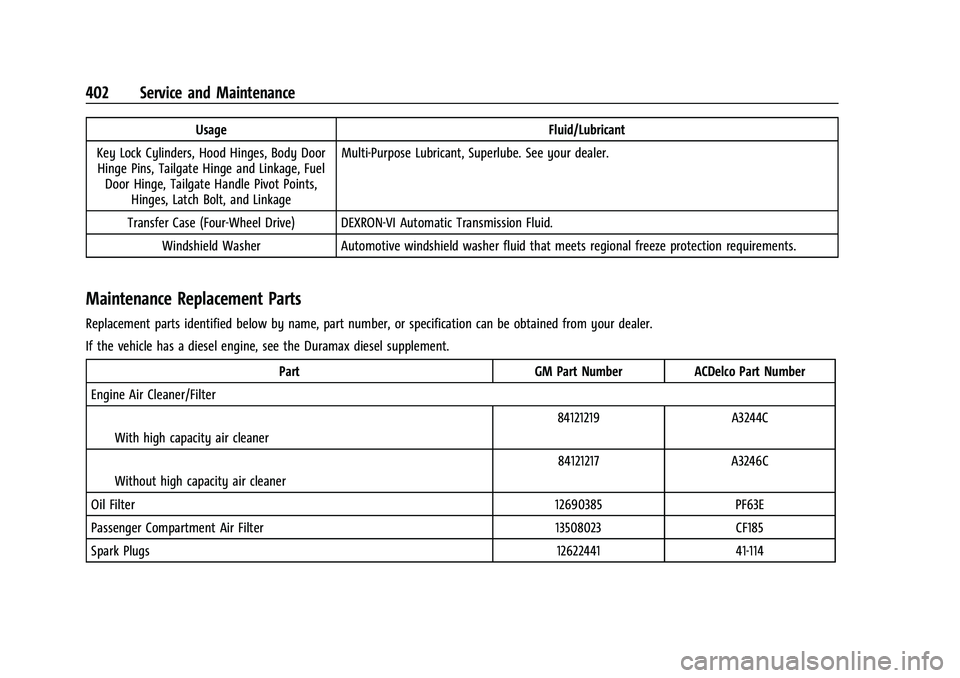
UsageFluid/Lubricant
Key Lock Cylinders, Hood Hinges, Body Door Hinge Pins, Tailgate Hinge and Linkage, Fuel Door Hinge, Tailgate Handle Pivot Points, Hinges, Latch Bolt, and Linkage Multi-Purpose Lubricant, Superlube. See your dealer.
Transfer Case (Four-Wheel Drive) DEXRON-VI Automatic Transmission Fluid. Windshield Washer Automotive windshield washer fluid that meets regional freeze protection requirements.
Maintenance Replacement Parts
Replacement parts identified below by name, part number, or specification can be obtained from your dealer.
If the vehicle has a diesel engine, see the Duramax diesel supplement.
Part GM Part Number ACDelco Part Number
Engine Air Cleaner/Filter
IWith high capacity air cleaner 84121219 A3244C
IWithout high capacity air cleaner 84121217 A3246C
Oil Filter 12690385 PF63E
Passenger Compartment Air Filter 13508023 CF185
Spark Plugs 12622441 41-114