brake sensor CHEVROLET SILVERADO 2500 2023 Owners Manual
[x] Cancel search | Manufacturer: CHEVROLET, Model Year: 2023, Model line: SILVERADO 2500, Model: CHEVROLET SILVERADO 2500 2023Pages: 441, PDF Size: 14.4 MB
Page 6 of 441
Chevrolet Silverado 2500 HD/3500 HD Owner Manual (GMNA-Localizing-U.
S./Canada/Mexico-15546003) - 2022 - CRC - 5/12/21
Introduction 5
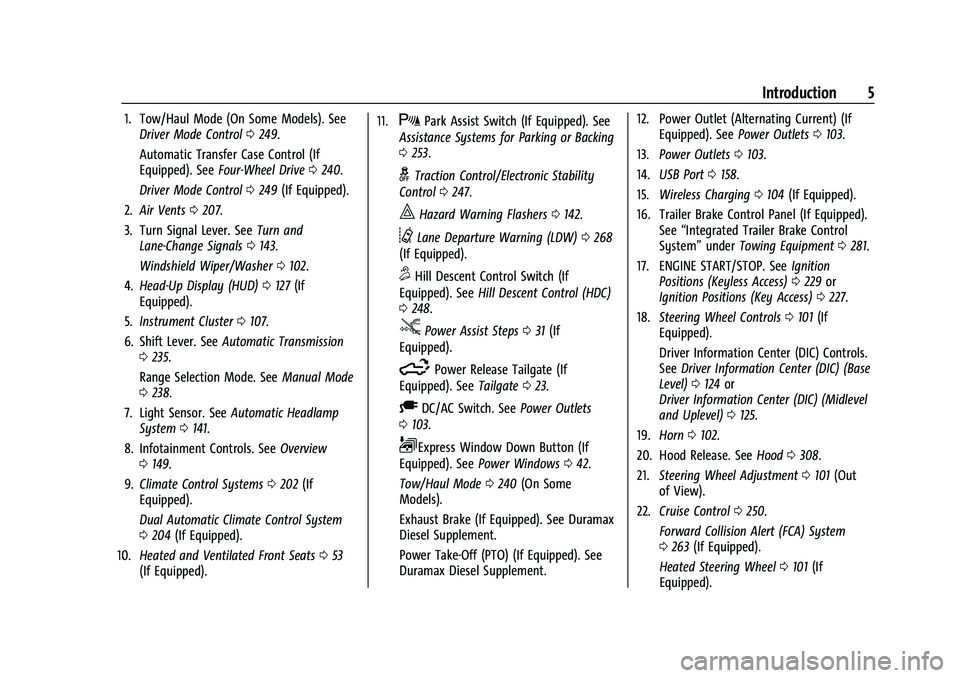
1. Tow/Haul Mode (On Some Models). SeeDriver Mode Control 0249.
Automatic Transfer Case Control (If
Equipped). See Four-Wheel Drive 0240.
Driver Mode Control 0249 (If Equipped).
2. Air Vents 0207.
3. Turn Signal Lever. See Turn and
Lane-Change Signals 0143.
Windshield Wiper/Washer 0102.
4. Head-Up Display (HUD) 0127 (If
Equipped).
5. Instrument Cluster 0107.
6. Shift Lever. See Automatic Transmission
0 235.
Range Selection Mode. See Manual Mode
0 238.
7. Light Sensor. See Automatic Headlamp
System 0141.
8. Infotainment Controls. See Overview
0 149.
9. Climate Control Systems 0202 (If
Equipped).
Dual Automatic Climate Control System
0 204 (If Equipped).
10. Heated and Ventilated Front Seats 053
(If Equipped). 11.XPark Assist Switch (If Equipped). See
Assistance Systems for Parking or Backing
0 253.
gTraction Control/Electronic Stability
Control 0247.
|Hazard Warning Flashers 0142.
@Lane Departure Warning (LDW) 0268
(If Equipped).
5Hill Descent Control Switch (If
Equipped). See Hill Descent Control (HDC)
0 248.
jPower Assist Steps 031 (If
Equipped).
5Power Release Tailgate (If
Equipped). See Tailgate023.
ADC/AC Switch. See Power Outlets
0 103.
LExpress Window Down Button (If
Equipped). See Power Windows 042.
Tow/Haul Mode 0240 (On Some
Models).
Exhaust Brake (If Equipped). See Duramax
Diesel Supplement.
Power Take-Off (PTO) (If Equipped). See
Duramax Diesel Supplement. 12. Power Outlet (Alternating Current) (If
Equipped). See Power Outlets0103.
13. Power Outlets 0103.
14. USB Port 0158.
15. Wireless Charging 0104 (If Equipped).
16. Trailer Brake Control Panel (If Equipped). See“Integrated Trailer Brake Control
System” underTowing Equipment 0281.
17. ENGINE START/STOP. See Ignition
Positions (Keyless Access) 0229 or
Ignition Positions (Key Access) 0227.
18. Steering Wheel Controls 0101 (If
Equipped).
Driver Information Center (DIC) Controls.
See Driver Information Center (DIC) (Base
Level) 0124 or
Driver Information Center (DIC) (Midlevel
and Uplevel) 0125.
19. Horn 0102.
20. Hood Release. See Hood0308.
21. Steering Wheel Adjustment 0101 (Out
of View).
22. Cruise Control 0250.
Forward Collision Alert (FCA) System
0 263 (If Equipped).
Heated Steering Wheel 0101 (If
Equipped).
Page 253 of 441
Chevrolet Silverado 2500 HD/3500 HD Owner Manual (GMNA-Localizing-U.
S./Canada/Mexico-15546003) - 2022 - CRC - 5/5/21
252 Driving and Operating
the release to override cruise control, briefly
pressing SET–will result in cruise control set
to the current vehicle speed.
Using Cruise Control on Hills
How well the cruise control works on hills
depends on the vehicle speed, the load, and
the steepness of the hills. When going up
steep hills, pressing the accelerator pedal
may be necessary to maintain vehicle speed.
While going downhill, cruise braking helps
maintain driver selected speed.
Cruise Grade Braking is enabled when the
vehicle is started and cruise control is active.
It is not enabled in Range Selection Mode.
It assists in maintaining driver selected
speed when driving on downhill grades by
using the engine and transmission to slow
the vehicle.
For other forms of descent control, see Hill
Descent Control (HDC) 0248, Automatic
Transmission 0235, and Tow/Haul Mode
0 240.
Ending Cruise Control
There are four ways to end cruise control:
.Step lightly on the brake pedal.
.Press*.
.Shift the transmission to N (Neutral).
.To turn off cruise control, press5.
Erasing Speed Memory
The cruise control set speed is erased from
memory if
5is pressed or the ignition is
turned off.
Driver Assistance Systems
This vehicle may have features that work
together to help avoid crashes or reduce
crash damage while driving, backing, and
parking. Read this entire section before
using these systems.
{Warning
Do not rely on the Driver Assistance
Systems. These systems do not replace
the need for paying attention and driving
safely. You may not hear or feel alerts or
warnings provided by these systems.
Failure to use proper care when driving
may result in injury, death, or vehicle
damage. See Defensive Driving 0211.
Under many conditions, these systems
will not: (Continued)
Warning (Continued)
.Detect children, pedestrians, bicyclists,
or animals.
.Detect vehicles or objects outside the
area monitored by the system.
.Work at all driving speeds.
.Warn you or provide you with enough
time to avoid a crash.
.Work under poor visibility or bad
weather conditions.
.Work if the detection sensor is not
cleaned or is covered by ice, snow,
mud, or dirt.
.Work if the detection sensor is
covered up, such as with a sticker,
magnet, or metal plate.
.Work if the area surrounding the
detection sensor is damaged or not
properly repaired.
Complete attention is always required
while driving, and you should be ready to
take action and apply the brakes and/or
steer the vehicle to avoid crashes.
Page 265 of 441
Chevrolet Silverado 2500 HD/3500 HD Owner Manual (GMNA-Localizing-U.
S./Canada/Mexico-15546003) - 2022 - CRC - 5/5/21
264 Driving and Operating
{Warning
FCA does not provide a warning to help
avoid a crash, unless it detects a vehicle.
FCA may not detect a vehicle ahead if
the FCA sensor is blocked by dirt, snow,
or ice, or if the windshield is damaged.
It may also not detect a vehicle on
winding or hilly roads, or in conditions
that can limit visibility such as fog, rain,
or snow, or if the headlamps or
windshield are not cleaned or in proper
condition. Keep the windshield,
headlamps, and FCA sensors clean and in
good repair.
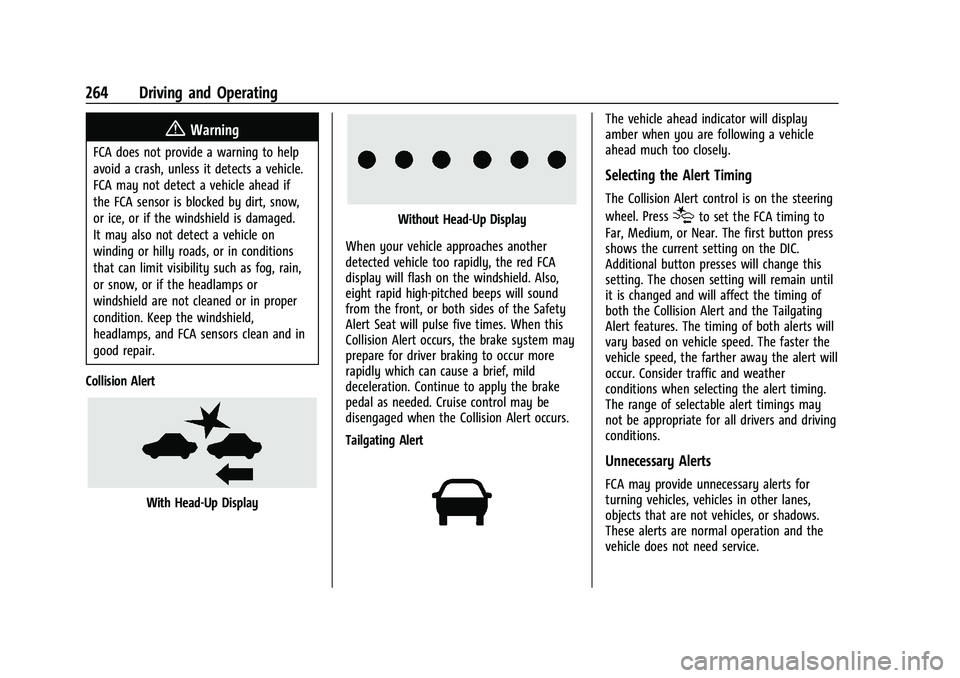
Collision Alert
With Head-Up Display
Without Head-Up Display
When your vehicle approaches another
detected vehicle too rapidly, the red FCA
display will flash on the windshield. Also,
eight rapid high-pitched beeps will sound
from the front, or both sides of the Safety
Alert Seat will pulse five times. When this
Collision Alert occurs, the brake system may
prepare for driver braking to occur more
rapidly which can cause a brief, mild
deceleration. Continue to apply the brake
pedal as needed. Cruise control may be
disengaged when the Collision Alert occurs.
Tailgating Alert
The vehicle ahead indicator will display
amber when you are following a vehicle
ahead much too closely.
Selecting the Alert Timing
The Collision Alert control is on the steering
wheel. Press
[to set the FCA timing to
Far, Medium, or Near. The first button press
shows the current setting on the DIC.
Additional button presses will change this
setting. The chosen setting will remain until
it is changed and will affect the timing of
both the Collision Alert and the Tailgating
Alert features. The timing of both alerts will
vary based on vehicle speed. The faster the
vehicle speed, the farther away the alert will
occur. Consider traffic and weather
conditions when selecting the alert timing.
The range of selectable alert timings may
not be appropriate for all drivers and driving
conditions.
Unnecessary Alerts
FCA may provide unnecessary alerts for
turning vehicles, vehicles in other lanes,
objects that are not vehicles, or shadows.
These alerts are normal operation and the
vehicle does not need service.
Page 295 of 441
Chevrolet Silverado 2500 HD/3500 HD Owner Manual (GMNA-Localizing-U.
S./Canada/Mexico-15546003) - 2022 - CRC - 5/5/21
294 Driving and Operating
1. Touch + Add Trailer Profile in theTrailering App
2. Touch Import Profile on the pop-up.
3. Select a trailer profile from the list.
4. Touch IMPORT.
A pop-up will indicate the import was
successful. Touch OK to return to the trailer
list and select the trailer profile. The Tow/
Haul Mode reminder, Brake Gain Setting and
Trailer Tire Pressure sensor learning,
if equipped, do not import.
Trailer Feature Setup
Tow/Haul Mode Reminder
To turn the Tow/Haul Mode Reminder
setting on, touch Yes. To turn it off,
touch No.
Trailer Tire Pressure Setup
If the Trailer Tire Pressure Monitoring
System (TTPMS) is detected, touch the Tire
Pressure Monitoring icon to set up tire
pressure monitoring. Touch Yes to set up
the sensors or touch No to return to the
previous screen.
The trailer tire pressure sensors can transmit
up to 7 m (23 feet) from the hitch receiver of
the vehicle. A trailer must be electrically connected to
the vehicle before starting the
sensor-to-vehicle learn process.
After selecting Start from the Learn Sensors
screen, use the Tool Method or the Manual
Method (described below) to learn each tire
sensor, during which the current tire number
will be highlighted.
Each sensor has a minimum of two minutes
to learn, shown by a timer. After a sensor is
learned, a checkmark appears next to the
tire, the vehicle horn will sound, the
vehicle’s brake lamps will flash, and all
working trailer lamps will flash. It then
moves to the next sensor.
To cancel the process touch Stop.
The recommended tire pressure must be
entered for the trailer tires. This allows the
vehicle to alert when the tire pressure is
high or low.
TTPMS must learn the location of the
installed tire sensors to show correct air
pressure and temperature for each tire. To
set up, use one of the following options or
see a tire or trailer dealer for service. The
learning process must be repeated when the
trailer tires are rotated or replaced. See
“Editing a Trailer Profile”
later in this section
for tire pressure sensor relearn information.
Tool Method: A TTPMS activation tool can
be purchased separately to learn the sensor
locations.
Manual Method: Without the tool, the air
pressure can be increased or decreased in
each tire for 10 seconds. Do not exceed the
maximum inflation pressure found on the
tire sidewalls. Make sure to re-adjust tire
pressure to the recommended level when
the process is complete.
Sensor Learning Steps
To complete the sensor-to-vehicle learn
process:
1. Touch Start on the Learn Sensors screen. The horn chirps twice and the Learning
Active screen appears on the
infotainment display.
2. Start with the driver side front trailer tire.
3. Activate the tool near the valve stem or adjust the air pressure of this tire until
the horn chirps and all working vehicle
and trailer lights flash.
Page 301 of 441
Chevrolet Silverado 2500 HD/3500 HD Owner Manual (GMNA-Localizing-U.
S./Canada/Mexico-15546003) - 2022 - CRC - 5/5/21
300 Driving and Operating
Trailer Tire Pressure Monitoring System or
maintenance reminders cannot be set up for
the Accessory/No Trailer Profile. The
Accessory/No Trailer profile cannot be
edited.
No Trailer Connected
When there is no trailer connected, Trailer
Profiles cannot be activated but most
options can be edited.
Trailer Brake Gain Memory
The system can memorize the brake gain
setting of a Trailer Profile or a Guest Trailer
Profile. When a Trailer Profile or Guest
Trailer Profile is selected, and a brake gain
setting is set for that Trailer Profile, a quick
notice will appear to indicate that the
system has recalled that profile’s brake gain
setting.
If a Trailer Profile is already active and the
brake gain setting had been set for that
Trailer Profile, the quick notice will trigger
whenever the ignition is turned on.
If there was an error in setting the brake
gain for a Trailer Profile, there will be a
notification. This pop-up will not appear if
the Guest Trailer Profile is active or if there
is no trailer connected.Trailer brake gain should be set for a specific
trailering condition and must be adjusted
anytime vehicle loading, trailer loading,
or road surface conditions change.
Editing a Trailer Profile
Trailer Profile View
Touch to edit any of the following options
in the Trailer Profile view:
.Trailer Name
.Towing Assistance Setup, if equipped
.Tire Pressure Setup, if equipped
.Trailer Maintenance
.Edit Mileage
.Reset Average Fuel Economy
Touch Save to save the new value to the
Trailer Profile. Touching Back will still save
the previously entered information.
Trailer Name
Touch to edit the Trailer Profile’s name. Use
at least one character and no spaces.
Touch Save.
Towing Assistance Setup
A trailer should be connected to complete
this portion of profile setup. Touch to set up towing assistance features
for the Trailer Profile. See "Towing
Assistance" for details on the setup.
Tire Pressure Setup
Touch to set up the Trailer Tire Pressure
Monitoring System (TTPMS) for the Trailer
Profile. See
“Trailer Tire Pressure Setup”
previously in this section for details on the
setup. Also, touch Tire Pressure Setup if the
trailer tires were rotated or if the tire
pressure sensors in the tires were replaced
for this Trailer Profile. The vehicle will need
to relearn the tire sensors and their
locations.
If TTPMS had been set up previously, the
Select Number of Sensors screen will appear
after touching Tire Pressure Setup. If the
number of sensors has changed, select the
number and touch Next.
If a new number of sensors is selected, the
Relearn Sensors pop-up will appear. Touch
Cancel to go back or touch Relearn to
overwrite the current sensors and begin the
relearning process. See “Trailer Tire Pressure
Setup” previously in this section.
If number of sensors has not changed, touch
Next and the Learn sensors screen will
appear.
Page 324 of 441
Chevrolet Silverado 2500 HD/3500 HD Owner Manual (GMNA-Localizing-U.
S./Canada/Mexico-15546003) - 2022 - CRC - 5/5/21
Vehicle Care 323
Brake pads should always be replaced as
complete axle sets.
How to Reset the Brake Pad Life System
The system will automatically detect when
significantly worn brake pads are replaced.
When the ignition is turned on after new
pads and wear sensors are installed, a
message will display. Follow the prompts to
reset the system.
The brake pad life system can also be
manually reset:1. Display Brake Pad Life on the DIC. See Driver Information Center (DIC) (Base
Level) 0124 or
Driver Information Center (DIC) (Midlevel
and Uplevel) 0125.
2. Select the Brake Pad Life menu.
3. Select front or rear pads as appropriate.
4. Select YES on the confirmation message. Repeat for pads on the other axle if they
were also replaced.
How to Disable the Brake Pad Life
System
The brake pad life system can be turned off.
This may be necessary if aftermarket brake
pads without wear sensors are installed. When the system is turned off, the front
and rear brake pad life percentages will not
display. However, the built-in wear
indicators that make a high-pitched warning
sound when the brake pads are worn can
still determine when the pads should be
replaced. See
Brakes0322.
To turn off the brake pad life system: 1. Display Brake Pad Life on the DIC. See Driver Information Center (DIC) (Base
Level) 0124 or
Driver Information Center (DIC) (Midlevel
and Uplevel) 0125.
2. Select the Brake Pad Life menu.
3. Select DISABLE.
To turn the brake pad life system back on,
follow the above steps but select ENABLE in
Step 2.
Brake Fluid
The brake master cylinder reservoir is filled
with GM approved DOT 4 brake fluid as
indicated on the reservoir cap. See Engine
Compartment Overview 0310 for the
location of the reservoir.
Checking Brake Fluid
With the vehicle in P (Park) on a level
surface, the brake fluid level should be
between the minimum and maximum marks
on the brake fluid reservoir.
There are only two reasons why the brake
fluid level in the reservoir may go down:
.Normal brake lining wear. When new
linings are installed, the fluid level goes
back up.
.A fluid leak in the brake hydraulic system.
Have the brake hydraulic system fixed.
With a leak, the brakes will not
work well.
Always clean the brake fluid reservoir cap
and the area around the cap before
removing it.
Do not top off the brake fluid. Adding fluid
does not correct a leak. If fluid is added
when the linings are worn, there will be too
much fluid when new brake linings are
Page 340 of 441
Chevrolet Silverado 2500 HD/3500 HD Owner Manual (GMNA-Localizing-U.
S./Canada/Mexico-15546003) - 2022 - CRC - 5/5/21
Vehicle Care 339
FusesUsage
82 Trailer Interface Module 2
83 FTZM
84 Trailer brake 85 ENG
86 Engine control module 87 Injector B even
88 O2 B sensor
89 O2 A sensor
90 Injector A odd 91 Engine control module throttle control
92 Cool fan clutch/ Aeroshutter Relays
Usage
5 Headlamp
18 DC/AC inverter
23 Rear window defogger
35 Parking lamp
36 Run/Crank
43 –
59 A/C clutch
64 Starter Motor (LD & HD DSL)
70 Starter Pinion (LD) / Starter Motor (HD Gas)
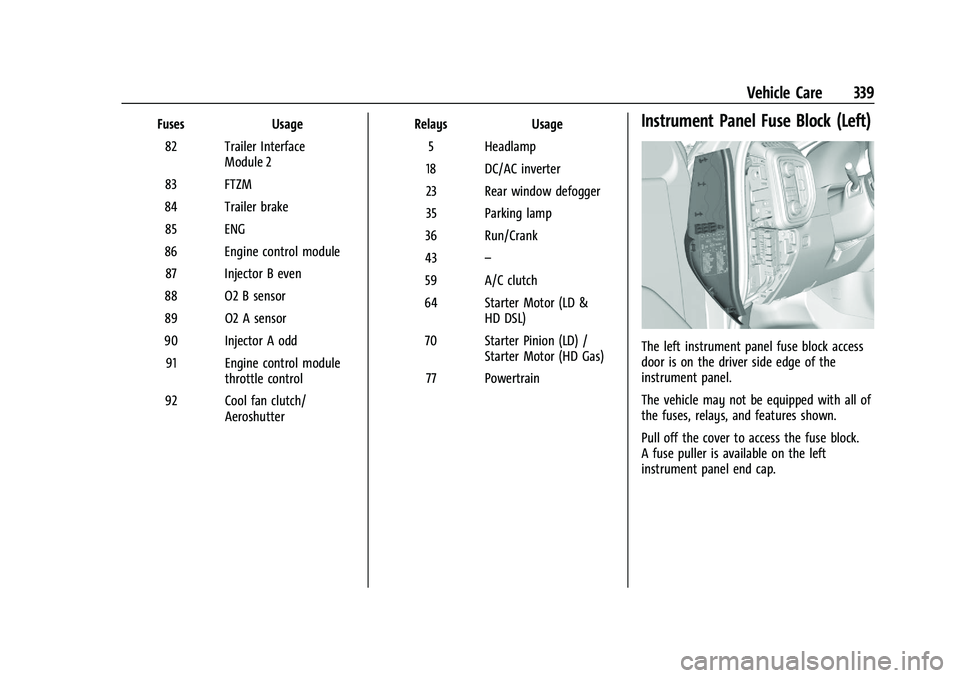
77 PowertrainInstrument Panel Fuse Block (Left)
The left instrument panel fuse block access
door is on the driver side edge of the
instrument panel.
The vehicle may not be equipped with all of
the fuses, relays, and features shown.
Pull off the cover to access the fuse block.
A fuse puller is available on the left
instrument panel end cap.
Page 353 of 441
Chevrolet Silverado 2500 HD/3500 HD Owner Manual (GMNA-Localizing-U.
S./Canada/Mexico-15546003) - 2022 - CRC - 5/5/21
352 Vehicle Care
Caution (Continued)
damage caused by using an incorrect tire
sealant is not covered by the vehicle
warranty. Always use only the GM
approved tire sealant available through
your dealer or included in the vehicle.
TPMS Malfunction Light and Message
The TPMS will not function properly if one
or more of the TPMS sensors are missing or
inoperable. When the system detects a
malfunction, the low tire pressure warning
light flashes for about one minute and then
stays on for the remainder of the ignition
cycle. A DIC warning message also displays.
The malfunction light and DIC warning
message come on at each ignition cycle
until the problem is corrected. Some of the
conditions that can cause these to come
on are:
.One of the road tires has been replaced
with the spare tire. The spare tire does
not have a TPMS sensor. The malfunction
light and the DIC message should go off
after the road tire is replaced and the
sensor matching process is performed
successfully. See "TPMS Sensor Matching
Process" later in this section.
.The TPMS sensor matching process was
not done or not completed successfully
after rotating the tires. The malfunction
light and the DIC message should go off
after successfully completing the sensor
matching process. See "TPMS Sensor
Matching Process" later in this section.
.One or more TPMS sensors are missing or
damaged. The malfunction light and the
DIC message should go off when the
TPMS sensors are installed and the sensor
matching process is performed
successfully. See your dealer for service.
.Replacement tires or wheels do not match
the original equipment tires or wheels.
Tires and wheels other than those
recommended could prevent the TPMS
from functioning properly. SeeBuying
New Tires 0359.
.Operating electronic devices or being near
facilities using radio wave frequencies
similar to the TPMS could cause the TPMS
sensors to malfunction.
If the TPMS is not functioning properly, it
cannot detect or signal a low tire pressure
condition. See your dealer for service if the
TPMS malfunction light and DIC message
come on and stay on.
Tire Fill Alert (If Equipped)
This feature provides visual and audible
alerts outside the vehicle to help when
inflating an underinflated tire to the
recommended cold tire pressure.
When the low tire pressure warning light
comes on: 1. Park the vehicle in a safe, level place.
2. Set the parking brake firmly.
3. Place the vehicle in P (Park).
4. Add air to the tire that is underinflated. The turn signal lamp will flash.
When the recommended pressure is
reached, the horn sounds once and the
turn signal lamp will stop flashing and
briefly turn solid.
Repeat these steps for all underinflated tires
that have illuminated the low tire pressure
warning light.
{Warning
Overinflating a tire could cause the tire
to rupture and you or others could be
injured. Do not exceed the maximum (Continued)
Page 354 of 441
Chevrolet Silverado 2500 HD/3500 HD Owner Manual (GMNA-Localizing-U.
S./Canada/Mexico-15546003) - 2022 - CRC - 5/5/21
Vehicle Care 353
Warning (Continued)
pressure listed on the tire sidewall. See
Tire Sidewall Labeling0345 and
Vehicle Load Limits 0220.
If the tire is overinflated by more than
35 kPa (5 psi), the horn will sound multiple
times and the turn signal lamp will continue
to flash for several seconds after filling
stops. To release and correct the pressure,
while the turn signal lamp is still flashing,
briefly press the center of the valve stem.
When the recommended pressure is reached,
the horn sounds once.
If the turn signal lamp does not flash within
15 seconds after starting to inflate the tire,
the tire fill alert has not been activated or is
not working.
If the hazard warning flashers are on, the
tire fill alert visual feedback will not work
properly.
The TPMS will not activate the tire fill alert
properly under the following conditions:
.There is interference from an external
device or transmitter.
.The air pressure from the inflation device
is not sufficient to inflate the tire.
.There is a malfunction in the TPMS.
.There is a malfunction in the horn or turn
signal lamps.
.The identification code of the TPMS
sensor is not registered to the system.
.The battery of the TPMS sensor is low.
If the tire fill alert does not operate due to
TPMS interference, move the vehicle about
1 m (3 ft) back or forward and try again.
If the tire fill alert feature is not working,
use a tire pressure gauge.
TPMS Sensor Matching Process
Each TPMS sensor has a unique
identification code. The identification code
needs to be matched to a new tire/wheel
position after rotating the vehicle’s tires or
replacing one or more of the TPMS sensors.
Also, the TPMS sensor matching process
should be performed after replacing a spare
tire with a road tire containing the TPMS
sensor. The malfunction light and the DIC
message should go off at the next ignition
cycle. The sensors are matched to the tire/
wheel positions, using a TPMS relearn tool,
in the following order: driver side front tire,
passenger side front tire, passenger side rear
tire, and driver side rear. See your dealer for
service or to purchase a relearn tool. A TPMS relearn tool can also be purchased.
See Tire Pressure Monitor Sensor Activation
Tool at www.gmtoolsandequipment.com or
call 1-800-GM TOOLS (1-800-468-6657).
There are two minutes to match the first
tire/wheel position, and five minutes overall
to match all four tire/wheel positions. If it
takes longer, the matching process stops
and must be restarted.
The TPMS sensor matching process is:
1. Set the parking brake.
2. Turn the ignition on without starting the vehicle.
3. Uplevel DIC Only: Make sure the Tire Pressure info page option is turned on.
The info pages on the DIC can be turned
on and off through the Options menu.
See Driver Information Center (DIC) (Base
Level) 0124 or
Driver Information Center (DIC) (Midlevel
and Uplevel) 0125.
4. If the vehicle has an uplevel DIC, use the DIC controls on the right side of the
steering wheel to scroll to the Tire
Pressure screen under the DIC info page.
If the vehicle has a base level DIC, use
the trip odometer reset stem to scroll to
the Tire Pressure screen.
Page 363 of 441
Chevrolet Silverado 2500 HD/3500 HD Owner Manual (GMNA-Localizing-U.
S./Canada/Mexico-15546003) - 2022 - CRC - 5/5/21
362 Vehicle Care
Your dealer will know the kind of wheel that
is needed.
Each new wheel should have the same
load-carrying capacity, diameter, width,
offset, and be mounted the same way as
the one it replaces.
Replace wheels, wheel bolts, wheel nuts,
or Tire Pressure Monitor System (TPMS)
sensors with new GM original equipment
parts.
{Warning
Using the wrong replacement wheels,
wheel bolts, or wheel nuts can be
dangerous. It could affect the braking and
handling of the vehicle. Tires can lose air,
and cause loss of control, causing a crash.
Always use the correct wheel, wheel
bolts, and wheel nuts for replacement.
Caution
The wrong wheel can also cause
problems with bearing life, brake cooling,
speedometer or odometer calibration,
headlamp aim, bumper height, vehicle
ground clearance, and tire or tire chain
clearance to the body and chassis.
Used Replacement Wheels
{Warning
Replacing a wheel with a used one is
dangerous. How it has been used or how
far it has been driven may be unknown.
It could fail suddenly and cause a crash.
When replacing wheels, use a new GM
original equipment wheel.
Tire Chains
{Warning
If the vehicle has LT275/65R20 size tires,
do not use tire chains. There is not
enough clearance. Tire chains used on a
vehicle without the proper amount of
clearance can cause damage to the
brakes, suspension, or other vehicle parts.
The area damaged by the tire chains
could cause loss of control and a crash.
Use another type of traction device only
if its manufacturer recommends it for the
vehicle's tire size combination and road
conditions. Follow that manufacturer's
instructions. To avoid vehicle damage,
drive slow and readjust or remove the(Continued)
Warning (Continued)
traction device if it is contacting the
vehicle. Do not spin the wheels.
If traction devices are used, install them
on the rear tires.
Caution
Use tire chains only where legal and only
when necessary. Use chains that are the
proper size for the tires. If the vehicle has
LT235/80R17 size tires, install the chains
on the tires of the rear axle only. If the
vehicle has LT245/75R17, LT265/70R17,
or LT275/70R18 size tires, install the
chains on the tires of the front and rear
axle. Tighten them as tightly as possible
with the ends securely fastened. Drive
slowly and follow the chain
manufacturer's instructions. If the chains
contact the vehicle, stop and retighten
them. If the contact continues, slow
down until it stops. Driving too fast or
spinning the wheels with chains on will
damage the vehicle.