lock CHEVROLET SONIC 2012 2.G Manual Online
[x] Cancel search | Manufacturer: CHEVROLET, Model Year: 2012, Model line: SONIC, Model: CHEVROLET SONIC 2012 2.GPages: 352, PDF Size: 6.32 MB
Page 246 of 352
Black plate (38,1)Chevrolet Sonic Owner Manual - 2012
10-38 Vehicle Care
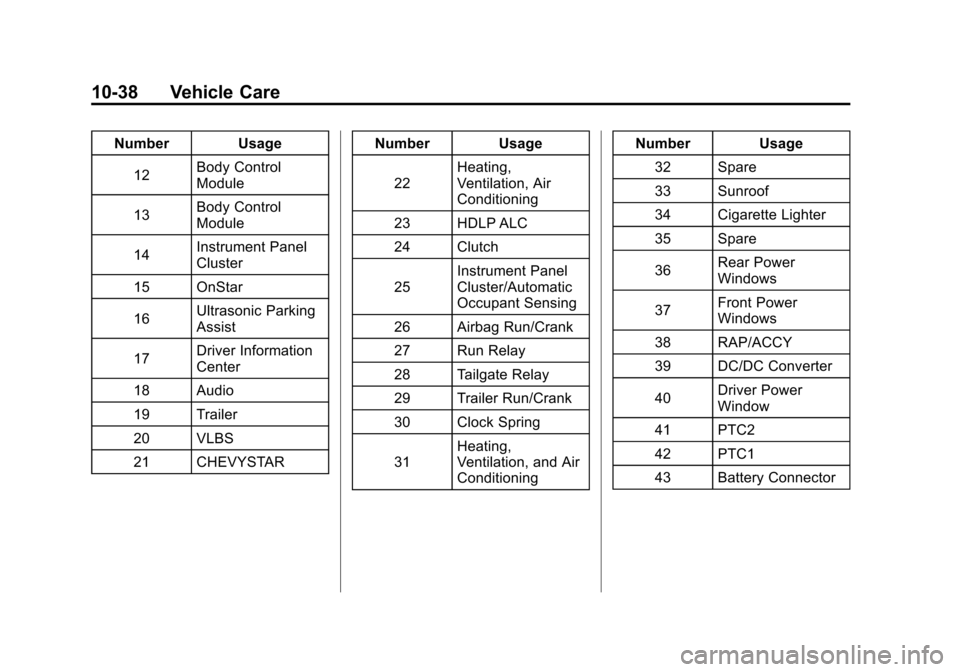
Number Usage12 Body Control
Module
13 Body Control
Module
14 Instrument Panel
Cluster
15 OnStar
16 Ultrasonic Parking
Assist
17 Driver Information
Center
18 Audio
19 Trailer
20 VLBS
21 CHEVYSTAR Number Usage
22 Heating,
Ventilation, Air
Conditioning
23 HDLP ALC
24 Clutch
25 Instrument Panel
Cluster/Automatic
Occupant Sensing
26 Airbag Run/Crank
27 Run Relay
28 Tailgate Relay
29 Trailer Run/Crank
30 Clock Spring
31 Heating,
Ventilation, and Air
Conditioning Number Usage
32 Spare
33 Sunroof
34 Cigarette Lighter
35 Spare
36 Rear Power
Windows
37 Front Power
Windows
38 RAP/ACCY
39 DC/DC Converter
40 Driver Power
Window
41 PTC2
42 PTC1
43 Battery Connector
Page 258 of 352
Black plate (50,1)Chevrolet Sonic Owner Manual - 2012
10-50 Vehicle Care
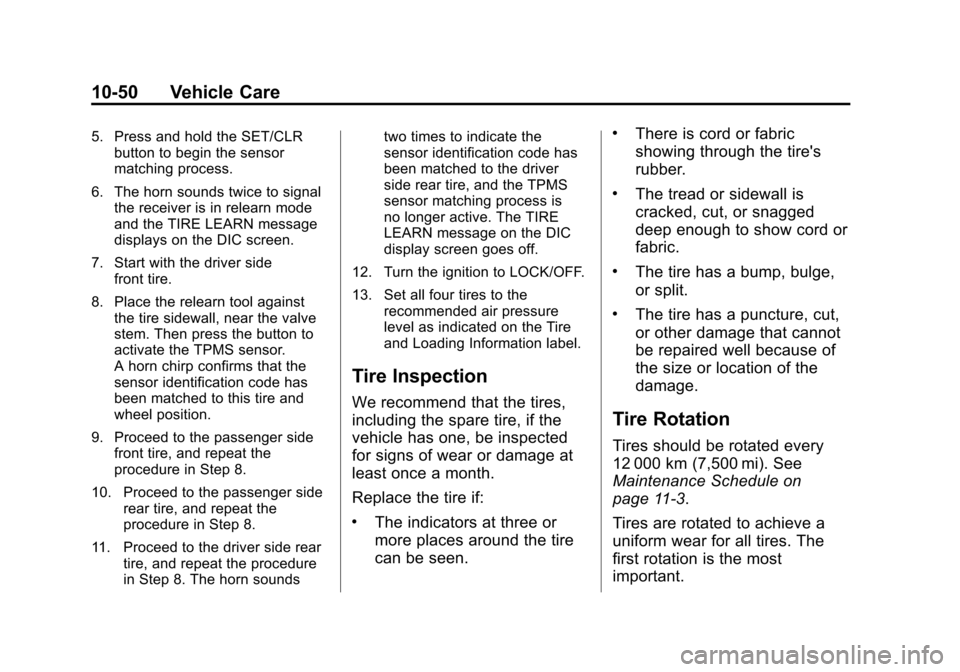
5. Press and hold the SET/CLRbutton to begin the sensor
matching process.
6. The horn sounds twice to signal the receiver is in relearn mode
and the TIRE LEARN message
displays on the DIC screen.
7. Start with the driver side front tire.
8. Place the relearn tool against the tire sidewall, near the valve
stem. Then press the button to
activate the TPMS sensor.
A horn chirp confirms that the
sensor identification code has
been matched to this tire and
wheel position.
9. Proceed to the passenger side front tire, and repeat the
procedure in Step 8.
10. Proceed to the passenger side rear tire, and repeat the
procedure in Step 8.
11. Proceed to the driver side rear tire, and repeat the procedure
in Step 8. The horn sounds two times to indicate the
sensor identification code has
been matched to the driver
side rear tire, and the TPMS
sensor matching process is
no longer active. The TIRE
LEARN message on the DIC
display screen goes off.
12. Turn the ignition to LOCK/OFF.
13. Set all four tires to the recommended air pressure
level as indicated on the Tire
and Loading Information label.
Tire Inspection
We recommend that the tires,
including the spare tire, if the
vehicle has one, be inspected
for signs of wear or damage at
least once a month.
Replace the tire if:
.The indicators at three or
more places around the tire
can be seen.
.There is cord or fabric
showing through the tire's
rubber.
.The tread or sidewall is
cracked, cut, or snagged
deep enough to show cord or
fabric.
.The tire has a bump, bulge,
or split.
.The tire has a puncture, cut,
or other damage that cannot
be repaired well because of
the size or location of the
damage.
Tire Rotation
Tires should be rotated every
12 000 km (7,500 mi). See
Maintenance Schedule on
page 11‑3.
Tires are rotated to achieve a
uniform wear for all tires. The
first rotation is the most
important.
Page 262 of 352
Black plate (54,1)Chevrolet Sonic Owner Manual - 2012
10-54 Vehicle Care
The Tire and Loading
Information label indicates the
original equipment tires on the
vehicle. SeeVehicle Load Limits
on page 9‑11 for the label
location and more information
about the Tire and Loading
Information label.
Different Size Tires and
Wheels
If wheels or tires are installed that
are a different size than the original
equipment wheels and tires, vehicle
performance, including its braking,
ride and handling characteristics,
stability, and resistance to rollover
may be affected. If the vehicle has
electronic systems such as antilock
brakes, rollover airbags, traction
control, and electronic stability
control, the performance of these
systems can also be affected.
{WARNING
If different sized wheels are used,
there may not be an acceptable
level of performance and safety if
tires not recommended for those
wheels are selected. This
increases the chance of a crash
and serious injury. Only use GM
specific wheel and tire systems
developed for the vehicle, and
have them properly installed by a
GM certified technician.
See Buying New Tires on
page 10‑52 andAccessories and
Modifications on page 10‑3 for
additional information.
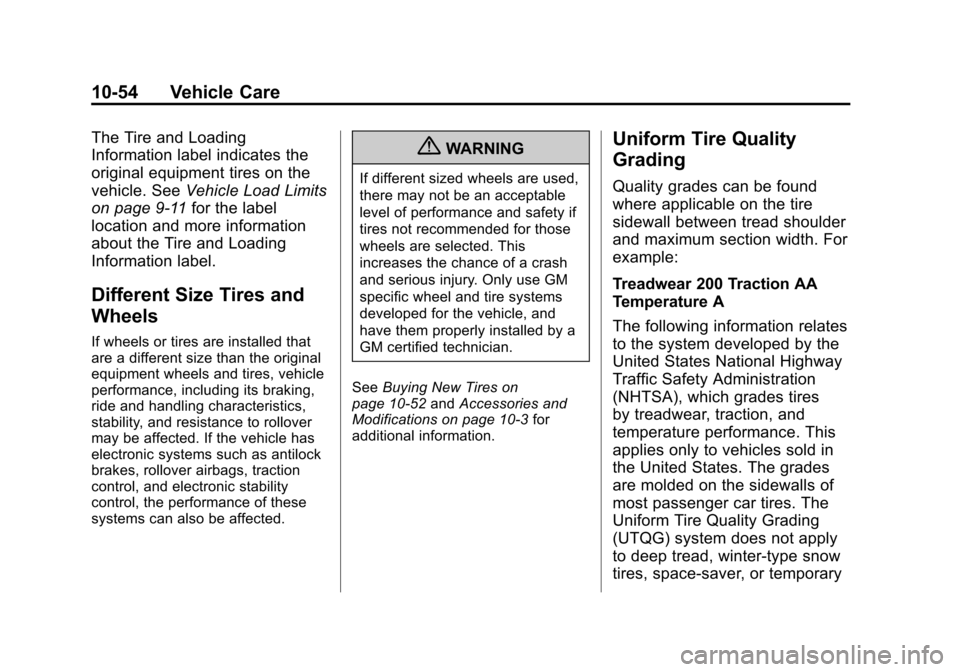
Uniform Tire Quality
Grading
Quality grades can be found
where applicable on the tire
sidewall between tread shoulder
and maximum section width. For
example:
Treadwear 200 Traction AA
Temperature A
The following information relates
to the system developed by the
United States National Highway
Traffic Safety Administration
(NHTSA), which grades tires
by treadwear, traction, and
temperature performance. This
applies only to vehicles sold in
the United States. The grades
are molded on the sidewalls of
most passenger car tires. The
Uniform Tire Quality Grading
(UTQG) system does not apply
to deep tread, winter-type snow
tires, space-saver, or temporary
Page 267 of 352
Black plate (59,1)Chevrolet Sonic Owner Manual - 2012
Vehicle Care 10-59
{WARNING
Changing a tire can be
dangerous. The vehicle can slip
off the jack and roll over or fall
causing injury or death. Find a
level place to change the tire. To
help prevent the vehicle from
moving:1. Set the parking brake firmly.
2. Put an automatic transmission in P (Park) or a
manual transmission in
1 (First) or R (Reverse).
3. Turn off the engine and do not restart while the vehicle
is raised.
(Continued)
WARNING (Continued)
4. Do not allow passengers toremain in the vehicle.
5. Place wheel blocks on both sides of the tire at the
opposite corner of the tire
being changed.
This vehicle may come with a jack
and spare tire or a tire sealant and
compressor kit. To use the jacking
equipment to change a spare tire
safely, follow the instructions below.
Then see Tire Changing on
page 10‑67. To use the tire sealant
and compressor kit, see Tire
Sealant and Compressor Kit on
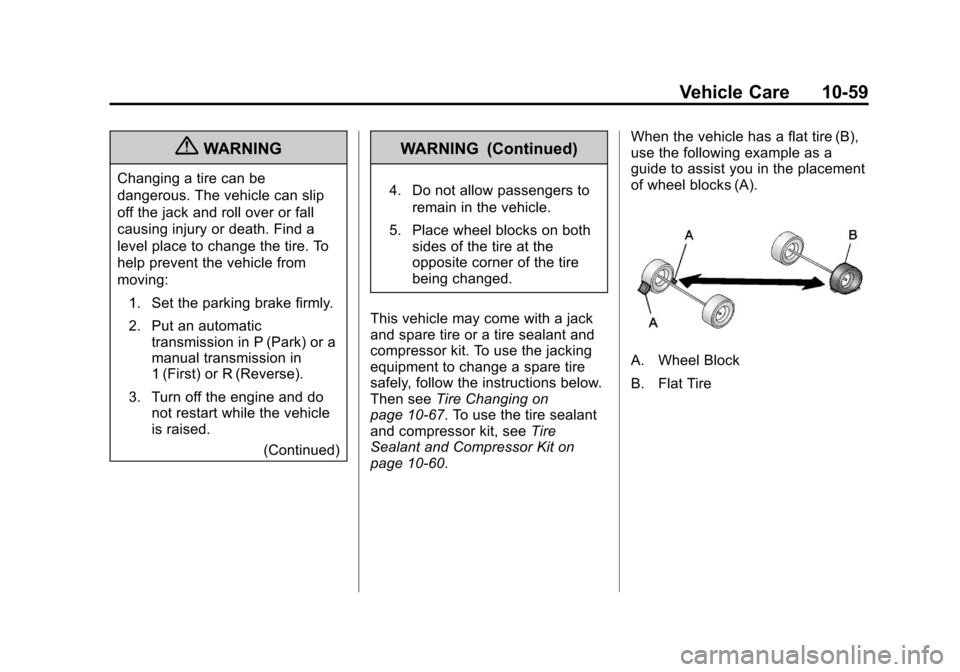
page 10‑60. When the vehicle has a flat tire (B),
use the following example as a
guide to assist you in the placement
of wheel blocks (A).
A. Wheel Block
B. Flat Tire
Page 270 of 352
Black plate (62,1)Chevrolet Sonic Owner Manual - 2012
10-62 Vehicle Care
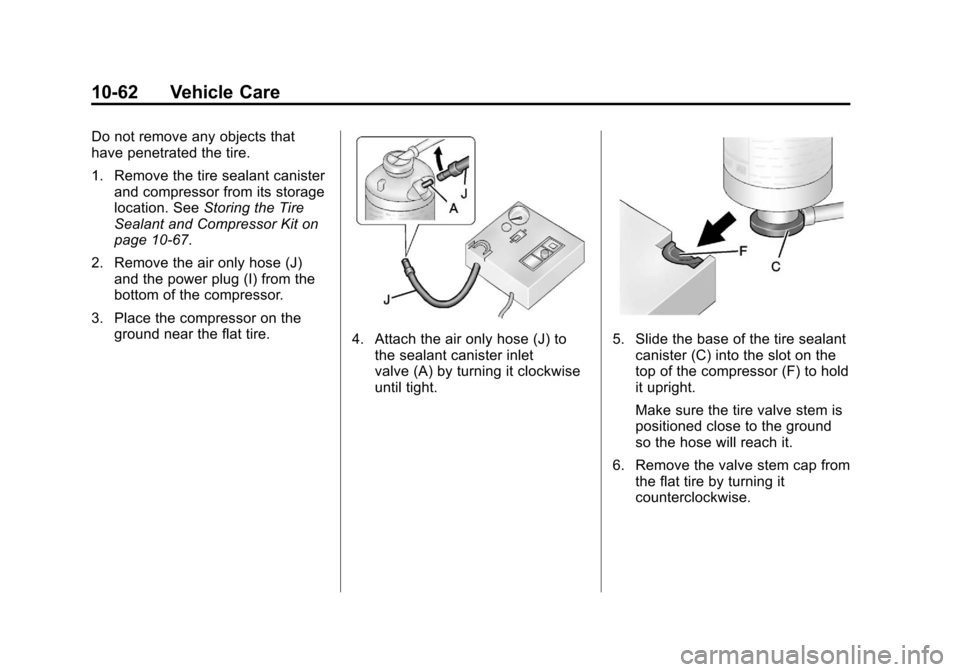
Do not remove any objects that
have penetrated the tire.
1. Remove the tire sealant canisterand compressor from its storage
location. See Storing the Tire
Sealant and Compressor Kit on
page 10‑67.
2. Remove the air only hose (J) and the power plug (I) from the
bottom of the compressor.
3. Place the compressor on the ground near the flat tire.
4. Attach the air only hose (J) tothe sealant canister inlet
valve (A) by turning it clockwise
until tight.5. Slide the base of the tire sealantcanister (C) into the slot on the
top of the compressor (F) to hold
it upright.
Make sure the tire valve stem is
positioned close to the ground
so the hose will reach it.
6. Remove the valve stem cap from the flat tire by turning it
counterclockwise.
Page 271 of 352
Black plate (63,1)Chevrolet Sonic Owner Manual - 2012
Vehicle Care 10-63
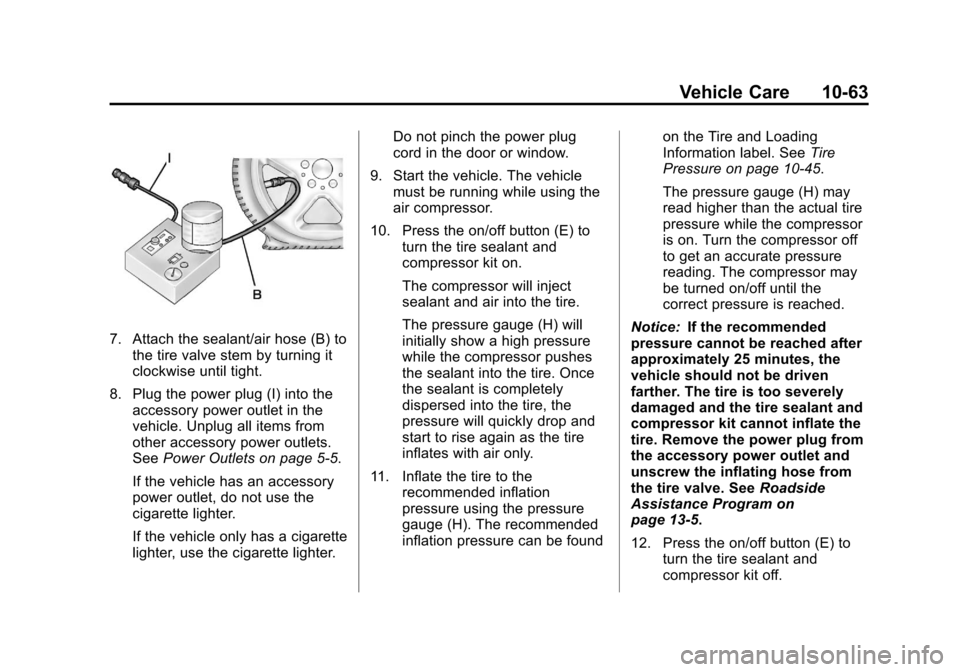
7. Attach the sealant/air hose (B) tothe tire valve stem by turning it
clockwise until tight.
8. Plug the power plug (I) into the accessory power outlet in the
vehicle. Unplug all items from
other accessory power outlets.
See Power Outlets on page 5‑5.
If the vehicle has an accessory
power outlet, do not use the
cigarette lighter.
If the vehicle only has a cigarette
lighter, use the cigarette lighter. Do not pinch the power plug
cord in the door or window.
9. Start the vehicle. The vehicle must be running while using the
air compressor.
10. Press the on/off button (E) to turn the tire sealant and
compressor kit on.
The compressor will inject
sealant and air into the tire.
The pressure gauge (H) will
initially show a high pressure
while the compressor pushes
the sealant into the tire. Once
the sealant is completely
dispersed into the tire, the
pressure will quickly drop and
start to rise again as the tire
inflates with air only.
11. Inflate the tire to the recommended inflation
pressure using the pressure
gauge (H). The recommended
inflation pressure can be found on the Tire and Loading
Information label. See
Tire
Pressure on page 10‑45.
The pressure gauge (H) may
read higher than the actual tire
pressure while the compressor
is on. Turn the compressor off
to get an accurate pressure
reading. The compressor may
be turned on/off until the
correct pressure is reached.
Notice: If the recommended
pressure cannot be reached after
approximately 25 minutes, the
vehicle should not be driven
farther. The tire is too severely
damaged and the tire sealant and
compressor kit cannot inflate the
tire. Remove the power plug from
the accessory power outlet and
unscrew the inflating hose from
the tire valve. See Roadside
Assistance Program on
page 13‑5.
12. Press the on/off button (E) to turn the tire sealant and
compressor kit off.
Page 272 of 352
Black plate (64,1)Chevrolet Sonic Owner Manual - 2012
10-64 Vehicle Care
The tire is not sealed and will
continue to leak air until the
vehicle is driven and the
sealant is distributed in the tire.
Therefore, Steps 13 through
21 must be done immediately
after Step 12.
Be careful while handling the
tire sealant and compressor kit
as it could be warm after
usage.
13. Unplug the power plug (I) from the accessory power outlet in
the vehicle.
14. Turn the sealant/air hose (B) counterclockwise to remove it
from the tire valve stem.
15. Replace the tire valve stem cap.
16. Remove the tire sealant canister (D) from the slot on
top of the compressor (F). 17. Turn the air only hose (J)
counterclockwise to remove it
from the tire sealant canister
inlet valve (A).
18. Turn the sealant/air hose (B) clockwise onto the sealant
canister inlet valve (A) to
prevent sealant leakage.
19. Return the air only hose (J) and power plug (I) back to their
original storage location.
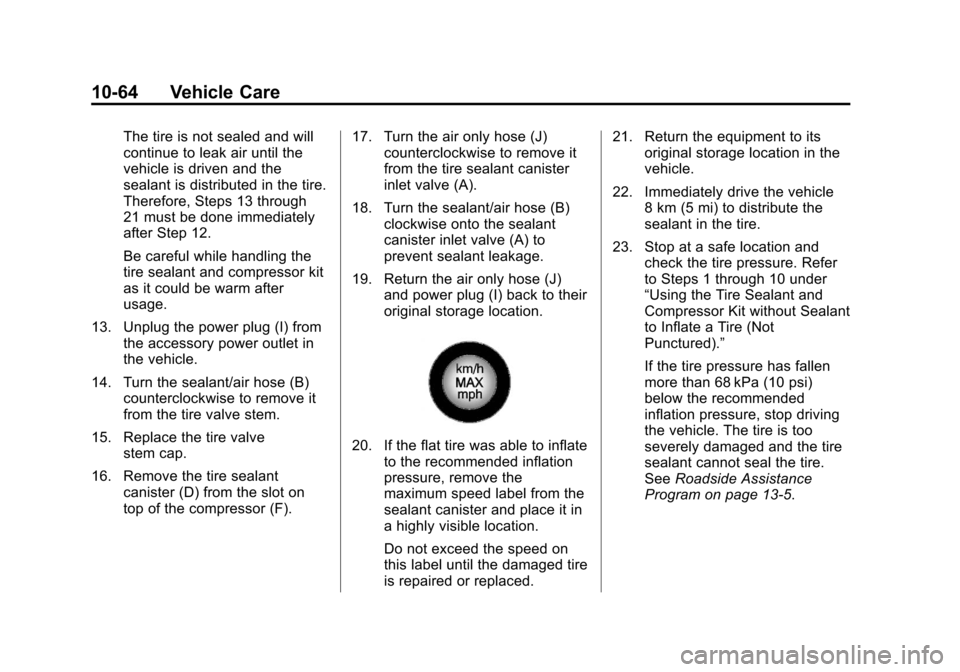
20. If the flat tire was able to inflateto the recommended inflation
pressure, remove the
maximum speed label from the
sealant canister and place it in
a highly visible location.
Do not exceed the speed on
this label until the damaged tire
is repaired or replaced. 21. Return the equipment to its
original storage location in the
vehicle.
22. Immediately drive the vehicle 8 km (5 mi) to distribute the
sealant in the tire.
23. Stop at a safe location and check the tire pressure. Refer
to Steps 1 through 10 under
“Using the Tire Sealant and
Compressor Kit without Sealant
to Inflate a Tire (Not
Punctured).”
If the tire pressure has fallen
more than 68 kPa (10 psi)
below the recommended
inflation pressure, stop driving
the vehicle. The tire is too
severely damaged and the tire
sealant cannot seal the tire.
SeeRoadside Assistance
Program on page 13‑5.
Page 274 of 352
Black plate (66,1)Chevrolet Sonic Owner Manual - 2012
10-66 Vehicle Care
SeeIf a Tire Goes Flat on
page 10‑58 for other important
safety warnings.
1. Remove the compressor from its storage location. See Storing the
Tire Sealant and Compressor Kit
on page 10‑67.
2. Remove the air only hose (J) and the power plug (I) from the
bottom of the compressor.
3. Place the compressor on the ground near the flat tire.
Make sure the tire valve stem is
positioned close to the ground
so the hose will reach it.
4. Remove the valve stem cap from the flat tire by turning it
counterclockwise.
5. Attach the air only hose (J) to the tire valve stem by turning it
clockwise until tight.
6. Plug the power plug (I) into the accessory power outlet in the
vehicle. Unplug all items from
other accessory power outlets.
See Power Outlets on page 5‑5. If the vehicle has an accessory
power outlet, do not use the
cigarette lighter.
If the vehicle only has a cigarette
lighter, use the cigarette lighter.
Do not pinch the power plug
cord in the door or window.
7. Start the vehicle. The vehicle must be running while using the
air compressor.
8. Press the on/off button (E) to turn the tire sealant and
compressor kit on.
The compressor will inflate the
tire with air only.
9. Inflate the tire to the recommended inflation pressure
using the pressure gauge (H).
The recommended inflation
pressure can be found on the
Tire and Loading Information
label. See Tire Pressure on
page 10‑45.
The pressure gauge (H) may
read higher than the actual tire
pressure while the compressor is on. Turn the compressor off to
get an accurate pressure
reading. The compressor may
be turned on/off until the correct
pressure is reached.
Notice: If the recommended
pressure cannot be reached after
approximately 25 minutes, the
vehicle should not be driven
farther. The tire is too severely
damaged and the tire sealant and
compressor kit cannot inflate the
tire. Remove the power plug from
the accessory power outlet and
unscrew the inflating hose from
the tire valve. See Roadside
Assistance Program on
page 13‑5.
10. Press the on/off button (E) to turn the tire sealant and
compressor kit off.
Be careful while handling the
compressor as it could be
warm after usage.
11. Unplug the power plug (I) from the accessory power outlet in
the vehicle.
Page 275 of 352
Black plate (67,1)Chevrolet Sonic Owner Manual - 2012
Vehicle Care 10-67
12. Turn the air only hose (J)counterclockwise to remove it
from the tire valve stem.
13. Replace the tire valve stem cap.
14. Return the air only hose (J) and power plug (I) back to their
original storage location.
15. Return the equipment to its original storage location in the
vehicle.
The tire sealant and compressor kit
has accessory adapters located in a
compartment on the bottom of its
housing that can be used to inflate
air mattresses, balls, etc.Storing the Tire Sealant
and Compressor Kit
The tire sealant and compressor kit
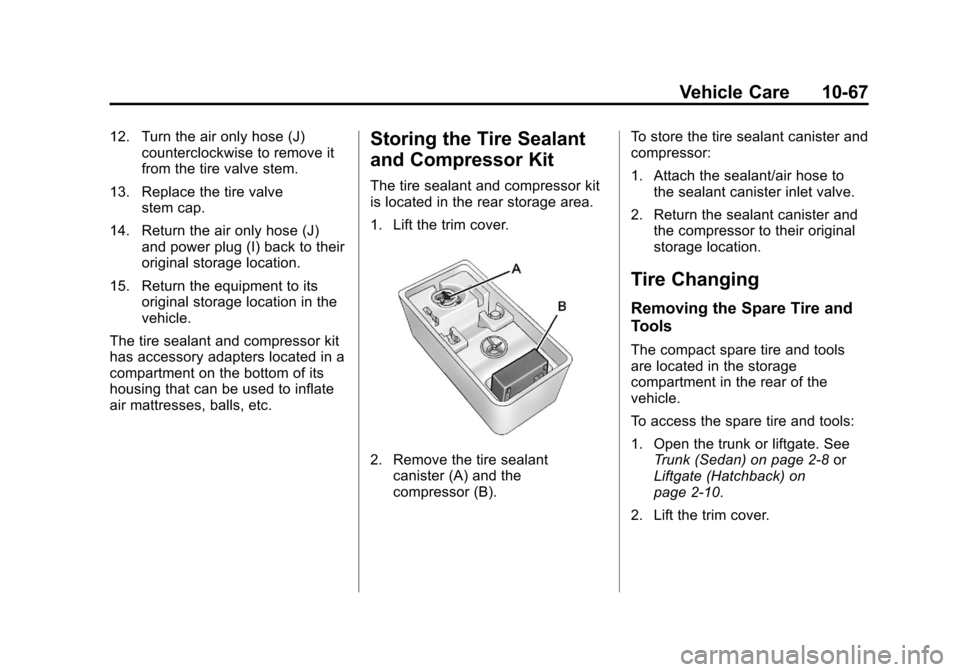
is located in the rear storage area.
1. Lift the trim cover.
2. Remove the tire sealant canister (A) and the
compressor (B). To store the tire sealant canister and
compressor:
1. Attach the sealant/air hose to
the sealant canister inlet valve.
2. Return the sealant canister and the compressor to their original
storage location.
Tire Changing
Removing the Spare Tire and
Tools
The compact spare tire and tools
are located in the storage
compartment in the rear of the
vehicle.
To access the spare tire and tools:
1. Open the trunk or liftgate. See
Trunk (Sedan) on page 2‑8 or
Liftgate (Hatchback) on
page 2‑10.
2. Lift the trim cover.
Page 276 of 352
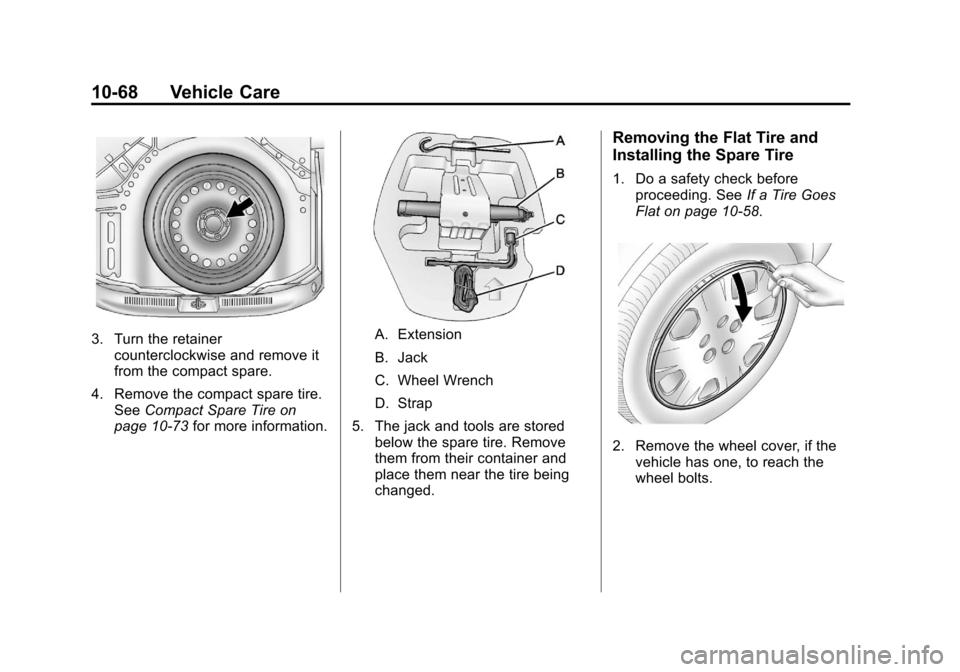
Black plate (68,1)Chevrolet Sonic Owner Manual - 2012
10-68 Vehicle Care
3. Turn the retainercounterclockwise and remove it
from the compact spare.
4. Remove the compact spare tire. See Compact Spare Tire on
page 10‑73 for more information.A. Extension
B. Jack
C. Wheel Wrench
D. Strap
5. The jack and tools are stored below the spare tire. Remove
them from their container and
place them near the tire being
changed.
Removing the Flat Tire and
Installing the Spare Tire
1. Do a safety check before
proceeding. See If a Tire Goes
Flat on page 10‑58.
2. Remove the wheel cover, if the vehicle has one, to reach the
wheel bolts.