clock CHEVROLET SONIC 2017 2.G Owners Manual
[x] Cancel search | Manufacturer: CHEVROLET, Model Year: 2017, Model line: SONIC, Model: CHEVROLET SONIC 2017 2.GPages: 342, PDF Size: 7.2 MB
Page 35 of 342
Chevrolet Sonic Owner Manual (GMNA-Localizing-U.S./Canada-10122660) -2017 - crc - 5/13/16
34 Keys, Doors, and Windows
Programming Transmitters to
the Vehicle
Only RKE transmitters programmedto the vehicle will work. If atransmitter is lost or stolen, areplacement can be purchased andprogrammed through your dealer.The vehicle can be reprogrammedso that lost or stolen transmitters nolonger work. Any remainingtransmitters will need to bereprogrammed. Each vehicle canhave up to eight transmittersmatched to it.
Programming with RecognizedTransmitters
Anewtransmittercanbeprogrammed to the vehicle whenthere are two recognizedtransmitters. To program, the vehiclemust be off and all of thetransmitters, both currentlyrecognized and new, must bewith you.
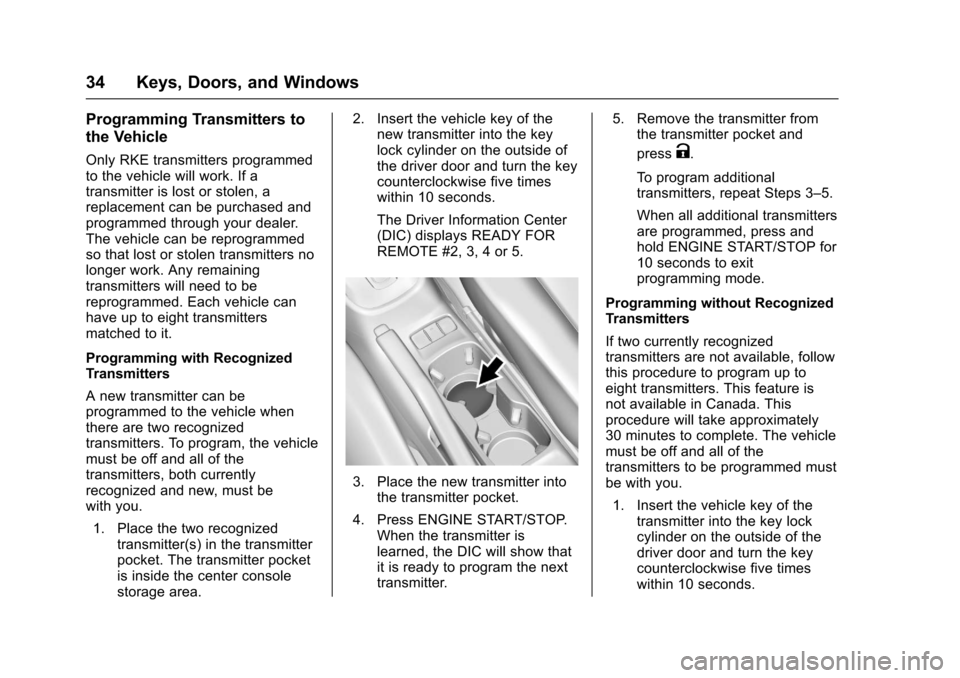
1. Place the two recognizedtransmitter(s) in the transmitterpocket. The transmitter pocketis inside the center consolestorage area.
2. Insert the vehicle key of thenew transmitter into the keylock cylinder on the outside ofthe driver door and turn the keycounterclockwise five timeswithin 10 seconds.
The Driver Information Center(DIC) displays READY FORREMOTE #2, 3, 4 or 5.
3. Place the new transmitter intothe transmitter pocket.
4. Press ENGINE START/STOP.When the transmitter islearned, the DIC will show thatit is ready to program the nexttransmitter.
5. Remove the transmitter fromthe transmitter pocket and
pressK.
To p r o g r a m a d d i t i o n a ltransmitters, repeat Steps 3–5.
When all additional transmittersare programmed, press andhold ENGINE START/STOP for10 seconds to exitprogramming mode.
Programming without RecognizedTransmitters
If two currently recognizedtransmitters are not available, followthis procedure to program up toeight transmitters. This feature isnot available in Canada. Thisprocedure will take approximately30 minutes to complete. The vehiclemust be off and all of thetransmitters to be programmed mustbe with you.
1. Insert the vehicle key of thetransmitter into the key lockcylinder on the outside of thedriver door and turn the keycounterclockwise five timeswithin 10 seconds.
Page 101 of 342
Chevrolet Sonic Owner Manual (GMNA-Localizing-U.S./Canada-10122660) -2017 - crc - 5/13/16
100 Instruments and Controls
Instruments and
Controls
Controls
Steering Wheel Adjustment . . . 101Steering Wheel Controls . . . . . . 101Heated Steering Wheel . . . . . . . 102Horn . . . . . . . . . . . . . . . . . . . . . . . . . . 102Windshield Wiper/Washer . . . . 102Rear Window Wiper/Washer . . . . . . . . . . . . . . . . . . . . . 103Compass . . . . . . . . . . . . . . . . . . . . . 104Clock . . . . . . . . . . . . . . . . . . . . . . . . . 104Power Outlets . . . . . . . . . . . . . . . . 105
Warning Lights, Gauges, and
Indicators
Warning Lights, Gauges, andIndicators . . . . . . . . . . . . . . . . . . . 106Instrument Cluster . . . . . . . . . . . . 107Speedometer . . . . . . . . . . . . . . . . . 109Odometer . . . . . . . . . . . . . . . . . . . . . 109Trip Odometer . . . . . . . . . . . . . . . . 109Ta c h o m e t e r . . . . . . . . . . . . . . . . . . . 1 0 9Fuel Gauge . . . . . . . . . . . . . . . . . . . 109Safety Belt Reminders . . . . . . . . 110Airbag Readiness Light . . . . . . . 110Passenger Airbag StatusIndicator . . . . . . . . . . . . . . . . . . . . . 111
Charging System Light . . . . . . . 112Malfunction Indicator Lamp(Check Engine Light) . . . . . . . . 112Service Vehicle Soon Light . . . 114Owner Manual Indicator . . . . . . 114Brake System WarningLight . . . . . . . . . . . . . . . . . . . . . . . . 114Antilock Brake System (ABS)Warning Light . . . . . . . . . . . . . . . 115Operate Pedal Light . . . . . . . . . . 115Up-Shift Light . . . . . . . . . . . . . . . . . 115Power Steering WarningLight . . . . . . . . . . . . . . . . . . . . . . . . 115Lane Departure Warning(LDW) Light . . . . . . . . . . . . . . . . . 116Forward Collision Alert (FCA)Warning Light . . . . . . . . . . . . . . . 116Vehicle Ahead Indicator . . . . . . . 116Ultrasonic Parking SensorLight . . . . . . . . . . . . . . . . . . . . . . . . 116Traction Off Light . . . . . . . . . . . . . 117StabiliTrak®OFF Light . . . . . . . . 117Traction Control System (TCS)/StabiliTrak®Light . . . . . . . . . . . . 117Engine Coolant TemperatureWarning Light . . . . . . . . . . . . . . . 118Tire Pressure Light . . . . . . . . . . . 118Engine Oil Pressure Light . . . . . 118Low Fuel Warning Light . . . . . . . 119Immobilizer Light . . . . . . . . . . . . . 119
Reduced Engine PowerLight . . . . . . . . . . . . . . . . . . . . . . . . 120High-Beam On Light . . . . . . . . . . 120Front Fog Lamp Light . . . . . . . . . 120Lamps On Reminder . . . . . . . . . 120Cruise Control Light . . . . . . . . . . 120Door Ajar Light . . . . . . . . . . . . . . . 121Trunk Ajar Light . . . . . . . . . . . . . . 121
Information Displays
Driver InformationCenter (DIC) . . . . . . . . . . . . . . . . 121
Vehicle Messages
Vehicle Messages . . . . . . . . . . . . 126Engine Oil Messages . . . . . . . . . 127Tire Messages . . . . . . . . . . . . . . . . 127
Vehicle Personalization
Vehicle Personalization . . . . . . . 127
Page 105 of 342
Chevrolet Sonic Owner Manual (GMNA-Localizing-U.S./Canada-10122660) -2017 - crc - 5/13/16
104 Instruments and Controls
in R (Reverse), and the frontwindshield wiper is performing lowor high speed wipes. If the rearwiper control is off, the shift lever isin R (Reverse), and the frontwindshield wiper is performinginterval wipes, then the rear wiperautomatically performs intervalwipes.
This feature can be changed. SeeVehicle Personalization0127.
The windshield washer reservoir isused for the windshield and the rearwindow. Check the fluid level in thereservoir if either washer is notworking. SeeWasher Fluid0231.
Compass
The vehicle may have a compassdisplay in the Driver InformationCenter (DIC). The compass receivesits heading and other informationfrom the Global PositioningSystem (GPS) antenna, StabiliTrak,and vehicle speed information.
Avoid covering the GPS antenna,located on the roof, for long periodsof time with objects that mayinterfere with the antenna's ability to
receive a satellite signal. Thecompass system is designed tooperate for a certain number ofmiles or degrees of turn beforeneeding a signal from the GPSsatellites. When the compassdisplay shows CAL, drive thevehicle for a short distance in anopen area where it can receive aGPS signal. The compass systemwill automatically determine whenthe GPS signal is restored andprovide a heading again.
Clock
The infotainment system controlsare used to access the time anddate settings through the menusystem. SeeOperation0144onhow to use the menu system.
Setting the Time and Date
When Auto Set is enabled the timecannot be manually set.
1. Press{,thentouch
SETTINGS.
2. Touch Time and Date, then SetTime or Set Date.
3. Touch + or✓to adjust thevalue.
4. TouchRorQto adjust AM or
PM for 12 hour format.
5. Touch0.
Using Auto Set
Auto Set requires an OnStarsubscription.
1. Press{,thentouch
SETTINGS.
2. Touch Time and Date, thenAuto Set.
3. Select from the availableselections.
4. Touch0.
Setting the 12/24 Hour Format
1. Press{,thentouch
SETTINGS.
2. Touch Time and Date, then SetTime Format.
3. Select 12h or 24h format.
4. Touch0.
Page 129 of 342
Chevrolet Sonic Owner Manual (GMNA-Localizing-U.S./Canada-10122660) -2017 - crc - 5/13/16
128 Instruments and Controls
Personalization Menus
The following list of menu items maybe available:
.Time and Date
.Language
.Va l e t M o d e
.Radio
.Vehicle
.Bluetooth
.Apple CarPlay
.Android Auto
.USB Auto Launch
.Turn Display Off
.Rear Camera
.Return to Factory Settings
.Software Information
Detailed information for each menufollows.
Time and Date
Manually set the time and date. SeeClock0104.
Language
Select Language, then select fromthe available language(s).
The selected language will displayon the system, and voicerecognition will reflect the selectedlanguage.
Valet Mode (If Equipped)
This will lock the infotainmentsystem and steering wheel controls.It may also limit access to vehiclestorage locations (if equipped).
To e n a b l e v a l e t m o d e :
1. Enter a four-digit code on thekeypad.
2. Select Enter to go to theconfirmation screen.
3. Re-enter the four-digit code.
To u c h L O C K o r U N L O C K t o l o c k o runlock the system. Touch Back togo back to the previous menu.
Radio
Press and the following maydisplay:
.Manage Favorites
.Number of Favorites Shown
.Audible Touch Feedback
.Te x t S c r o l l
.To n e S e t t i n g s
.Auto Volume
.Maximum Startup Volume
.Audio Cue Volume
Manage Favorites
This allows favorites to be edited.See“Storing a Station as aFavorite”inAM-FM Radio0145.
Number of Favorites Shown
Press to set the number of favoritesto display.
Select the desired number or selectAuto and the infotainment systemwill automatically adjust the numberof favorites shown.
Audible Touch Feedback
This allows Audible TouchFeedback to be turned on or off.
Select Off or On.
Page 155 of 342
Chevrolet Sonic Owner Manual (GMNA-Localizing-U.S./Canada-10122660) -2017 - crc - 5/13/16
154 Infotainment System
Browse Music
1. Touch Browse Music.
2. Touch the desired music.
To n e S e t t i n g s
To u c h To n e S e t t i n g s . T h e To n eSettings menu is displayed. See“To n e S e t t i n g s”under“RadioControls”inOperation0144
Auto Volume
To u c h A u t o V o l u m e . T h e A u t oVolume menu is displayed. See“Auto Volume”under“RadioControls”inOperation0144.
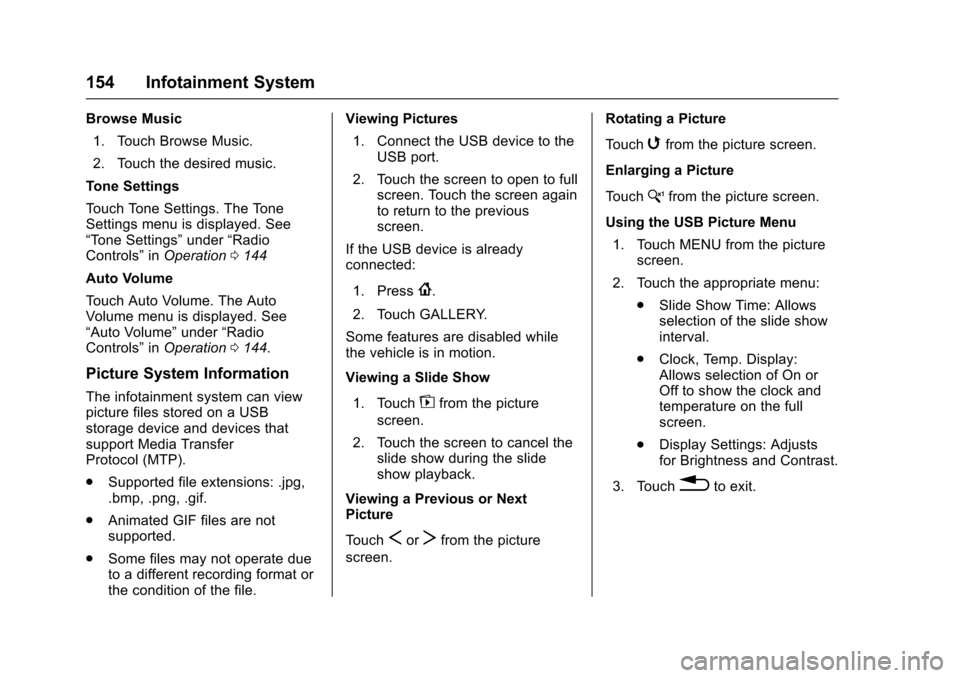
Picture System Information
The infotainment system can viewpicture files stored on a USBstorage device and devices thatsupport Media TransferProtocol (MTP).
.Supported file extensions: .jpg,.bmp, .png, .gif.
.Animated GIF files are notsupported.
.Some files may not operate dueto a different recording format orthe condition of the file.
Viewing Pictures
1. Connect the USB device to theUSB port.
2. Touch the screen to open to fullscreen. Touch the screen againto return to the previousscreen.
If the USB device is alreadyconnected:
1. Press{.
2. Touch GALLERY.
Some features are disabled whilethe vehicle is in motion.
Viewing a Slide Show
1. Touchzfrom the picture
screen.
2. Touch the screen to cancel theslide show during the slideshow playback.
Viewing a Previous or NextPicture
To u c hSorTfrom the picture
screen.
Rotating a Picture
To u c hwfrom the picture screen.
Enlarging a Picture
To u c hxfrom the picture screen.
Using the USB Picture Menu
1. Touch MENU from the picturescreen.
2. Touch the appropriate menu:
.Slide Show Time: Allowsselection of the slide showinterval.
.Clock, Temp. Display:Allows selection of On orOff to show the clock andtemperature on the fullscreen.
.Display Settings: Adjustsfor Brightness and Contrast.
3. Touch0to exit.
Page 167 of 342
Chevrolet Sonic Owner Manual (GMNA-Localizing-U.S./Canada-10122660) -2017 - crc - 5/13/16
166 Climate Controls
Climate Controls
Climate Control Systems
Climate Control Systems . . . . . 166
Air Vents
Air Vents . . . . . . . . . . . . . . . . . . . . . 168
Maintenance
Air Intake . . . . . . . . . . . . . . . . . . . . . 169Passenger Compartment AirFilter . . . . . . . . . . . . . . . . . . . . . . . . 169Service . . . . . . . . . . . . . . . . . . . . . . . 169
Climate Control
Systems
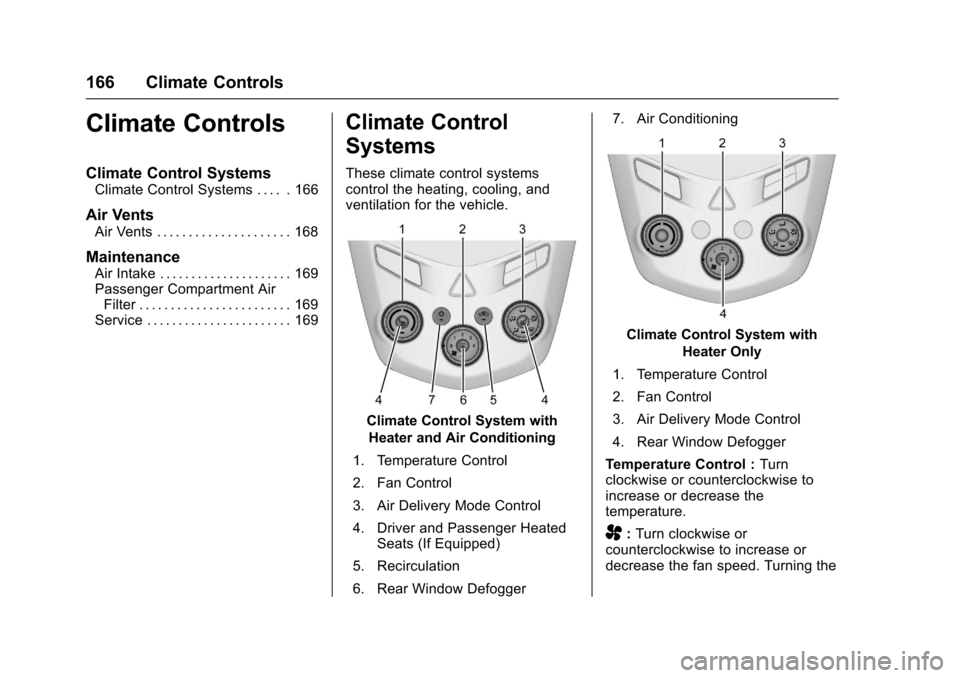
These climate control systemscontrol the heating, cooling, andventilation for the vehicle.
Climate Control System with
Heater and Air Conditioning
1. Temperature Control
2. Fan Control
3. Air Delivery Mode Control
4. Driver and Passenger HeatedSeats (If Equipped)
5. Recirculation
6. Rear Window Defogger
7. Air Conditioning
Climate Control System with
Heater Only
1. Temperature Control
2. Fan Control
3. Air Delivery Mode Control
4. Rear Window Defogger
Te m p e r a t u r e C o n t r o l :Turnclockwise or counterclockwise toincrease or decrease thetemperature.
A:Turn clockwise orcounterclockwise to increase ordecrease the fan speed. Turning the
Page 168 of 342
Chevrolet Sonic Owner Manual (GMNA-Localizing-U.S./Canada-10122660) -2017 - crc - 5/13/16
Climate Controls 167
fan control to 0 turns the fan off. Thefan must be turned on to run the airconditioning compressor.
Air Delivery Mode Control :Turnclockwise or counterclockwise tochange the current airflow mode.
Select from the following air deliverymodes:
Y:Air is directed to the instrumentpanel outlets.
\:Air is divided between theinstrument panel and floor outlets.
[:Air is directed to the flooroutlets, with some air directed to therear outlets.
W:This mode clears the windowsof fog or moisture. Air is directed tothe floor, windshield, and sidewindow outlets.
1:This mode clears thewindshield of fog or frost morequickly. Air is directed to thewindshield and side window outlets.
Do not drive the vehicle until allwindows are clear.
In defrost or defog mode, excessiveair conditioning use can cause thewindows to fog. If this happens,
change the air delivery mode toY
and reduce the fan speed.
#:If equipped with airconditioning, follow these steps to
use the system. TurnAto the
desired speed. The air conditioningdoes not operate when the fancontrol knob is in the off position.
Press#to turn the air conditioning
on and off. When#is pressed, an
indicator light comes on to showthat the air conditioning is on.
For quick cool down on hot days:
1. Open the windows to let hot airescape.
2. PressM.
3. Press#.
4. Select the coolest temperature.
5. Select the highestAspeed.
Using these settings together forlong periods of time may cause theair inside the vehicle to become too
dry. To prevent this from happening,after the air in the vehicle hascooled, turn the recirculationmode off.
M:This mode recirculates andhelps to quickly cool the air insidethe vehicle. It can be used to reducethe entry of outside air and odors.
Press the button to turn therecirculation mode on. An indicatorlight comes on to show that therecirculation is on. Press the buttonagain to return to outside air mode.
Using the recirculation mode forextended periods may cause thewindows to fog. If this happens,select the defrost mode.
Max#is available when the air
conditioning is selected and thetemperature is set to the coolestsetting while the outside air
temperature is warm. When Max#
is activated, the air inside thevehicle is automatically recirculated,which helps to quickly cool thevehicle. The recirculation indicatorwill not be lit.
Page 169 of 342
Chevrolet Sonic Owner Manual (GMNA-Localizing-U.S./Canada-10122660) -2017 - crc - 5/13/16
168 Climate Controls
To a l l o w o u t s i d e a i r t o e n t e r i n t h e s econditions, press the recirculationbutton twice. The recirculationindicator will not be lit.
MorL:If equipped, press to heatthe driver or passenger seat. SeeHeated Front Seats056.
Rear Window and Outside
Mirror Defogger
1:Press to turn the rear windowand outside mirror defogger on oroff. An indicator light comes on toshow that the feature is on.
The rear window defogger can be
turned off by pressing1again or
by turning the ignition to ACC/ACCESSORY or LOCK/OFF.
If equipped with heated outsiderearview mirrors, they turn on withthe rear window defogger and helpto clear fog or frost from the surfaceof the mirror. SeeHeatedMirrors047.
Caution
Using a razor blade or sharp
object on the inside rear window
can damage the antenna or
defogger. Repairs would not be
covered by the vehicle warranty.
Do not stick anything to the rear
window.
Air Vents
Use the air vents located in thecenter and on the side of theinstrument panel to direct theairflow. Move the slats on the centerair vents to direct airflow.
Turn the knobs on the side air ventscounterclockwise or clockwise toopen or close off the airflow.
Operation Tips
.Clear away any ice, snow,or leaves from the air inlets atthe base of the windshield thatmay block the flow of air into thevehicle.
.Use of non-GM approved hooddeflectors may adversely affectthe performance of the system.
.Keep the path under the frontseats clear of objects to helpcirculate the air inside thevehicle more effectively.
Page 210 of 342
Chevrolet Sonic Owner Manual (GMNA-Localizing-U.S./Canada-10122660) -2017 - crc - 5/13/16
Driving and Operating 209
gasoline additive recommended byGeneral Motors. It is available atyour dealer.
Filling the Tank
{Warning
Fuel vapors and fuel fires burn
violently and can cause injury or
death.
.To h e l p a v o i d i n j u r i e s t o y o uand others, read and followall the instructions on thefuel pump island.
.Turn off the engine whenrefueling.
.Keep sparks, flames, andsmoking materials awayfrom fuel.
.Do not leave the fuel pumpunattended.
.Do not use a cell phonewhile refueling.
.Do not re-enter the vehiclewhile pumping fuel.
(Continued)
Warning (Continued)
.Keep children away fromthe fuel pump and never letchildren pump fuel.
.Fuel can spray out if the fuelcap is opened too quickly.This spray can happen if thetank is nearly full, and ismore likely in hot weather.Open the fuel cap slowlyand wait for any hiss noiseto stop, then unscrew thecap all the way.
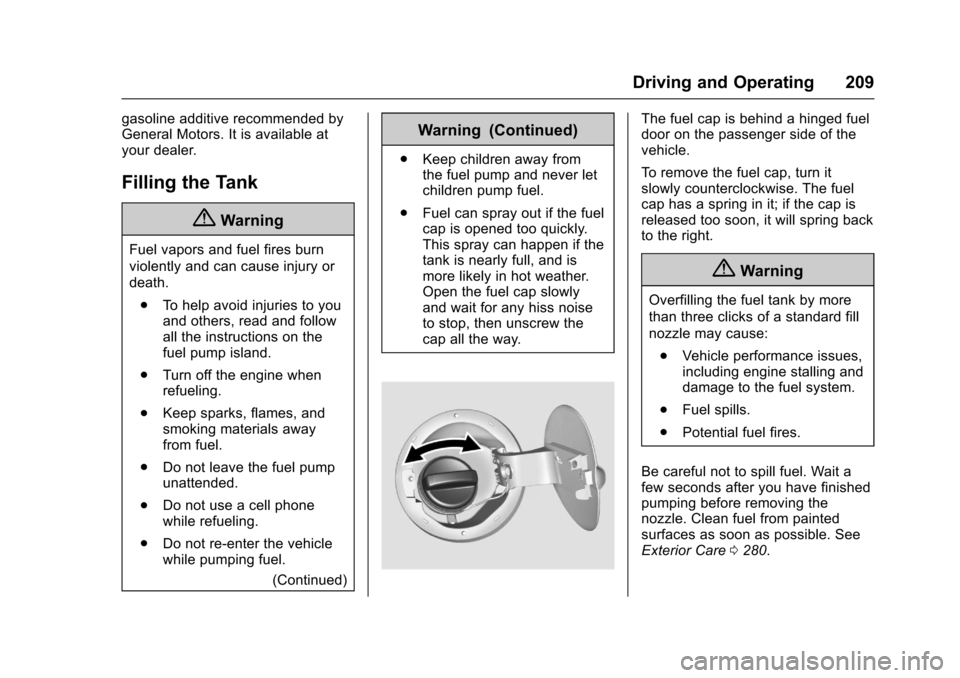
The fuel cap is behind a hinged fueldoor on the passenger side of thevehicle.
To r e m o v e t h e f u e l c a p , t u r n i tslowly counterclockwise. The fuelcap has a spring in it; if the cap isreleased too soon, it will spring backto the right.
{Warning
Overfilling the fuel tank by more
than three clicks of a standard fill
nozzle may cause:
.Vehicle performance issues,including engine stalling anddamage to the fuel system.
.Fuel spills.
.Potential fuel fires.
Be careful not to spill fuel. Wait afew seconds after you have finishedpumping before removing thenozzle. Clean fuel from paintedsurfaces as soon as possible. SeeExterior Care0280.
Page 211 of 342
Chevrolet Sonic Owner Manual (GMNA-Localizing-U.S./Canada-10122660) -2017 - crc - 5/13/16
210 Driving and Operating
When replacing the fuel cap, turn itclockwise until it clicks. Make surethe cap is fully installed. Thediagnostic system can determine ifthe fuel cap has been left off orimproperly installed. This wouldallow fuel to evaporate into theatmosphere. SeeMalfunctionIndicator Lamp (Check EngineLight)011 2.
{Warning
If a fire starts while you are
refueling, do not remove the
nozzle. Shut off the flow of fuel by
shutting off the pump or by
notifying the station attendant.
Leave the area immediately.
Caution
If a new fuel cap is needed, be
sure to get the right type of cap
from your dealer. The wrong type
of fuel cap may not fit properly,
may cause the malfunction
(Continued)
Caution (Continued)
indicator lamp to light, and could
damage the fuel tank and
emissions system. See
Malfunction Indicator Lamp
(Check Engine Light)011 2.
Filling a Portable Fuel
Container
{Warning
Filling a portable fuel container
while it is in the vehicle can cause
fuel vapors that can ignite either
by static electricity or other
means. You or others could be
badly burned and the vehicle
could be damaged. Always:
.Use approved fuelcontainers.
.Remove the container fromthe vehicle, trunk, or pickupbed before filling.
(Continued)
Warning (Continued)
.Place the container on theground.
.Place the nozzle inside thefill opening of the containerbefore dispensing fuel, andkeep it in contact with the fillopening until filling iscomplete.
.Fill the container no morethan 95% full to allow forexpansion.
.Do not smoke, lightmatches, or use lighterswhile pumping fuel.
.Avoid using cell phones orother electronic devices.