spare wheel CHEVROLET SONIC 2020 Owner's Manual
[x] Cancel search | Manufacturer: CHEVROLET, Model Year: 2020, Model line: SONIC, Model: CHEVROLET SONIC 2020Pages: 329, PDF Size: 5.56 MB
Page 203 of 329
Chevrolet Sonic Owner Manual (GMNA-Localizing-U.S./Canada-13566834) -
2020 - CRC - 10/4/19
202 Vehicle Care
Vehicle Care
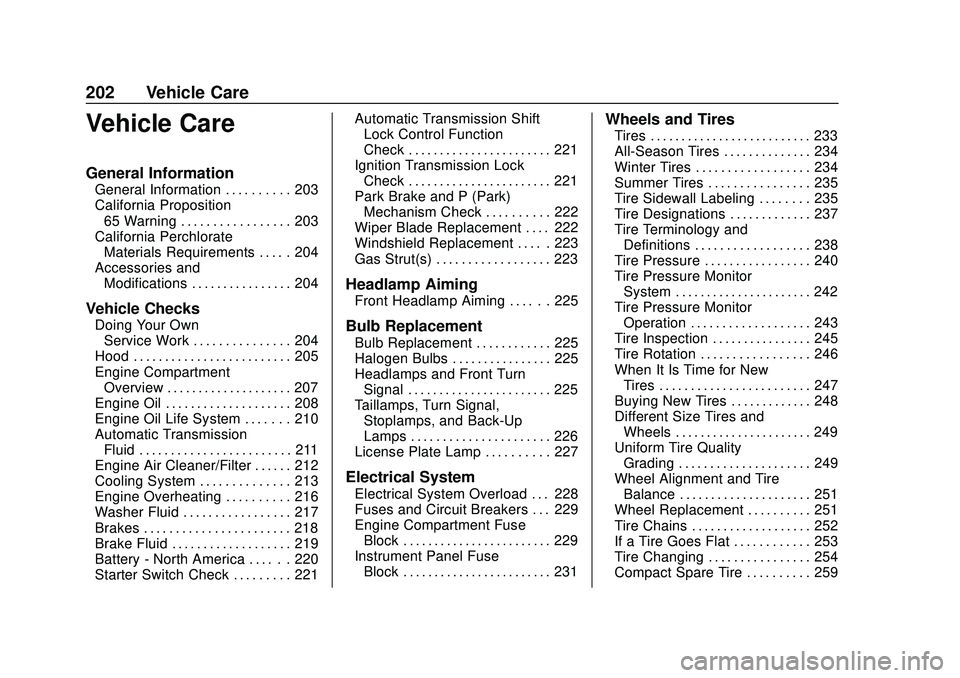
General Information
General Information . . . . . . . . . . 203
California Proposition65 Warning . . . . . . . . . . . . . . . . . 203
California Perchlorate Materials Requirements . . . . . 204
Accessories and Modifications . . . . . . . . . . . . . . . . 204
Vehicle Checks
Doing Your OwnService Work . . . . . . . . . . . . . . . 204
Hood . . . . . . . . . . . . . . . . . . . . . . . . . 205
Engine Compartment Overview . . . . . . . . . . . . . . . . . . . . 207
Engine Oil . . . . . . . . . . . . . . . . . . . . 208
Engine Oil Life System . . . . . . . 210
Automatic Transmission Fluid . . . . . . . . . . . . . . . . . . . . . . . . 211
Engine Air Cleaner/Filter . . . . . . 212
Cooling System . . . . . . . . . . . . . . 213
Engine Overheating . . . . . . . . . . 216
Washer Fluid . . . . . . . . . . . . . . . . . 217
Brakes . . . . . . . . . . . . . . . . . . . . . . . 218
Brake Fluid . . . . . . . . . . . . . . . . . . . 219
Battery - North America . . . . . . 220
Starter Switch Check . . . . . . . . . 221 Automatic Transmission Shift
Lock Control Function
Check . . . . . . . . . . . . . . . . . . . . . . . 221
Ignition Transmission Lock Check . . . . . . . . . . . . . . . . . . . . . . . 221
Park Brake and P (Park) Mechanism Check . . . . . . . . . . 222
Wiper Blade Replacement . . . . 222
Windshield Replacement . . . . . 223
Gas Strut(s) . . . . . . . . . . . . . . . . . . 223
Headlamp Aiming
Front Headlamp Aiming . . . . . . 225
Bulb Replacement
Bulb Replacement . . . . . . . . . . . . 225
Halogen Bulbs . . . . . . . . . . . . . . . . 225
Headlamps and Front Turn Signal . . . . . . . . . . . . . . . . . . . . . . . 225
Taillamps, Turn Signal, Stoplamps, and Back-Up
Lamps . . . . . . . . . . . . . . . . . . . . . . 226
License Plate Lamp . . . . . . . . . . 227
Electrical System
Electrical System Overload . . . 228
Fuses and Circuit Breakers . . . 229
Engine Compartment Fuse Block . . . . . . . . . . . . . . . . . . . . . . . . 229
Instrument Panel Fuse Block . . . . . . . . . . . . . . . . . . . . . . . . 231
Wheels and Tires
Tires . . . . . . . . . . . . . . . . . . . . . . . . . . 233
All-Season Tires . . . . . . . . . . . . . . 234
Winter Tires . . . . . . . . . . . . . . . . . . 234
Summer Tires . . . . . . . . . . . . . . . . 235
Tire Sidewall Labeling . . . . . . . . 235
Tire Designations . . . . . . . . . . . . . 237
Tire Terminology andDefinitions . . . . . . . . . . . . . . . . . . 238
Tire Pressure . . . . . . . . . . . . . . . . . 240
Tire Pressure Monitor System . . . . . . . . . . . . . . . . . . . . . . 242
Tire Pressure Monitor Operation . . . . . . . . . . . . . . . . . . . 243
Tire Inspection . . . . . . . . . . . . . . . . 245
Tire Rotation . . . . . . . . . . . . . . . . . 246
When It Is Time for New Tires . . . . . . . . . . . . . . . . . . . . . . . . 247
Buying New Tires . . . . . . . . . . . . . 248
Different Size Tires and Wheels . . . . . . . . . . . . . . . . . . . . . . 249
Uniform Tire Quality Grading . . . . . . . . . . . . . . . . . . . . . 249
Wheel Alignment and Tire Balance . . . . . . . . . . . . . . . . . . . . . 251
Wheel Replacement . . . . . . . . . . 251
Tire Chains . . . . . . . . . . . . . . . . . . . 252
If a Tire Goes Flat . . . . . . . . . . . . 253
Tire Changing . . . . . . . . . . . . . . . . 254
Compact Spare Tire . . . . . . . . . . 259
Page 233 of 329
Chevrolet Sonic Owner Manual (GMNA-Localizing-U.S./Canada-13566834) -
2020 - CRC - 10/4/19
232 Vehicle Care
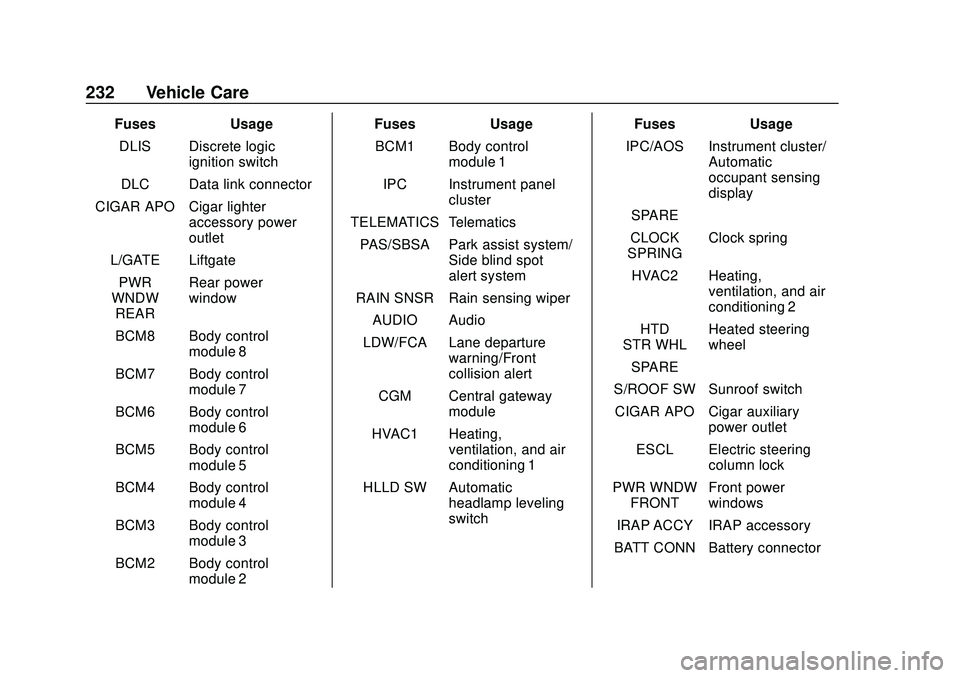
FusesUsage
DLIS Discrete logic ignition switch
DLC Data link connector
CIGAR APO Cigar lighter accessory power
outlet
L/GATE Liftgate PWR
WNDW REAR Rear power
window
BCM8 Body control module 8
BCM7 Body control module 7
BCM6 Body control module 6
BCM5 Body control module 5
BCM4 Body control module 4
BCM3 Body control module 3
BCM2 Body control module 2 Fuses
Usage
BCM1 Body control module 1
IPC Instrument panel cluster
TELEMATICS Telematics PAS/SBSA Park assist system/ Side blind spot
alert system
RAIN SNSR Rain sensing wiper AUDIO Audio
LDW/FCA Lane departure warning/Front
collision alert
CGM Central gateway module
HVAC1 Heating, ventilation, and air
conditioning 1
HLLD SW Automatic headlamp leveling
switch Fuses
Usage
IPC/AOS Instrument cluster/ Automatic
occupant sensing
display
SPARE –
CLOCK
SPRING Clock spring
HVAC2 Heating, ventilation, and air
conditioning 2
HTD
STR WHL Heated steering
wheel
SPARE –
S/ROOF SW Sunroof switch CIGAR APO Cigar auxiliary power outlet
ESCL Electric steering column lock
PWR WNDW FRONT Front power
windows
IRAP ACCY IRAP accessory
BATT CONN Battery connector
Page 243 of 329
Chevrolet Sonic Owner Manual (GMNA-Localizing-U.S./Canada-13566834) -
2020 - CRC - 10/4/19
242 Vehicle Care
Tire Pressure Monitor
System
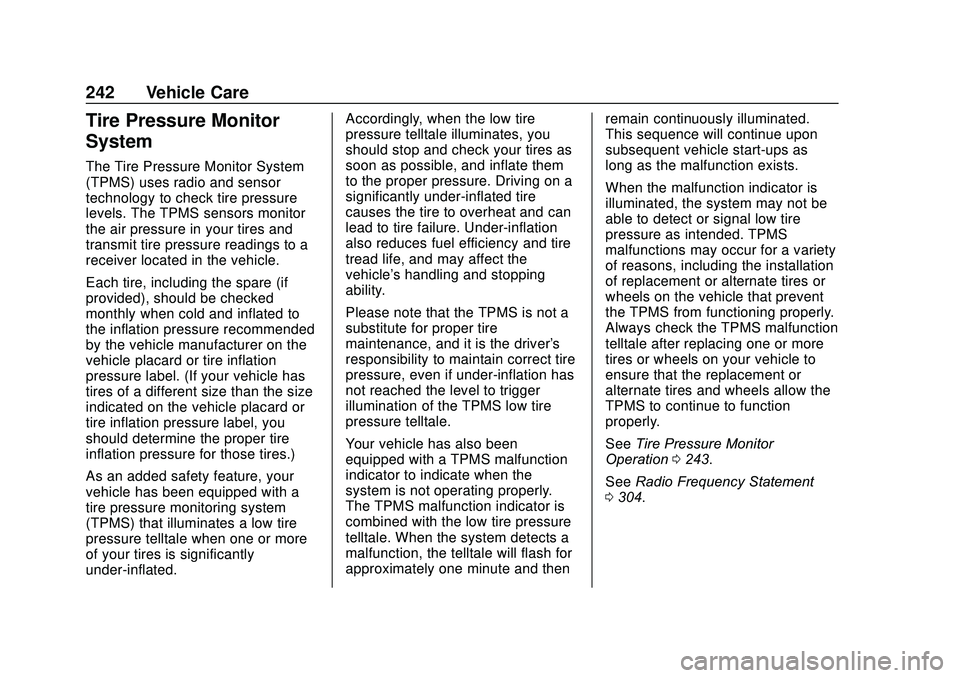
The Tire Pressure Monitor System
(TPMS) uses radio and sensor
technology to check tire pressure
levels. The TPMS sensors monitor
the air pressure in your tires and
transmit tire pressure readings to a
receiver located in the vehicle.
Each tire, including the spare (if
provided), should be checked
monthly when cold and inflated to
the inflation pressure recommended
by the vehicle manufacturer on the
vehicle placard or tire inflation
pressure label. (If your vehicle has
tires of a different size than the size
indicated on the vehicle placard or
tire inflation pressure label, you
should determine the proper tire
inflation pressure for those tires.)
As an added safety feature, your
vehicle has been equipped with a
tire pressure monitoring system
(TPMS) that illuminates a low tire
pressure telltale when one or more
of your tires is significantly
under-inflated.Accordingly, when the low tire
pressure telltale illuminates, you
should stop and check your tires as
soon as possible, and inflate them
to the proper pressure. Driving on a
significantly under-inflated tire
causes the tire to overheat and can
lead to tire failure. Under-inflation
also reduces fuel efficiency and tire
tread life, and may affect the
vehicle's handling and stopping
ability.
Please note that the TPMS is not a
substitute for proper tire
maintenance, and it is the driver's
responsibility to maintain correct tire
pressure, even if under-inflation has
not reached the level to trigger
illumination of the TPMS low tire
pressure telltale.
Your vehicle has also been
equipped with a TPMS malfunction
indicator to indicate when the
system is not operating properly.
The TPMS malfunction indicator is
combined with the low tire pressure
telltale. When the system detects a
malfunction, the telltale will flash for
approximately one minute and then
remain continuously illuminated.
This sequence will continue upon
subsequent vehicle start-ups as
long as the malfunction exists.
When the malfunction indicator is
illuminated, the system may not be
able to detect or signal low tire
pressure as intended. TPMS
malfunctions may occur for a variety
of reasons, including the installation
of replacement or alternate tires or
wheels on the vehicle that prevent
the TPMS from functioning properly.
Always check the TPMS malfunction
telltale after replacing one or more
tires or wheels on your vehicle to
ensure that the replacement or
alternate tires and wheels allow the
TPMS to continue to function
properly.
See
Tire Pressure Monitor
Operation 0243.
See Radio Frequency Statement
0 304.
Page 244 of 329
Chevrolet Sonic Owner Manual (GMNA-Localizing-U.S./Canada-13566834) -
2020 - CRC - 10/4/19
Vehicle Care 243
Tire Pressure Monitor
Operation
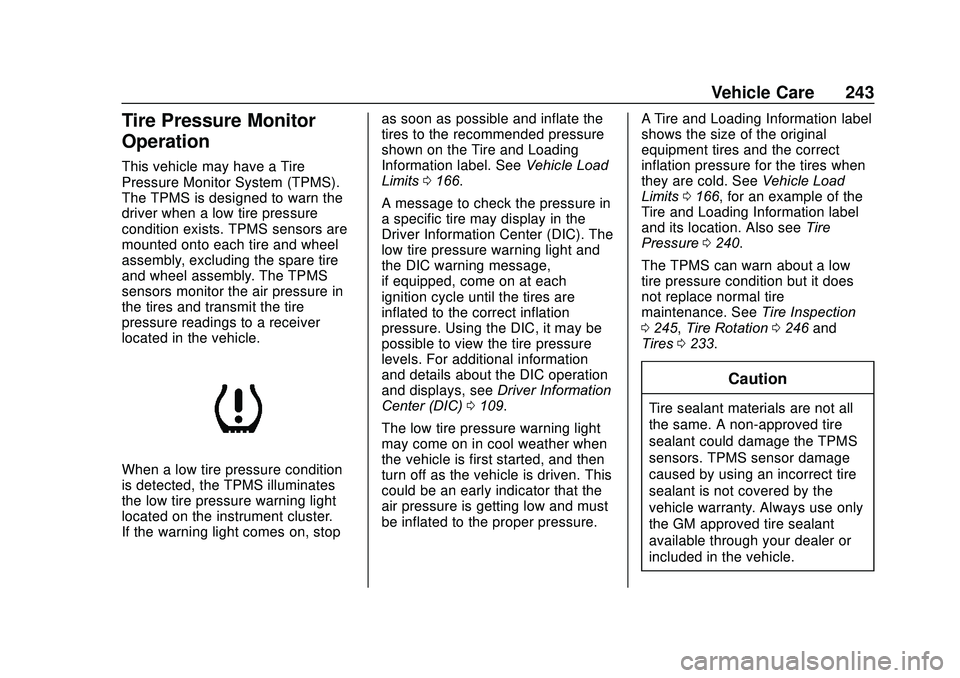
This vehicle may have a Tire
Pressure Monitor System (TPMS).
The TPMS is designed to warn the
driver when a low tire pressure
condition exists. TPMS sensors are
mounted onto each tire and wheel
assembly, excluding the spare tire
and wheel assembly. The TPMS
sensors monitor the air pressure in
the tires and transmit the tire
pressure readings to a receiver
located in the vehicle.
When a low tire pressure condition
is detected, the TPMS illuminates
the low tire pressure warning light
located on the instrument cluster.
If the warning light comes on, stopas soon as possible and inflate the
tires to the recommended pressure
shown on the Tire and Loading
Information label. See
Vehicle Load
Limits 0166.
A message to check the pressure in
a specific tire may display in the
Driver Information Center (DIC). The
low tire pressure warning light and
the DIC warning message,
if equipped, come on at each
ignition cycle until the tires are
inflated to the correct inflation
pressure. Using the DIC, it may be
possible to view the tire pressure
levels. For additional information
and details about the DIC operation
and displays, see Driver Information
Center (DIC) 0109.
The low tire pressure warning light
may come on in cool weather when
the vehicle is first started, and then
turn off as the vehicle is driven. This
could be an early indicator that the
air pressure is getting low and must
be inflated to the proper pressure. A Tire and Loading Information label
shows the size of the original
equipment tires and the correct
inflation pressure for the tires when
they are cold. See
Vehicle Load
Limits 0166, for an example of the
Tire and Loading Information label
and its location. Also see Tire
Pressure 0240.
The TPMS can warn about a low
tire pressure condition but it does
not replace normal tire
maintenance. See Tire Inspection
0 245, Tire Rotation 0246 and
Tires 0233.
Caution
Tire sealant materials are not all
the same. A non-approved tire
sealant could damage the TPMS
sensors. TPMS sensor damage
caused by using an incorrect tire
sealant is not covered by the
vehicle warranty. Always use only
the GM approved tire sealant
available through your dealer or
included in the vehicle.
Page 245 of 329
Chevrolet Sonic Owner Manual (GMNA-Localizing-U.S./Canada-13566834) -
2020 - CRC - 10/4/19
244 Vehicle Care
TPMS Malfunction Light
The TPMS will not function properly
if one or more of the TPMS sensors
are missing or inoperable. When the
system detects a malfunction, the
low tire pressure warning light
flashes for about one minute and
then stays on for the remainder of
the ignition cycle. The malfunction
light comes on at each ignition cycle
until the problem is corrected. Some
of the conditions that can cause this
to come on are:
.One of the road tires has been
replaced with the spare tire. The
spare tire does not have a
TPMS sensor. The malfunction
light should go off after the road
tire is replaced and the sensor
matching process is performed
successfully. See "TPMS Sensor
Matching Process" later in this
section.
. The TPMS sensor matching
process was not done or not
completed successfully after
rotating the tires. The
malfunction light should go off
after successfully completing the sensor matching process. See
"TPMS Sensor Matching
Process" later in this section.
. One or more TPMS sensors are
missing or damaged. The
malfunction light should go off
when the TPMS sensors are
installed and the sensor
matching process is performed
successfully. See your dealer for
service.
. Replacement tires or wheels do
not match the original equipment
tires or wheels. Tires and wheels
other than those recommended
could prevent the TPMS from
functioning properly. See Buying
New Tires 0248.
. Operating electronic devices or
being near facilities using radio
wave frequencies similar to the
TPMS could cause the TPMS
sensors to malfunction.
If the TPMS is not functioning
properly, it cannot detect or signal a
low tire pressure condition. See
your dealer for service if the TPMS
malfunction light comes on and
stays on.
TPMS Sensor Matching
Process
Each TPMS sensor has a unique
identification code. The identification
code needs to be matched to a new
tire/wheel position after rotating the
tires or replacing one or more of the
TPMS sensors. The TPMS sensor
matching process should also be
performed after replacing a spare
tire with a road tire containing the
TPMS sensor. The malfunction light
should go off at the next ignition
cycle. The sensors are matched to
the tire/wheel positions, using a
TPMS relearn tool, in the following
order: driver side front tire,
passenger side front tire, passenger
side rear tire, and driver side rear.
See your dealer for service or to
purchase a relearn tool. A TPMS
relearn tool can also be purchased.
See Tire Pressure Monitor
Sensor Activation Tool at
www.gmtoolsandequipment.com or
call 1-800-GM TOOLS
(1-800-468-6657).
Page 246 of 329
Chevrolet Sonic Owner Manual (GMNA-Localizing-U.S./Canada-13566834) -
2020 - CRC - 10/4/19
Vehicle Care 245
There are two minutes to match the
first tire/wheel position, and
five minutes overall to match all four
tire/wheel positions. If it takes
longer, the matching process stops
and must be restarted.
The TPMS sensor matching
process is:1. Set the parking brake.
2. Turn the ignition on without starting the vehicle or place the
vehicle in Service Mode. See
Ignition Positions (Keyless
Access) 0170 or
Ignition Positions (Key Access)
0 172.
3. Press the MENU button to display the menu items in the
Driver Information
Center (DIC).
4. If the vehicle has a base level DIC, use the thumbwheel to
scroll to the Tire Learn menu
item screen.
If the vehicle has an uplevel
DIC, use the thumbwheel to
scroll to the Tire Pressure
menu item screen. 5. Press and hold the SET/CLR
button to begin the sensor
matching process.
A message requesting
acceptance of the process may
display.
6. The horn sounds twice to signal the receiver is in relearn
mode and the TIRE LEARN
message may display on the
DIC screen.
7. Start with the driver side front tire.
8. Place the relearn tool against the tire sidewall, near the valve
stem. Then press the button to
activate the TPMS sensor.
A horn chirp confirms that the
sensor identification code has
been matched to this tire and
wheel position.
9. Proceed to the passenger side front tire, and repeat the
procedure in Step 8.
10. Proceed to the passenger side rear tire, and repeat the
procedure in Step 8. 11. Proceed to the driver side rear
tire, and repeat the procedure
in Step 8. The horn sounds two
times to indicate the sensor
identification code has been
matched to the driver side rear
tire, and the TPMS sensor
matching process is no longer
active. The TIRE LEARN
message on the DIC display
screen goes off.
12. Turn the vehicle off.
13. Set all four tires to the recommended air pressure
level as indicated on the Tire
and Loading Information label.
Tire Inspection
We recommend that the tires,
including the spare tire, if the
vehicle has one, be inspected
for signs of wear or damage at
least once a month.
Replace the tire if:
.The indicators at three or
more places around the tire
can be seen.
Page 247 of 329
Chevrolet Sonic Owner Manual (GMNA-Localizing-U.S./Canada-13566834) -
2020 - CRC - 10/4/19
246 Vehicle Care
.There is cord or fabric
showing through the tire's
rubber.
.The tread or sidewall is
cracked, cut, or snagged
deep enough to show cord or
fabric.
.The tire has a bump, bulge,
or split.
.The tire has a puncture, cut,
or other damage that cannot
be repaired well because of
the size or location of the
damage.
Tire Rotation
Tires should be rotated every
12 000 km (7,500 mi). See
Maintenance Schedule0278.
Tires are rotated to achieve a
more uniform wear for all tires.
The first rotation is the most
important. Anytime unusual wear is
noticed, rotate the tires as soon
as possible, check for proper tire
inflation pressure, and check for
damaged tires or wheels. If the
unusual wear continues after the
rotation, check the wheel
alignment. See
When It Is Time
for New Tires 0247 and
Wheel Replacement 0251.
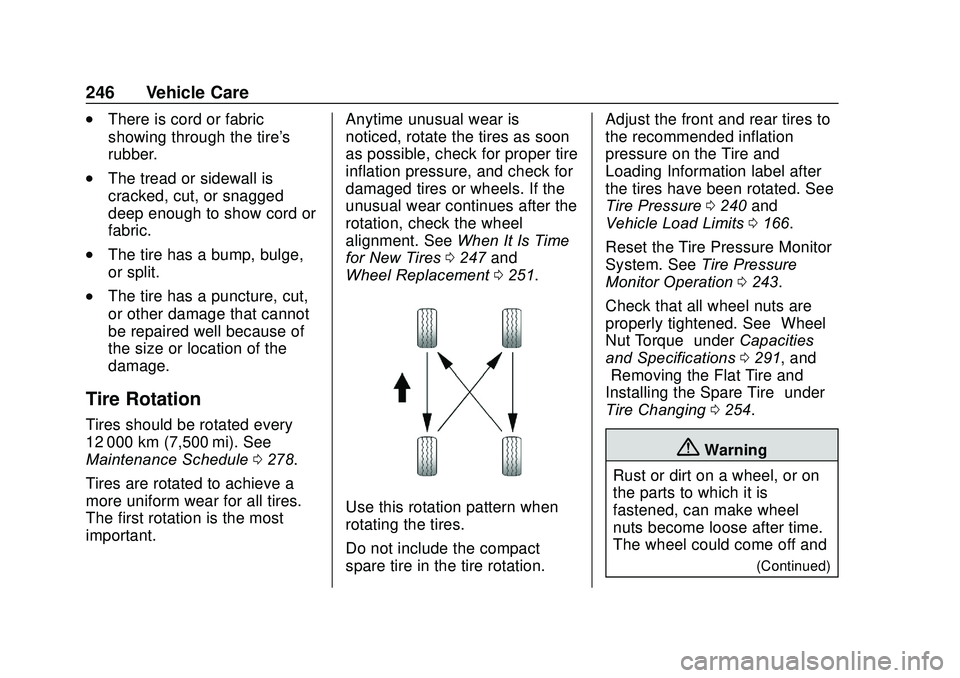
Use this rotation pattern when
rotating the tires.
Do not include the compact
spare tire in the tire rotation. Adjust the front and rear tires to
the recommended inflation
pressure on the Tire and
Loading Information label after
the tires have been rotated. See
Tire Pressure
0240 and
Vehicle Load Limits 0166.
Reset the Tire Pressure Monitor
System. See Tire Pressure
Monitor Operation 0243.
Check that all wheel nuts are
properly tightened. See “Wheel
Nut Torque” underCapacities
and Specifications 0291, and
“Removing the Flat Tire and
Installing the Spare Tire” under
Tire Changing 0254.
{Warning
Rust or dirt on a wheel, or on
the parts to which it is
fastened, can make wheel
nuts become loose after time.
The wheel could come off and
(Continued)
Page 248 of 329
Chevrolet Sonic Owner Manual (GMNA-Localizing-U.S./Canada-13566834) -
2020 - CRC - 10/4/19
Vehicle Care 247
Warning (Continued)
cause a crash. When
changing a wheel, remove any
rust or dirt from places where
the wheel attaches to the
vehicle. In an emergency, a
cloth or a paper towel can be
used; however, use a scraper
or wire brush later to remove
all rust or dirt.
Lightly coat the inner diameter of
the wheel hub opening with
wheel bearing grease after a
wheel change or tire rotation to
prevent corrosion or rust
buildup. Do not get grease on
the wheel mounting surface or
on the wheel nuts or bolts.When It Is Time for New
Tires
Factors such as maintenance,
temperatures, driving speeds,
vehicle loading, and road conditions
affect the wear rate of the tires.
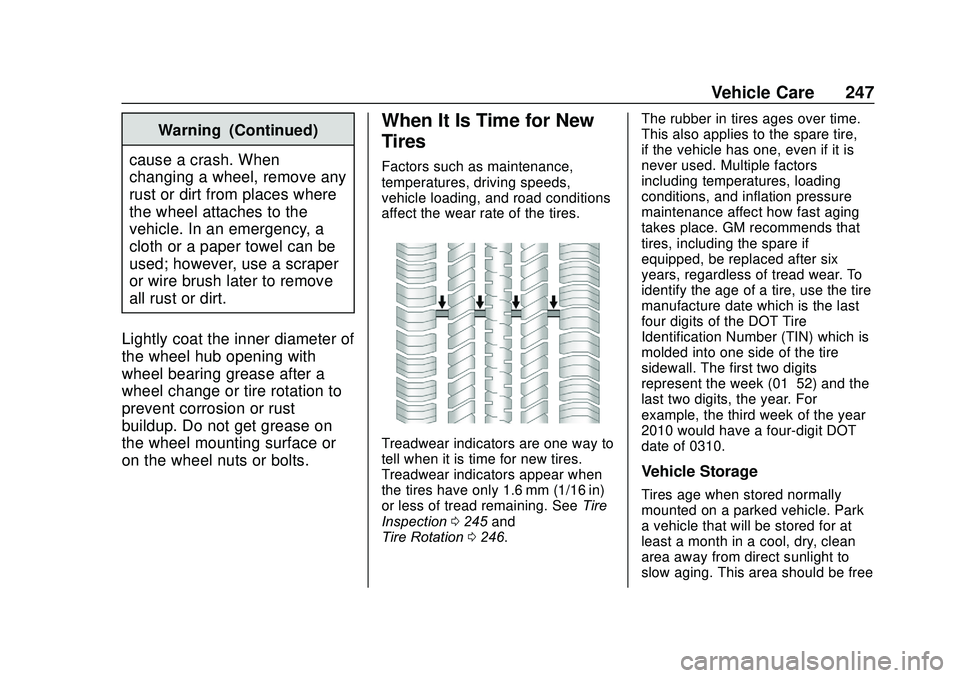
Treadwear indicators are one way to
tell when it is time for new tires.
Treadwear indicators appear when
the tires have only 1.6 mm (1/16 in)
or less of tread remaining. See Tire
Inspection 0245 and
Tire Rotation 0246. The rubber in tires ages over time.
This also applies to the spare tire,
if the vehicle has one, even if it is
never used. Multiple factors
including temperatures, loading
conditions, and inflation pressure
maintenance affect how fast aging
takes place. GM recommends that
tires, including the spare if
equipped, be replaced after six
years, regardless of tread wear. To
identify the age of a tire, use the tire
manufacture date which is the last
four digits of the DOT Tire
Identification Number (TIN) which is
molded into one side of the tire
sidewall. The first two digits
represent the week (01–52) and the
last two digits, the year. For
example, the third week of the year
2010 would have a four-digit DOT
date of 0310.
Vehicle Storage
Tires age when stored normally
mounted on a parked vehicle. Park
a vehicle that will be stored for at
least a month in a cool, dry, clean
area away from direct sunlight to
slow aging. This area should be free
Page 255 of 329
Chevrolet Sonic Owner Manual (GMNA-Localizing-U.S./Canada-13566834) -
2020 - CRC - 10/4/19
254 Vehicle Care
if possible. Turn on the hazard
warning flashers. SeeHazard
Warning Flashers 0121.
{Warning
Changing a tire can be
dangerous. The vehicle can slip
off the jack and roll over or fall
causing injury or death. Find a
level place to change the tire. To
help prevent the vehicle from
moving:
1. Set the parking brake firmly.
2. Put the vehicle in P (Park).
3. Turn off the engine and donot restart while the vehicle
is raised.
4. Do not allow passengers to remain in the vehicle.
5. Place wheel blocks, if equipped, on both sides of
the tire at the opposite
corner of the tire being
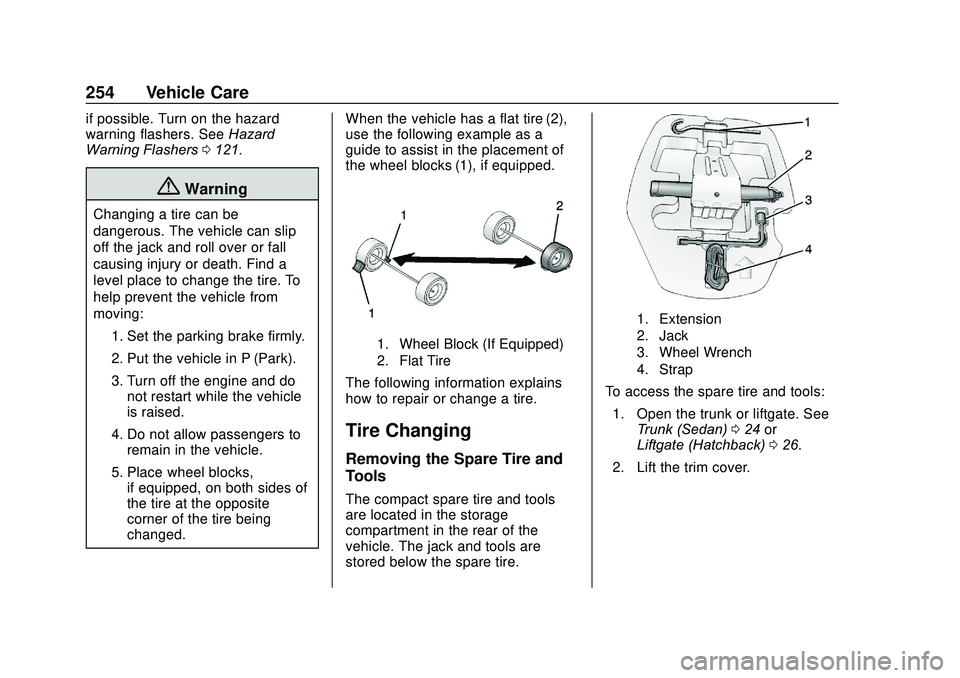
changed. When the vehicle has a flat tire (2),
use the following example as a
guide to assist in the placement of
the wheel blocks (1), if equipped.
1. Wheel Block (If Equipped)
2. Flat Tire
The following information explains
how to repair or change a tire.
Tire Changing
Removing the Spare Tire and
Tools
The compact spare tire and tools
are located in the storage
compartment in the rear of the
vehicle. The jack and tools are
stored below the spare tire.
1. Extension
2. Jack
3. Wheel Wrench
4. Strap
To access the spare tire and tools:
1. Open the trunk or liftgate. See Trunk (Sedan) 024 or
Liftgate (Hatchback) 026.
2. Lift the trim cover.
Page 256 of 329
Chevrolet Sonic Owner Manual (GMNA-Localizing-U.S./Canada-13566834) -
2020 - CRC - 10/4/19
Vehicle Care 255
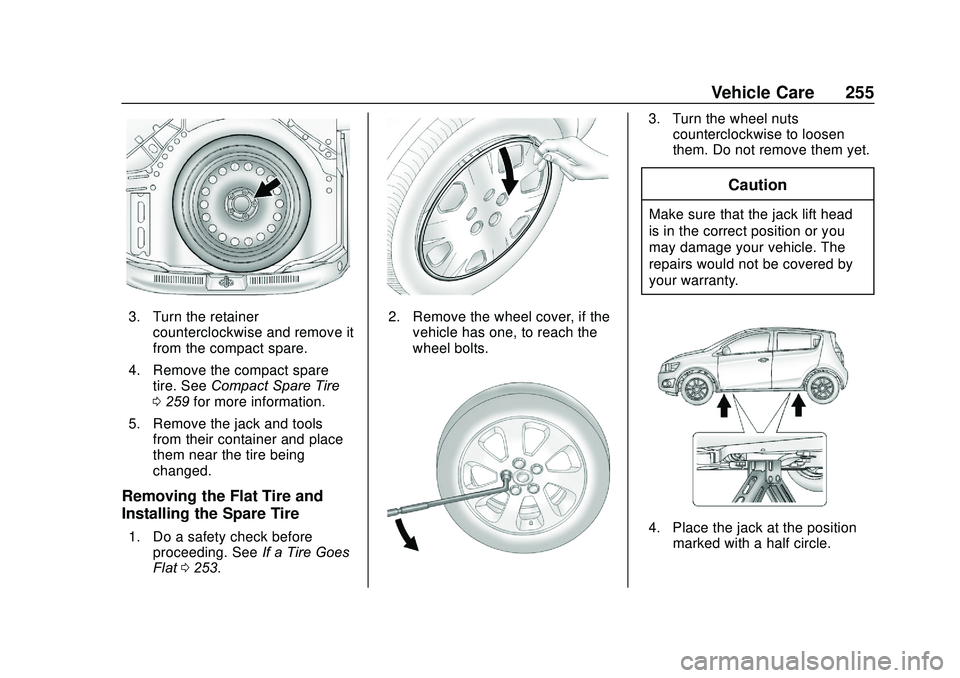
3. Turn the retainercounterclockwise and remove it
from the compact spare.
4. Remove the compact spare tire. See Compact Spare Tire
0 259 for more information.
5. Remove the jack and tools from their container and place
them near the tire being
changed.
Removing the Flat Tire and
Installing the Spare Tire
1. Do a safety check beforeproceeding. See If a Tire Goes
Flat 0253.
2. Remove the wheel cover, if the
vehicle has one, to reach the
wheel bolts.
3. Turn the wheel nutscounterclockwise to loosen
them. Do not remove them yet.
Caution
Make sure that the jack lift head
is in the correct position or you
may damage your vehicle. The
repairs would not be covered by
your warranty.
4. Place the jack at the positionmarked with a half circle.