check CHEVROLET SPARK 2015 3.G Repair Manual
[x] Cancel search | Manufacturer: CHEVROLET, Model Year: 2015, Model line: SPARK, Model: CHEVROLET SPARK 2015 3.GPages: 363, PDF Size: 5.05 MB
Page 271 of 363

Black plate (44,1)Chevrolet Spark Owner Manual (GMNA-Localizing-U.S./Canada-7707489) -
2015 - CRC - 11/19/14
10-44 Vehicle Care
Remove the valve cap from the
tire valve stem. Press the tire
gauge firmly onto the valve to
get the pressure measurement.
If the cold tire inflation pressure
matches the recommended
pressure on the Tire and
Loading Information label, no
further adjustment is necessary.
If the inflation pressure is low,
add air until the recommended
pressure is reached. If the
inflation pressure in high, press
on the metal stem in the center
of the tire valve to release air.
Re-check the tire pressure with
the tire gauge.
Return the valve caps on the
valve stems to keep out dirt and
moisture and prevent leaks.Tire Pressure Monitor
System
The Tire Pressure Monitor System
(TPMS) uses radio and sensor
technology to check tire pressure
levels. The TPMS sensors monitor
the air pressure in your tires and
transmit tire pressure readings to a
receiver located in the vehicle.
Each tire, including the spare (if
provided), should be checked
monthly when cold and inflated to
the inflation pressure recommended
by the vehicle manufacturer on the
vehicle placard or tire inflation
pressure label. (If your vehicle has
tires of a different size than the size
indicated on the vehicle placard or
tire inflation pressure label, you
should determine the proper tire
inflation pressure for those tires.)
As an added safety feature, your
vehicle has been equipped with a
tire pressure monitoring system
(TPMS) that illuminates a low tirepressure telltale when one or more
of your tires is significantly
under-inflated.
Accordingly, when the low tire
pressure telltale illuminates, you
should stop and check your tires as
soon as possible, and inflate them
to the proper pressure. Driving on a
significantly under-inflated tire
causes the tire to overheat and can
lead to tire failure. Under-inflation
also reduces fuel efficiency and tire
tread life, and may affect the
vehicle's handling and stopping
ability.
Please note that the TPMS is not a
substitute for proper tire
maintenance, and it is the driver's
responsibility to maintain correct tire
pressure, even if under-inflation has
not reached the level to trigger
illumination of the TPMS low tire
pressure telltale.
Your vehicle has also been
equipped with a TPMS malfunction
indicator to indicate when the
system is not operating properly.
Page 272 of 363
Black plate (45,1)Chevrolet Spark Owner Manual (GMNA-Localizing-U.S./Canada-7707489) -
2015 - CRC - 11/19/14
Vehicle Care 10-45
The TPMS malfunction indicator is
combined with the low tire pressure
telltale. When the system detects a
malfunction, the telltale will flash for
approximately one minute and then
remain continuously illuminated.
This sequence will continue upon
subsequent vehicle start-ups as
long as the malfunction exists.
When the malfunction indicator is
illuminated, the system may not be
able to detect or signal low tire
pressure as intended. TPMS
malfunctions may occur for a variety
of reasons, including the installation
of replacement or alternate tires or
wheels on the vehicle that prevent
the TPMS from functioning properly.
Always check the TPMS malfunction
telltale after replacing one or more
tires or wheels on your vehicle to
ensure that the replacement or
alternate tires and wheels allow the
TPMS to continue to function
properly.
SeeTire Pressure Monitor
Operation on page 10-45. See
Radio Frequency Statement on
page 13-12.
Tire Pressure Monitor
Operation
This vehicle may have a Tire
Pressure Monitor System (TPMS).
The TPMS is designed to warn the
driver when a low tire pressure
condition exists. TPMS sensors are
mounted onto each tire and wheel
assembly, excluding the spare tire
and wheel assembly. The TPMS
sensors monitor the air pressure in
the tires and transmit the tire
pressure readings to a receiver
located in the vehicle.
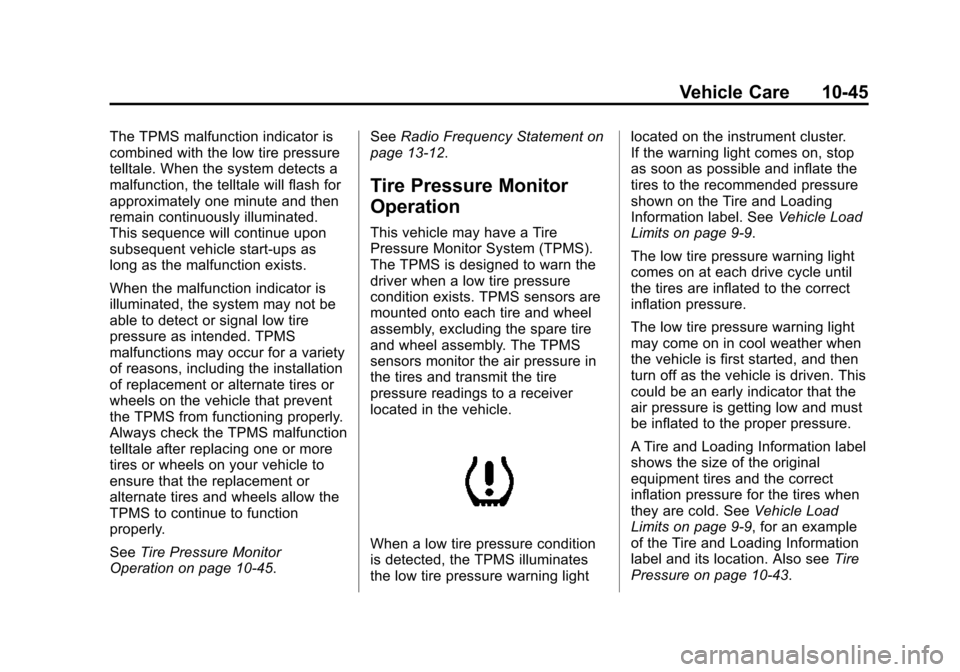
When a low tire pressure condition
is detected, the TPMS illuminates
the low tire pressure warning light located on the instrument cluster.
If the warning light comes on, stop
as soon as possible and inflate the
tires to the recommended pressure
shown on the Tire and Loading
Information label. See
Vehicle Load
Limits on page 9-9.
The low tire pressure warning light
comes on at each drive cycle until
the tires are inflated to the correct
inflation pressure.
The low tire pressure warning light
may come on in cool weather when
the vehicle is first started, and then
turn off as the vehicle is driven. This
could be an early indicator that the
air pressure is getting low and must
be inflated to the proper pressure.
A Tire and Loading Information label
shows the size of the original
equipment tires and the correct
inflation pressure for the tires when
they are cold. See Vehicle Load
Limits on page 9-9, for an example
of the Tire and Loading Information
label and its location. Also see Tire
Pressure on page 10-43.
Page 275 of 363
Black plate (48,1)Chevrolet Spark Owner Manual (GMNA-Localizing-U.S./Canada-7707489) -
2015 - CRC - 11/19/14
10-48 Vehicle Care
10. Proceed to the driver side reartire, and repeat the procedure
in Step 7. The horn sounds two
times to indicate the sensor
identification code has been
matched to the driver side rear
tire, and the TPMS sensor
matching process is no longer
active. The TIRE LEARN
message on the DIC display
screen goes off.
11. Turn the ignition to LOCK/OFF.
12. Set all four tires to the recommended air pressure
level as indicated on the Tire
and Loading Information label.
Tire Inspection
We recommend that the tires,
including the spare tire, if the
vehicle has one, be inspected
for signs of wear or damage at
least once a month. Replace the tire if:
.The indicators at three or
more places around the tire
can be seen.
.There is cord or fabric
showing through the tire's
rubber.
.The tread or sidewall is
cracked, cut, or snagged
deep enough to show cord or
fabric.
.The tire has a bump, bulge,
or split.
.The tire has a puncture, cut,
or other damage that cannot
be repaired well because of
the size or location of the
damage.
Tire Rotation
Tires should be rotated every
12 000 km (7,500 mi). The first
rotation is the most important.
See
Maintenance Schedule on
page 11-3.
Tires are rotated to achieve a
more uniform wear for all tires.
Anytime unusual wear is
noticed, rotate the tires as soon
as possible, check for proper tire
inflation pressure, and check for
damaged tires or wheels. If the
unusual wear continues after the
rotation, check the wheel
alignment. See When It Is Time
for New Tires on page 10-49
and Wheel Replacement on
page 10-54.
Page 276 of 363
Black plate (49,1)Chevrolet Spark Owner Manual (GMNA-Localizing-U.S./Canada-7707489) -
2015 - CRC - 11/19/14
Vehicle Care 10-49
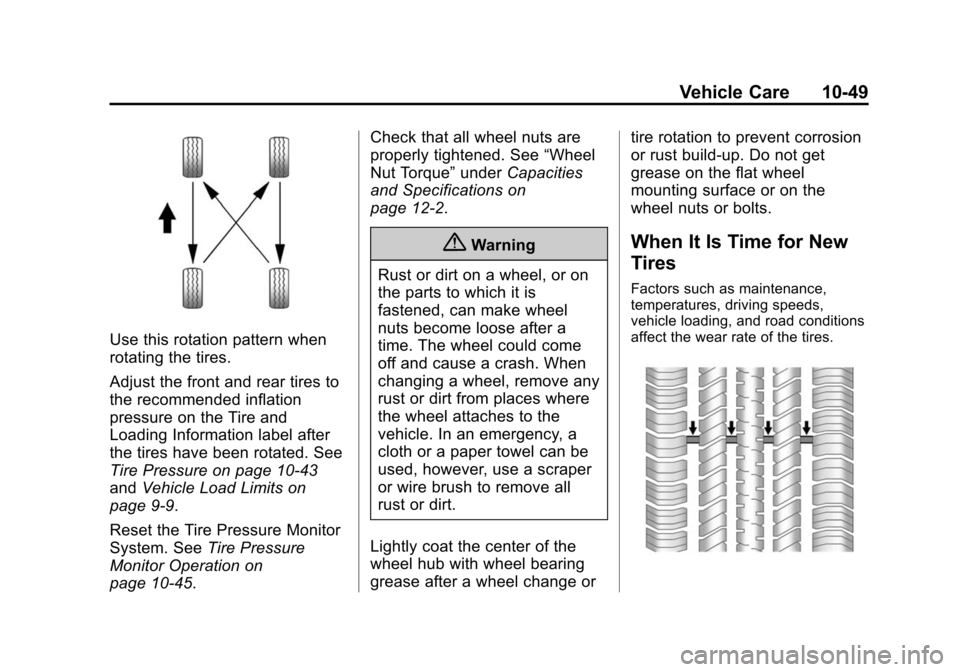
Use this rotation pattern when
rotating the tires.
Adjust the front and rear tires to
the recommended inflation
pressure on the Tire and
Loading Information label after
the tires have been rotated. See
Tire Pressure on page 10-43
andVehicle Load Limits on
page 9-9.
Reset the Tire Pressure Monitor
System. See Tire Pressure
Monitor Operation on
page 10-45. Check that all wheel nuts are
properly tightened. See
“Wheel
Nut Torque” underCapacities
and Specifications on
page 12-2.
{Warning
Rust or dirt on a wheel, or on
the parts to which it is
fastened, can make wheel
nuts become loose after a
time. The wheel could come
off and cause a crash. When
changing a wheel, remove any
rust or dirt from places where
the wheel attaches to the
vehicle. In an emergency, a
cloth or a paper towel can be
used, however, use a scraper
or wire brush to remove all
rust or dirt.
Lightly coat the center of the
wheel hub with wheel bearing
grease after a wheel change or tire rotation to prevent corrosion
or rust build-up. Do not get
grease on the flat wheel
mounting surface or on the
wheel nuts or bolts.When It Is Time for New
Tires
Factors such as maintenance,
temperatures, driving speeds,
vehicle loading, and road conditions
affect the wear rate of the tires.
Page 281 of 363
Black plate (54,1)Chevrolet Spark Owner Manual (GMNA-Localizing-U.S./Canada-7707489) -
2015 - CRC - 11/19/14
10-54 Vehicle Care
overloaded. Excessive speed,
underinflation, or excessive
loading, either separately or in
combination, can cause heat
buildup and possible tire failure.
Wheel Alignment and Tire
Balance
The tires and wheels were aligned
and balanced at the factory to
provide the longest tire life and best
overall performance. Adjustments to
wheel alignment and tire balancing
are not necessary on a regular
basis. Consider an alignment check
if there is unusual tire wear or the
vehicle is significantly pulling to one
side or the other. Some slight pull to
the left or right, depending on the
crown of the road and/or other road
surface variations such as troughs
or ruts, is normal. If the vehicle is
vibrating when driving on a smooth
road, the tires and wheels may need
to be rebalanced. See your dealer
for proper diagnosis.
Wheel Replacement
Replace any wheel that is bent,
cracked, or badly rusted or
corroded. If wheel nuts keep coming
loose, the wheel, wheel bolts, and
wheel nuts should be replaced.
If the wheel leaks air, replace it.
Some aluminum wheels can be
repaired. See your dealer if any of
these conditions exist.
Your dealer will know the kind of
wheel that is needed.
Each new wheel should have the
same load-carrying capacity,
diameter, width, offset, and be
mounted the same way as the one it
replaces.
Replace wheels, wheel bolts, wheel
nuts, or Tire Pressure Monitor
System (TPMS) sensors with new
GM original equipment parts.{Warning
Using the wrong replacement
wheels, wheel bolts, or wheel
nuts can be dangerous. It could
affect the braking and handling of
the vehicle. Tires can lose air,
and cause loss of control, causing
a crash. Always use the correct
wheel, wheel bolts, and wheel
nuts for replacement.
{Caution
The wrong wheel can also cause
problems with bearing life, brake
cooling, speedometer or
odometer calibration, headlamp
aim, bumper height, vehicle
ground clearance, and tire or tire
chain clearance to the body and
chassis.
Page 285 of 363
Black plate (58,1)Chevrolet Spark Owner Manual (GMNA-Localizing-U.S./Canada-7707489) -
2015 - CRC - 11/19/14
10-58 Vehicle Care
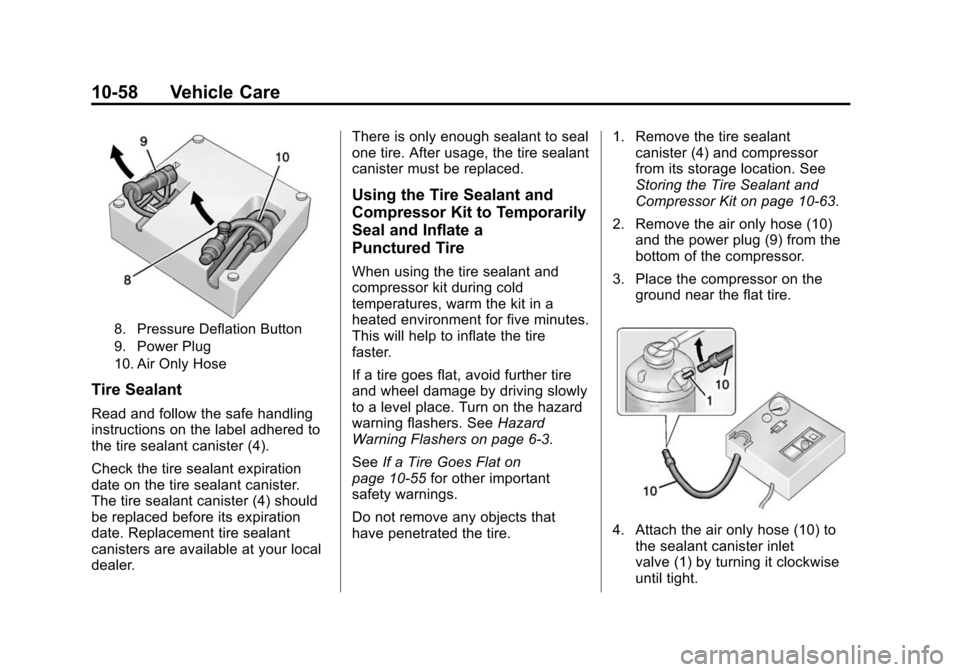
8. Pressure Deflation Button
9. Power Plug
10. Air Only Hose
Tire Sealant
Read and follow the safe handling
instructions on the label adhered to
the tire sealant canister (4).
Check the tire sealant expiration
date on the tire sealant canister.
The tire sealant canister (4) should
be replaced before its expiration
date. Replacement tire sealant
canisters are available at your local
dealer.There is only enough sealant to seal
one tire. After usage, the tire sealant
canister must be replaced.
Using the Tire Sealant and
Compressor Kit to Temporarily
Seal and Inflate a
Punctured Tire
When using the tire sealant and
compressor kit during cold
temperatures, warm the kit in a
heated environment for five minutes.
This will help to inflate the tire
faster.
If a tire goes flat, avoid further tire
and wheel damage by driving slowly
to a level place. Turn on the hazard
warning flashers. See
Hazard
Warning Flashers on page 6-3.
See If a Tire Goes Flat on
page 10-55 for other important
safety warnings.
Do not remove any objects that
have penetrated the tire. 1. Remove the tire sealant
canister (4) and compressor
from its storage location. See
Storing the Tire Sealant and
Compressor Kit on page 10-63.
2. Remove the air only hose (10) and the power plug (9) from the
bottom of the compressor.
3. Place the compressor on the ground near the flat tire.
4. Attach the air only hose (10) tothe sealant canister inlet
valve (1) by turning it clockwise
until tight.
Page 288 of 363
Black plate (61,1)Chevrolet Spark Owner Manual (GMNA-Localizing-U.S./Canada-7707489) -
2015 - CRC - 11/19/14
Vehicle Care 10-61
20. If the flat tire was able to inflateto the recommended inflation
pressure, remove the
maximum speed label from the
sealant canister and place it in
a highly visible location.
Do not exceed the speed on
this label until the damaged tire
is repaired or replaced.
21. Return the equipment to its original storage location in the
vehicle.
22. Immediately drive the vehicle 8 km (5 mi) to distribute the
sealant in the tire.
23. Stop at a safe location and check the tire pressure. Refer
to Steps 1–10 under “Using the
Tire Sealant and Compressor
Kit without Sealant to Inflate a
Tire (Not Punctured).” If the tire pressure has fallen
more than 68 kPa (10 psi)
below the recommended
inflation pressure, stop driving
the vehicle. The tire is too
severely damaged and the tire
sealant cannot seal the tire.
See
Roadside Assistance
Program on page 13-5.
If the tire pressure has not
dropped more than 68 kPa
(10 psi) from the recommended
inflation pressure, inflate the
tire to the recommended
inflation pressure.
24. Wipe off any sealant from the wheel, tire, or vehicle.
25. Dispose of the used tire sealant canister (4) at a local
dealer or in accordance with
local state codes and practices.
26. Replace it with a new canister available from your dealer.
27. After temporarily sealing a tire using the tire sealant and
compressor kit, take the vehicle to an authorized dealer
within 161 km (100 mi) of
driving to have the tire repaired
or replaced.
Using the Tire Sealant and
Compressor Kit without
Sealant to Inflate a Tire (Not
Punctured)
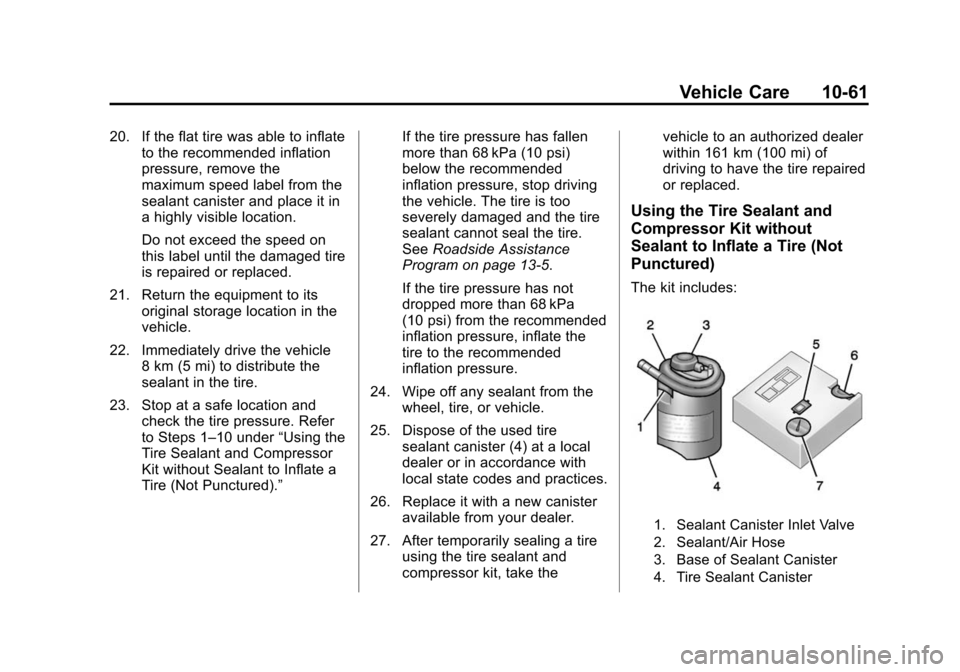
The kit includes:
1. Sealant Canister Inlet Valve
2. Sealant/Air Hose
3. Base of Sealant Canister
4. Tire Sealant Canister
Page 292 of 363
Black plate (65,1)Chevrolet Spark Owner Manual (GMNA-Localizing-U.S./Canada-7707489) -
2015 - CRC - 11/19/14
Vehicle Care 10-65
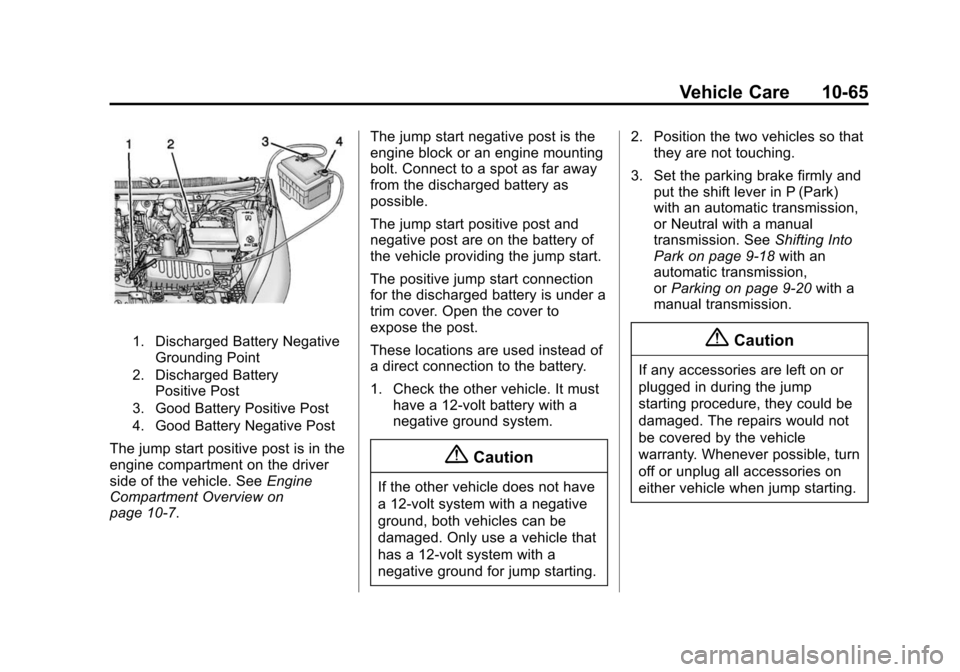
1. Discharged Battery NegativeGrounding Point
2. Discharged Battery Positive Post
3. Good Battery Positive Post
4. Good Battery Negative Post
The jump start positive post is in the
engine compartment on the driver
side of the vehicle. See Engine
Compartment Overview on
page 10-7. The jump start negative post is the
engine block or an engine mounting
bolt. Connect to a spot as far away
from the discharged battery as
possible.
The jump start positive post and
negative post are on the battery of
the vehicle providing the jump start.
The positive jump start connection
for the discharged battery is under a
trim cover. Open the cover to
expose the post.
These locations are used instead of
a direct connection to the battery.
1. Check the other vehicle. It must
have a 12-volt battery with a
negative ground system.{Caution
If the other vehicle does not have
a 12-volt system with a negative
ground, both vehicles can be
damaged. Only use a vehicle that
has a 12-volt system with a
negative ground for jump starting. 2. Position the two vehicles so that
they are not touching.
3. Set the parking brake firmly and put the shift lever in P (Park)
with an automatic transmission,
or Neutral with a manual
transmission. See Shifting Into
Park on page 9-18 with an
automatic transmission,
or Parking on page 9-20 with a
manual transmission.
{Caution
If any accessories are left on or
plugged in during the jump
starting procedure, they could be
damaged. The repairs would not
be covered by the vehicle
warranty. Whenever possible, turn
off or unplug all accessories on
either vehicle when jump starting.
Page 301 of 363
Black plate (74,1)Chevrolet Spark Owner Manual (GMNA-Localizing-U.S./Canada-7707489) -
2015 - CRC - 11/19/14
10-74 Vehicle Care
Caution (Continued)
automatic car wash that uses
silicone carbide tire cleaning
brushes. Damage could occur
and the repairs would not be
covered by the vehicle warranty.
Brake System
Visually inspect brake lines and
hoses for proper hook-up, binding,
leaks, cracks, chafing, etc. Inspect
disc brake pads for wear and rotors
for surface condition. Inspect drum
brake linings/shoes for wear or
cracks. Inspect other brake parts,
including drums, wheel cylinders,
calipers, parking brake, master
cylinder, brake fluid reservoir,
vacuum pipes, electric vacuum
pump including bracket and vent
hose, if equipped.
Steering, Suspension, and
Chassis Components
Visually inspect steering,
suspension, and chassis
components for damaged, loose,
or missing parts or signs of wear at
least once a year.
Inspect power steering for proper
hook-up, binding, leaks, cracks,
chafing, etc.
Visually check constant velocity joint
boots and axle seals for leaks.
Body Component Lubrication
Lubricate all key lock cylinders,
hood hinges, liftgate hinges, steel
fuel door hinge, unless the
components are plastic. Applying
silicone grease on weatherstrips
with a clean cloth will make them
last longer, seal better, and not stick
or squeak.
Underbody Maintenance
At least twice a year, spring and fall
use plain water to flush any
corrosive materials from theunderbody. Take care to thoroughly
clean any areas where mud and
other debris can collect.
Sheet Metal Damage
If the vehicle is damaged and
requires sheet metal repair or
replacement, make sure the body
repair shop applies anti-corrosion
material to parts repaired or
replaced to restore corrosion
protection.
Original manufacturer replacement
parts will provide the corrosion
protection while maintaining the
vehicle warranty.
Finish Damage
Quickly repair minor chips and
scratches with touch-up materials
available from your dealer to avoid
corrosion. Larger areas of finish
damage can be corrected in your
dealer's body and paint shop.
Page 305 of 363
Black plate (78,1)Chevrolet Spark Owner Manual (GMNA-Localizing-U.S./Canada-7707489) -
2015 - CRC - 11/19/14
10-78 Vehicle Care
Cargo Cover and
Convenience Net
Wash with warm water and mild
detergent. Do not use chlorine
bleach. Rinse with cold water, and
then dry completely.
Care of Safety Belts
Keep belts clean and dry.
{Warning
Do not bleach or dye safety belts.
It may severely weaken them. In
a crash, they might not be able to
provide adequate protection.
Clean safety belts only with mild
soap and lukewarm water.
Floor Mats
{Warning
If a floor mat is the wrong size or
is not properly installed, it can
interfere with the pedals.
Interference with the pedals can
cause unintended acceleration
and/or increased stopping
distance which can cause a crash
and injury. Make sure the floor
mat does not interfere with the
pedals.
Use the following guidelines for
proper floor mat usage:
.The original equipment floor
mats were designed for your
vehicle. If the floor mats need
replacing, it is recommended that GM certified floor mats be
purchased. Non-GM floor mats
may not fit properly and may
interfere with the pedals. Always
check that the floor mats do not
interfere with the pedals.
.Do not use a floor mat if the
vehicle is not equipped with a
floor mat retainer on the driver
side floor.
.Use the floor mat with the
correct side up. Do not turn
it over.
.Do not place anything on top of
the driver side floor mat.
.Use only a single floor mat on
the driver side.
.Do not place one floor mat on
top of another.