infotainment CHEVROLET SPARK 2018 Get To Know Guide
[x] Cancel search | Manufacturer: CHEVROLET, Model Year: 2018, Model line: SPARK, Model: CHEVROLET SPARK 2018Pages: 16, PDF Size: 2.38 MB
Page 3 of 16
3
Refer to your Owner’s Manual to learn about the information being relayed by the lights, gauges and indicators on the instrument cluster.
See In Brief in your Owner’s Manual.
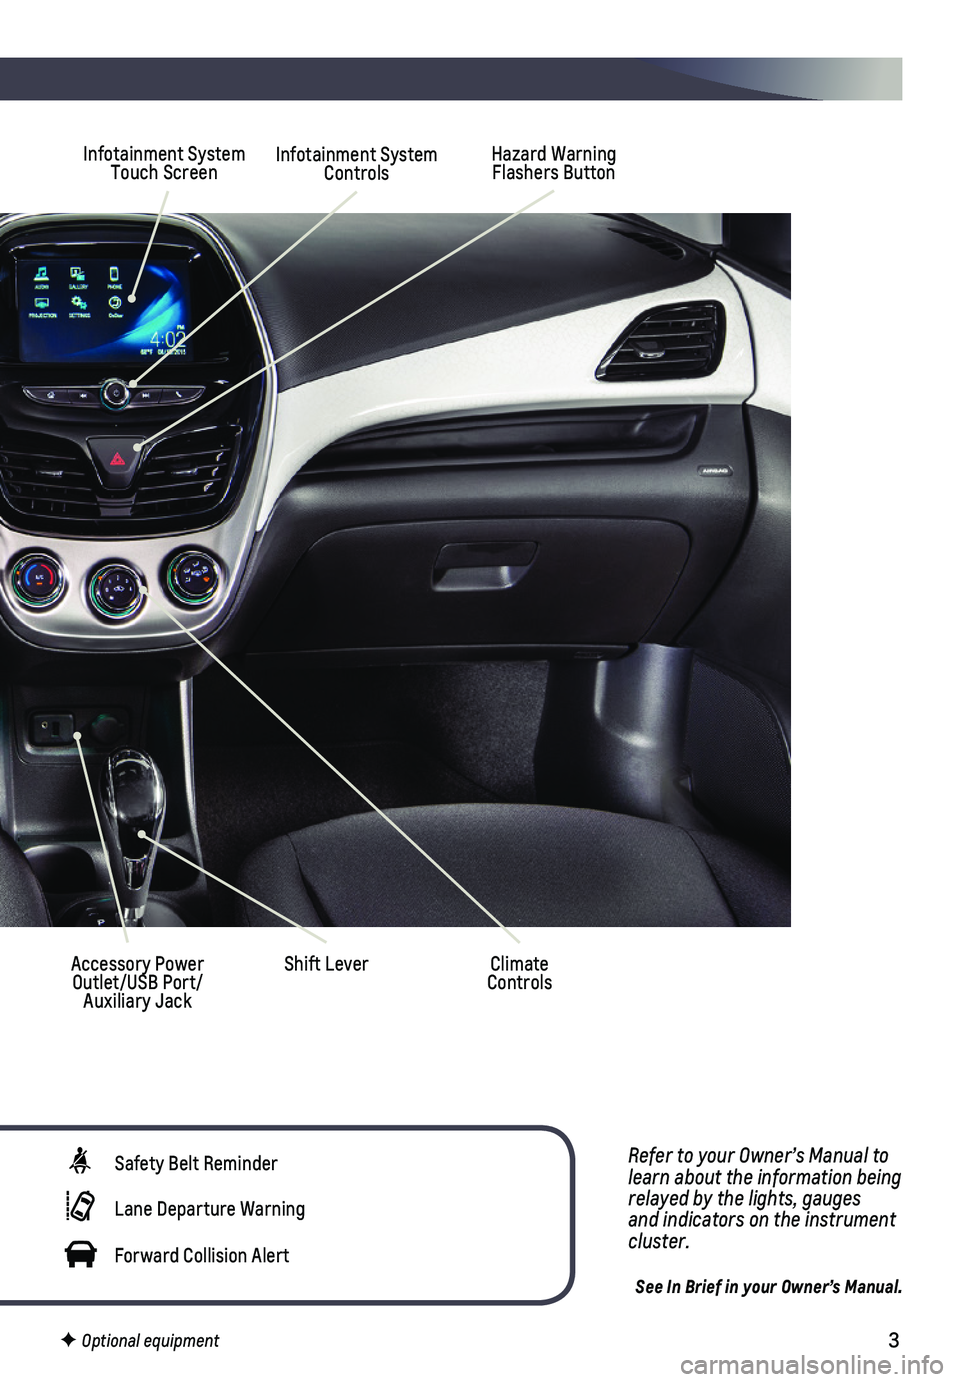
Hazard Warning Flashers Button
Accessory Power Outlet/USB Port/Auxiliary Jack
Shift Lever
Infotainment System Touch ScreenInfotainment System Controls
Climate Controls
Safety Belt Reminder
Lane Departure Warning
Forward Collision Alert
F Optional equipment
Page 8 of 16
8
CHEVROLET MYLINK INFOTAINMENT SYSTEM
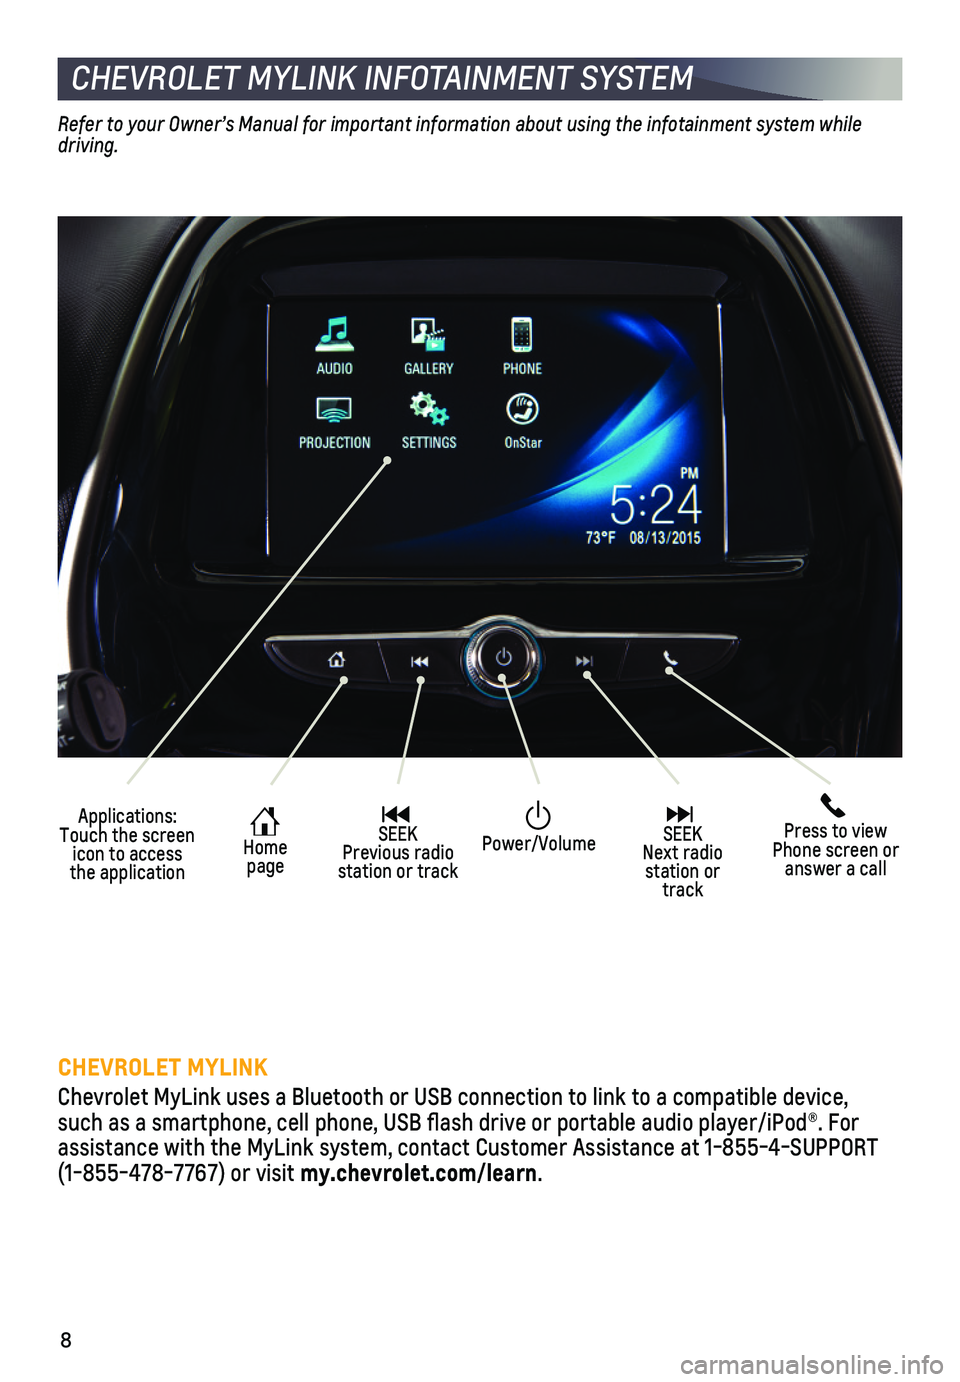
Applications: Touch the screen icon to access the application
Home page
SEEK Previous radio station or track
Press to view Phone screen or answer a call
SEEK Next radio station or track
Power/Volume
Refer to your Owner’s Manual for important information about using the infotainment system while driving.
CHEVROLET MYLINK
Chevrolet MyLink uses a Bluetooth or USB connection to link to a compati\
ble device, such as a smartphone, cell phone, USB flash drive or portable audio player/\
iPod®. For assistance with the MyLink system, contact Customer Assistance at 1-855-\
4-SUPPORT (1-855-478-7767) or visit my.chevrolet.com/learn.
Page 9 of 16
9
CHEVROLET MYLINK INFOTAINMENT SYSTEM
SETTING THE TIME
1. Touch Settings on the home page.
2. Touch Time and Date.
3. Touch Set Time.
4. Touch the screen buttons to adjust the hours, minutes and AM or PM.
5. Touch to exit the menu.
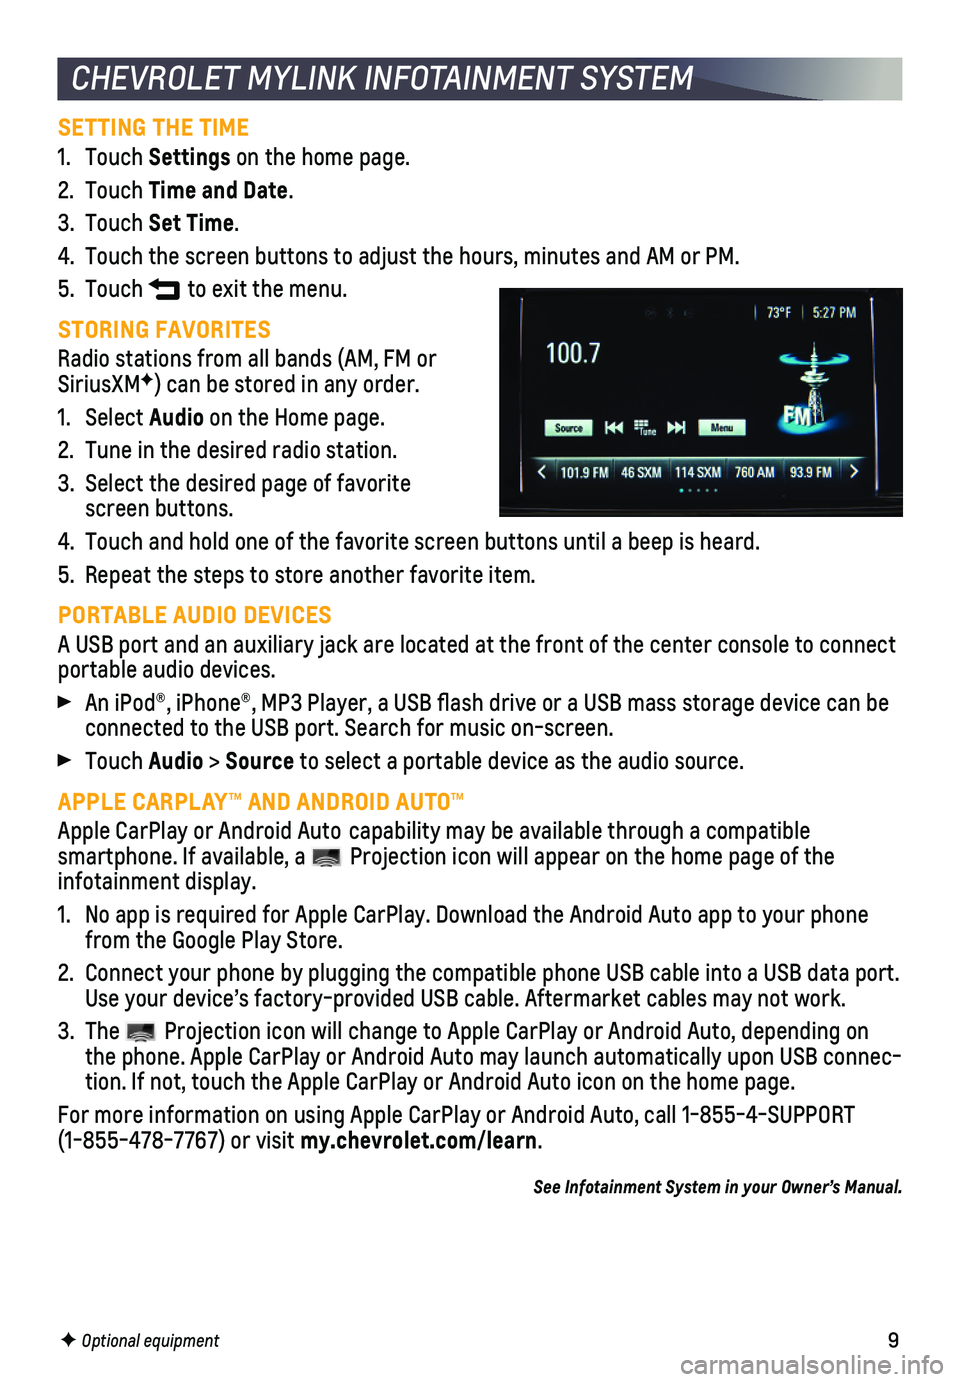
STORING FAVORITES
Radio stations from all bands (AM, FM or SiriusXMF) can be stored in any order.
1. Select Audio on the Home page.
2. Tune in the desired radio station.
3. Select the desired page of favorite screen buttons.
4. Touch and hold one of the favorite screen buttons until a beep is heard.\
5. Repeat the steps to store another favorite item.
PORTABLE AUDIO DEVICES
A USB port and an auxiliary jack are located at the front of the center \
console to connect portable audio devices.
An iPod®, iPhone®, MP3 Player, a USB flash drive or a USB mass s\
torage device can be connected to the USB port. Search for music on-screen.
Touch Audio > Source to select a portable device as the audio source.
APPLE CARPLAY™ AND ANDROID AUTO™
Apple CarPlay or Android Auto capability may be available through a compatible
smartphone. If available, a Projection icon will appear on the home page of the infotainment display.
1. No app is required for Apple CarPlay. Download the Android Auto app to y\
our phone from the Google Play Store.
2. Connect your phone by plugging the compatible phone USB cable into a USB\
data port. Use your device’s factory-provided USB cable. Aftermarket cables may \
not work.
3. The Projection icon will change to Apple CarPlay or Android Auto, depending \
on the phone. Apple CarPlay or Android Auto may launch automatically upon U\
SB connec-tion. If not, touch the Apple CarPlay or Android Auto icon on the home p\
age.
For more information on using Apple CarPlay or Android Auto, call 1-855-\
4-SUPPORT (1-855-478-7767) or visit my.chevrolet.com/learn.
See Infotainment System in your Owner’s Manual.
F Optional equipment
Page 10 of 16
10
AUDIO STEERING WHEEL CONTROLSF
BLUETOOTH® SYSTEM
Refer to your Owner’s Manual for important information about using the Bluetooth system while driving.
Before using a Bluetooth-enabled device in the vehicle, it must be paired with the in-vehicle Bluetooth system. The pairing process is disabled when the ve\
hicle is moving. Not all devices will support all functions. Visit my.chevrolet.com/learn for more information.
PAIR A PHONE
1. Select the Phone screen and touch Search Device.
2. Start the pairing process on the phone. Locate Your Vehicle or Chevrolet MyLink on the phone.
3. Confirm the codes that appear on the infotainment screen and the phone.
4. When pairing is complete, the phone screen is displayed. Your phone book\
may be downloaded depending on the phone.
See Infotainment System in your Owner’s Manual.
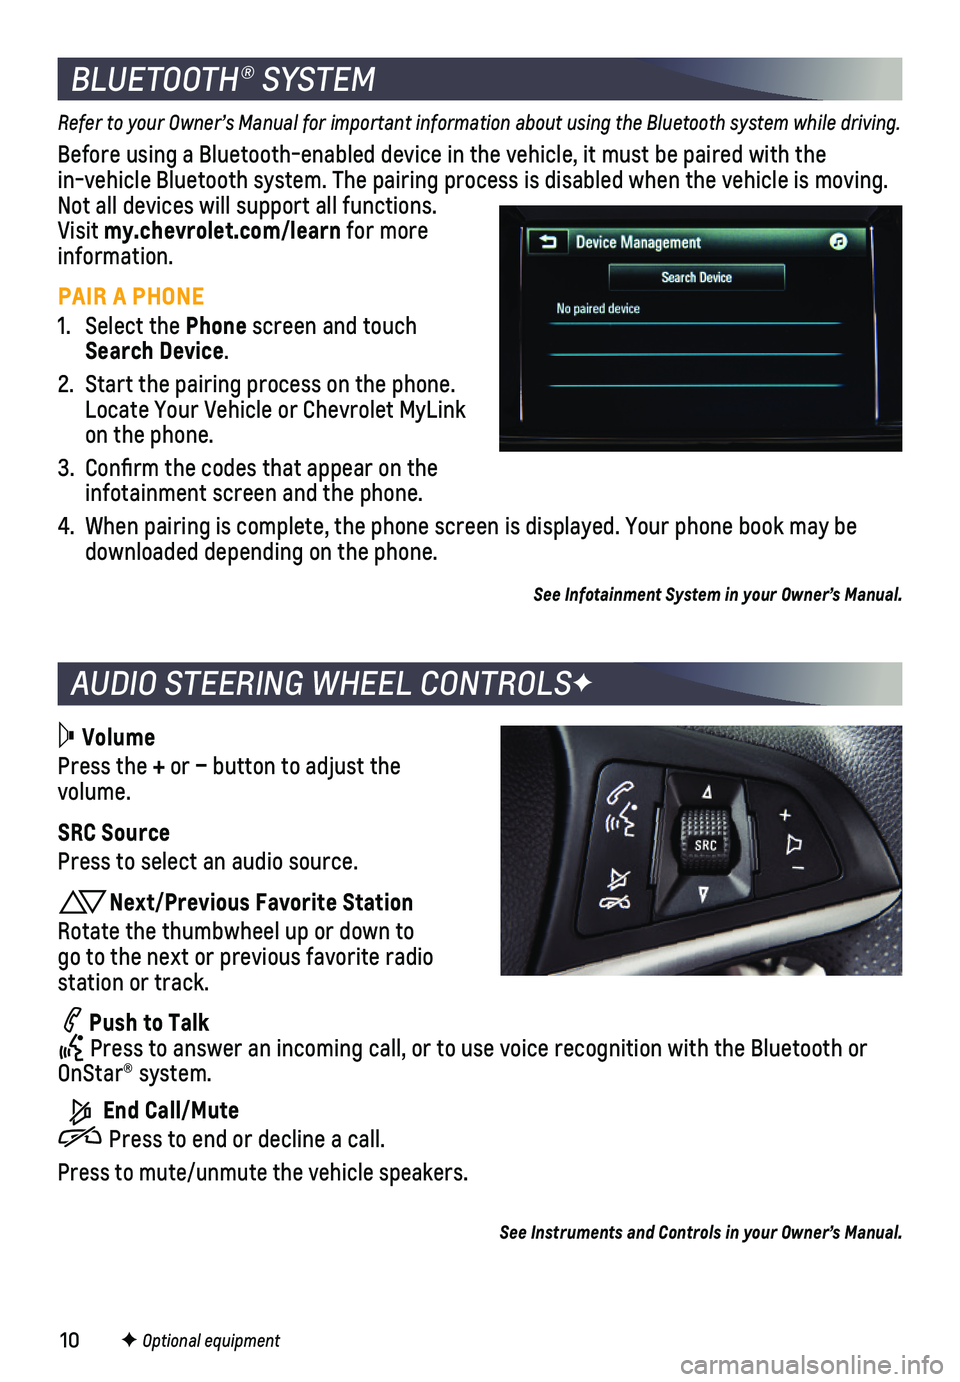
Volume
Press the + or – button to adjust the volume.
SRC Source
Press to select an audio source.
Next/Previous Favorite Station
Rotate the thumbwheel up or down to go to the next or previous favorite radio station or track.
Push to Talk Press to answer an incoming call, or to use voice recognition with the B\
luetooth or OnStar® system.
End Call/Mute
Press to end or decline a call.
Press to mute/unmute the vehicle speakers.
F Optional equipment
See Instruments and Controls in your Owner’s Manual.
Page 11 of 16
11
The sunroof control is located on the overhead console.
Press and hold the Sunroof switch to vent the sunroof. Press the switch again to express-open the sunroof.
Press and hold the Sunroof switch to close the sunroof.
See Keys, Doors and Windows in your Owner’s Manual.
SUNROOFF
F Optional equipment
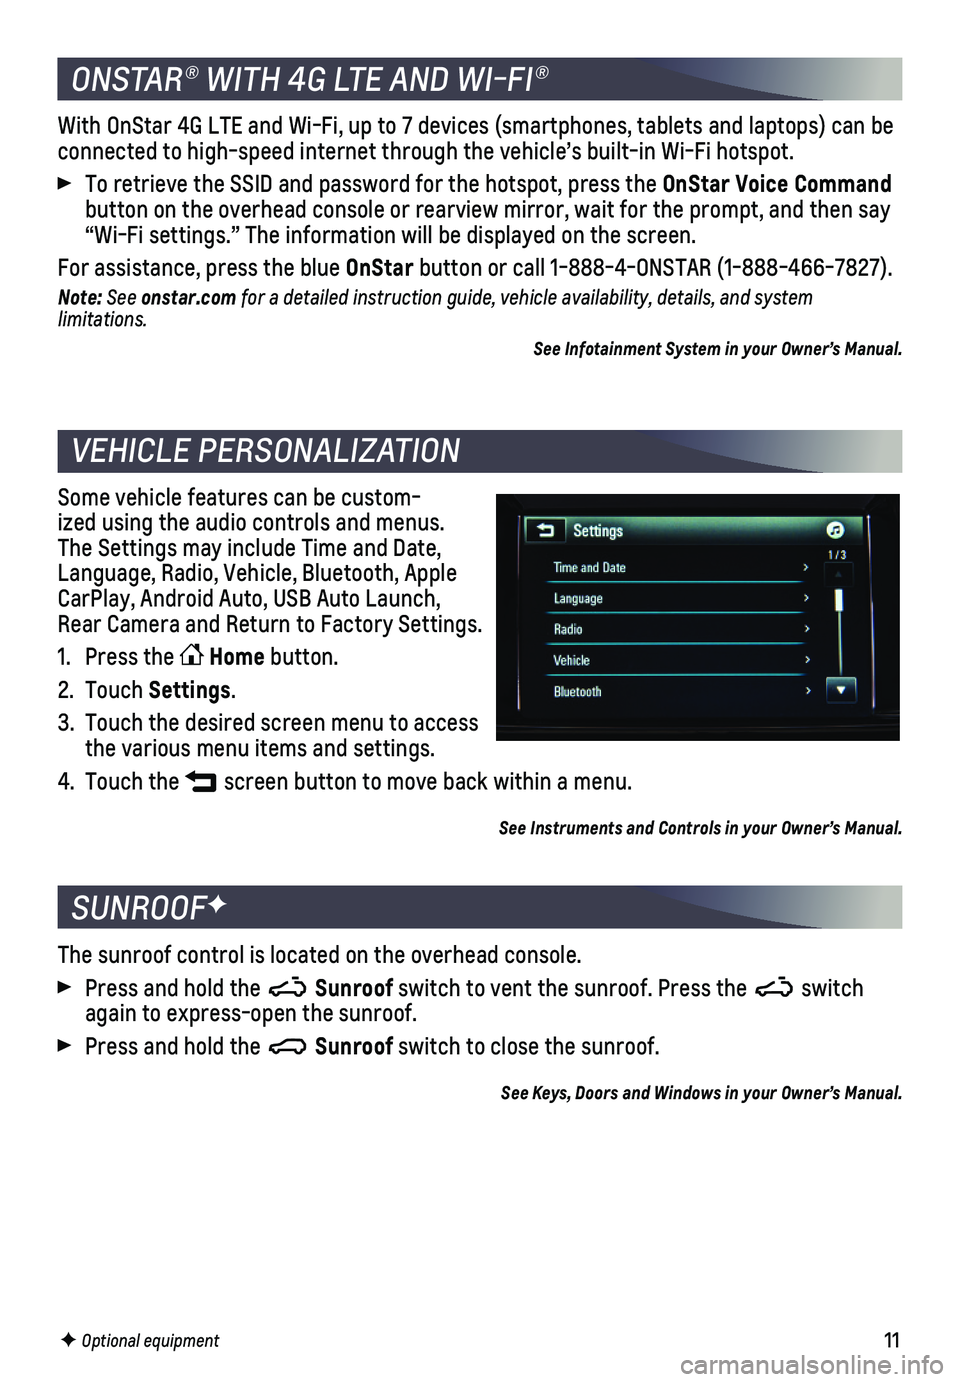
Some vehicle features can be custom-ized using the audio controls and menus. The Settings may include Time and Date, Language, Radio, Vehicle, Bluetooth, Apple CarPlay, Android Auto, USB Auto Launch, Rear Camera and Return to Factory Settings.
1. Press the Home button.
2. Touch Settings.
3. Touch the desired screen menu to access the various menu items and settings.
4. Touch the screen button to move back within a menu.
See Instruments and Controls in your Owner’s Manual.
VEHICLE PERSONALIZATION
With OnStar 4G LTE and Wi-Fi, up to 7 devices (smartphones, tablets and\
laptops) can be connected to high-speed internet through the vehicle’s built-in Wi-Fi\
hotspot.
To retrieve the SSID and password for the hotspot, press the OnStar Voice Command button on the overhead console or rearview mirror, wait for the prompt, \
and then say “Wi-Fi settings.” The information will be displayed on the screen.\
For assistance, press the blue OnStar button or call 1-888-4-ONSTAR (1-888-466-7827).
Note: See onstar.com for a detailed instruction guide, vehicle availability, details, and system l imitations.
See Infotainment System in your Owner’s Manual.
ONSTAR® WITH 4G LTE AND WI-FI®
Page 14 of 16
14
When stopped on a steep hill, the Hill Start Assist feature prevents the\
vehicle from roll-ing before driving off, whether facing uphill or downhill. During the tr\
ansition between when the driver releases the brake pedal and starts to accelerate, Hill \
Start Assist holds the brake pressure (for up to 2 seconds) to ensure the vehicle doesn’\
t roll.
Note: Hill Start Assist will not operate if StabiliTrak is disabled.
See Driving and Operating in your Owner’s Manual.
HILL START ASSIST
DRIVER ASSISTANCE SYSTEMS
LANE DEPARTURE WARNINGF
The Lane Departure Warning indicator on the instrument cluster is green whe\
n a lane marking is detected. If a detected lane marking is crossed without using\
a turn signal in that direction, the system flashes an amber indicator and 3 beeps sound on the side of the departure direction.
Press the Lane Departure Warning button on the left side of the instrument panel to turn the system on or off.
FORWARD COLLISION ALERTF
The Vehicle Ahead indicator is green on the instrument cluster when a vehicl\
e is detected and is amber when following a vehicle ahead too closely. When a\
pproaching a vehicle directly ahead too rapidly, a red alert flashes on the windshi\
eld and rapid beeps sound.
Press the Forward Collision Alert button on the left side of the steering wheel to set the alert timing to Far, Medium, Near, or Off.
REAR VISION CAMERA
When the vehicle is in Reverse, a view of the area behind the vehicle ap\
pears on the infotainment screen.
To turn the Rear Camera Guidance Lines or Rear Park Assist Symbols on or\
off, go to Settings > Rear Camera.
Note: Clean the camera lens, located above the license plate, with water and a soft cloth.
REAR PARKING ASSISTF
When the vehicle is in Reverse, detected objects are indicated by audibl\
e beeps. The
interval between beeps becomes shorter as the vehicle gets closer to an \
object. When the distance is less than 16 in. (40 cm), the beeps are continuou\
s. The system operates only at speeds less than 5 mph.
To turn the system on or off, go to Settings > Vehicle > Collision/Detec\
tion Systems.
See Driving and Operating in your Owner’s Manual.
F Optional equipment