turn signal CHEVROLET SPARK 2018 Owner's Guide
[x] Cancel search | Manufacturer: CHEVROLET, Model Year: 2018, Model line: SPARK, Model: CHEVROLET SPARK 2018Pages: 338, PDF Size: 5.66 MB
Page 203 of 338
Chevrolet Spark Owner Manual (GMNA-Localizing-U.S./Canada-11348464) -
2018 - crc - 9/19/17
202 Driving and Operating
Selecting the Alert Timing
The Collision Alert control is on the
steering wheel. Press
[to set the
FCA timing to Far, Medium, Near,
or Off. The first button press shows
the current setting on the Driver
Information Center (DIC). Additional
button presses will change this
setting. The chosen setting will
remain until it is changed and will
affect the timing of both the Collision
Alert and the Tailgating Alert
features. The timing of both alerts
will vary based on vehicle speed.
The faster the vehicle speed, the
farther away the alert will occur.
Consider traffic and weather
conditions when selecting the alert
timing. The range of selectable alert
timings may not be appropriate for
all drivers and driving conditions.
Unnecessary Alerts
FCA may provide unnecessary
alerts to turning vehicles, vehicles in
other lanes, objects that are not
vehicles, or shadows. These alerts
are normal operation and the
vehicle does not need service.
Cleaning the System
If the FCA system does not seem to
operate properly, cleaning the
outside of the windshield in front of
the rearview mirror may correct the
issue.
Lane Departure
Warning (LDW)
If equipped, LDW may help avoid
crashes due to unintentional lane
departures. It may provide an alert if
the vehicle is crossing a lane
without using a turn signal in that
direction. LDW uses a camera
sensor to detect the lane markings
at speeds of 56 km/h (35 mph) or
greater.
{Warning
The LDW system does not steer
the vehicle. The LDW system
may not:
. Provide enough time to
avoid a crash.
(Continued)
Warning (Continued)
.Detect lane markings under
poor weather or visibility
conditions. This can occur if
the windshield or
headlamps are blocked by
dirt, snow, or ice; if they are
not in proper condition; or if
the sun shines directly into
the camera.
. Detect road edges.
. Detect lanes on winding or
hilly roads.
If LDW only detects lane
markings on one side of the road,
it will only warn you when
departing the lane on the side
where it has detected a lane
marking. Always keep your
attention on the road and
maintain proper vehicle position
within the lane, or vehicle
damage, injury, or death could
occur. Always keep the
windshield, headlamps, and (Continued)
Page 204 of 338

Chevrolet Spark Owner Manual (GMNA-Localizing-U.S./Canada-11348464) -
2018 - crc - 9/19/17
Driving and Operating 203
Warning (Continued)
camera sensors clean and in
good repair. Do not use LDW in
bad weather conditions.
How the System Works
The LDW camera sensor is on the
windshield ahead of the rearview
mirror.
To turn LDW on and off, press
@on
the instrument panel to the left of
the steering wheel. The control
indicator will light when LDW is on.
When LDW is on,@is green if
LDW is available to warn of a lane
departure. If the vehicle crosses a
detected lane marking without using
the turn signal in that direction,
@
changes to amber and flashes. Additionally, there will be three
beeps on the right or left, depending
on the lane departure direction.
When the System Does Not
Seem To Work Properly
The system may not detect lanes as
well when there are:
.
Close vehicles ahead.
. Sudden lighting changes, such
as when driving through tunnels.
. Banked roads.
If the LDW system is not functioning
properly when lane markings are
clearly visible, cleaning the
windshield may help.
LDW alerts may occur due to tar
marks, shadows, cracks in the road,
temporary or construction lane
markings, or other road
imperfections. This is normal system
operation; the vehicle does not need
service. Turn LDW off if these
conditions continue.
Fuel
GM recommends the use of TOP
TIER detergent gasoline to keep the
engine cleaner and reduce engine
deposits. See www.toptiergas.com
for a list of TOP TIER detergent
gasoline marketers and applicable
countries.
Do not use any fuel labeled E85 or
FlexFuel. Do not use gasoline with
ethanol levels greater than 15% by
volume.
Use regular unleaded gasoline
meeting ASTM specification D4814
with a posted octane rating of 87 or
Page 210 of 338

Chevrolet Spark Owner Manual (GMNA-Localizing-U.S./Canada-11348464) -
2018 - crc - 9/19/17
Vehicle Care 209
Vehicle Care
General Information
General Information . . . . . . . . . . 210
California Proposition65 Warning . . . . . . . . . . . . . . . . . 210
California Perchlorate Materials Requirements . . . . . . . . . . . . . . . 211
Accessories and Modifications . . . . . . . . . . . . . . . . 211
Vehicle Checks
Doing Your OwnService Work . . . . . . . . . . . . . . . . 211
Hood . . . . . . . . . . . . . . . . . . . . . . . . . 212
Engine Compartment Overview . . . . . . . . . . . . . . . . . . . . 214
Engine Oil . . . . . . . . . . . . . . . . . . . . 215
Engine Oil Life System . . . . . . . 217
Automatic Transmission Fluid . . . . . . . . . . . . . . . . . . . . . . . . 218
Manual Transmission Fluid . . . 219
Hydraulic Clutch . . . . . . . . . . . . . . 219
Engine Air Cleaner/Filter . . . . . . 219
Cooling System . . . . . . . . . . . . . . 220
Engine Overheating . . . . . . . . . . 224
Washer Fluid . . . . . . . . . . . . . . . . . 225
Brakes . . . . . . . . . . . . . . . . . . . . . . . 226
Brake Fluid . . . . . . . . . . . . . . . . . . . 226 Battery - North America . . . . . . 228
Starter Switch Check . . . . . . . . . 228
Automatic Transmission Shift
Lock Control Function
Check . . . . . . . . . . . . . . . . . . . . . . . 229
Ignition Transmission Lock Check . . . . . . . . . . . . . . . . . . . . . . . 229
Park Brake and P (Park) Mechanism Check . . . . . . . . . . 229
Wiper Blade Replacement . . . . 230
Windshield Replacement . . . . . 231
Gas Strut(s) . . . . . . . . . . . . . . . . . . 231Headlamp Aiming
Headlamp Aiming . . . . . . . . . . . . 232
Bulb Replacement
Bulb Replacement . . . . . . . . . . . . 233
Halogen Bulbs . . . . . . . . . . . . . . . . 233
Headlamps, Front Turn Signal, Sidemarker, and Parking
Lamps . . . . . . . . . . . . . . . . . . . . . . 233
Taillamps, Turn Signal, Stoplamps, and Back-Up
Lamps . . . . . . . . . . . . . . . . . . . . . . 235
License Plate Lamp . . . . . . . . . . 235
Electrical System
Electrical System Overload . . . 236
Fuses and Circuit Breakers . . . 237 Engine Compartment Fuse
Block . . . . . . . . . . . . . . . . . . . . . . . . 237
Instrument Panel Fuse Block . . . . . . . . . . . . . . . . . . . . . . . . 239
Wheels and Tires
Tires . . . . . . . . . . . . . . . . . . . . . . . . . . 242
All-Season Tires . . . . . . . . . . . . . . 242
Winter Tires . . . . . . . . . . . . . . . . . . 243
Tire Sidewall Labeling . . . . . . . . 243
Tire Designations . . . . . . . . . . . . . 245
Tire Terminology andDefinitions . . . . . . . . . . . . . . . . . . 246
Tire Pressure . . . . . . . . . . . . . . . . . 249
Tire Pressure Monitor System . . . . . . . . . . . . . . . . . . . . . . 250
Tire Pressure Monitor
Operation . . . . . . . . . . . . . . . . . . . 251
Tire Inspection . . . . . . . . . . . . . . . . 254
Tire Rotation . . . . . . . . . . . . . . . . . 254
When It Is Time for New Tires . . . . . . . . . . . . . . . . . . . . . . . . 255
Buying New Tires . . . . . . . . . . . . . 256
Different Size Tires and Wheels . . . . . . . . . . . . . . . . . . . . . . 257
Wheel Covers . . . . . . . . . . . . . . . . 258
Uniform Tire Quality Grading . . . . . . . . . . . . . . . . . . . . . 258
Wheel Alignment and Tire Balance . . . . . . . . . . . . . . . . . . . . . 259
Wheel Replacement . . . . . . . . . . 260
Page 219 of 338

Chevrolet Spark Owner Manual (GMNA-Localizing-U.S./Canada-11348464) -
2018 - crc - 9/19/17
218 Vehicle Care
If the system is ever reset
accidentally, the oil must be
changed at 5 000 km (3,000 mi)
since the last oil change.
Remember to reset the oil life
system whenever the oil is changed.
How to Reset the Engine Oil
Life System
Reset the system whenever the
engine oil is changed so that the
system can calculate the next
engine oil change. Always reset the
engine oil life to 100% after every oil
change. It will not reset itself. To
reset the system:
Base Level Cluster1. Press MENU on the turn signal lever to show Remaining Oil
Life on the display. This display
shows an estimate of the oil’ s
remaining useful life. If 99% is
displayed, that means that 99%
of the current oil life remains.
2. To reset the engine oil life system, press SET/CLR while
the oil life display is active.
After a few seconds, the oil life will be reset to 100%. Be
careful not to reset the oil life
display accidentally at any time
other than after the oil is
changed. It cannot be reset
accurately.
If the
:% CHANGE message in
the DIC comes back on when the
vehicle is started, the engine oil life
system has not reset. Repeat the
procedure.
Uplevel Cluster
1. Turn the ignition on with the engine off.
2. Press MENU on the turn signal lever to enter the Vehicle
Information Menu. Use the
thumbwheel to scroll through
the menu items until you reach
REMAINING OIL LIFE.
3. Press SET/CLR to reset the oil life at 100%.
4. Turn the ignition off. The oil life system can also be reset
as follows:
1. Turn the ignition on with the engine off.
2. Fully press and release the accelerator pedal three times
within five seconds.
The system is reset when the
CHANGE ENGINE OIL SOON
message is off and the REMAINING
OIL LIFE 100% message is
displayed. If the CHANGE ENGINE
OIL SOON message comes back on
when the vehicle is started, the
engine oil life system has not been
reset. Repeat the procedure.
Automatic Transmission
Fluid
How to Check Automatic
Transmission Fluid
It is not necessary to check the
transmission fluid level.
A transmission fluid leak is the only
reason for fluid loss. If a leak
Page 234 of 338
Chevrolet Spark Owner Manual (GMNA-Localizing-U.S./Canada-11348464) -
2018 - crc - 9/19/17
Vehicle Care 233
Bulb Replacement
For the proper type of replacement
bulbs, or any bulb changing
procedure not listed in this section,
contact your dealer.
Halogen Bulbs
{Warning
Halogen bulbs have pressurized
gas inside and can burst if you
drop or scratch the bulb. You or
others could be injured. Be sure
to read and follow the instructions
on the bulb package.
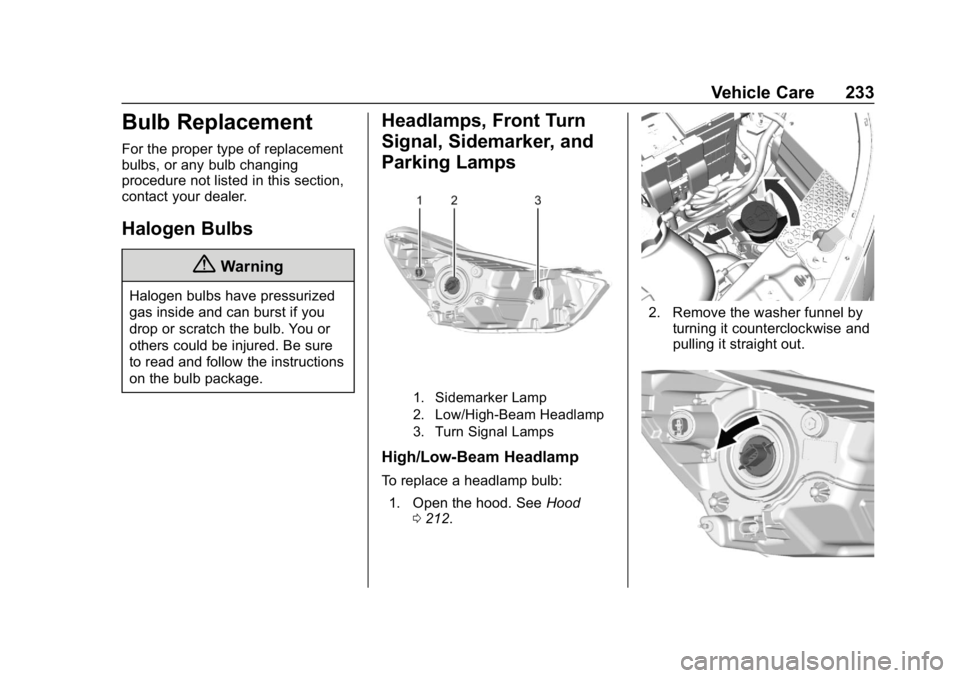
Headlamps, Front Turn
Signal, Sidemarker, and
Parking Lamps
1. Sidemarker Lamp
2. Low/High-Beam Headlamp
3. Turn Signal Lamps
High/Low-Beam Headlamp
To replace a headlamp bulb:1. Open the hood. See Hood
0 212.
2. Remove the washer funnel by
turning it counterclockwise and
pulling it straight out.
Page 235 of 338
Chevrolet Spark Owner Manual (GMNA-Localizing-U.S./Canada-11348464) -
2018 - crc - 9/19/17
234 Vehicle Care
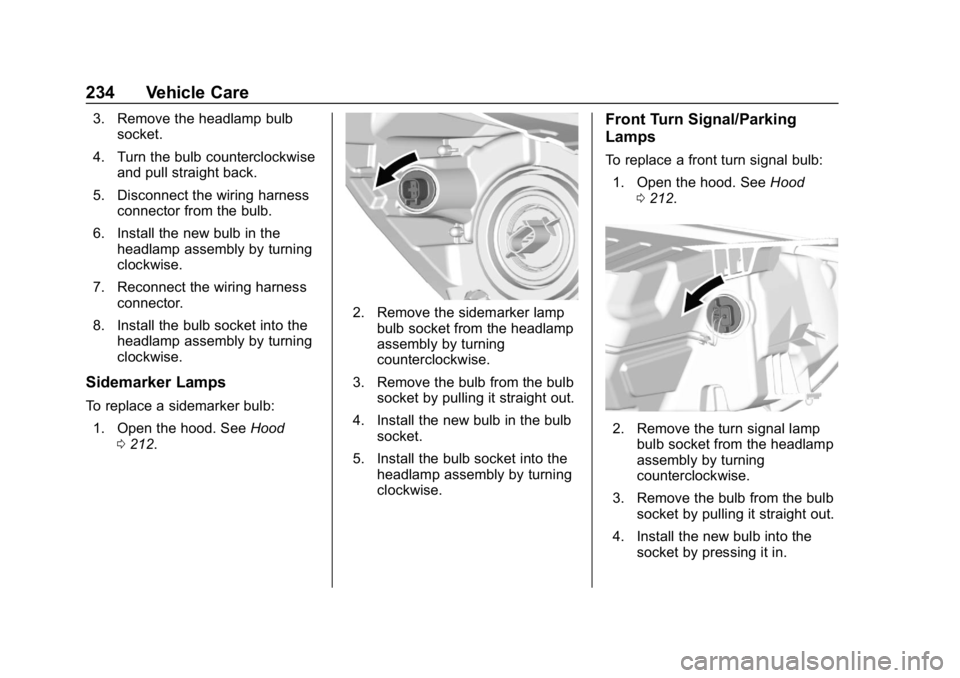
3. Remove the headlamp bulbsocket.
4. Turn the bulb counterclockwise and pull straight back.
5. Disconnect the wiring harness connector from the bulb.
6. Install the new bulb in the headlamp assembly by turning
clockwise.
7. Reconnect the wiring harness connector.
8. Install the bulb socket into the headlamp assembly by turning
clockwise.
Sidemarker Lamps
To replace a sidemarker bulb:
1. Open the hood. See Hood
0 212.
2. Remove the sidemarker lamp
bulb socket from the headlamp
assembly by turning
counterclockwise.
3. Remove the bulb from the bulb socket by pulling it straight out.
4. Install the new bulb in the bulb socket.
5. Install the bulb socket into the headlamp assembly by turning
clockwise.
Front Turn Signal/Parking
Lamps
To replace a front turn signal bulb:
1. Open the hood. See Hood
0 212.
2. Remove the turn signal lamp
bulb socket from the headlamp
assembly by turning
counterclockwise.
3. Remove the bulb from the bulb socket by pulling it straight out.
4. Install the new bulb into the socket by pressing it in.
Page 236 of 338
Chevrolet Spark Owner Manual (GMNA-Localizing-U.S./Canada-11348464) -
2018 - crc - 9/19/17
Vehicle Care 235
5. Install the bulb socket into theheadlamp assembly by turning
clockwise.
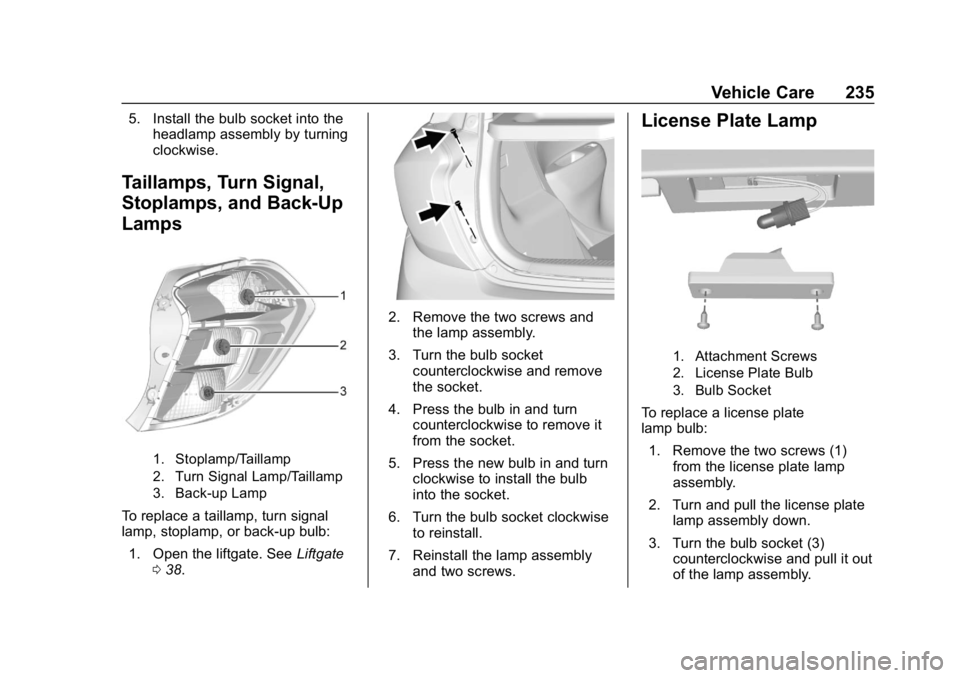
Taillamps, Turn Signal,
Stoplamps, and Back-Up
Lamps
1. Stoplamp/Taillamp
2. Turn Signal Lamp/Taillamp
3. Back-up Lamp
To replace a taillamp, turn signal
lamp, stoplamp, or back-up bulb:
1. Open the liftgate. See Liftgate
0 38.
2. Remove the two screws and
the lamp assembly.
3. Turn the bulb socket counterclockwise and remove
the socket.
4. Press the bulb in and turn counterclockwise to remove it
from the socket.
5. Press the new bulb in and turn clockwise to install the bulb
into the socket.
6. Turn the bulb socket clockwise to reinstall.
7. Reinstall the lamp assembly and two screws.
License Plate Lamp
1. Attachment Screws
2. License Plate Bulb
3. Bulb Socket
To replace a license plate
lamp bulb:
1. Remove the two screws (1) from the license plate lamp
assembly.
2. Turn and pull the license plate lamp assembly down.
3. Turn the bulb socket (3) counterclockwise and pull it out
of the lamp assembly.
Page 254 of 338

Chevrolet Spark Owner Manual (GMNA-Localizing-U.S./Canada-11348464) -
2018 - crc - 9/19/17
Vehicle Care 253
vehicle’s tires or replacing one or
more of the TPMS sensors. Also,
the TPMS sensor matching process
should be performed after replacing
a spare tire with a road tire
containing the TPMS sensor. The
malfunction light and the DIC
message, if equipped, should go off
at the next ignition cycle. The
sensors are matched to the tire/
wheel positions, using a TPMS
relearn tool, in the following order:
driver side front tire, passenger side
front tire, passenger side rear tire,
and driver side rear. See your
dealer for service or to purchase a
relearn tool. A TPMS relearn tool
can also be purchased. See Tire
Pressure Monitor Sensor Activation
Tool at
www.gmtoolsandequipment.com or
call 1-800-GM TOOLS
(1-800-468-6657).
There are two minutes to match the
first tire/wheel position, and
five minutes overall to match all four
tire/wheel positions. If it takes
longer, the matching process stops
and must be restarted.The TPMS sensor matching
process is:
1. Set the parking brake.
2. Turn the ignition on without starting the vehicle or place the
vehicle in Service Mode.
See Ignition Positions (Keyless
Access) 0176 orIgnition
Positions (Key Access) 0178.
3. Use MENU to select the Vehicle Information Menu
(Menu 2) in the Driver
Information Center (DIC).
4. Use the thumbwheel (or up and down arrows) to scroll to the
Tire Pressure Learn Menu Item
(Base DIC) or the Tire
Pressure Menu Item screen
(Uplevel DIC).
5. Press and hold SET/CLR to begin the sensor matching
process.
A message requesting
acceptance of the process may
display.
6. If requested, press SET/CLR again to confirm the selection. The horn sounds twice to
signal the receiver is in relearn
mode and the TIRE LEARN or
TIRE LEARNING ACTIVE
message displays on the DIC
screen.
7. Start with the driver side front tire.
8. Place the relearn tool against the tire sidewall, near the valve
stem. Then press the button to
activate the TPMS sensor.
A horn chirp confirms that the
sensor identification code has
been matched to this tire and
wheel position.
9. Proceed to the passenger side front tire, and repeat the
procedure in Step 8.
10. Proceed to the passenger side rear tire, and repeat the
procedure in Step 8.
11. Proceed to the driver side rear tire, and repeat the procedure
in Step 8. The horn sounds two
times to indicate the sensor
identification code has been
matched to the driver side rear
Page 318 of 338
Chevrolet Spark Owner Manual (GMNA-Localizing-U.S./Canada-11348464) -
2018 - crc - 9/19/17
OnStar 317
2. Say“Get my destination.”
System responds with the
address and distance to the
destination, then responds with
“OnStar ready,” then a tone.
Send Destination to Vehicle
Directions can be sent to the
vehicle’s navigation screen,
if equipped.
Press
Q, then ask the Advisor to
download directions to the vehicle’s
navigation system, if equipped. After
the call ends, the navigation screen
will provide prompts to begin driving
directions. Routes that are sent to
the navigation screen can only be
canceled through the navigation
system.
See www.onstar.com (U.S.) or
www.onstar.ca (Canada).
Connections
The following OnStar services help
with staying connected.
For coverage maps, see
www.onstar.com (U.S.) or
www.onstar.ca (Canada). Ensuring Security
.
Change the default passwords
for the Wi-Fi hotspot and
myChevrolet mobile application.
Make these passwords different
from each other and use a
combination of letters, numbers,
and symbols to increase the
security.
. Change the default name of the
SSID (Service Set Identifier).
This is your network’s name that
is visible to other wireless
devices. Choose a unique name
and avoid family names or
vehicle descriptions.
OnStar Wi-Fi Hotspot (If Equipped)
The vehicle may have a built-in
Wi-Fi hotspot that provides access
to the Internet and web content at
4G LTE speed. Up to seven mobile
devices can be connected. A data
plan is required. Use the in-vehicle
controls only when it is safe to
do so. 1. To retrieve Wi-Fi hotspot
information, press
=to open
the OnStar app on the
infotainment display, then
select Wi-Fi Hotspot. On some
vehicles, touch Wi-Fi or Wi-Fi
Settings on the screen.
2. The Wi-Fi settings will display the Wi-Fi hotspot name (SSID),
password, and on some
vehicles, the connection type
(no Internet connection, 3G,
4G, 4G LTE), and signal quality
(poor, good, excellent).
3. To change the SSID or password, press
Qor call
1-888-4ONSTAR to connect
with an Advisor. On some
vehicles, the SSID and
password can be changed in
the Wi-Fi Hotspot menu.
After initial set-up, your vehicle’s
Wi-Fi hotspot will connect
automatically to your mobile
devices. Manage data usage by
turning Wi-Fi on or off on your
mobile device, using the
myChevrolet mobile app, or by
Page 322 of 338
Chevrolet Spark Owner Manual (GMNA-Localizing-U.S./Canada-11348464) -
2018 - crc - 9/19/17
OnStar 321
services. Service involving location
information about the vehicle cannot
work unless GPS signals are
available, unobstructed, and
compatible with the OnStar
hardware. OnStar services may not
work if the OnStar equipment is not
properly installed or it has not been
properly maintained. If equipment or
software is added, connected,
or modified, OnStar services may
not work. Other problems beyond
the control of OnStar—such as
hills, tall buildings, tunnels, weather,
electrical system design and
architecture of the vehicle, damage
to the vehicle in a crash, or wireless
phone network congestion or
jamming —may prevent service.
See Radio Frequency Statement
0 310.
Services for People with
Disabilities
Advisors provide services to help
with physical disabilities and
medical conditions. Press
Qto help:
. Locate a gas station with an
attendant to pump gas.
. Find a hotel, restaurant, etc.,
that meets accessibility needs.
. Provide directions to the closest
hospital or pharmacy in urgent
situations.
TTY Users
OnStar has the ability to
communicate to deaf,
hard-of-hearing, or speech-impaired
customers while in the vehicle. The
available dealer-installed TTY
system can provide in-vehicle
access to all OnStar services,
except Virtual Advisor and OnStar
Turn-by-Turn Navigation.
OnStar Personal Identification
Number (PIN)
A PIN is needed to access some
OnStar services. The PIN will need
to be changed the first time when
speaking with an Advisor. To change the OnStar PIN, contact an
OnStar Advisor by pressing
Qor
calling 1-888-4ONSTAR.
Warranty
OnStar equipment may be
warranted as part of the vehicle
warranty.
Languages
The vehicle can be programmed to
respond in multiple languages.
Press
Qand ask for an Advisor.
Advisors are available in English,
Spanish, and French. Available
languages may vary by country.
Potential Issues
OnStar cannot perform Remote
Door Unlock or Stolen Vehicle
Assistance after the vehicle has
been off continuously for 10 days
without an ignition cycle. If the
vehicle has not been started for
10 days, OnStar can contact
Roadside Assistance or a locksmith
to help gain access to the vehicle.