battery replacement CHEVROLET SPARK 2020 Owner's Manual
[x] Cancel search | Manufacturer: CHEVROLET, Model Year: 2020, Model line: SPARK, Model: CHEVROLET SPARK 2020Pages: 329, PDF Size: 5.06 MB
Page 11 of 329
Chevrolet Spark Owner Manual (GMNA-Localizing-U.S./Canada-13556236) -
2020 - CRC - 4/23/19
10 Keys, Doors, and Windows
Press the button on the side of the
RKE transmitter to release the key.
Never take the key out without
pressing the button.
See your dealer if a new key is
needed.
If it becomes difficult to turn the key,
inspect the key blade for debris.
Periodically clean with a brush
or pick.
If you are locked out of the vehicle,
seeRoadside Assistance Program
0 295.
With an active OnStar or connected
service plan, an OnStar Advisor
may remotely unlock the vehicle.
See OnStar Overview 0305.
Remote Keyless Entry
(RKE) System
See Radio Frequency Statement
0 301.
If there is a decrease in the Remote
Keyless Entry (RKE) operating
range: .
Check the distance. The
transmitter may be too far from
the vehicle.
. Check the location. Other
vehicles or objects may be
blocking the signal.
. Check the transmitter's battery.
See “Battery Replacement” later
in this section.
. If the transmitter is still not
working correctly, see your
dealer or a qualified technician
for service.
Remote Keyless Entry
(RKE) System Operation
(Key Access)
The RKE transmitter may work up to
60 m (167 ft) away from the vehicle.
Other conditions can affect the
performance of the transmitter. See
Remote Keyless Entry (RKE)
System 010.
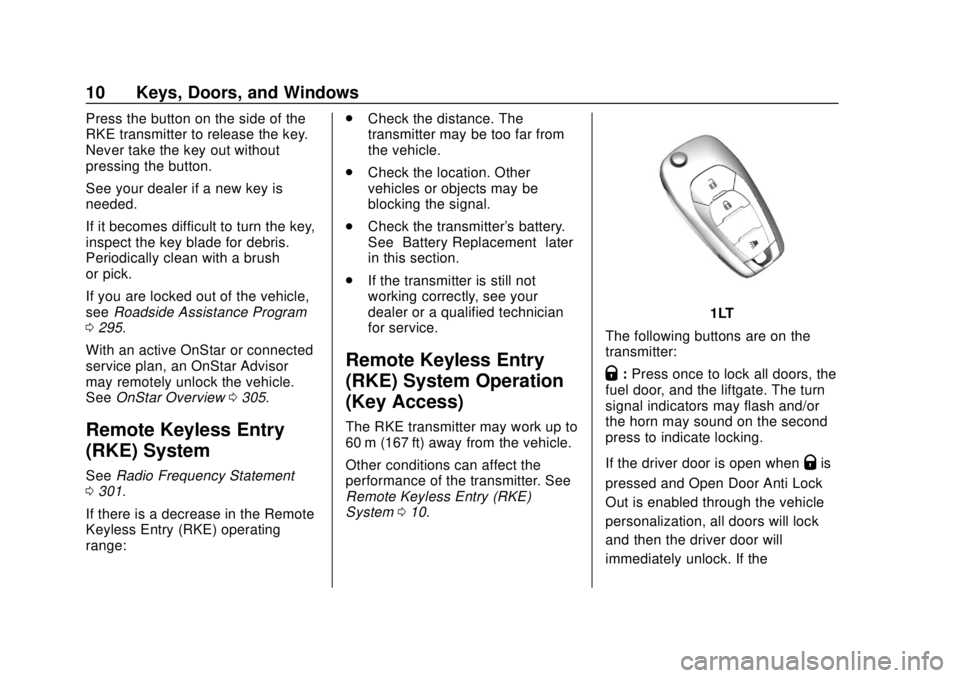
1LT
The following buttons are on the
transmitter:
Q: Press once to lock all doors, the
fuel door, and the liftgate. The turn
signal indicators may flash and/or
the horn may sound on the second
press to indicate locking.
If the driver door is open when
Qis
pressed and Open Door Anti Lock
Out is enabled through the vehicle
personalization, all doors will lock
and then the driver door will
immediately unlock. If the
Page 13 of 329
Chevrolet Spark Owner Manual (GMNA-Localizing-U.S./Canada-13556236) -
2020 - CRC - 4/23/19
12 Keys, Doors, and Windows
If two currently recognized keys are
not available, follow this procedure
to program the first key.
This procedure will take
approximately 30 minutes to
complete for the first key. The
vehicle must be off and all of the
keys you wish to program must be
with you.1. Insert the new vehicle key into the ignition.
2. Turn the ignition on without starting the vehicle. The
security light will come on.
3. Wait 10 minutes until the security light turns off.
4. Turn the ignition off.
5. Repeat Steps 2–4 two more times. After the third time, turn
the ignition on without starting
the vehicle; the key is learned
and all previously known keys
will no longer work with the
vehicle. 6. To program the second key,
turn the ignition off and insert
the second key to be learned
and turn the ignition on without
starting the vehicle.
After the two keys are learned,
remaining keys can be learned by
following the procedure in
“Programming with Two
Recognized Keys.”
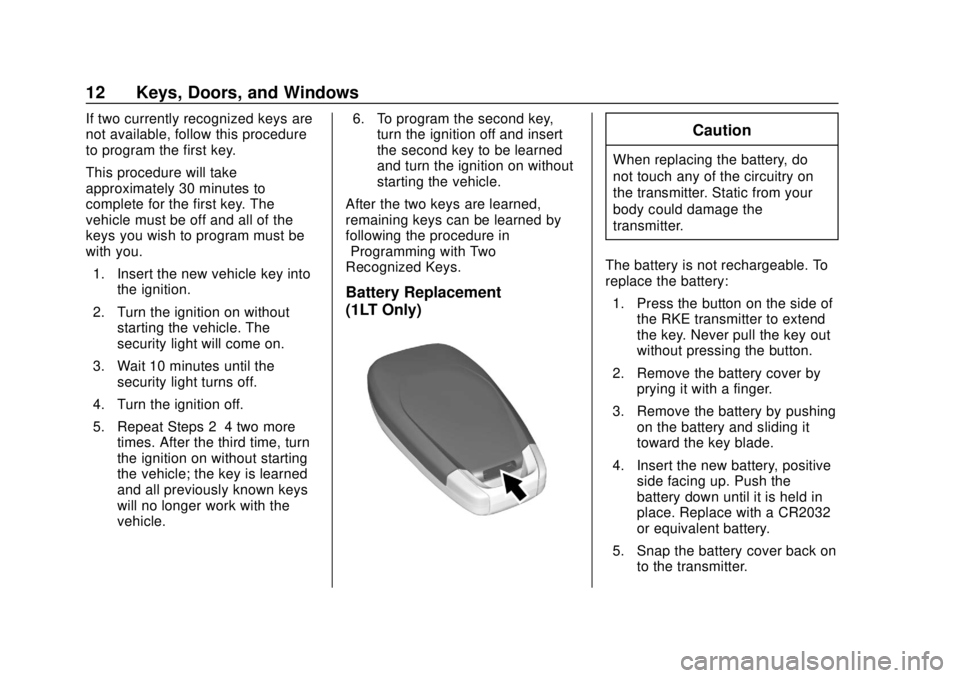
Battery Replacement
(1LT Only)
Caution
When replacing the battery, do
not touch any of the circuitry on
the transmitter. Static from your
body could damage the
transmitter.
The battery is not rechargeable. To
replace the battery: 1. Press the button on the side of the RKE transmitter to extend
the key. Never pull the key out
without pressing the button.
2. Remove the battery cover by prying it with a finger.
3. Remove the battery by pushing on the battery and sliding it
toward the key blade.
4. Insert the new battery, positive side facing up. Push the
battery down until it is held in
place. Replace with a CR2032
or equivalent battery.
5. Snap the battery cover back on to the transmitter.
Page 17 of 329
Chevrolet Spark Owner Manual (GMNA-Localizing-U.S./Canada-13556236) -
2020 - CRC - 4/23/19
16 Keys, Doors, and Windows
Key Access
To access a vehicle with a weak
transmitter battery, seeDoor Locks
0 17.
Programming Transmitters to
the Vehicle
Only RKE transmitters programmed
to the vehicle will work. If a
transmitter is lost or stolen, a
replacement can be purchased and
programmed through your dealer.
The vehicle can be reprogrammed
so that lost or stolen transmitters no
longer work. Any remaining
transmitters will need to be
reprogrammed. Each vehicle can
have up to eight transmitters
matched to it.
Starting the Vehicle with a Low
Transmitter Battery
If the transmitter battery is weak, the
DIC may display NO REMOTE
DETECTED when trying to start the
vehicle. The DIC may also display
REPLACE BATTERY IN
REMOTE KEY. To start the vehicle:
1. Place the transmitter in the transmitter pocket with the
buttons facing the front of the
vehicle.
2. With the vehicle in P (Park) or N (Neutral), press the brake
pedal, and press ENGINE
START/STOP.
Replace the transmitter battery
as soon as possible.
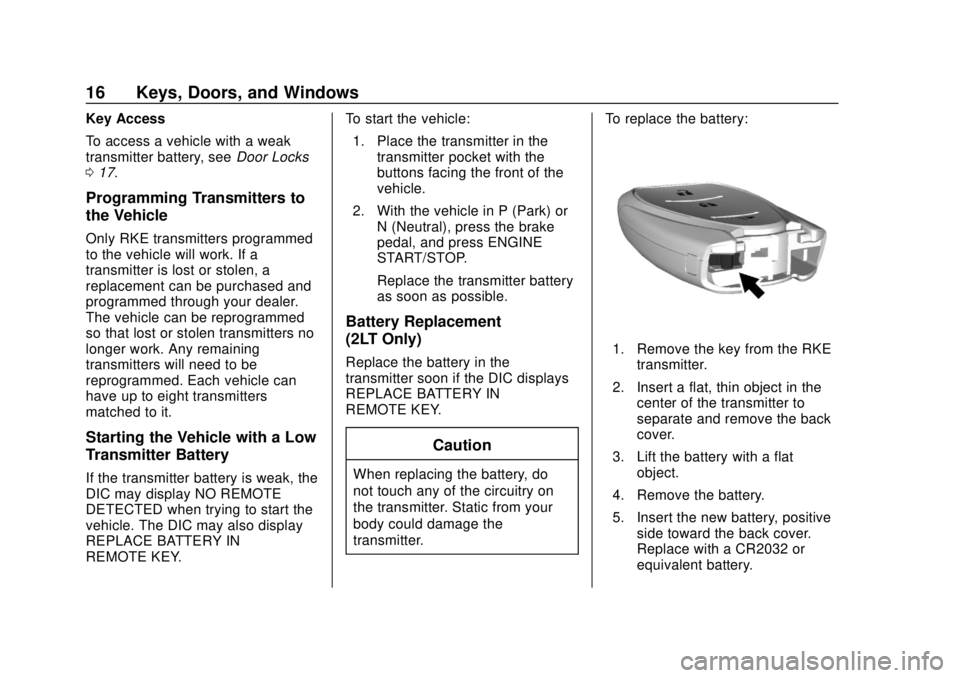
Battery Replacement
(2LT Only)
Replace the battery in the
transmitter soon if the DIC displays
REPLACE BATTERY IN
REMOTE KEY.
Caution
When replacing the battery, do
not touch any of the circuitry on
the transmitter. Static from your
body could damage the
transmitter. To replace the battery:
1. Remove the key from the RKE
transmitter.
2. Insert a flat, thin object in the center of the transmitter to
separate and remove the back
cover.
3. Lift the battery with a flat object.
4. Remove the battery.
5. Insert the new battery, positive side toward the back cover.
Replace with a CR2032 or
equivalent battery.
Page 55 of 329
Chevrolet Spark Owner Manual (GMNA-Localizing-U.S./Canada-13556236) -
2020 - CRC - 4/23/19
54 Seats and Restraints
{Warning
Stowing articles under the
passenger seat or between the
passenger seat cushion and
seatback may interfere with the
proper operation of the passenger
sensing system.
Servicing the
Airbag-Equipped Vehicle
Airbags affect how the vehicle
should be serviced. There are parts
of the airbag system in several
places around the vehicle. Your
dealer and the service manual have
information about servicing the
vehicle and the airbag system. To
purchase a service manual, see
Publication Ordering Information
0300.
{Warning
For up to 10 seconds after the
vehicle is turned off and the
battery is disconnected, an airbag
can still inflate during improper
service. You can be injured if you
are close to an airbag when it
inflates. Avoid yellow connectors.
They are probably part of the
airbag system. Be sure to follow
proper service procedures, and
make sure the person performing
work for you is qualified to do so.
Adding Equipment to the
Airbag-Equipped Vehicle
Adding accessories that change the
vehicle's frame, bumper system,
height, front end, or side sheet
metal may keep the airbag system
from working properly.
The operation of the airbag system
can also be affected by changing,
including improperly repairing or
replacing, any parts of the following: .
Airbag system, including airbag
modules, front or side impact
sensors, sensing and diagnostic
module, or airbag wiring
. Front seats, including stitching,
seams or zippers
. Seat belts
. Steering wheel, instrument
panel, overhead console, ceiling
trim, or pillar garnish trim
. Inner door seals, including
speakers
Your dealer and the service manual
have information about the location
of the airbag modules and sensors,
sensing and diagnostic module, and
airbag wiring along with the proper
replacement procedures.
In addition, the vehicle has a
passenger sensing system for the
front outboard passenger position,
which includes sensors that are part
of the passenger seat. The
passenger sensing system may not
operate properly if the original seat
trim is replaced with non-GM
covers, upholstery, or trim; or with
Page 84 of 329
Chevrolet Spark Owner Manual (GMNA-Localizing-U.S./Canada-13556236) -
2020 - CRC - 4/23/19
Instruments and Controls 83
{Warning
Power is always supplied to the
outlets. Do not leave electrical
equipment plugged in when the
vehicle is not in use because the
vehicle could catch fire and cause
injury or death.
Caution
Leaving electrical equipment
plugged in for an extended period
of time while the vehicle is off will
drain the battery. Always unplug
electrical equipment when not in
use and do not plug in equipment
that exceeds the maximum
20 amp rating.
Certain accessory power plugs may
not be compatible with the
accessory power outlet and could
overload vehicle or adapter fuses.
If a problem is experienced, see
your dealer. When adding electrical equipment,
be sure to follow the proper
installation instructions included with
the equipment. See
Add-On
Electrical Equipment 0195.
Caution
Hanging heavy equipment from
the power outlet can cause
damage not covered by the
vehicle warranty. The power
outlets are designed for
accessory power plugs only, such
as cell phone charge cords.
Warning Lights,
Gauges, and
Indicators
Warning lights and gauges can
signal that something is wrong
before it becomes serious enough
to cause an expensive repair or
replacement. Paying attention to the
warning lights and gauges could
prevent injury.
Some warning lights come on briefly
when the engine is started to
indicate they are working. When
one of the warning lights comes on
and stays on while driving, or when
one of the gauges shows there may
be a problem, check the section that
explains what to do. Waiting to do
repairs can be costly and even
dangerous.
Page 105 of 329
Chevrolet Spark Owner Manual (GMNA-Localizing-U.S./Canada-13556236) -
2020 - CRC - 4/23/19
104 Instruments and Controls
258 :Park Assist Off
Engine Oil Messages
:% CHANGE
This message displays when the
engine oil needs to be changed.
When changing the engine oil, be
sure to reset the Oil Life System.
See Engine Oil Life System 0204,
Engine Oil 0202, and Maintenance
Schedule 0275.
Vehicle Messages
(Uplevel Cluster)
Messages displayed on the DIC
indicate the status of the vehicle or
some action that may be needed to
correct a condition. Multiple
messages may appear one after
another.
The messages that do not require
immediate action can be
acknowledged and cleared by
pressing SET/CLR. The messages
that require immediate action cannot
be cleared until that action is
performed. All messages should be taken
seriously; clearing the message
does not correct the problem.
If a SERVICE message appears,
see your dealer.
Follow the instructions given in the
messages. The system displays
messages regarding the following
topics:
.
Service Messages
. Fluid Levels
. Vehicle Security
. Brakes
. Steering
. Ride Control Systems
. Driver Assistance Systems
. Cruise Control
. Lighting and Bulb Replacement
. Wiper/Washer Systems
. Doors and Windows
. Seat Belts
. Airbag Systems
. Engine and Transmission .
Tire Pressure
. Battery
Engine Power Messages
ENGINE POWER IS REDUCED
This message displays when the
vehicle's propulsion power is
reduced. A reduction in propulsion
power can affect the vehicle's ability
to accelerate. If this message is on,
but there is no observed reduction
in performance, proceed to your
destination. The performance may
be reduced the next time the vehicle
is driven. The vehicle may be driven
while this message is on, but
maximum acceleration and speed
may be reduced. Anytime this
message stays on, or displays
repeatedly, the vehicle should be
taken to your dealer for service as
soon as possible.
Under certain operating conditions,
propulsion will be disabled. Try
restarting after the vehicle has been
off for 30 seconds.
Page 197 of 329
Chevrolet Spark Owner Manual (GMNA-Localizing-U.S./Canada-13556236) -
2020 - CRC - 4/23/19
196 Vehicle Care
Vehicle Care
General Information
General Information . . . . . . . . . . 197
California Proposition65 Warning . . . . . . . . . . . . . . . . . 197
California Perchlorate Materials Requirements . . . . . 198
Accessories and Modifications . . . . . . . . . . . . . . . . 198
Vehicle Checks
Doing Your OwnService Work . . . . . . . . . . . . . . . 198
Hood . . . . . . . . . . . . . . . . . . . . . . . . . 199
Engine Compartment Overview . . . . . . . . . . . . . . . . . . . . 201
Engine Oil . . . . . . . . . . . . . . . . . . . . 202
Engine Oil Life System . . . . . . . 204
Automatic Transmission Fluid . . . . . . . . . . . . . . . . . . . . . . . . 205
Manual Transmission Fluid . . . 206
Hydraulic Clutch . . . . . . . . . . . . . . 206
Engine Air Cleaner/Filter . . . . . . 207
Cooling System . . . . . . . . . . . . . . 208
Engine Overheating . . . . . . . . . . 211
Washer Fluid . . . . . . . . . . . . . . . . . 212
Brakes . . . . . . . . . . . . . . . . . . . . . . . 213
Brake Fluid . . . . . . . . . . . . . . . . . . . 213 Battery - North America . . . . . . 215
Starter Switch Check . . . . . . . . . 216
Automatic Transmission Shift
Lock Control Function
Check . . . . . . . . . . . . . . . . . . . . . . . 217
Ignition Transmission Lock Check . . . . . . . . . . . . . . . . . . . . . . . 217
Park Brake and P (Park) Mechanism Check . . . . . . . . . . 217
Wiper Blade Replacement . . . . 218
Windshield Replacement . . . . . 219
Gas Strut(s) . . . . . . . . . . . . . . . . . . 219Headlamp Aiming
Headlamp Aiming . . . . . . . . . . . . 220
Bulb Replacement
Bulb Replacement . . . . . . . . . . . . 220
Halogen Bulbs . . . . . . . . . . . . . . . . 220
High Intensity Discharge (HID) Lighting . . . . . . . . . . . . . . . . . . . . . 221
LED Lighting . . . . . . . . . . . . . . . . . 221
Headlamps, Front Turn Signal, Sidemarker, and Parking
Lamps . . . . . . . . . . . . . . . . . . . . . . 221
Taillamps, Turn Signal, Stoplamps, and Back-Up
Lamps . . . . . . . . . . . . . . . . . . . . . . 224
License Plate Lamp . . . . . . . . . . 224
Electrical System
Electrical System Overload . . . 225
Fuses and Circuit Breakers . . . 226
Engine Compartment Fuse
Block . . . . . . . . . . . . . . . . . . . . . . . . 226
Instrument Panel Fuse
Block . . . . . . . . . . . . . . . . . . . . . . . . 229
Wheels and Tires
Tires . . . . . . . . . . . . . . . . . . . . . . . . . . 231
All-Season Tires . . . . . . . . . . . . . . 232
Winter Tires . . . . . . . . . . . . . . . . . . 232
Tire Sidewall Labeling . . . . . . . . 233
Tire Designations . . . . . . . . . . . . . 235
Tire Terminology andDefinitions . . . . . . . . . . . . . . . . . . 235
Tire Pressure . . . . . . . . . . . . . . . . . 238
Tire Pressure Monitor System . . . . . . . . . . . . . . . . . . . . . . 239
Tire Pressure Monitor Operation . . . . . . . . . . . . . . . . . . . 240
Tire Inspection . . . . . . . . . . . . . . . . 243
Tire Rotation . . . . . . . . . . . . . . . . . 243
When It Is Time for New Tires . . . . . . . . . . . . . . . . . . . . . . . . 244
Buying New Tires . . . . . . . . . . . . . 245
Different Size Tires and Wheels . . . . . . . . . . . . . . . . . . . . . . 247
Wheel Covers . . . . . . . . . . . . . . . . 247
Page 198 of 329
Chevrolet Spark Owner Manual (GMNA-Localizing-U.S./Canada-13556236) -
2020 - CRC - 4/23/19
Vehicle Care 197
Uniform Tire QualityGrading . . . . . . . . . . . . . . . . . . . . . 247
Wheel Alignment and Tire Balance . . . . . . . . . . . . . . . . . . . . . 249
Wheel Replacement . . . . . . . . . . 249
Tire Chains . . . . . . . . . . . . . . . . . . . 250
If a Tire Goes Flat . . . . . . . . . . . . 250
Tire Changing . . . . . . . . . . . . . . . . 251
Compact Spare Tire . . . . . . . . . . 256
Jump Starting
Jump Starting - North
America . . . . . . . . . . . . . . . . . . . . . 257
Towing the Vehicle
Towing the Vehicle . . . . . . . . . . . 260
Recreational VehicleTowing . . . . . . . . . . . . . . . . . . . . . . 261
Appearance Care
Exterior Care . . . . . . . . . . . . . . . . . 264
Interior Care . . . . . . . . . . . . . . . . . . 269
Floor Mats . . . . . . . . . . . . . . . . . . . . 272
General Information
For service and parts needs, visit
your dealer. You will receive
genuine GM parts and GM-trained
and supported service people.
Genuine GM parts have one of
these marks:
California Proposition
65 Warning
{Warning
Most motor vehicles, including
this one, as well as many of its
service parts and fluids, contain
and/or emit chemicals known to
the State of California to cause
cancer and birth defects or other
reproductive harm. Engine
exhaust, many parts and
systems, many fluids, and some
component wear by-products
contain and/or emit these
chemicals. For more information
go to www.P65Warnings.ca.gov/
passenger-vehicle.
See Battery - North America 0215
and Jump Starting - North America
0 257 and the back cover.
Page 216 of 329
Chevrolet Spark Owner Manual (GMNA-Localizing-U.S./Canada-13556236) -
2020 - CRC - 4/23/19
Vehicle Care 215
Battery - North America
The original equipment battery is
maintenance free. Do not remove
the cap and do not add fluid.
Refer to the replacement number
shown on the original battery label
when a new battery is needed. See
Engine Compartment Overview
0201 for battery location.
{Warning
WARNING: Battery posts,
terminals, and related
accessories contain lead and lead
compounds, chemicals known to
the State of California to cause
cancer and birth defects or other
reproductive harm. Batteries also
contain other chemicals known to
the State of California to cause
cancer. WASH HANDS AFTER
HANDLING. For more information
go to www.P65Warnings.ca.gov/
passenger-vehicle. See
California Proposition
65 Warning 0197 and the back
cover.
Vehicle Storage
{Warning
Batteries have acid that can burn
you and gas that can explode.
You can be badly hurt if you are
not careful. See Jump Starting -
North America 0257 for tips on
working around a battery without
getting hurt.
Infrequent Usage: Remove the
black, negative (−) cable from the
battery to keep the battery from
running down.
Extended Storage: Remove the
black, negative (−) cable from the
battery or use a battery trickle
charger.
Negative Battery Cable
Disconnection
{Warning
Before disconnecting the negative
battery cable, turn off all features,
turn the ignition off, and remove
the key, if equipped, from the
vehicle. If this is not done, you or
others could be injured, and the
vehicle could be damaged.
Caution
If the battery is disconnected with
the ignition on or the vehicle in
Retained Accessory Power
(RAP), the OnStar back-up
battery will be permanently
discharged and will need to be
replaced.
1. Make sure the lamps, features, and accessories are turned off.
2. Turn the ignition off and remove the key, if equipped.
Page 217 of 329
Chevrolet Spark Owner Manual (GMNA-Localizing-U.S./Canada-13556236) -
2020 - CRC - 4/23/19
216 Vehicle Care
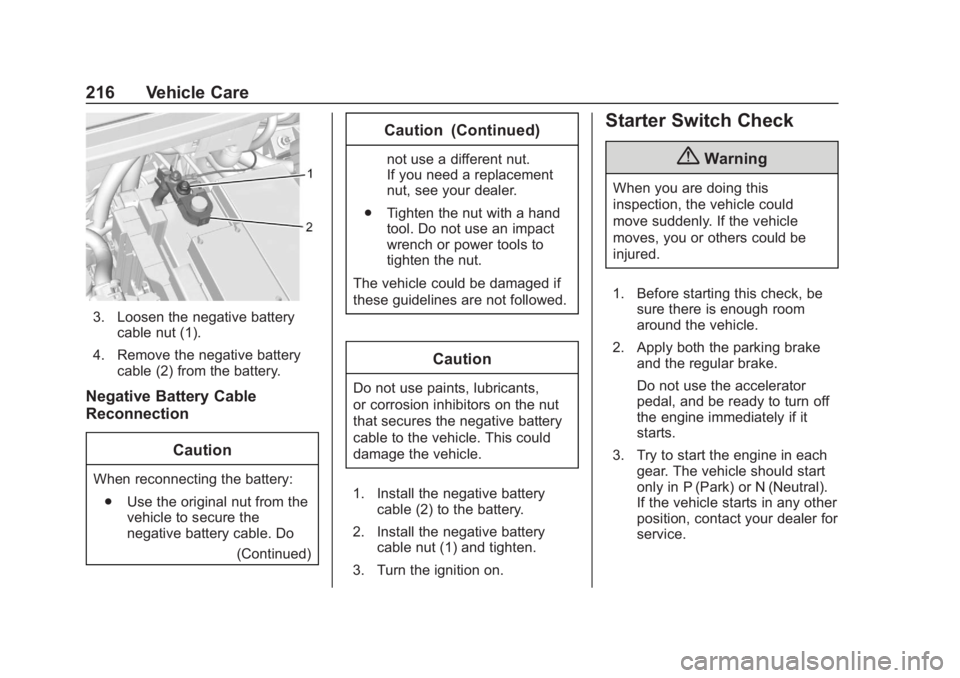
3. Loosen the negative batterycable nut (1).
4. Remove the negative battery cable (2) from the battery.
Negative Battery Cable
Reconnection
Caution
When reconnecting the battery:. Use the original nut from the
vehicle to secure the
negative battery cable. Do
(Continued)
Caution (Continued)
not use a different nut.
If you need a replacement
nut, see your dealer.
. Tighten the nut with a hand
tool. Do not use an impact
wrench or power tools to
tighten the nut.
The vehicle could be damaged if
these guidelines are not followed.
Caution
Do not use paints, lubricants,
or corrosion inhibitors on the nut
that secures the negative battery
cable to the vehicle. This could
damage the vehicle.
1. Install the negative battery cable (2) to the battery.
2. Install the negative battery cable nut (1) and tighten.
3. Turn the ignition on.
Starter Switch Check
{Warning
When you are doing this
inspection, the vehicle could
move suddenly. If the vehicle
moves, you or others could be
injured.
1. Before starting this check, be sure there is enough room
around the vehicle.
2. Apply both the parking brake and the regular brake.
Do not use the accelerator
pedal, and be ready to turn off
the engine immediately if it
starts.
3. Try to start the engine in each gear. The vehicle should start
only in P (Park) or N (Neutral).
If the vehicle starts in any other
position, contact your dealer for
service.