remove seats CHEVROLET SPARK 2020 Owner's Manual
[x] Cancel search | Manufacturer: CHEVROLET, Model Year: 2020, Model line: SPARK, Model: CHEVROLET SPARK 2020Pages: 329, PDF Size: 5.06 MB
Page 35 of 329
Chevrolet Spark Owner Manual (GMNA-Localizing-U.S./Canada-13556236) -
2020 - CRC - 4/23/19
34 Seats and Restraints
Rear Seats
Rear Seat Reminder
If equipped, the message REAR
SEAT REMINDER LOOK IN REAR
SEAT displays under certain
conditions indicating there may be
an item or passenger in the rear
seat. Check before exiting the
vehicle.
This feature will activate when a
second row door is opened while
the vehicle is on or up to 10 minutes
before the vehicle is turned on.
There will be an alert when the
vehicle is turned off. The alert does
not directly detect objects in the rear
seat; instead, under certain
conditions, it detects when a rear
door is opened and closed,
indicating that there may be
something in the rear seat.
The feature is active only once each
time the vehicle is turned on and off,
and will require reactivation by
opening and closing the second row
doors. There may be an alert even
when there is nothing in the rear
seat; for example, if a child enteredthe vehicle through the rear door
and left the vehicle without the
vehicle being shut off.
The feature can be turned on or off.
See
Vehicle Personalization 0105.
Folding the Seatback
Either side of the seatback can be
folded down for more cargo space.
Fold a seatback only when the
vehicle is not moving.
Caution
Folding a rear seat with the seat
belts still fastened may cause
damage to the seat or the seat
belts. Always unbuckle the seat
belts and return them to their
normal stowed position before
folding a rear seat.
To fold a seatback down: 1. Slide the front seats forward and place the front seatbacks
in the upright position. See
Seat Adjustment 031 and
Reclining Seatbacks 032. 2. Remove the rear head
restraints. See “Head Restraint
Removal and Reinstallation”
under Lower Anchors and
Tethers for Children (LATCH
System) 063.
3. Pull up on the front edge of the rear seat cushion to release it.
Tilt the seat cushion forward
toward the front of the vehicle.
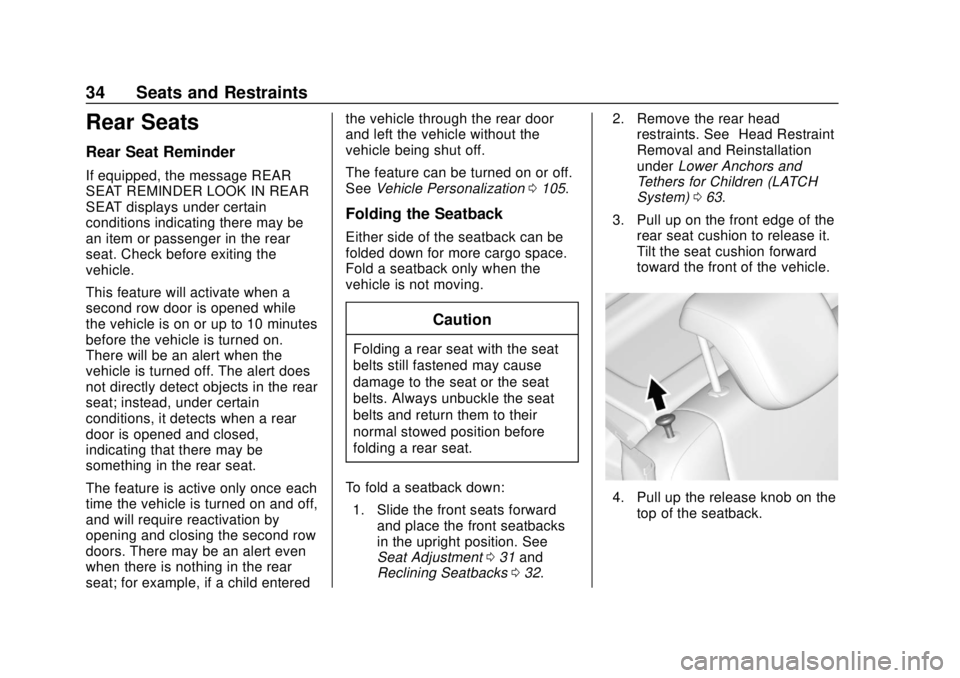
4. Pull up the release knob on thetop of the seatback.
Page 37 of 329

Chevrolet Spark Owner Manual (GMNA-Localizing-U.S./Canada-13556236) -
2020 - CRC - 4/23/19
36 Seats and Restraints
The seat belt should not cross
the seatback locking
mechanism when raising the
seatback.
2. Lift the seatback up slightly and reinstall the head restraint. See
“Head Restraint Removal and
Reinstallation” underLower
Anchors and Tethers for
Children (LATCH System) 063.
3. Push the seatback rearward all the way to lock it in place.
4. Push and pull the top of the seatback to be sure it is locked
into position.
5. Return the seat cushion to its original position and push
down on the front part of the
seat cushion until it latches.
6. Remove the seat belt from the belt guide on the trim.
7. Repeat Steps 1–6 for the other seatback and seat cushion,
if necessary.
If added cargo space is not needed,
the seatbacks should be kept in the
upright, locked position.Seat Belts
This section describes how to use
seat belts properly, and some things
not to do.
{Warning
Do not let anyone ride where a
seat belt cannot be worn properly.
In a crash, if you or your
passenger(s) are not wearing
seat belts, injuries can be much
worse than if you are wearing
seat belts. You can be seriously
injured or killed by hitting things
inside the vehicle harder or by
being ejected from the vehicle. In
addition, anyone who is not
buckled up can strike other
passengers in the vehicle.
It is extremely dangerous to ride
in a cargo area, inside or outside
of a vehicle. In a collision,
passengers riding in these areas
are more likely to be seriously
injured or killed. Do not allow (Continued)
Warning (Continued)
passengers to ride in any area of
the vehicle that is not equipped
with seats and seat belts.
Always wear a seat belt, and
check that all passenger(s) are
restrained properly too.
This vehicle has indicators as a
reminder to buckle the seat belts.
See Seat Belt Reminders 087.
Why Seat Belts Work
Page 53 of 329
Chevrolet Spark Owner Manual (GMNA-Localizing-U.S./Canada-13556236) -
2020 - CRC - 4/23/19
52 Seats and Restraints
1. Turn the vehicle off.
2. Remove the child restraint fromthe vehicle.
3. Remove any additional items from the seat such as blankets,
cushions, seat covers, seat
heaters, or seat massagers.
4. Reinstall the child restraint following the directions
provided by the child restraint
manufacturer and refer to
Securing Child Restraints (With
the Seat Belt in the Rear Seat)
071 or
Securing Child Restraints (With
the Seat Belt in the Front Seat)
0 73. 5. If, after reinstalling the child
restraint and restarting the
vehicle, the ON indicator is still
lit, turn the vehicle off. Then
slightly recline the vehicle
seatback and adjust the seat
cushion, if adjustable, to make
sure that the vehicle seatback
is not pushing the child
restraint into the seat cushion.
Also make sure the child
restraint is not trapped under
the vehicle head restraint.
If this happens, adjust the head
restraint. See Head Restraints
0 30.
6. Restart the vehicle.
The passenger sensing system may
or may not turn off the airbags for a
child in a child restraint depending
upon the child’s size. It is better to
secure the child restraint in a rear
seat. Never put a rear-facing child
restraint in the front seat, even if the
ON indicator is not lit.If the Off Indicator Is Lit for an
Adult-Sized Occupant
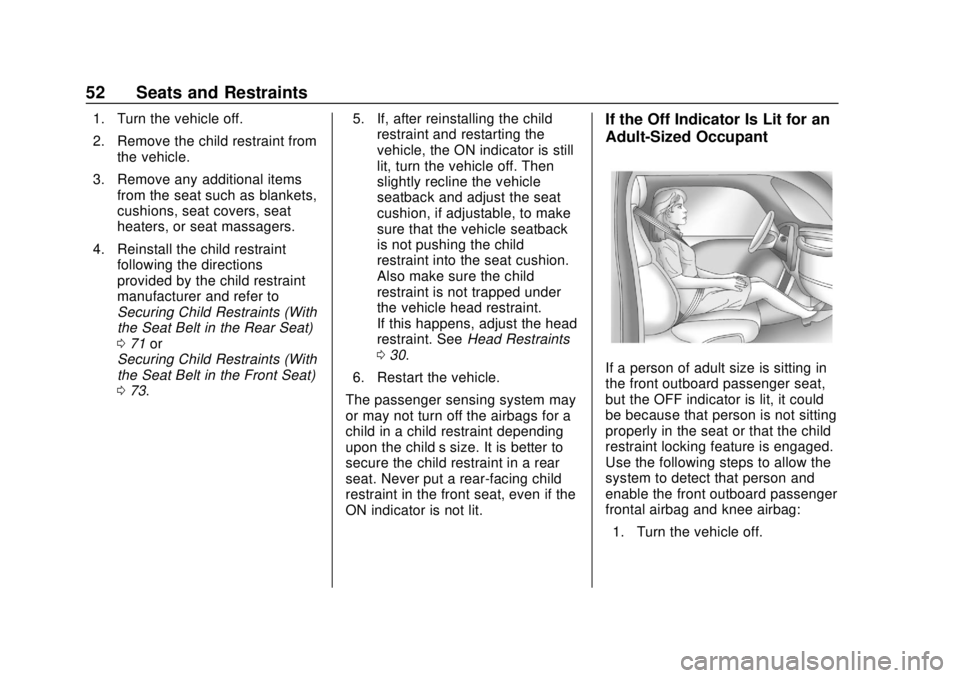
If a person of adult size is sitting in
the front outboard passenger seat,
but the OFF indicator is lit, it could
be because that person is not sitting
properly in the seat or that the child
restraint locking feature is engaged.
Use the following steps to allow the
system to detect that person and
enable the front outboard passenger
frontal airbag and knee airbag: 1. Turn the vehicle off.
Page 54 of 329
Chevrolet Spark Owner Manual (GMNA-Localizing-U.S./Canada-13556236) -
2020 - CRC - 4/23/19
Seats and Restraints 53
2. Remove any additional materialfrom the seat, such as
blankets, cushions, seat
covers, seat heaters, or seat
massagers.
3. Place the seatback in the fully upright position.
4. Have the person sit upright in the seat, centered on the seat
cushion, with legs comfortably
extended.
5. If the shoulder portion of the belt is pulled out all the way,
the child restraint locking
feature will be engaged. This
may unintentionally cause the
passenger sensing system to
turn the airbag off for some
adult-sized occupants. If this
happens, unbuckle the belt and
let the belt go back all the way,
and then buckle the belt again
without pulling the belt out all
the way. 6. Restart the vehicle and have
the person remain in this
position for two to
three minutes after the ON
indicator is lit.
{Warning
If the front outboard passenger
airbag is turned off for an
adult-sized occupant, the airbag
will not be able to inflate and help
protect that person in a crash,
resulting in an increased risk of
serious injury or even death. An
adult-sized occupant should not
ride in the front outboard
passenger seat, if the passenger
airbag OFF indicator is lit.
Additional Factors Affecting
System Operation
Seat belts help keep the passenger
in position on the seat during
vehicle maneuvers and braking,
which helps the passenger sensing
system maintain the passenger
airbag status. See “Seat Belts”and“Child Restraints”
in the Index for
additional information about the
importance of proper restraint use.
A thick layer of additional material,
such as a blanket or cushion,
or aftermarket equipment such as
seat covers, seat heaters, and seat
massagers can affect how well the
passenger sensing system
operates. We recommend that you
not use seat covers or other
aftermarket equipment except when
approved by GM for your specific
vehicle. See Adding Equipment to
the Airbag-Equipped Vehicle 054
for more information about
modifications that can affect how
the system operates.
The ON indicator may be lit if an
object, such as a briefcase,
handbag, grocery bag, laptop,
or other electronic device, is put on
an unoccupied seat. If this is not
desired, remove the object from
the seat.
Page 69 of 329

Chevrolet Spark Owner Manual (GMNA-Localizing-U.S./Canada-13556236) -
2020 - CRC - 4/23/19
68 Seats and Restraints
1.1. Find the lower anchorsfor the desired seating
position.
1.2. Put the child restraint on the seat.
For rear outboard seating
positions, if the head
restraint interferes with
the proper installation of
the child restraint, the
head restraint may be
removed. See “Head
Restraint Removal and
Reinstallation” at the end
of this section.
When installing a
rear-facing child restraint,
it may be necessary to
move the front seat
forward to properly install
the child restraint per the
child restraint
manufacturer instructions.
See Seat Adjustment
0 31. 1.3. Attach and tighten the
lower attachments on the
child restraint to the lower
anchors.
2. If the child restraint manufacturer recommends that
the top tether be attached,
attach and tighten the top
tether to the top tether anchor,
if equipped. Refer to the child
restraint instructions and the
following steps:
2.1. Find the top tether
anchor.
2.2. Attach the top tether to the top tether anchor. The
cargo cover can be
removed and placed in a
secure area if it interferes
with the attachment of the
top tether to the top
tether anchor.
2.3. Route, attach, and tighten the top tether according
to your child restraint
instructions and the
following instructions:
If you are using a single
tether in an outboard
seating position and the
head restraint has been
removed, route the tether
over the seatback.
If you are using a dual
tether in an outboard
seating position and the
Page 70 of 329
Chevrolet Spark Owner Manual (GMNA-Localizing-U.S./Canada-13556236) -
2020 - CRC - 4/23/19
Seats and Restraints 69
head restraint has been
removed, route the tether
over the seatback.
If the rear outboard
seating position you are
using has an adjustable
head restraint and you
are using a single tether,
raise the head restraint
and route the tether
under the head restraint
and in between the head
restraint posts.
If the rear outboard
seating position you are
using has an adjustable
head restraint and you
are using a dual tether,
raise the head restraint
and route the tether
under the head restraint
and around the head
restraint posts.
3. Before placing a child in the child restraint, make sure it is
securely held in place. To
check, grasp the child restraint
at the LATCH path and attempt
to move it side to side and
back and forth. There should
be no more than 2.5 cm (1 in) of
movement for proper
installation.
Head Restraint Removal and
Reinstallation
The rear outboard head restraints
can be removed if they interfere with
the proper installation of the child
restraint, see “Securing a Child
Restraint Designed for the LATCH
System” previously in this section.
Store the head restraints in a secure
place.
To remove the head restraint:
1. Partially fold the seatback forward. See Rear Seats034
for more information.
Page 71 of 329
Chevrolet Spark Owner Manual (GMNA-Localizing-U.S./Canada-13556236) -
2020 - CRC - 4/23/19
70 Seats and Restraints
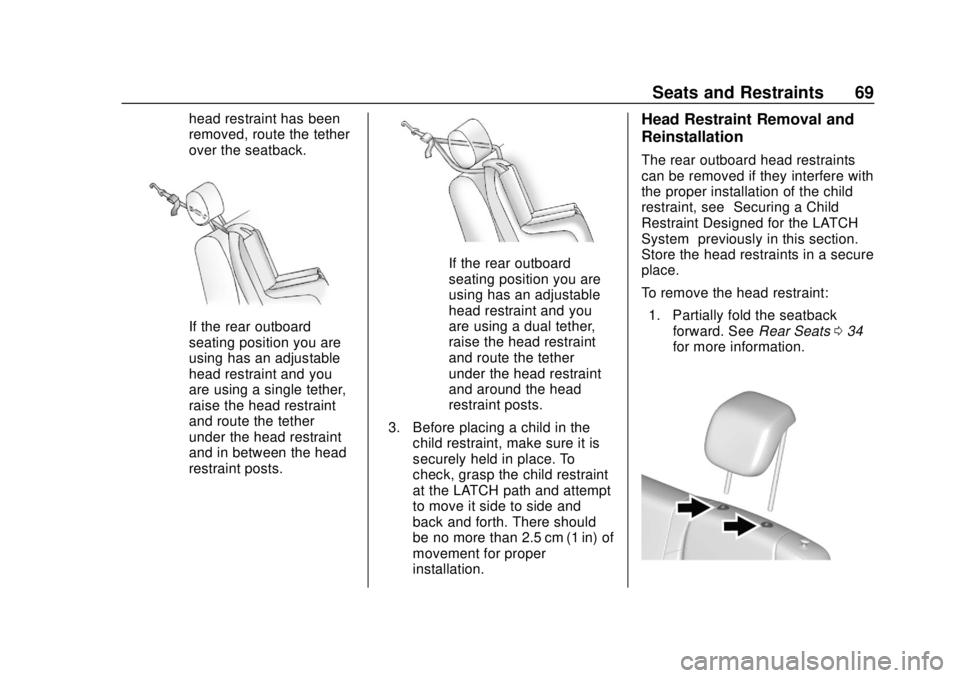
2. Press both buttons on the headrestraint posts at the same time
and pull up on the head
restraint.
3. Store the head restraints in a secure place.
4. When the child restraint is removed, reinstall the head
restraint before the seating
position is used.
{Warning
With head restraints that are not
installed and adjusted properly,
there is a greater chance that
occupants will suffer a neck/
spinal injury in a crash. Do not
drive until the head restraints for
all occupants are installed and
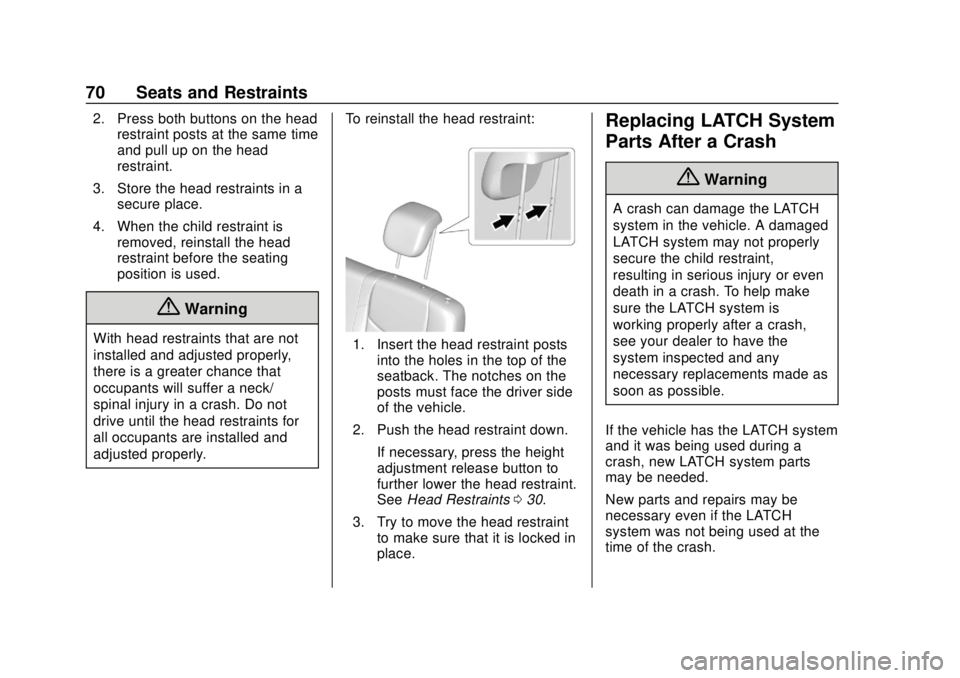
adjusted properly. To reinstall the head restraint:1. Insert the head restraint posts
into the holes in the top of the
seatback. The notches on the
posts must face the driver side
of the vehicle.
2. Push the head restraint down. If necessary, press the height
adjustment release button to
further lower the head restraint.
See Head Restraints 030.
3. Try to move the head restraint to make sure that it is locked in
place.
Replacing LATCH System
Parts After a Crash
{Warning
A crash can damage the LATCH
system in the vehicle. A damaged
LATCH system may not properly
secure the child restraint,
resulting in serious injury or even
death in a crash. To help make
sure the LATCH system is
working properly after a crash,
see your dealer to have the
system inspected and any
necessary replacements made as
soon as possible.
If the vehicle has the LATCH system
and it was being used during a
crash, new LATCH system parts
may be needed.
New parts and repairs may be
necessary even if the LATCH
system was not being used at the
time of the crash.
Page 72 of 329

Chevrolet Spark Owner Manual (GMNA-Localizing-U.S./Canada-13556236) -
2020 - CRC - 4/23/19
Seats and Restraints 71
Securing Child Restraints
(With the Seat Belt in the
Rear Seat)
When securing a child restraint in a
rear seating position, study the
instructions that came with the child
restraint to make sure it is
compatible with this vehicle.
If the child restraint has the LATCH
system, seeLower Anchors and
Tethers for Children (LATCH
System) 063 for how and where to
install the child restraint using
LATCH. If a child restraint is
secured in the vehicle using a seat
belt and it uses a top tether, see
Lower Anchors and Tethers for
Children (LATCH System) 063 for
top tether anchor locations.
Do not secure a child seat in a
position without a top tether anchor
if a national or local law requires
that the top tether be anchored, or if
the instructions that come with the
child restraint say that the top tether
must be anchored. In Canada, the law requires that
forward-facing child restraints have
a top tether, and that the tether be
attached.
If the child restraint or vehicle seat
position does not have the LATCH
system, you will be using the seat
belt to secure the child restraint.
Be sure to follow the instructions
that came with the child restraint.
If more than one child restraint
needs to be installed in the rear
seat, be sure to read
Where to Put
the Restraint 061.
1. Put the child restraint on the seat.
If the head restraint interferes
with the proper installation of
the child restraint, the head
restraint may be removed. See
“Head Restraint Removal and
Reinstallation” underLower
Anchors and Tethers for
Children (LATCH System) 063.
2. Pick up the latch plate, and run the lap and shoulder portions
of the vehicle seat belt through or around the child restraint.
The child restraint instructions
will show you how.
3. Push the latch plate into the
buckle until it clicks.
Position the release button on
the buckle, away from the child
restraint, so that the seat belt
could be quickly unbuckled if
necessary.
Page 73 of 329

Chevrolet Spark Owner Manual (GMNA-Localizing-U.S./Canada-13556236) -
2020 - CRC - 4/23/19
72 Seats and Restraints
4. Pull the shoulder belt all theway out of the retractor to set
the lock. When the retractor
lock is set, the belt can be
tightened but not pulled out of
the retractor.5. To tighten the belt, push downon the child restraint, pull the
shoulder portion of the belt to
tighten the lap portion of the
belt, and feed the shoulder belt
back into the retractor. When
installing a forward-facing child
restraint, it may be helpful to
use your knee to push down on
the child restraint as you
tighten the belt.
Try to pull the belt out of the
retractor to make sure the
retractor is locked. If the
retractor is not locked, repeat
Steps 4 and 5. 6. If the child restraint has a top
tether, follow the child restraint
manufacturer's instructions
regarding the use of the top
tether. See Lower Anchors and
Tethers for Children (LATCH
System) 063.
7. Before placing a child in the child restraint, make sure it is
securely held in place. To
check, grasp the child restraint
at the seat belt path and
attempt to move it side to side
and back and forth. When the
child restraint is properly
installed, there should be no
more than 2.5 cm (1 in) of
movement.
To remove the child restraint,
unbuckle the vehicle seat belt and
let it return to the stowed position.
If the top tether is attached to a top
tether anchor, disconnect it. If the
head restraint was removed,
reinstall it before the seating
position is used. See “Head
Restraint Removal and
Page 76 of 329

Chevrolet Spark Owner Manual (GMNA-Localizing-U.S./Canada-13556236) -
2020 - CRC - 4/23/19
Seats and Restraints 75
5. Pull the shoulder belt all theway out of the retractor to set
the lock. When the retractor
lock is set, the belt can be
tightened but not pulled out of
the retractor.6. To tighten the belt, push downon the child restraint, pull the
shoulder portion of the belt to
tighten the lap portion of the
belt, and feed the shoulder belt
back into the retractor. When
installing a forward-facing child
restraint, it may be helpful to
use your knee to push down on
the child restraint as you
tighten the belt.
Try to pull the belt out of the
retractor to make sure the
retractor is locked. If the
retractor is not locked, repeat
Steps 5 and 6. 7. Before placing a child in the
child restraint, make sure it is
securely held in place. To
check, grasp the child restraint
at the seat belt path and
attempt to move it side to side
and back and forth. When the
child restraint is properly
installed, there should be no
more than 2.5 cm (1 in) of
movement.
If the airbags are off, the OFF
indicator in the passenger airbag
status indicator will come on and
stay on when the vehicle is started.
If a child restraint has been installed
and the ON indicator is lit, see “If
the On Indicator Is Lit for a Child
Restraint” underPassenger Sensing
System 049.
To remove the child restraint,
unbuckle the vehicle seat belt and
let it return to the stowed position.