knob CHEVROLET SPARK 2021 Owner's Manual
[x] Cancel search | Manufacturer: CHEVROLET, Model Year: 2021, Model line: SPARK, Model: CHEVROLET SPARK 2021Pages: 270, PDF Size: 8.19 MB
Page 16 of 270

Chevrolet Spark Owner Manual (GMNA-Localizing-U.S./Canada-14622955) -
2021 - CRC - 8/17/20
Keys, Doors, and Windows 15
Warning (Continued)
.Young children who get into unlocked
vehicles may be unable to get out.
A child can be overcome by extreme
heat and can suffer permanent injuries
or even death from heat stroke.
Always lock the vehicle whenever
leaving it.
.Outsiders can easily enter through an
unlocked door when you slow down
or stop the vehicle. Locking the doors
can help prevent this from happening.
To lock or unlock the doors from outside the
vehicle, use the key in the driver door or
press
QorKon the RKE transmitter. See
Remote Keyless Entry (RKE) System
Operation (Key Access) 09or
Remote Keyless Entry (RKE) System
Operation (Keyless Access) 011.
Keyless Access
If equipped, the RKE transmitter must be
within 1 m (3 ft) of the door or liftgate being
opened. Press the button on the door handle to
open. See
“Keyless Access Operation” under
Remote Keyless Entry (RKE) System
Operation (Key Access) 09or
Remote Keyless Entry (RKE) System
Operation (Keyless Access) 011.
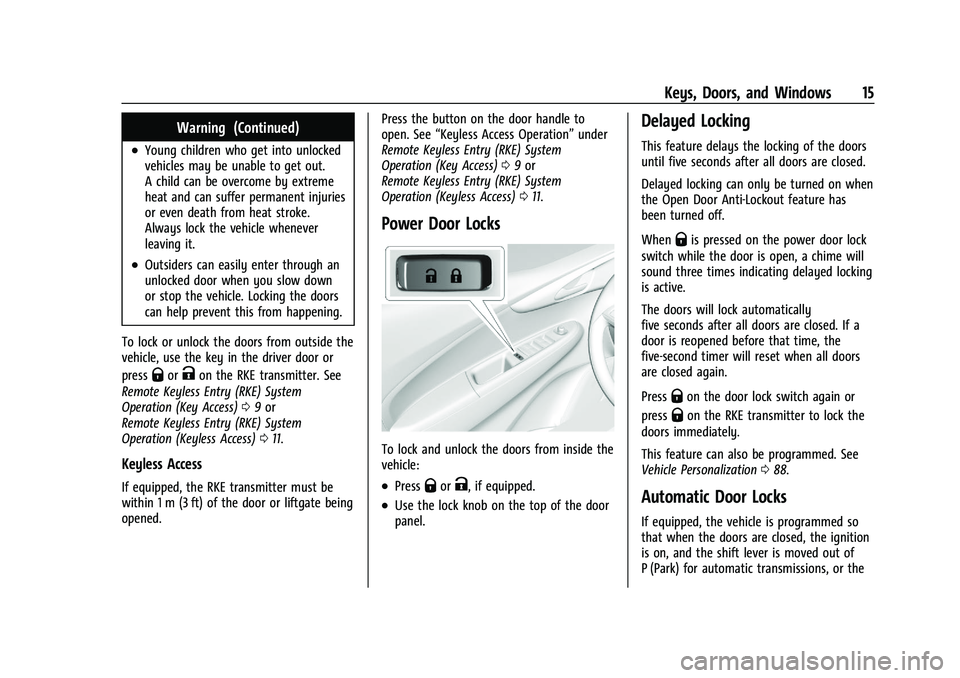
Power Door Locks
To lock and unlock the doors from inside the
vehicle:
.PressQorK, if equipped.
.Use the lock knob on the top of the door
panel.
Delayed Locking
This feature delays the locking of the doors
until five seconds after all doors are closed.
Delayed locking can only be turned on when
the Open Door Anti-Lockout feature has
been turned off.
When
Qis pressed on the power door lock
switch while the door is open, a chime will
sound three times indicating delayed locking
is active.
The doors will lock automatically
five seconds after all doors are closed. If a
door is reopened before that time, the
five-second timer will reset when all doors
are closed again.
Press
Qon the door lock switch again or
press
Qon the RKE transmitter to lock the
doors immediately.
This feature can also be programmed. See
Vehicle Personalization 088.
Automatic Door Locks
If equipped, the vehicle is programmed so
that when the doors are closed, the ignition
is on, and the shift lever is moved out of
P (Park) for automatic transmissions, or the
Page 22 of 270

Chevrolet Spark Owner Manual (GMNA-Localizing-U.S./Canada-14622955) -
2021 - CRC - 8/17/20
Keys, Doors, and Windows 21
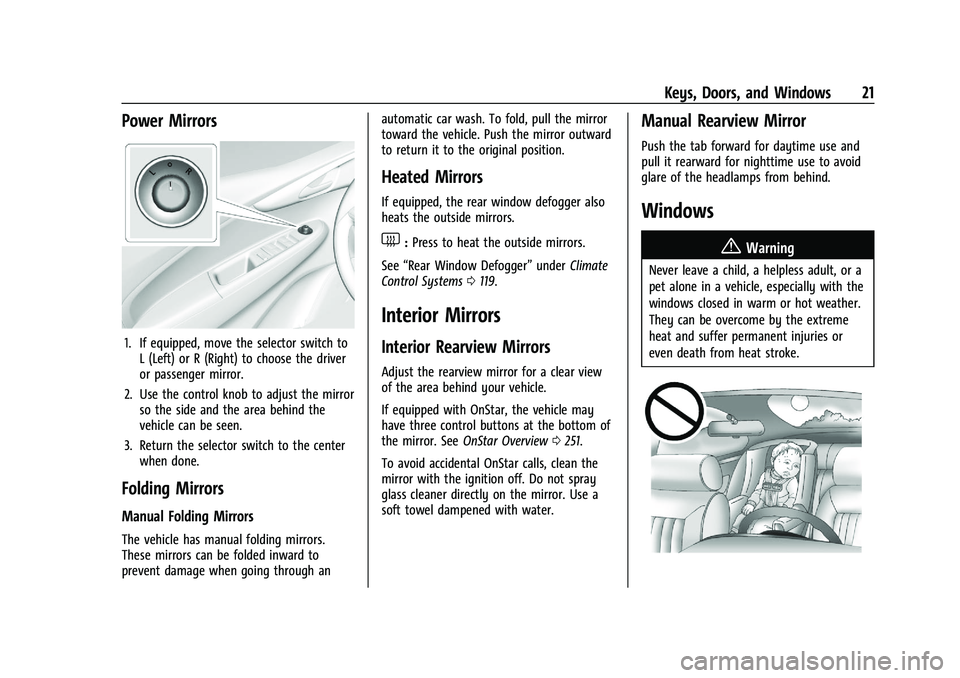
Power Mirrors
1. If equipped, move the selector switch toL (Left) or R (Right) to choose the driver
or passenger mirror.
2. Use the control knob to adjust the mirror so the side and the area behind the
vehicle can be seen.
3. Return the selector switch to the center when done.
Folding Mirrors
Manual Folding Mirrors
The vehicle has manual folding mirrors.
These mirrors can be folded inward to
prevent damage when going through an automatic car wash. To fold, pull the mirror
toward the vehicle. Push the mirror outward
to return it to the original position.
Heated Mirrors
If equipped, the rear window defogger also
heats the outside mirrors.
1:
Press to heat the outside mirrors.
See “Rear Window Defogger” underClimate
Control Systems 0119.
Interior Mirrors
Interior Rearview Mirrors
Adjust the rearview mirror for a clear view
of the area behind your vehicle.
If equipped with OnStar, the vehicle may
have three control buttons at the bottom of
the mirror. See OnStar Overview 0251.
To avoid accidental OnStar calls, clean the
mirror with the ignition off. Do not spray
glass cleaner directly on the mirror. Use a
soft towel dampened with water.
Manual Rearview Mirror
Push the tab forward for daytime use and
pull it rearward for nighttime use to avoid
glare of the headlamps from behind.
Windows
{
Warning
Never leave a child, a helpless adult, or a
pet alone in a vehicle, especially with the
windows closed in warm or hot weather.
They can be overcome by the extreme
heat and suffer permanent injuries or
even death from heat stroke.
Page 30 of 270

Chevrolet Spark Owner Manual (GMNA-Localizing-U.S./Canada-14622955) -
2021 - CRC - 8/17/20
Seats and Restraints 29
Rear Seats
Rear Seat Reminder
If equipped, the message REAR SEAT
REMINDER LOOK IN REAR SEAT displays
under certain conditions indicating there
may be an item or passenger in the rear
seat. Check before exiting the vehicle.
This feature will activate when a second row
door is opened while the vehicle is on or up
to 10 minutes before the vehicle is turned
on. There will be an alert when the vehicle
is turned off. The alert does not directly
detect objects in the rear seat; instead,
under certain conditions, it detects when a
rear door is opened and closed, indicating
that there may be something in the
rear seat.
The feature is active only once each time
the vehicle is turned on and off, and will
require reactivation by opening and closing
the second row doors. There may be an
alert even when there is nothing in the rear
seat; for example, if a child entered the
vehicle through the rear door and left the
vehicle without the vehicle being shut off.
The feature can be turned on or off. See
Vehicle Personalization088.
Folding the Seatback
Either side of the seatback can be folded
down for more cargo space. Fold a seatback
only when the vehicle is not moving.
Caution
Folding a rear seat with the seat belts
still fastened may cause damage to the
seat or the seat belts. Always unbuckle
the seat belts and return them to their
normal stowed position before folding a
rear seat.
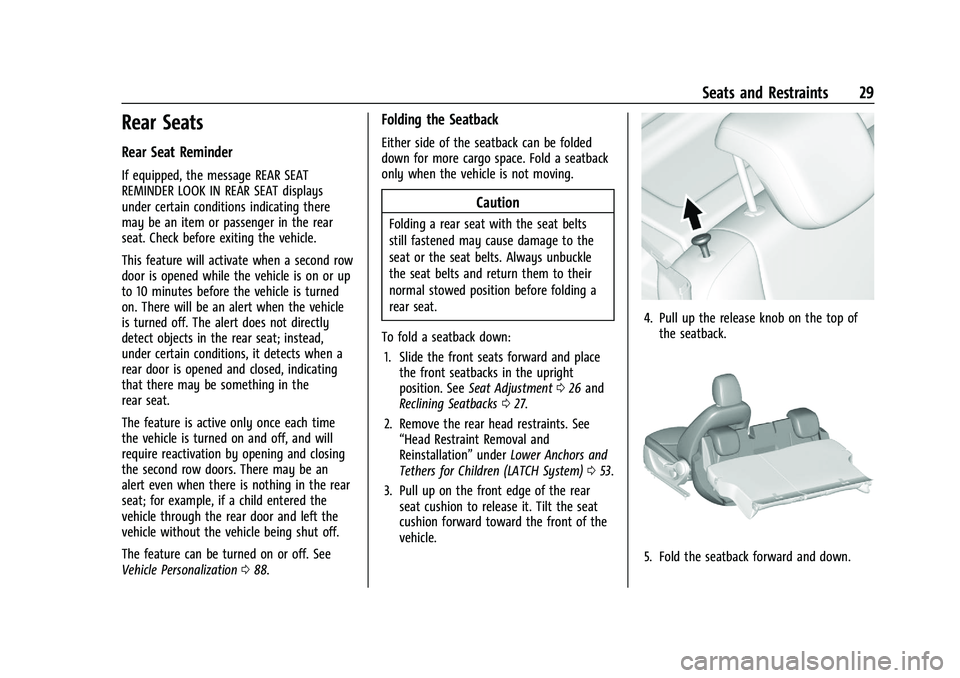
To fold a seatback down: 1. Slide the front seats forward and place the front seatbacks in the upright
position. See Seat Adjustment 026 and
Reclining Seatbacks 027.
2. Remove the rear head restraints. See “Head Restraint Removal and
Reinstallation” underLower Anchors and
Tethers for Children (LATCH System) 053.
3. Pull up on the front edge of the rear seat cushion to release it. Tilt the seat
cushion forward toward the front of the
vehicle.
4. Pull up the release knob on the top ofthe seatback.
5. Fold the seatback forward and down.
Page 121 of 270

Chevrolet Spark Owner Manual (GMNA-Localizing-U.S./Canada-14622955) -
2021 - CRC - 8/17/20
120 Climate Controls
Air Delivery Mode Control :Turn clockwise
or counterclockwise to change the current
airflow mode.
Select from the following air delivery
modes:
Y: Air is directed to the instrument panel
outlets.
\: Air is divided between the instrument
panel and floor outlets.
[: Air is directed to the floor outlets.
W:This mode clears the windows of fog
or moisture. Air is directed to the floor,
windshield, and side window outlets.
1: This mode clears the windshield of fog
or frost more quickly. Air is directed to the
windshield and side window outlets.
Do not drive the vehicle until all windows
are clear.
In defrost or defog mode, excessive air
conditioning use can cause the windows to
fog. If this happens, change the air delivery
mode to
Yand reduce the fan speed.
A/C : If equipped with air conditioning,
follow these steps to use the system. Turn
Ato the desired speed. The air conditioning does not operate when the fan
control knob is in the off position. Press A/C
to turn the air conditioning on and off.
When A/C is pressed, an indicator light
comes on to show that the air conditioning
is on.
For quick cool down on hot days:
1. Open the windows to let hot air escape.
2. Press
M.
3. Press A/C.
4. Select the coolest temperature.
5. Select the highest
Aspeed.
Using these settings together for long
periods of time may cause the air inside the
vehicle to become too dry. To prevent this
from happening, after the air in the vehicle
has cooled, turn the recirculation mode off.
M: This mode recirculates and helps to
quickly cool the air inside the vehicle. It can
be used to reduce the entry of outside air
and odors.
Press
Mto turn the recirculation mode
on. An indicator light comes on to show
that the recirculation is on. Press
Magain
to return to outside air mode. Using the recirculation mode for extended
periods may cause the windows to fog.
If this happens, select the defrost mode.
If the air delivery mode is set to
Wor1,
A/C operation and outside air mode will be
fixed to defog or defrost as quickly as
possible regardless of indicator status.
Rear Window and Outside Mirror
Defogger
1: Press to turn the rear window and
outside mirror defogger on or off. An
indicator light comes on to show that the
feature is on.
The rear window defogger can be turned off
by pressing
1again or by turning the
ignition off or to ACC/ACCESSORY.
If equipped with heated outside mirrors,
they turn on with the rear window defogger
and help to clear fog or frost from the
surface of the mirror. See Heated Mirrors
0 21.
Caution
Using a razor blade or sharp object to
clear the inside rear window can damage
the rear window defogger. Repairs would
(Continued)
Page 211 of 270

Chevrolet Spark Owner Manual (GMNA-Localizing-U.S./Canada-14622955) -
2021 - CRC - 8/17/20
210 Vehicle Care
Caution
Wheel covers will not fit on the vehicle's
compact spare. If you try to put a wheel
cover on the compact spare, the cover or
the spare could be damaged.
Storing a Flat or Spare Tire and Tools
{Warning
Storing a jack, a tire, or other equipment
in the passenger compartment of the
vehicle could cause injury. In a sudden
stop or collision, loose equipment could
strike someone. Store all these in the
proper place.
1. Remove the load compartment cover.
2. Lift the load floor.
3. Place the tool container and the flat tire upright into the tool box spare.
4. Pull the release knob on top of the rear seatback to move it forward.
5. Route the loop end of the strap throughthe seatback latch.
6. Route the hook end of the strap through the loop and securely fasten it to the
seatback latch.
7. Pull back the rear seatbacks.8. Attach the hook to the liftgate latch.
9. Tighten the strap and secure it using the buckle.
The compact spare tire is for temporary use
only. Replace the compact spare tire with a
full-size tire as soon as you can. See
Compact Spare Tire 0210.
Compact Spare Tire
{Warning
Driving with more than one compact
spare tire at a time could result in loss of
braking and handling. This could lead to a
(Continued)
Page 221 of 270

Chevrolet Spark Owner Manual (GMNA-Localizing-U.S./Canada-14622955) -
2021 - CRC - 8/17/20
220 Vehicle Care
Caution (Continued)
or brushes. Use only GM approved
cleaners. Do not drive the vehicle through
an automatic car wash that uses silicon
carbide tire/wheel cleaning brushes.
Damage could occur and the repairs
would not be covered by the vehicle
warranty.
Brake System
Visually inspect brake lines and hoses for
proper hook-up, binding, leaks, cracks,
chafing, etc. Inspect disc brake pads for wear
and rotors for surface condition. Inspect
drum brake linings/shoes for wear or cracks.
Inspect all other brake parts.
Steering, Suspension, and Chassis
Components
Visually inspect steering, suspension, and
chassis components for damaged, loose,
or missing parts or signs of wear at least
once a year.
Inspect power steering for proper
attachment, connections, binding, leaks,
cracks, chafing, etc.Visually check constant velocity joint boots
and axle seals for leaks.
Body Component Lubrication
Lubricate all key lock cylinders, hood hinges,
liftgate hinges, and the steel fuel door
hinges, unless the components are plastic.
Applying silicone grease on weatherstrips
with a clean cloth will make them last
longer, seal better, and not stick or squeak.
Underbody Maintenance
At least twice a year, spring and fall, use
plain water to flush any corrosive materials
from the underbody. Take care to
thoroughly clean any areas where mud and
other debris can collect.
Do not directly power wash the transfer
case and/or front/rear axle output seals.
High pressure water can overcome the seals
and contaminate the fluid. Contaminated
fluid will decrease the life of the transfer
case and/or axles and should be replaced.
Sheet Metal Damage
If the vehicle is damaged and requires sheet
metal repair or replacement, make sure the
body repair shop applies anti-corrosion
material to parts repaired or replaced to
restore corrosion protection.Original manufacturer replacement parts will
provide the corrosion protection while
maintaining the vehicle warranty.
Finish Damage
Quickly repair minor chips and scratches
with touch-up materials available from your
dealer to avoid corrosion. Larger areas of
finish damage can be corrected in your
dealer's body and paint shop.
Chemical Paint Spotting
Airborne pollutants can fall upon and attack
painted vehicle surfaces causing blotchy,
ring-shaped discolorations, and small,
irregular dark spots etched into the paint
surface. See
“Finish Care” previously in this
section.
Interior Care
To prevent dirt particle abrasions, regularly
clean the vehicle's interior. Immediately
remove any soils. Newspapers or dark
garments can transfer color to the vehicle’s
interior.
Use a soft bristle brush to remove dust from
knobs and crevices on the instrument
cluster. Using a mild soap solution,
immediately remove hand lotions,