display CHEVROLET SSR 2005 1.G Owner's Manual
[x] Cancel search | Manufacturer: CHEVROLET, Model Year: 2005, Model line: SSR, Model: CHEVROLET SSR 2005 1.GPages: 388, PDF Size: 2.5 MB
Page 168 of 388
When operating the top in low temperatures, such as
below 32ÉF (0ÉC), the time needed to cycle the top will
increase. This may cause the top movement to stop
and the Roof Cycle Timeout message to appear on
the DIC display. If this occurs, you may release
the convertible top switch and press it again to continue
the cycle. Make sure nothing is blocking the path of
the top before pressing the switch again. It may
be necessary to do this several times to complete the
cycle, depending on the outside temperature. See
Convertible Top on page 2-51for more information.
Notice:If you operate the convertible top switch
continuously while the ignition is in ACCESSORY,
the battery will drain and you might not be able
to start your vehicle. Do not use the convertible
top switch for extended periods of time when
the ignition is in ACCESSORY.
Roof Hall Switch Fault
This message will be displayed on the DIC when trying
to raise or lower the convertible top and there is a
fault with this switch. If the message persists, see your
GM dealer for service.
Service Air Bag
If there is a problem with the airbag system, this
message will be displayed on the DIC. The airbag
readiness light may also be displayed on the instrument
panel cluster. See your GM dealer for service. Press
the select button to acknowledge this message and clear
it from the display. See
Servicing Your Airbag-Equipped
Vehicle on page 1-51andAirbag Readiness Light on
page 3-27for more information.
Service Brake System
If a problem occurs with the brake system, this message
will appear on the DIC. The brake system warning
light and the anti-lock brake system warning light may
also be displayed on the instrument panel cluster.
See
Brake System Warning Light on page 3-30andAnti-Lock Brake System Warning Light on page 3-31for
more information. If this message appears, stop as
soon as possible and turn off the vehicle. Restart the
vehicle and check for the message on the DIC display.
If the message is still displayed, or appears again
when you begin driving, the brake system needs service.
See your GM dealer. See
Brakes on page 5-35for
more information. Press the select button to
acknowledge this message and clear it from the display.
3-50
Page 169 of 388
Stop Vehicle
This message will be displayed when attempting to
release the cargo cover while the vehicle is in motion.
The vehicle must be stopped to release the cargo cover.
See
Cargo Cover on page 2-36for more information.
Tlat (Tonneau Latch) Hall Switch Fault
This message will be displayed when trying to raise
or lower the convertible top and there is a problem with
this switch. If the message persists, see your
GM dealer for service.
Tonn (Tonneau) Hall Switch Fault
This message will be displayed when trying to raise or
lower the convertible top and there is a fault with
this switch. If the message persists, see your GM dealer
for service.
Tonn (Tonneau) Latd (Latched)
Switch Fault
This message will be displayed when trying to raise
or lower the convertible top and there is a fault with this
switch. If the message persists, see your GM dealer
for service.
Traction Active
(Automatic Transmission Only)
This message, along with the light on the Traction
Control System (TCS) warning light on the instrument
panel cluster, will be displayed when the TCS system is
active. Press the select button to acknowledge this
message and clear it from the DIC display. See
Traction
Control System (TCS) (Automatic Transmission) on page 4-8
andTraction Control System (TCS) Warning
Light (Automatic Transmission) on page 3-31for
more information.
Trans (Transmission) Hot Idle
(Automatic Transmission Only)
If the transmission ¯uid in the vehicle becomes too hot,
this message will appear on the DIC. Stop the vehicle
and let it idle to allow the transmission ¯uid to cool. This
message will clear when the ¯uid temperature reaches
a safe level. See
Automatic Transmission Fluid on
page 5-21for more information.
3-51
Page 170 of 388
Turn Signal On
If a turn signal is left on for 3/4 mile (1.2 km), this
message will appear on the display and you will hear a
chime. Move the turn signal/multifunction lever to the
off position. Press the select button to acknowledge this
message and clear it from the display. See
Turn
Signal/Multifunction Lever on page 3-6for more
information.
Unknown Speed
This message will be displayed when trying to raise or
lower the convertible top and the roof controller
cannot communicate with the Powertrain Control
Module (PCM). See your GM dealer for service.
DIC Vehicle Personalization
Your vehicle has a personalization feature that allows
you to program certain features to a preferred setting
for up to two drivers. The number of programmable
features varies depending upon which model of
the vehicle you purchased. Once the features are
programmed, the saved settings are recalled by
pressing the unlock button on the remote keyless entry
transmitter, 1 or 2, or by pressing the appropriate
memory button, 1 or 2, located on the outboard side of
the driver's seat. See
Memory Seat on page 2-59for more information. The following is a list of available programmable
options:
·AUTOMATIC LOCKING (Automatic
Transmission only)
·AUTOMATIC UNLOCKING
·REMOTE LOCK FEEDBACK
·REMOTE UNLOCK FEEDBACK
·HEADLAMPS ON AT EXIT
·PERIMETER LIGHTING
·SEAT POSITION RECALL, if equipped
·ALARM WARNING TYPE
·DISPLAY LANGUAGE
·DISPLAY UNITS ± U.S./MET
q(Personalization):
Press this button located on
the steering wheel to access the vehicle personalization
menu and customize the personalization settings on
your vehicle.
3-52
Page 171 of 388
Automatic Locking
(Automatic Transmission only)
This feature allows you to choose how the vehicle's
doors are locked on your automatic transmission vehicle.
Press the personalization button until AUTOMATIC
LOCKING appears in the display. To access the modes
for AUTOMATIC LOCKING, press the select button.
Once AUTOMATIC LOCKING is selected, press
the select button to scroll through the following modes:
Mode 1:LOCK DOORS OUT OF PARK
Mode 2: LOCK DOORS WITH SPEED
If you choose Mode 1, the doors will lock when
the vehicle is shifted out of PARK (P).
If you choose Mode 2, the doors will lock when
the vehicle speed is above 8 mph (13 km/h) for
three seconds.
Scroll through the list of modes. When the mode you
want is displayed on the DIC, press the personalization
button to set your choice, return to the personalization
menu, and advance to the next programmable feature.
For more information on automatic door locks, see
Programmable Automatic Door Locks on page 2-10.
Automatic Unlocking
This feature allows you to choose how the vehicle's
doors are unlocked. Press the personalization button
until AUTOMATIC UNLOCKING appears in the display.
To access the modes for AUTOMATIC UNLOCKING,
press the select button. Once AUTOMATIC
UNLOCKING is selected, press the select button to
scroll through the following modes:
Mode 1: UNLOCK ALL IN PARK (Automatic
Transmission only)
Mode 2: UNLOCK ALL AT KEY OUT
Mode 3: UNLOCK DRIVER IN PARK
(Automatic Transmission only)
Mode 4: UNLOCK DOORS MANUALLY
If you choose Mode 1, all of the doors will unlock when
the vehicle is shifted into PARK (P).
If you choose Mode 2, all of the doors will unlock when
the key is taken out of the ignition.
If you choose Mode 3, the driver's door will be unlocked
when the vehicle is shifted into PARK (P).
If you choose Mode 4, the doors will not be unlocked
automatically.
3-53
Page 172 of 388
Scroll through the list of modes. When the mode you
want is displayed on the DIC, press the personalization
button to set your choice, return to the personalization
menu, and advance to the next programmable feature.
For more information on automatic door locks, see
Programmable Automatic Door Locks on page 2-10.
Remote Lock Feedback
This feature allows you to choose whether or not the
horn chirps and the parking lamps ¯ash when you lock
the vehicle with the remote keyless entry transmitter.
Press the personalization button until REMOTE
LOCK FEEDBACK appears in the display. To access
the modes for REMOTE LOCK FEEDBACK, press
the select button. Once REMOTE LOCK FEEDBACK is
selected, press the select button to scroll through the
following modes:
Mode 1:LOCK FEEDBACK: BOTH
Mode 2: LOCK FEEDBACK: OFF
Mode 3: LOCK FEEDBACK: HORN
Mode 4: LOCK FEEDBACK: LAMPS If you choose Mode 1, the parking lamps will ¯ash each
time you press the lock button on the remote keyless
entry transmitter and the horn will chirp the second time
you press the lock button.
If you choose Mode 2, there will be no feedback when
locking the vehicle.
If you choose Mode 3, the horn will chirp the second
time you press the button with the lock symbol on
the remote keyless entry transmitter.
If you choose Mode 4, the parking lamps will ¯ash each
time you press the button with the lock symbol on
the remote keyless entry transmitter.
Scroll through the list of modes. When the mode you
want is displayed on the DIC, press the personalization
button to set your choice, return to the personalization
menu, and advance to the next programmable feature.
Remote Unlock Feedback
This feature allows you to choose whether or not the
parking lamps ¯ash and the horn chirps when you
unlock the vehicle with the remote keyless entry
transmitter. Press the personalization button until
REMOTE UNLOCK FEEDBACK appears in the display.
3-54
Page 173 of 388
To access the modes for REMOTE UNLOCK
FEEDBACK, press the select button. Once REMOTE
UNLOCK FEEDBACK is selected, press the select
button to scroll through the following modes:
Mode 1:UNLOCK FEEDBACK: BOTH
Mode 2: UNLOCK FEEDBACK: OFF
Mode 3: UNLOCK FEEDBACK: HORN
Mode 4: UNLOCK FEEDBACK: LAMPS
If you choose Mode 1, the parking lamps will ¯ash each
time you press the button with the unlock symbol on
the remote keyless entry transmitter. The horn will chirp
the second time you press the unlock button.
If you choose Mode 2, there will be no feedback when
unlocking the vehicle.
If you choose Mode 3, the horn will chirp the second
time you press the button with the unlock symbol on the
remote keyless entry transmitter.
If you choose Mode 4, the parking lamps will ¯ash each
time you press the button with the unlock symbol on
the remote keyless entry transmitter.
Scroll through the list of modes. When the mode you
want is displayed on the DIC, press the personalization
button to set your choice, return to the personalization
menu, and advance to the next programmable feature.Headlamps on at Exit
This feature allows you to set the amount of time you
want the headlamps to remain on after you exit the
vehicle. Press the personalization button until
HEADLAMPS ON AT EXIT appears in the display.
To access the modes for HEADLAMPS ON AT EXIT,
press the select button. Once HEADLAMPS ON
AT EXIT is selected, press the select button to scroll
through the following modes:
Mode 1: HEADLAMP DELAY 10 SEC
Mode 2: HEADLAMP DELAY 20 SEC
Mode 3: HEADLAMP DELAY 40 SEC
Mode 4: HEADLAMP DELAY 60 SEC
Mode 5: HEADLAMP DELAY 120 SEC
Mode 6: HEADLAMP DELAY 180 SEC
Mode 7: HEADLAMP DELAY OFF
If you choose Mode 7, the headlamps will turn off as
soon as you turn off the vehicle.
Scroll through the list of modes. When the mode you
want is displayed on the DIC, press the personalization
button to set your choice, return to the personalization
menu, and advance to the next programmable feature.
3-55
Page 174 of 388
Perimeter Lighting
This feature allows you to choose whether or not certain
exterior lamps turn on when the unlock button on the
remote keyless entry transmitter is pressed. Press
the personalization button until PERIMETER LIGHTING
appears in the display. To access the modes for
PERIMETER LIGHTING, press the select button. Once
PERIMETER LIGHTING is selected, press the select
button to scroll through the following modes:
Mode 1:PERIMETER LIGHTING ON
Mode 2: PERIMETER LIGHTING OFF
If you choose Mode 1, the headlamps and back-up
lamps will come on for 40 seconds, if it is dark enough
outside, when you unlock the vehicle with the remote
keyless entry transmitter.
Scroll through the list of modes. When the mode you
want is displayed on the DIC, press the personalization
button to set your choice, return to the personalization
menu, and advance to the next programmable feature.
Seat Position Recall
This feature allows you to choose how any previously
programmed seat position is recalled. Press the
personalization button until SEAT POSITION RECALL
appears in the display. To access the modes for
SEAT POSITION RECALL, press the select button.
Once SEAT POSITION RECALL is selected, press the
select button to scroll through the following modes:
Mode 1: SEAT RECALL: OFF
Mode 2: SEAT RECALL: AT KEY IN
Mode 3: SEAT RECALL: ON REMOTE
If you choose Mode 1, the memory seat position
you saved will only be recalled when the memory
button 1 or 2 is pressed.
If you choose Mode 2, the memory seat position you
saved will be recalled when you put the key in the
ignition.
If you choose Mode 3, the memory seat position you
saved will be recalled when you unlock the vehicle with
the remote keyless entry transmitter.
Scroll through the list of modes. When the mode you
want is displayed on the DIC, press the personalization
button to set your choice, return to the personalization
menu, and advance to the next programmable feature.
See
Memory Seat on page 2-59for more information.
3-56
Page 175 of 388
Alarm Warning Type
This feature allows you to choose the type of alarm
warning feedback that will occur. Press the select button
until ALARM WARNING TYPE appears on the DIC.
Once ALARM WARNING TYPE is selected, press the
select button to scroll through the following modes:
Mode 1:ALARM WARNING: BOTH
Mode 2: ALARM WARNING: OFF
Mode 3: ALARM WARNING: HORN
Mode 4: ALARM WARNING: LAMPS
If you choose Mode 1, the horn will chirp and the
exterior lamps will ¯ash when the alarm is active.
If you choose Mode 2, there will be no alarm warning
on activation.
If you choose Mode 3, the horn will chirp when the
alarm is active.
If you choose Mode 4, the exterior lamps will ¯ash when
the alarm is active.
Scroll through the list of modes. When the mode you
want is displayed on the DIC, press the personalization
button to set your choice, return to the personalization
menu, and advance to the next programmable feature.
See
Content Theft-Deterrent on page 2-13for more
information.
Display Language
This feature allows you to choose the language in which
the DIC information will be displayed. Press the select
button until DISPLAY LANGUAGE appears on the
DIC. Once DISPLAY LANGUAGE is selected, press the
select button to scroll through the following modes:
Mode 1: LANGUAGE: ENGLISH
Mode 2: LANGUAGE: FRANCAIS (French)
Mode 3: LANGUAGE: ESPANOL (Spanish)
When the language you desire is displayed on the DIC,
press the personalization button to set your choice,
return to the personalization menu, and advance to the
next programmable feature.
If you accidentally choose a language that you do not
want, press and hold the personalization button and the
trip information button at the same time. The DIC will
begin scrolling through the languages in their particular
language. English will be in English, French will be
in French and so on. When you see the language that
you would like, release both buttons. The DIC will
then display the information in the language you chose.
3-57
Page 176 of 388
Display Units ± U.S./MET
The feature allows you to choose the measurement
units. Press the personalization button until DISPLAY
UNITS ± U.S./MET appears in the display. To access
the modes for DISPLAY UNITS ± U.S./MET, press
the select button. Once DISPLAY UNITS ± U.S./MET is
selected, press the select button to scroll through the
following modes:
Mode 1:UNITS: U.S. (ENGLISH)
Mode 2: UNITS: METRIC (km/L)
Mode 3: UNITS: METRIC (L/100km)
If you choose Mode 1, all information will be displayed
in English units.
If you choose Mode 2 or 3, all information will be
displayed in metric units.
Scroll through the list of modes. When the mode you
want is displayed on the DIC, press the personalization
button to set your choice, return to the personalization
menu, and advance to the next programmable feature.
Audio System(s)
Notice:Before adding any sound equipment to
your vehicle, like a tape player, CB radio, mobile
telephone, or two-way radio, make sure that it can
be added by checking with your dealer. Also,
check federal rules covering mobile radio and
telephone units. If sound equipment can be added,
it is very important to do it properly. Added
sound equipment may interfere with the operation
of your vehicle's engine, radio, or other systems,
and even damage them. Your vehicle's systems may
interfere with the operation of sound equipment
that has been added improperly.
Figure out which audio system is in your vehicle, ®nd
out what your audio system can do, and how to operate
all of its controls.
3-58
Page 177 of 388
Setting the Time
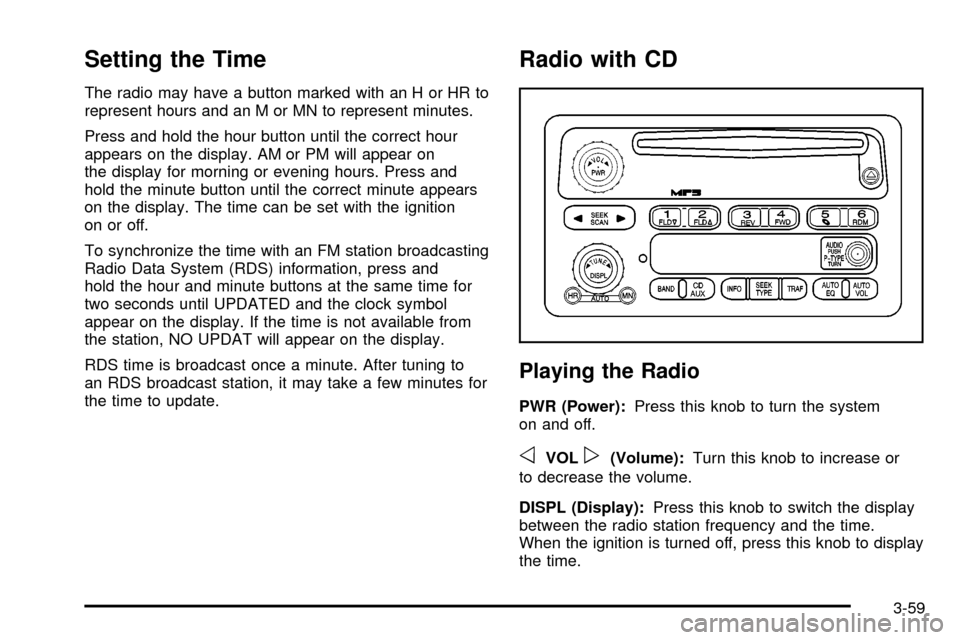
The radio may have a button marked with an H or HR to
represent hours and an M or MN to represent minutes.
Press and hold the hour button until the correct hour
appears on the display. AM or PM will appear on
the display for morning or evening hours. Press and
hold the minute button until the correct minute appears
on the display. The time can be set with the ignition
on or off.
To synchronize the time with an FM station broadcasting
Radio Data System (RDS) information, press and
hold the hour and minute buttons at the same time for
two seconds until UPDATED and the clock symbol
appear on the display. If the time is not available from
the station, NO UPDAT will appear on the display.
RDS time is broadcast once a minute. After tuning to
an RDS broadcast station, it may take a few minutes for
the time to update.
Radio with CD
Playing the Radio
PWR (Power):Press this knob to turn the system
on and off.
oVOLp(Volume): Turn this knob to increase or
to decrease the volume.
DISPL (Display): Press this knob to switch the display
between the radio station frequency and the time.
When the ignition is turned off, press this knob to display
the time.
3-59