set CHEVROLET SUBURBAN 2019 Get To Know Guide
[x] Cancel search | Manufacturer: CHEVROLET, Model Year: 2019, Model line: SUBURBAN, Model: CHEVROLET SUBURBAN 2019Pages: 20, PDF Size: 2.83 MB
Page 2 of 20
2
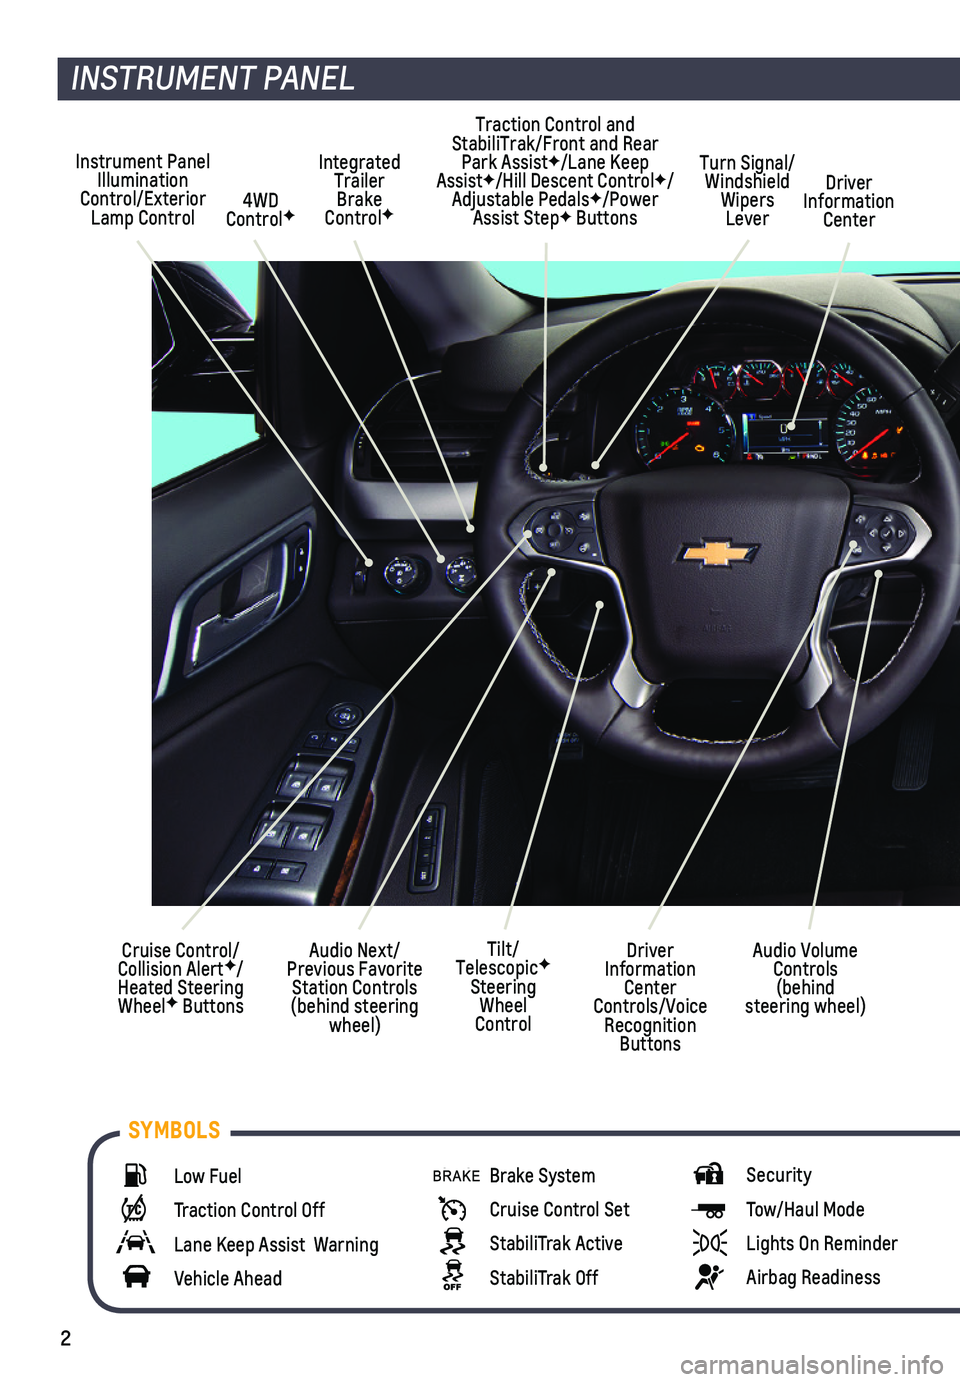
Instrument Panel Illumination Control/Exterior Lamp Control4WD ControlF
Traction Control and StabiliTrak/Front and Rear Park AssistF/Lane Keep AssistF/Hill Descent ControlF/Adjustable PedalsF/Power Assist StepF Buttons
Driver Information Center
Turn Signal/Windshield Wipers Lever
Audio Next/Previous Favorite Station Controls (behind steering wheel)
Integrated Trailer Brake ControlF
Cruise Control/ Collision AlertF/Heated Steering WheelF Buttons
INSTRUMENT PANEL
Audio Volume Controls (behind steering wheel)
Driver Information Center Controls/Voice Recognition Buttons
Tilt/TelescopicF Steering Wheel Control
Low Fuel
Traction Control Off
Lane Keep Assist Warning
Vehicle Ahead
Brake System
Cruise Control Set
StabiliTrak Active
StabiliTrak Off
Security
Tow/Haul Mode
Lights On Reminder
Airbag Readiness
SYMBOLS
Page 4 of 20
4
STARTING THE VEHICLE
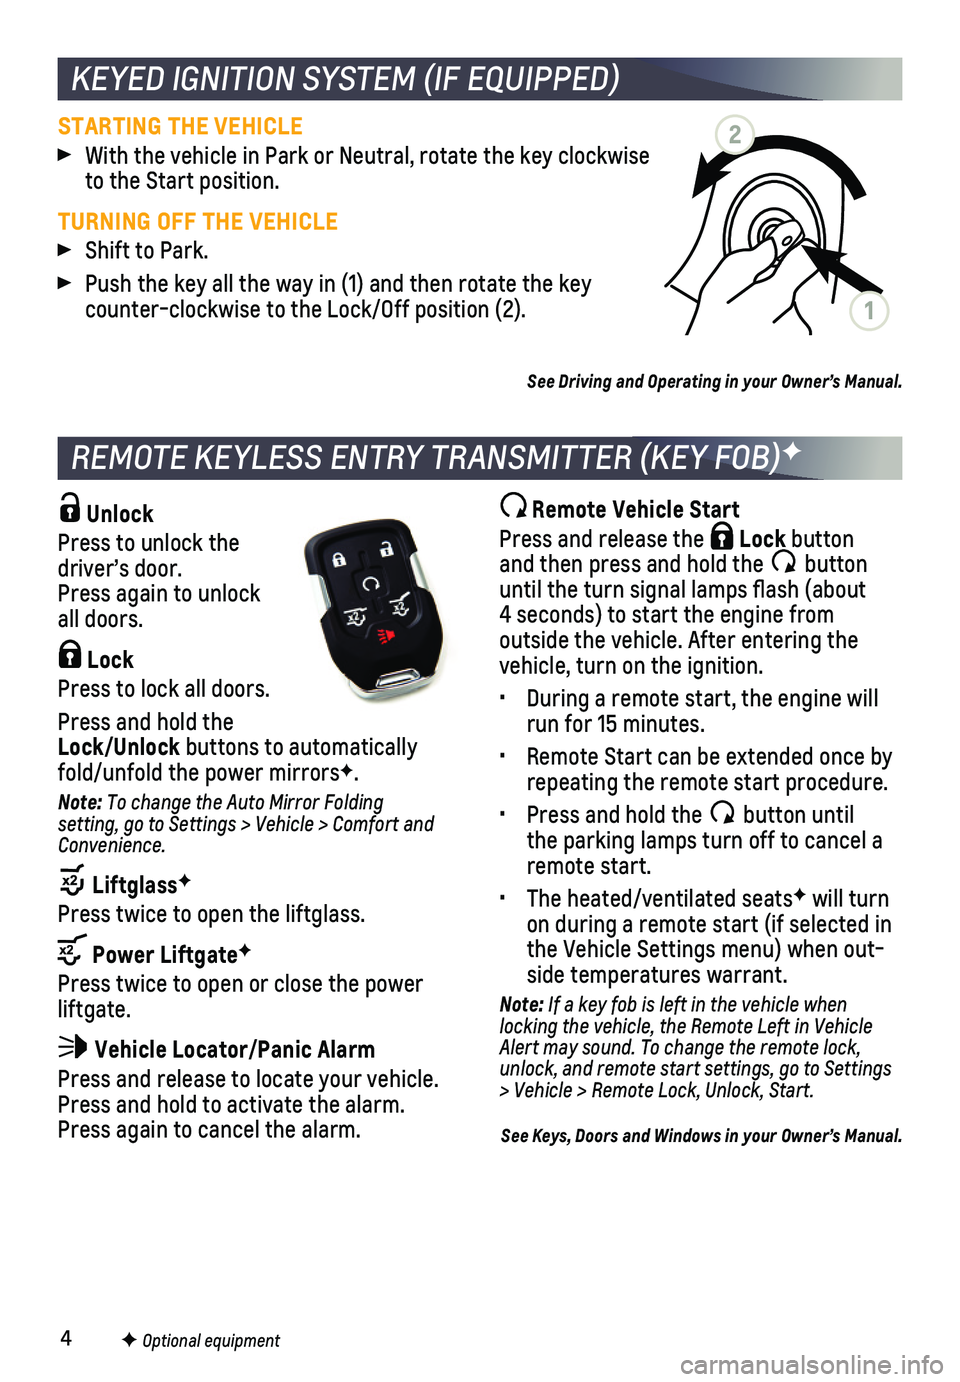
With the vehicle in Park or Neutral, rotate the key clockwise to the Start position.
TURNING OFF THE VEHICLE
Shift to Park.
Push the key all the way in (1) and then rotate the key counter-clockwise to the Lock/Off position (2).
See Driving and Operating in your Owner’s Manual.
Unlock
Press to unlock the driver’s door. Press again to unlock all doors.
Lock
Press to lock all doors.
Press and hold the Lock/Unlock buttons to automatically fold/unfold the power mirrorsF.
Note: To change the Auto Mirror Folding setting, go to Settings > Vehicle > Comfort and Convenience.
LiftglassF
Press twice to open the liftglass.
Power LiftgateF
Press twice to open or close the power liftgate.
Vehicle Locator/Panic Alarm
Press and release to locate your vehicle. Press and hold to activate the alarm. Press again to cancel the alarm.
Remote Vehicle Start
Press and release the Lock button and then press and hold the button until the turn signal lamps flash (about 4 seconds) to start the engine from outside the vehicle. After entering the vehicle, turn on the ignition.
• During a remote start, the engine will run for 15 minutes.
• Remote Start can be extended once by repeating the remote start procedure.
• Press and hold the button until the parking lamps turn off to cancel a remote start.
• The heated/ventilated seatsF will turn on during a remote start (if selected in the Vehicle Settings menu) when out-side temperatures warrant.
Note: If a key fob is left in the vehicle when locking the vehicle, the Remote Left in Vehicle Alert may sound. To change the remote lock, unlock, and remote start settings, go to Settings > Vehicle > Remote Lock, Unlock, Start.
See Keys, Doors and Windows in your Owner’s Manual.
F Optional equipment
KEYED IGNITION SYSTEM (IF EQUIPPED)
REMOTE KEYLESS ENTRY TRANSMITTER (KEY FOB)F
1
2
Page 5 of 20
5
The Remote Keyless Entry (RKE) transmitter must be in the vehicle to turn on the ignition.
STARTING THE ENGINE
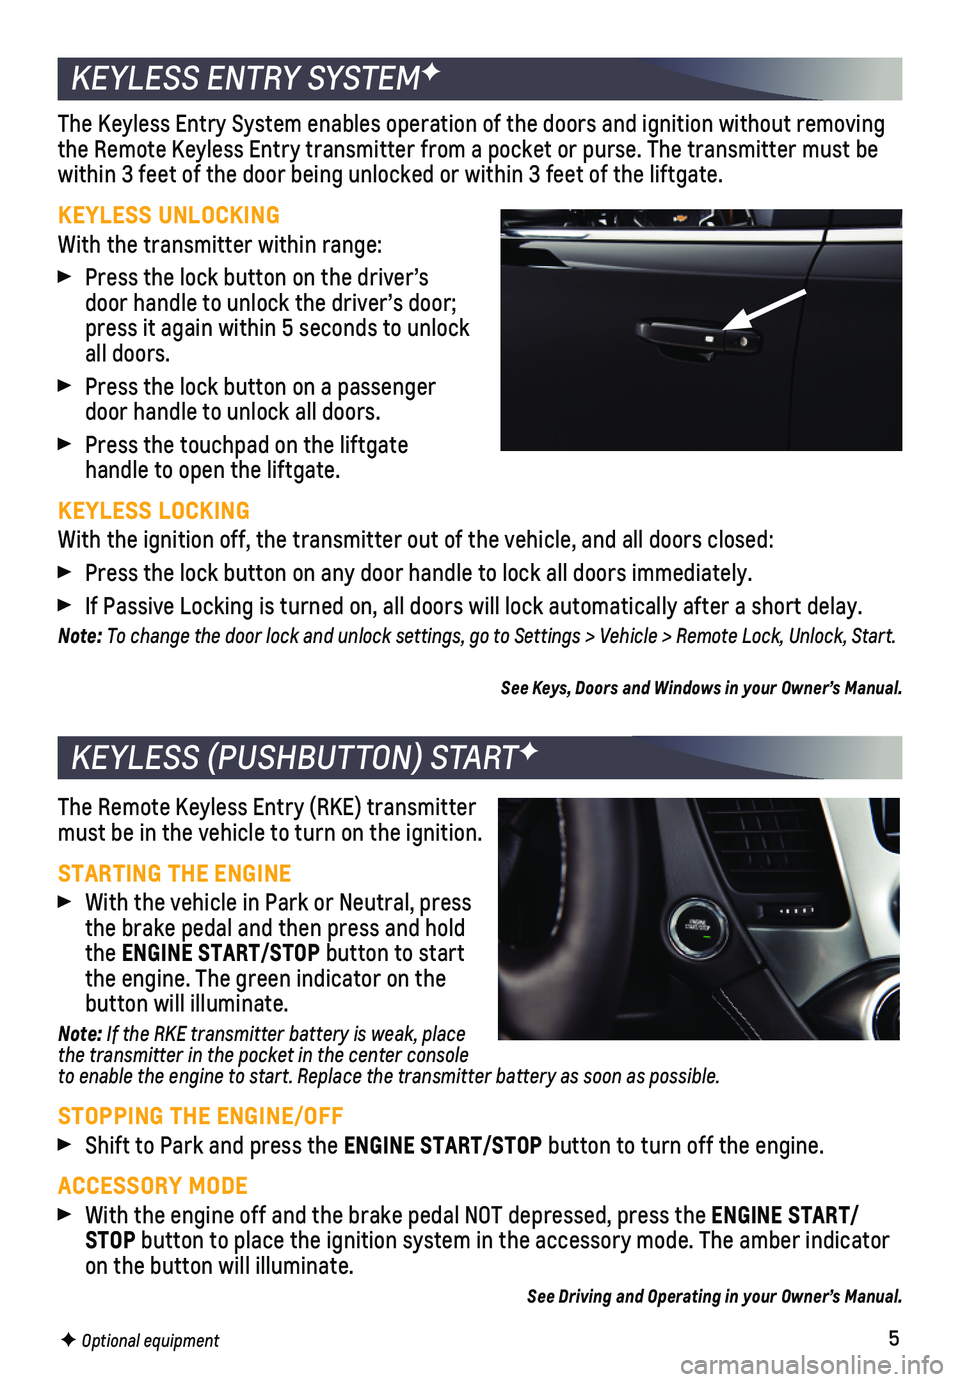
With the vehicle in Park or Neutral, press the brake pedal and then press and hold the ENGINE START/STOP button to start the engine. The green indicator on the button will illuminate.
Note: If the RKE transmitter battery is weak, place the transmitter in the pocket in the center console to enable the engine to start. Replace the transmitter battery as soon a\
s possible.
STOPPING THE ENGINE/OFF
Shift to Park and press the ENGINE START/STOP button to turn off the engine.
ACCESSORY MODE
With the engine off and the brake pedal NOT depressed, press the ENGINE START/STOP button to place the ignition system in the accessory mode. The amber in\
dicator on the button will illuminate.
See Driving and Operating in your Owner’s Manual.
The Keyless Entry System enables operation of the doors and ignition wit\
hout removing the Remote Keyless Entry transmitter from a pocket or purse. The transmi\
tter must be within 3 feet of the door being unlocked or within 3 feet of the liftgat\
e.
KEYLESS UNLOCKING
With the transmitter within range:
Press the lock button on the driver’s door handle to unlock the driver’s door; press it again within 5 seconds to unlock all doors.
Press the lock button on a passenger door handle to unlock all doors.
Press the touchpad on the liftgate
handle to open the liftgate.
KEYLESS LOCKING
With the ignition off, the transmitter out of the vehicle, and all doors\
closed:
Press the lock button on any door handle to lock all doors immediately.
If Passive Locking is turned on, all doors will lock automatically after\
a short delay.
Note: To change the door lock and unlock settings, go to Settings > Vehicle > Remote Lock, Unlock, Start.
See Keys, Doors and Windows in your Owner’s Manual.
F Optional equipment
KEYLESS (PUSHBUTTON) STARTF
KEYLESS ENTRY SYSTEMF
Page 6 of 20
6
SEAT ADJUSTMENTS
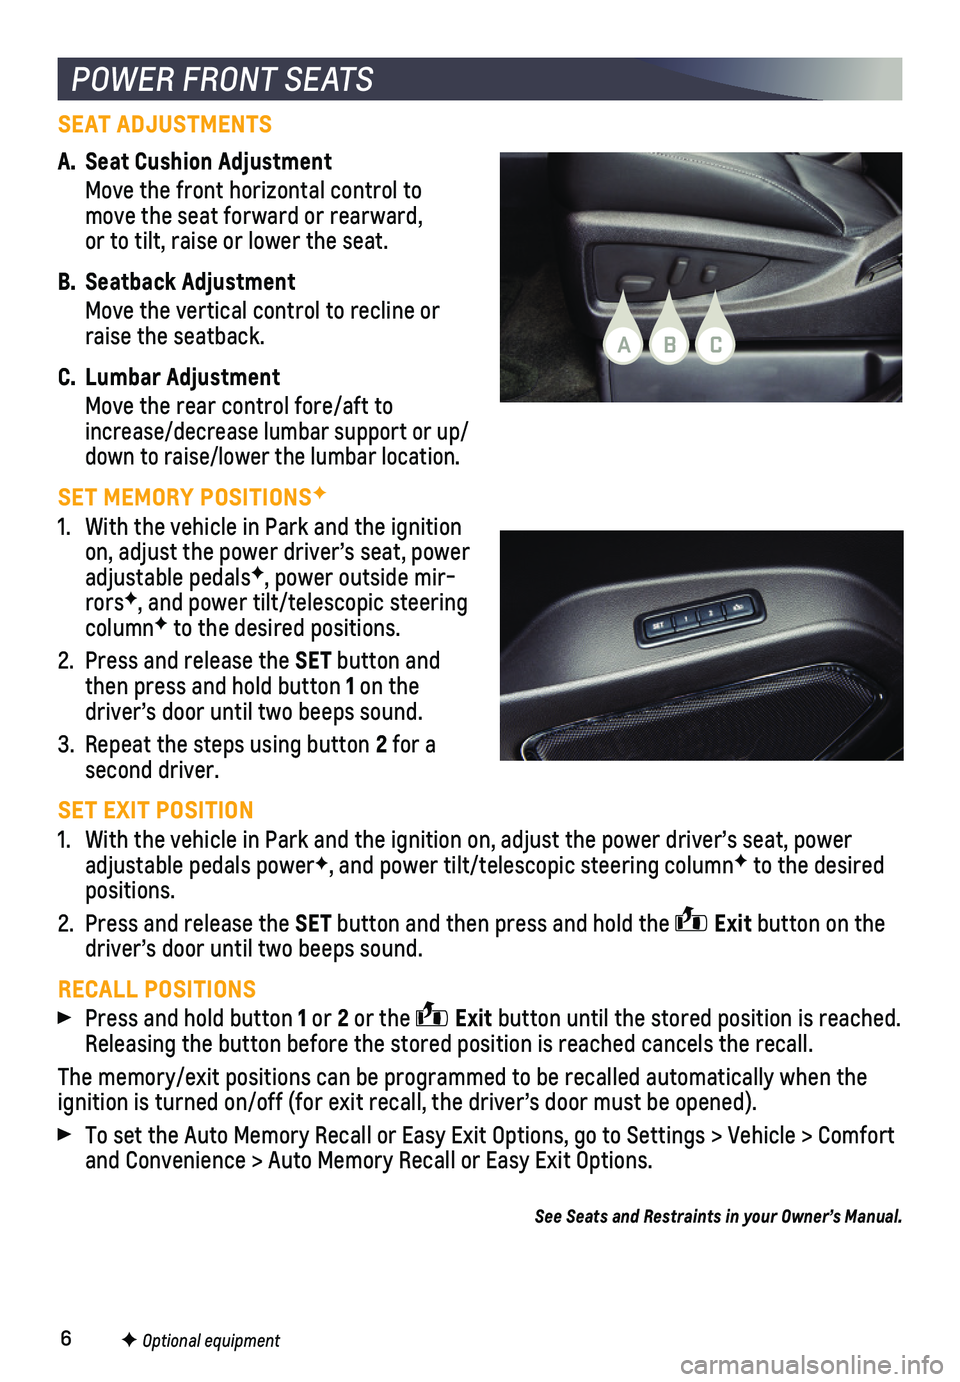
A. Seat Cushion Adjustment
Move the front horizontal control to move the seat forward or rearward, or to tilt, raise or lower the seat.
B. Seatback Adjustment
Move the vertical control to recline or raise the seatback.
C. Lumbar Adjustment
Move the rear control fore/aft to increase/decrease lumbar support or up/down to raise/lower the lumbar location.
SET MEMORY POSITIONSF
1. With the vehicle in Park and the ignition on, adjust the power driver’s seat, power adjustable pedalsF, power outside mir-rorsF, and power tilt/telescopic steering columnF to the desired positions.
2. Press and release the SET button and then press and hold button 1 on the driver’s door until two beeps sound.
3. Repeat the steps using button 2 for a second driver.
SET EXIT POSITION
1. With the vehicle in Park and the ignition on, adjust the power driver’\
s seat, power adjustable pedals powerF, and power tilt/telescopic steering columnF to the desired positions.
2. Press and release the SET button and then press and hold the Exit button on the driver’s door until two beeps sound.
RECALL POSITIONS
Press and hold button 1 or 2 or the Exit button until the stored position is reached. Releasing the button before the stored position is reached cancels the r\
ecall.
The memory/exit positions can be programmed to be recalled automatically\
when the ignition is turned on/off (for exit recall, the driver’s door must b\
e opened).
To set the Auto Memory Recall or Easy Exit Options, go to Settings > Veh\
icle > Comfort and Convenience > Auto Memory Recall or Easy Exit Options.
POWER FRONT SEATS
F Optional equipment
See Seats and Restraints in your Owner’s Manual.
BAC
Page 8 of 20

8
REAR SEAT REMINDER
UNIVERSAL REMOTE SYSTEMF
F Optional equipment
When the vehicle is turned off, a chime may sound and a Rear Seat Remind\
er mes-sage may display on the Driver Information Center. The system does not a\
ctually detect objects in the rear seat. It works by monitoring when a rear door is ope\
ned and closed, under certain conditions. The feature is active only once each time the \
vehicle is turned on and off. Always check the rear seat before exiting the vehicle.
To turn the Rear Seat Reminder on or off, go to Settings > Rear Seat Rem\
inder.
See Seats and Restraints in your Owner’s Manual.
The Universal Remote System on the overhead console enables your vehicle to control 3 different devices, ranging from garage doors and gates to home lighting. Go to www.homelink.com for detailed
videos and instructions on how to program the Universal Remote System. For additional assistance, call 1-800-355-3515.
See Instruments and Controls in your Owner’s Manual.
PROGRAMMING THE LIFTGATE HEIGHT
1. Turn the Power Liftgate knob to the 3/4 mode position.
2. Open the liftgate.
3. Adjust the liftgate manually to the desired height.
4. To save the setting, press and hold the button next to the liftgate latch for 3
seconds. The turn signals flash and a beep sounds when the setting is saved.
See Keys, Doors and Windows in your Owner’s Manual.
OPEN/CLOSE THE POWER LIFTGATE
Press the Power Liftgate button on the Remote Keyless Entry (RKE) trans-mitter twice.
Press the Power Liftgate knob on the overhead console.
Press the touchpad on the liftgate
handle to open the liftgate.
Press the button next to the liftgate latch to close the liftgate.
HANDS-FREE OPERATIONF
To open or close the liftgate hands-free, kick your foot straight in and out under the center of the rear bumper. Do not swing your foot side-to-side. The RKE transmitter must be within 3 feet of the liftgate.
POWER PROGRAMMABLE LIFTGATEF
Page 9 of 20

9
HEAD-UP DISPLAY
AUTOMATIC OPERATION
1. Press AUTO.
2 Set the temperature.
The system automatically controls the fan speed, air delivery, air condi\
tioning and recir-culation to reach the set temperature. Allow time for the system to reac\
h the desired temperature. If the functions are manually adjusted, automatic operation\
is turned off.
SYNC TEMPERATURE SETTINGS
Press SYNC to link the passenger’s and rear climate temperature settings to the\
driver’s setting. When the passenger’s or rear climate setting is \
adjusted, the differ-ent temperature setting is displayed.
REAR CLIMATE CONTROLS
Press the Power button to turn the rear climate controls on/off.
Press the button to lock out the rear controls. Rear climate control operation is controlled using the front controls.
See Climate Controls in your Owner’s Manual.
Rear Power Control
Driver’s Heated/Ventilated Seat ButtonsF
Passenger’s Heated/Ventilated Seat ButtonsF
AUTO Rear Automatic Operation
Rear Fan Speed
Rear Control Lock-out
Rear Air DeliveryRear Temperature
AUTO Driver’s Temp. Control/Automatic Operation
/ Defog Mode/ Bi-level Mode
/REAR Defrost Mode/ Rear Window/Outside Mirror Defogger
SYNC Passenger’s Temp. Control/Link setting to driver’s setting
/ Vent Mode/ Floor Mode
Fan Speed Control/On/Off
A/C/ Air Conditioning Control/Recirculation Mode
AUTOMATIC CLIMATE CONTROLS
F Optional equipment
Page 10 of 20
10
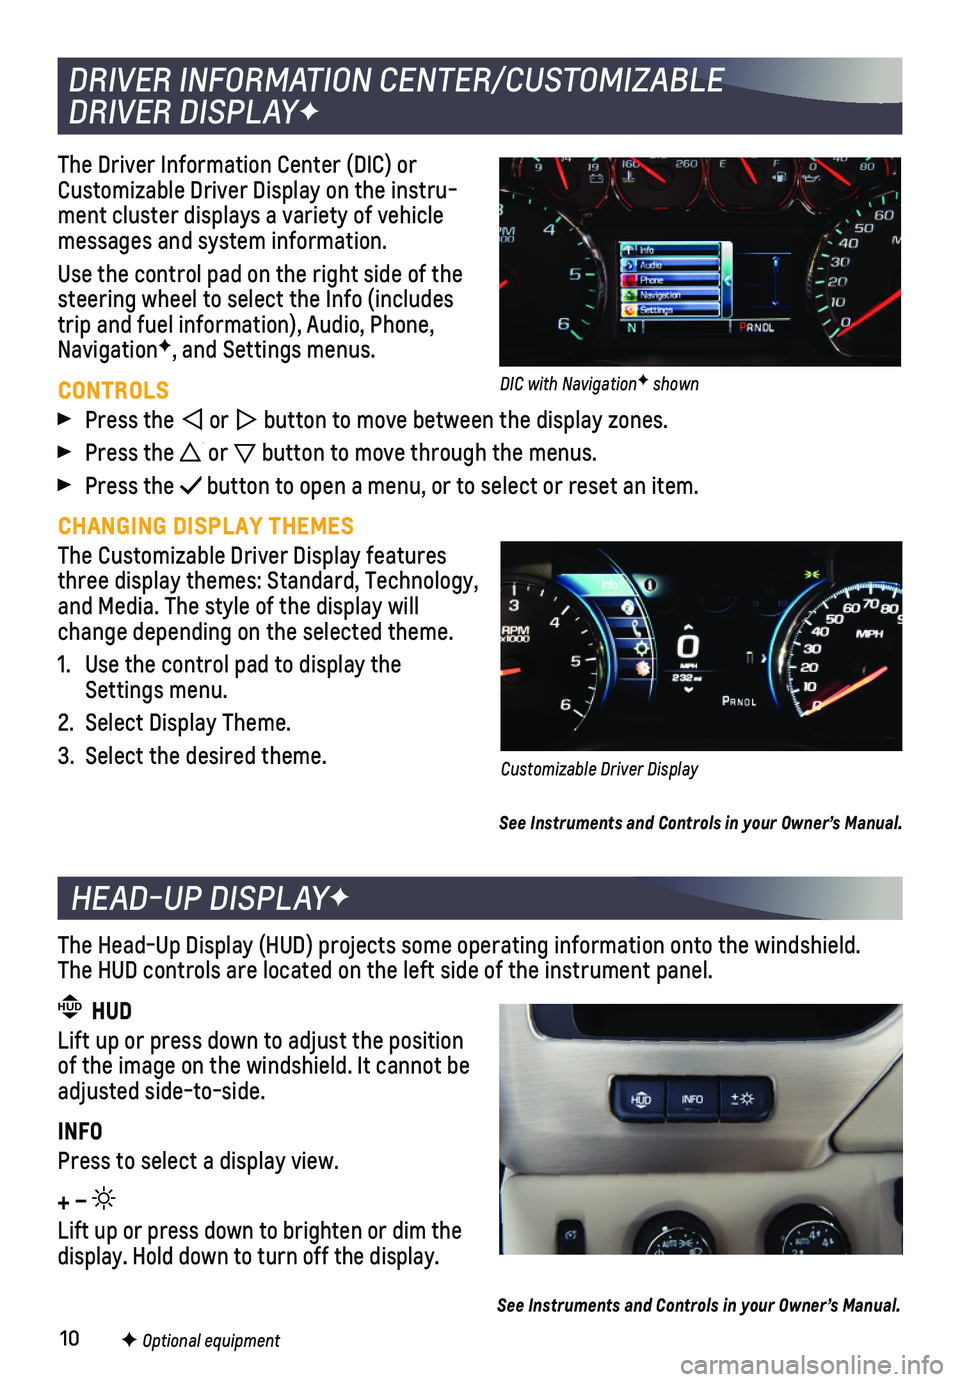
The Driver Information Center (DIC) or Customizable Driver Display on the instru-ment cluster displays a variety of vehicle messages and system information.
Use the control pad on the right side of the steering wheel to select the Info (includes trip and fuel information), Audio, Phone, NavigationF, and Settings menus.
CONTROLS
Press the or button to move between the display zones.
Press the or button to move through the menus.
Press the button to open a menu, or to select or reset an item.
CHANGING DISPLAY THEMES
The Customizable Driver Display features three display themes: Standard, Technology, and Media. The style of the display will change depending on the selected theme.
1. Use the control pad to display the Settings menu.
2. Select Display Theme.
3. Select the desired theme.
See Instruments and Controls in your Owner’s Manual.
DRIVER INFORMATION CENTER/CUSTOMIZABLE
DRIVER DISPLAYF
Customizable Driver Display
DIC with NavigationF shown
HEAD-UP DISPLAYF
The Head-Up Display (HUD) projects some operating information onto the\
windshield. The HUD controls are located on the left side of the instrument panel.
HUD HUD
Lift up or press down to adjust the position of the image on the windshield. It cannot be adjusted side-to-side.
INFO
Press to select a display view.
+ –
Lift up or press down to brighten or dim the display. Hold down to turn off the display.
See Instruments and Controls in your Owner’s Manual.
F Optional equipment
Page 13 of 20
13F Optional equipment *Screen measured diagonally
MANAGING HOME PAGE ICONS
The Home page icons can be arranged in any order.
1. Press the Home button.
2. To enter edit mode, touch and hold the Home page icon to move.
3. Continue holding the icon and drag it to the desired position, and then \
release.
4. Press the Home button to exit edit mode.
STORING FAVORITES
Up to 60 radio stations from all bands (AM, FM or XMF), media (song, artist, album, and genre with device connected to a USB port), phone contacts and navigati\
on destina-tionsF can be stored in any order.
1. Select the desired radio station, media favorite, navigation destination\
or contact.
2. Touch and drag up the Interaction Selector at the bottom of the screen to display the favorite screen buttons.
3. Touch and hold one of the favorite screen buttons until a beep is heard,\
indicating it is stored.
4. Repeat the steps to store another favorite item.
To change the number of favorites displayed, go to Settings > Radio.
NATURAL VOICE RECOGNITION
Control the music source and make phone calls hands-free (after pairing\
your Bluetooth-enabled phone) using the natural voice recognition system.
1. Press the Push to Talk button on the steering wheel.
2. The radio will play a prompt followed by a beep.
3. After the beep, say what you want it to do using natural speech. (Examples: “Call Amanda” or “Tune FM 104.3.” Say “Help”\
for assistance.)
APPS
In-vehicle apps — connecting to music, news, weather, travel informat\
ion, sports, enter-tainment and more — are available for download to the radio through t\
he Apps icon on the Home page. Downloading and using the apps requires internet connecti\
vity, and may require a data plan, accessed through the vehicle’s 4G LTE Wi-Fi hots\
pot, if active, or a mobile device hotspot.
TEXT MESSAGE ALERTS
Text message alerts play a text message over the audio system and allow \
a response with a preset message. The text messaging feature must be set up when th\
e cell phone is paired. Messages can be viewed on the infotainment screen only when the \
vehicle is not moving.
Touch Text to view the text message inbox.
For assistance with the MyLink system, contact Customer Assistance at 1-855-4-SUPPORT (1-855-478-7767) or visit my.chevrolet.com/learn.
See your Infotainment System Manual.
CHEVROLET INFOTAINMENT WITH
8-INCH* SCREEN & NAVIGATIONF
Page 14 of 20
 can be connected to high-speed internet.
To retrieve the SSID and password for the hotspo")
14
With the vehicle’s available 4G LTE Wi-Fi hotspot, up to 7 devices (\
smartphones, tablets and laptops) can be connected to high-speed internet.
To retrieve the SSID and password for the hotspot, go to Settings > Wi-F\
i > Manage Wi-Fi Networks.
Note: For more information on use and system limitations, visit my.chevrolet.com/learn.
See Instruments and Controls in your Owner’s Manual.
4G LTE WI-FI® HOTSPOT
Refer to your Owner’s Manual for important information about using the Bluetooth system while driving.
Before using a Bluetooth-enabled device in the vehicle, it must be paire\
d with the in-vehicle Bluetooth system. The pairing process is disabled when the ve\
hicle is moving. Not all devices will support all functions. For more information, visit my.chevrolet.com/learn.
PAIR A PHONE
1. To use voice recognition, press the Push to Talk button; after the beep, say “Pair phone,” or use the MENU knob or the infotainment screen to select the Phone icon > Phones > Pair Device.
2. Start the pairing process on the phone. From your phone’s Bluetooth s\
ettings, select the name shown on the infotainment screen.
3. Confirm the codes that appear on the infotainment screen and the phone\
.
4. When pairing is complete, the phone screen is displayed. Your phone book\
may be downloaded depending on the phone.
STREAMING AUDIO
With a paired device connected via Bluetooth, press the MEDIA button until Bluetooth is displayed on the touch screen to stream audio from the device. For fu\
ll control of the device, connect it to a USB port.
See your Infotainment System Manual.
The Wireless Charging system for mobile devices is located on the storag\
e tray on top of the center console. To check mobile device compatibility, visit my.chevrolet.com/learn. See your phone retailer for details on required phone accessories.
1. The vehicle must be on or Retained Accessory Power must be active.
2. Remove all objects from the charging pad.
3. Place the device, face up, on the symbol on the pad, aligned with the rear rib.
4. Move the device slowly until the battery charging symbol displays on the\
infotainment screen. If not charging, remove the device for 3 seconds and rotate it 1\
80 degrees.
See Instruments and Controls in your Owner’s Manual.
BLUETOOTH® SYSTEM
WIRELESS CHARGINGF
F Optional equipment
Page 15 of 20

15
The system includes a Blu-ray/DVD/CD player, two USB ports, HDMI/MHL inp\
ut, wireless digital headphones, a remote control, and two screens on Suburban models\
.
Press the release button to open the video screen. Push up the screen when not in use. The screen turns on/off automatically.
Use the remote control to select the same or a dif-ferent source for each screen from the rear seats.
To access the Rear Seat Infotainment controls from the front seat, select Video on the Home page.
See your Infotainment System Manual.
REAR SEAT INFOTAINMENT SYSTEMF
F Optional equipment
TEEN DRIVER
Teen Driver Mode allows multiple keys to be registered for beginning dri\
vers. When active, the system automatically activates certain safety systems, allow\
s setting of some features, and limits the use of others. An in-vehicle Report Card r\
ecords vehicle data about driving behavior. When the vehicle is started with a register\
ed key, a Driver Information Center message displays that Teen Driver is active.
To create a Personal Identification Number, register a key, change Tee\
n Driver Mode settings, or access the Report Card, go to Settings > Teen Driver.
See your Infotainment System Manual.
APPLE CARPLAY™
ANDROID AUTO™
Apple CarPlay capability is available through a compatible smartphone us\
ing the Projection icon on the Home page of the infotainment system. No app is r\
equired.
1. Connect your compatible phone by plugging the Lightning cable into a USB\
data port. Use your device’s factory-provided Lightning cable. Aftermarket cable\
s may not work.
2. The Projection icon will change to Apple CarPlay. Touch the Apple CarPla\
y icon to have your apps displayed.
For more information, call 1-855-478-7767 or visit my.chevrolet.com/learn.
See your Infotainment System Manual.
Android Auto capability is available through a compatible smartphone usi\
ng the Projection icon on the Home page of the infotainment system.
1. Download the Android Auto app to your phone from the Google Play Store.
2. Connect your compatible phone by plugging the phone USB cable into a USB\
data port. Use your device’s factory-provided USB cable. Aftermarket cables may \
not work.
3. The Projection icon will change to Android Auto. Touch the Android Auto \
icon to have your apps displayed.
For more information, call 1-855-478-7767 or visit my.chevrolet.com/learn.
See your Infotainment System Manual.