instrument panel CHEVROLET SUBURBAN 2022 Owner's Manual
[x] Cancel search | Manufacturer: CHEVROLET, Model Year: 2022, Model line: SUBURBAN, Model: CHEVROLET SUBURBAN 2022Pages: 438, PDF Size: 14.08 MB
Page 241 of 438
Chevrolet Tahoe/Suburban Owner Manual (GMNA-Localizing-U.S./Canada/
Mexico-15555985) - 2022 - CRC - 12/3/21
240 Driving and Operating
Locking Rear Axle
Vehicles with a locking rear axle can give
more traction on snow, mud, ice, sand,
or gravel. It works like a standard axle most
of the time, but when traction is low, this
feature will allow the rear wheel with the
most traction to move the vehicle.
Four Corner Air Suspension
System
The Four Corner Air Suspension feature
provides full time load leveling capability
along with the benefit of adjusting ride
height for increased convenience and
capability.
{Warning
To help avoid personal injury or death,
make sure the area underneath the
vehicle and inside the wheel wells is clear
when lowering the vehicle.
{Warning
To help avoid personal injury or death,
always select the lowest ride height for
the current driving conditions. Higher ride
heights raise the vehicle's center of
gravity, increasing the chance of a
rollover during extreme maneuvers.
{Warning
Heavy loads on the roof rack will make
the vehicle's center of gravity higher,
increasing the possibility of a rollover. To
avoid losing control of the vehicle, always
select the normal height setting and
avoid high speeds, sudden starts, sharp
turns, sudden braking, or abrupt
maneuvers when carrying cargo on the
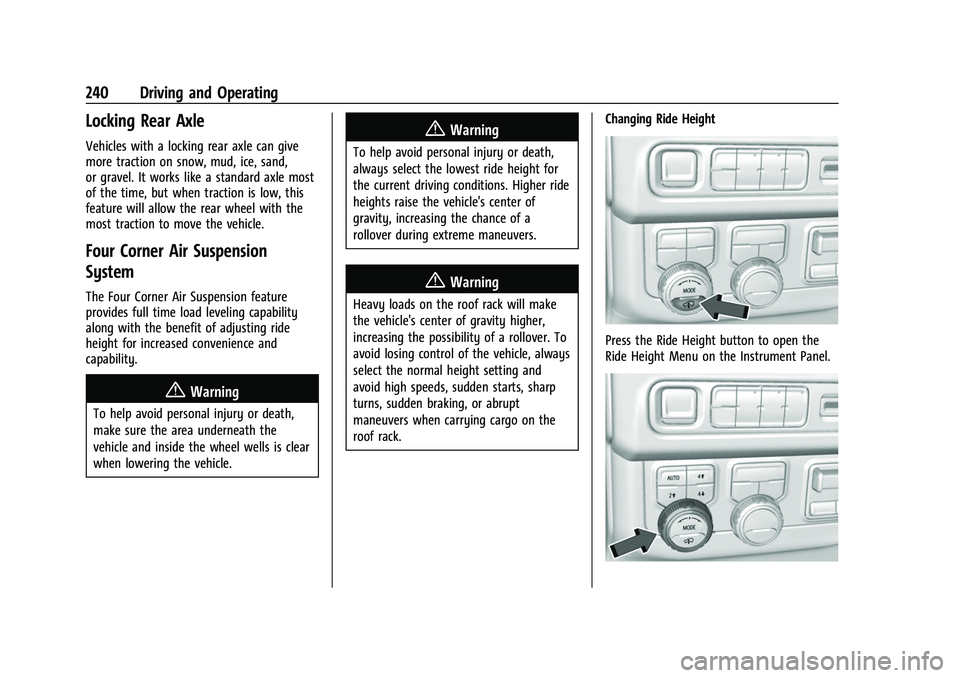
roof rack.Changing Ride Height
Press the Ride Height button to open the
Ride Height Menu on the Instrument Panel.
Page 282 of 438
Chevrolet Tahoe/Suburban Owner Manual (GMNA-Localizing-U.S./Canada/
Mexico-15555985) - 2022 - CRC - 12/3/21
Driving and Operating 281
{Warning
When towing a trailer, exhaust gases
may collect at the rear of the vehicle and
enter if the liftgate, trunk/hatch,
or rear-most window is open.
When towing a trailer:
.Do not drive with the liftgate, trunk/
hatch, or rear-most window open.
.Fully open the air outlets on or under
the instrument panel.
.Also adjust the climate control system
to a setting that brings in only outside
air. See“Climate Control Systems” in
the Index.
For more information about carbon
monoxide, see Engine Exhaust 0223.
Towing a trailer requires experience. The
combination of the vehicle and trailer is
longer and not as responsive as the vehicle
itself. Get used to the handling and braking
of the combination by driving on a level
road surface before driving on public roads.
The trailer structure, the tires, and the
brakes must be all be rated to carry the
intended cargo. Inadequate trailer equipment can cause the combination to
operate in an unexpected or unsafe manner.
Before driving, inspect all trailer hitch parts
and attachments, safety chains, electrical
connectors, lamps, tires, and mirrors. See
Towing Equipment
0287. If the trailer has
electric brakes, start the combination
moving and then manually apply the trailer
brake controller to check the trailer brakes
work. During the trip, occasionally check
that the cargo and trailer are secure and
that the lamps and any trailer brakes are
working.Towing with a Stability Control System
When towing, the stability control system
might be heard. The system reacts to
vehicle movement caused by the trailer,
which mainly occurs during cornering. This is
normal when towing heavier trailers.
Following Distance
Stay at least twice as far behind the vehicle
ahead as you would when driving without a
trailer. This can help to avoid heavy braking
and sudden turns.
Passing
More passing distance is needed when
towing a trailer. The combination of the
vehicle and trailer will not accelerate as
quickly and is much longer than the vehicle
alone. It is necessary to go much farther
beyond the passed vehicle before returning
to the lane. Pass on level roadways. Avoid
passing on hills if possible.
Backing Up
Hold the bottom of the steering wheel with
one hand. To move the trailer to the left,
move that hand to the left. To move the
trailer to the right, move that hand to the
right. Always back up slowly and, if possible,
have someone guide you.
Making Turns
Caution
Turn more slowly and make wider arcs
when towing a trailer to prevent damage
to your vehicle. Making very sharp turns
could cause the trailer to contact the
vehicle.
Page 295 of 438
Chevrolet Tahoe/Suburban Owner Manual (GMNA-Localizing-U.S./Canada/
Mexico-15555985) - 2022 - CRC - 12/3/21
294 Driving and Operating
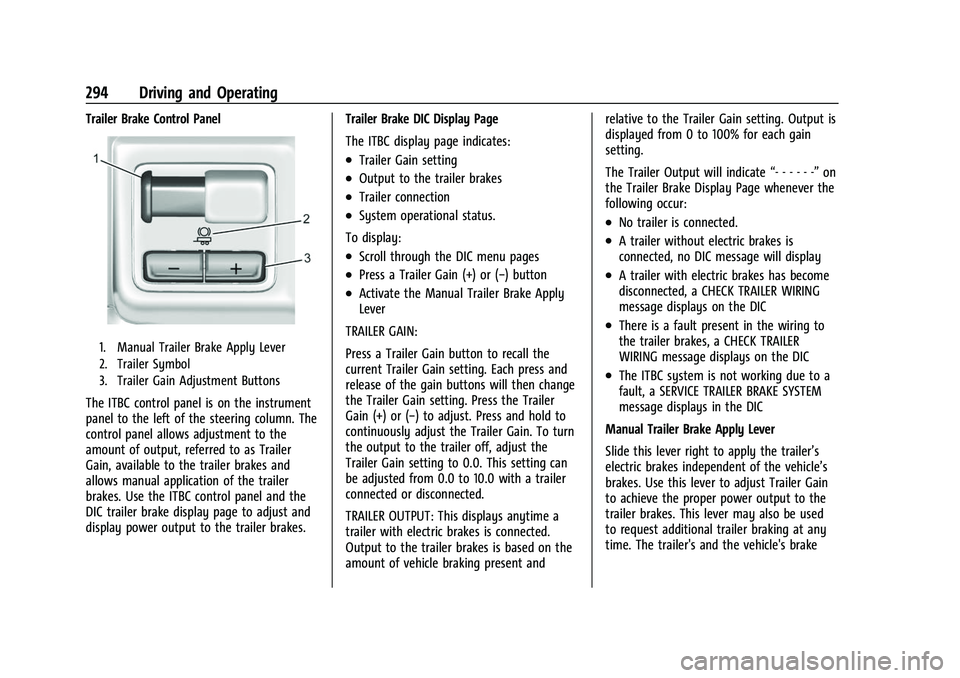
Trailer Brake Control Panel
1. Manual Trailer Brake Apply Lever
2. Trailer Symbol
3. Trailer Gain Adjustment Buttons
The ITBC control panel is on the instrument
panel to the left of the steering column. The
control panel allows adjustment to the
amount of output, referred to as Trailer
Gain, available to the trailer brakes and
allows manual application of the trailer
brakes. Use the ITBC control panel and the
DIC trailer brake display page to adjust and
display power output to the trailer brakes.Trailer Brake DIC Display Page
The ITBC display page indicates:
.Trailer Gain setting
.Output to the trailer brakes
.Trailer connection
.System operational status.
To display:
.Scroll through the DIC menu pages
.Press a Trailer Gain (+) or (−) button
.Activate the Manual Trailer Brake Apply
Lever
TRAILER GAIN:
Press a Trailer Gain button to recall the
current Trailer Gain setting. Each press and
release of the gain buttons will then change
the Trailer Gain setting. Press the Trailer
Gain (+) or (−) to adjust. Press and hold to
continuously adjust the Trailer Gain. To turn
the output to the trailer off, adjust the
Trailer Gain setting to 0.0. This setting can
be adjusted from 0.0 to 10.0 with a trailer
connected or disconnected.
TRAILER OUTPUT: This displays anytime a
trailer with electric brakes is connected.
Output to the trailer brakes is based on the
amount of vehicle braking present and relative to the Trailer Gain setting. Output is
displayed from 0 to 100% for each gain
setting.
The Trailer Output will indicate
“- - - - - -”on
the Trailer Brake Display Page whenever the
following occur:
.No trailer is connected.
.A trailer without electric brakes is
connected, no DIC message will display
.A trailer with electric brakes has become
disconnected, a CHECK TRAILER WIRING
message displays on the DIC
.There is a fault present in the wiring to
the trailer brakes, a CHECK TRAILER
WIRING message displays on the DIC
.The ITBC system is not working due to a
fault, a SERVICE TRAILER BRAKE SYSTEM
message displays in the DIC
Manual Trailer Brake Apply Lever
Slide this lever right to apply the trailer’s
electric brakes independent of the vehicle’s
brakes. Use this lever to adjust Trailer Gain
to achieve the proper power output to the
trailer brakes. This lever may also be used
to request additional trailer braking at any
time. The trailer's and the vehicle's brake
Page 309 of 438
Chevrolet Tahoe/Suburban Owner Manual (GMNA-Localizing-U.S./Canada/
Mexico-15555985) - 2022 - CRC - 12/3/21
308 Vehicle Care
Vehicle Care
General Information
General Information . . . . . . . . . . . . . . . . . . 309
California Perchlorate MaterialsRequirements . . . . . . . . . . . . . . . . . . . . . . . 309
Accessories and Modifications . . . . . . . . . 309
Vehicle Checks
Doing Your Own Service Work . . . . . . . . 309
Hood . . . . . . . . . . . . . . . . . . . . . . . . . . . . . . . . . . 310
Engine Compartment Overview . . . . . . . . 312
Engine Oil . . . . . . . . . . . . . . . . . . . . . . . . . . . . . 315
Engine Oil Life System . . . . . . . . . . . . . . . . . 316
Automatic Transmission Fluid . . . . . . . . . . 317
Engine Air Filter Life System . . . . . . . . . . . 318
Engine Air Cleaner/Filter . . . . . . . . . . . . . . . 318
Cooling System . . . . . . . . . . . . . . . . . . . . . . . . 319
Engine Overheating . . . . . . . . . . . . . . . . . . . . 322
Engine Fan . . . . . . . . . . . . . . . . . . . . . . . . . . . . 324
Washer Fluid . . . . . . . . . . . . . . . . . . . . . . . . . . 324
Brakes . . . . . . . . . . . . . . . . . . . . . . . . . . . . . . . . . 324
Brake Pad Life System . . . . . . . . . . . . . . . . . 325
Brake Fluid . . . . . . . . . . . . . . . . . . . . . . . . . . . . 326
Battery - North America . . . . . . . . . . . . . . . 327
Four-Wheel Drive . . . . . . . . . . . . . . . . . . . . . . 327
Front Axle . . . . . . . . . . . . . . . . . . . . . . . . . . . . . 328
Rear Axle . . . . . . . . . . . . . . . . . . . . . . . . . . . . . . 328
Park Brake and P (Park) Mechanism Check . . . . . . . . . . . . . . . . . . . . . . . . . . . . . . . . 328 Wiper Blade Replacement . . . . . . . . . . . . . 329
Glass Replacement . . . . . . . . . . . . . . . . . . . . 330
Windshield Replacement . . . . . . . . . . . . . . 330
Gas Strut(s) . . . . . . . . . . . . . . . . . . . . . . . . . . . 330
Headlamp Aiming
Front Headlamp Aiming . . . . . . . . . . . . . . . 331
Bulb Replacement
Bulb Replacement . . . . . . . . . . . . . . . . . . . . . . 331
LED Lighting . . . . . . . . . . . . . . . . . . . . . . . . . . . 331
Taillamps, Turn Signal, Stoplamps, and
Back-Up Lamps . . . . . . . . . . . . . . . . . . . . . . . 331
Electrical System
Electrical System Overload . . . . . . . . . . . . . 332
Fuses and Circuit Breakers . . . . . . . . . . . . . 334
Engine Compartment Fuse Block . . . . . . . 335
Instrument Panel Fuse Block . . . . . . . . . . 339
Rear Compartment Fuse Block . . . . . . . . . 341
Wheels and Tires
Tires . . . . . . . . . . . . . . . . . . . . . . . . . . . . . . . . . . . 343
All-Season Tires . . . . . . . . . . . . . . . . . . . . . . . 344
Winter Tires . . . . . . . . . . . . . . . . . . . . . . . . . . . 344
Low-Profile Tires . . . . . . . . . . . . . . . . . . . . . . . 344
All-Terrain Tires . . . . . . . . . . . . . . . . . . . . . . . . 345
Tire Sidewall Labeling . . . . . . . . . . . . . . . . . 345
Tire Designations . . . . . . . . . . . . . . . . . . . . . . 346
Tire Terminology and Definitions . . . . . . 347
Tire Pressure . . . . . . . . . . . . . . . . . . . . . . . . . . 349 Tire Pressure for High-Speed
Operation . . . . . . . . . . . . . . . . . . . . . . . . . . . 350
Tire Pressure Monitor System . . . . . . . . . . 351
Tire Pressure Monitor Operation . . . . . . . 352
Tire Inspection . . . . . . . . . . . . . . . . . . . . . . . . 356
Tire Rotation . . . . . . . . . . . . . . . . . . . . . . . . . . 356
When It Is Time for New Tires . . . . . . . . 357
Buying New Tires . . . . . . . . . . . . . . . . . . . . . 358
Different Size Tires and Wheels . . . . . . . 359
Uniform Tire Quality Grading . . . . . . . . . 359
Wheel Alignment and Tire Balance . . . . 360
Wheel Replacement . . . . . . . . . . . . . . . . . . . 360
Tire Chains . . . . . . . . . . . . . . . . . . . . . . . . . . . . 361
If a Tire Goes Flat . . . . . . . . . . . . . . . . . . . . . 362
Tire Changing . . . . . . . . . . . . . . . . . . . . . . . . . 363
Full-Size Spare Tire . . . . . . . . . . . . . . . . . . . . . 373
Jump Starting
Jump Starting - North America . . . . . . . . 373
Towing the Vehicle
Towing the Vehicle . . . . . . . . . . . . . . . . . . . . 376
Recreational Vehicle Towing . . . . . . . . . . . 377
Appearance Care
Exterior Care . . . . . . . . . . . . . . . . . . . . . . . . . . . 381
Interior Care . . . . . . . . . . . . . . . . . . . . . . . . . . . 385
Floor Mats . . . . . . . . . . . . . . . . . . . . . . . . . . . . 388
Page 311 of 438
Chevrolet Tahoe/Suburban Owner Manual (GMNA-Localizing-U.S./Canada/
Mexico-15555985) - 2022 - CRC - 12/3/21
310 Vehicle Care
This vehicle has an airbag system. Before
attempting to do your own service work,
seeServicing the Airbag-Equipped Vehicle
0 67.
If equipped with remote vehicle start, open
the hood before performing any service
work to prevent remote starting the vehicle
accidentally. See Remote Vehicle Start 012.
Keep a record with all parts receipts and list
the mileage and the date of any service
work performed. See Maintenance Records
0 401.
Caution
Even small amounts of contamination can
cause damage to vehicle systems. Do not
allow contaminants to contact the fluids,
reservoir caps, or dipsticks.
Hood
{Warning
For vehicles with auto engine stop/start,
turn the vehicle off before opening the
hood. If the vehicle is on, the engine will
start when the hood is opened. You or
others could be injured.
{Warning
Components under the hood can get hot
from running the engine. To help avoid
the risk of burning unprotected skin,
never touch these components until they
have cooled, and always use a glove or
towel to avoid direct skin contact.
Clear any snow from the hood before
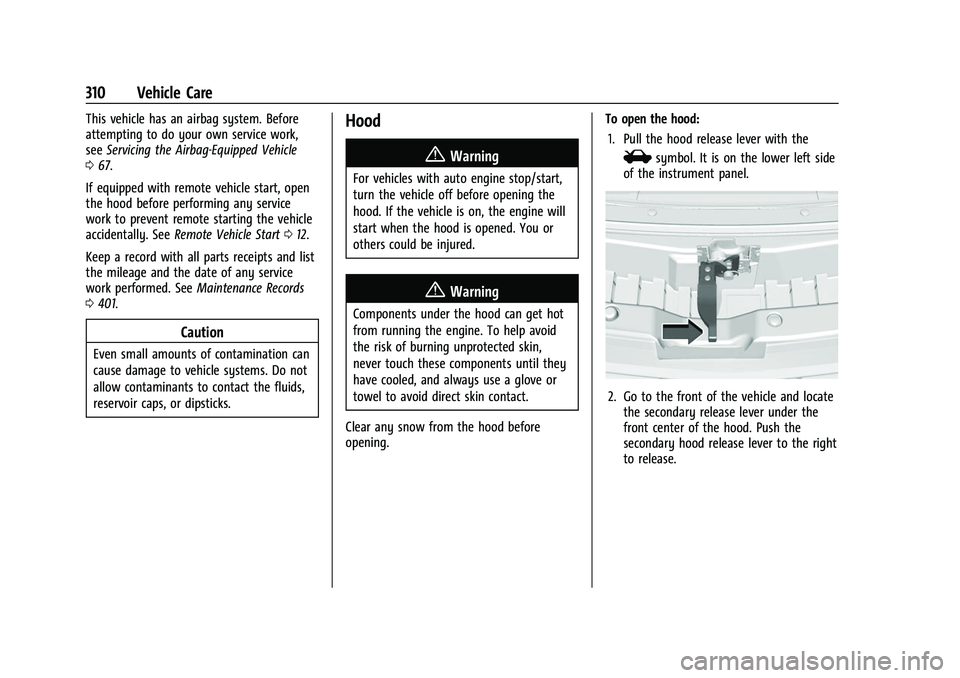
opening. To open the hood:
1. Pull the hood release lever with the
isymbol. It is on the lower left side
of the instrument panel.
2. Go to the front of the vehicle and locate the secondary release lever under the
front center of the hood. Push the
secondary hood release lever to the right
to release.
Page 334 of 438

Chevrolet Tahoe/Suburban Owner Manual (GMNA-Localizing-U.S./Canada/
Mexico-15555985) - 2022 - CRC - 12/3/21
Vehicle Care 333
When the current electrical load is too
heavy, the circuit breaker opens and closes,
protecting the circuit until the current load
returns to normal or the problem is fixed.
This greatly reduces the chance of circuit
overload and fire caused by electrical
problems.
Fuses and circuit breakers protect the wires
that provide the power to the devices in
your vehicle.
If there is a problem on the road and a fuse
needs to be replaced, the same amperage
fuse can be borrowed. Choose some feature
of the vehicle that is not needed to use and
replace it as soon as possible.
To check a fuse, look at the band inside the
fuse. If the band is broken or melted,
replace the fuse. Be sure to replace a bad
fuse with a fuse of the identical size and
rating.
Replacing a Blown Fuse
1. Turn off the vehicle.2. Locate the fuse puller on the instrument
panel end cap. See the Instrument Panel
Fuse Block 0339.
Page 335 of 438

Chevrolet Tahoe/Suburban Owner Manual (GMNA-Localizing-U.S./Canada/
Mexico-15555985) - 2022 - CRC - 12/3/21
334 Vehicle Care
3. Use the fuse puller to remove the fusefrom the top or side, as shown above.
4. If the fuse must be replaced immediately, spare fuses are also
provided on the instrument panel end
cap or borrow a replacement fuse with
the same amperage from the fuse block.
Choose a vehicle feature that is not
needed to safely operate the vehicle.
Repeat Steps 2-3.
5. Insert the replacement fuse into the empty slot of the blown fuse.
At the next opportunity, see your dealer to
replace the blown fuse.
Headlamp Wiring
An electrical overload may cause the lamps
to go on and off, or in some cases to
remain off. Have the headlamp wiring
checked right away if the lamps go on and
off or remain off.
Windshield Wipers
If the wiper motor overheats due to heavy
snow or ice, the windshield wipers will stop
until the motor cools and will then restart.
Although the circuit is protected from
electrical overload, overload due to heavy
snow or ice may cause wiper linkage
damage. Always clear ice and heavy snow
from the windshield before using the
windshield wipers.
If the overload is caused by an electrical
problem and not snow or ice, be sure to get
it fixed.
Fuses and Circuit Breakers
The wiring circuits in the vehicle are
protected from short circuits by a
combination of fuses and circuit breakers.
This greatly reduces the chance of damage
caused by electrical problems.
{Danger
Fuses and circuit breakers are marked
with their ampere rating. Do not exceed
the specified amperage rating when
replacing fuses and circuit breakers. Use
of an oversized fuse or circuit breaker can
result in a vehicle fire. You and others
could be seriously injured or killed.
{Warning
Installation or use of fuses that do not
meet GM’s original fuse specifications is
dangerous. The fuses could fail, and result
in a fire. You or others could be injured
or killed, and the vehicle could be
damaged.
See Accessories and Modifications 0309 and
General Information 0309.
Page 338 of 438
Chevrolet Tahoe/Suburban Owner Manual (GMNA-Localizing-U.S./Canada/
Mexico-15555985) - 2022 - CRC - 12/3/21
Vehicle Care 337
FusesUsage
9 ELM 5 –Exterior
Lighting Module 5
10 ELM 6 –Exterior
Lighting Module 6
11 Spare
12 –
13 Washer Front
14 Washer Rear 15 REC 2 –Rear Electrical
Center 2
16 Power Sounder 17 Spare
19 DC/AC Inverter
20 IECR 2 21 –
22 IECL 2
24 EBCM –Electronic Brake
Control Module
25 REC 1 –Rear Electrical
Center 1
26 Camera Wash Fuses
Usage
27 Horn
28 Headlamp RT –Right
29 Headlamp LT –Left
30 ELM 3 –Exterior
Lighting Module 3
31 ELM 1 –Exterior
Lighting Module 1
32 –
33 Not R/C
34 –
37 On Board Diagnostics (OBD) Body
38 MISC Body
39 Upfitter
40 MISC Instrument Panel (IP)
41 Trailer Parking Lamps
42 Right Taillamp
44 Trailer Tow 45 Secondary Axle Motor Fuses
Usage
46 Engine Control Module (ECM) Ignition
47 OBD Engine
48 –
49 TCM –Telematics
Control Module
50 A/C Clutch 51 TCCM –Transfer Case
Control Module
52 Front Wiper
53 –
54 Left Taillamps 55 Trailer Back-up Lamp
56 SADS –Semi Active
Damping System
57 Spare
58 Starter Motor
60 AFM 1 –Active Fuel
Management 1
61 Automatic Lamp Control (ALC) Main
Page 340 of 438
Chevrolet Tahoe/Suburban Owner Manual (GMNA-Localizing-U.S./Canada/
Mexico-15555985) - 2022 - CRC - 12/3/21
Vehicle Care 339
Instrument Panel Fuse Block
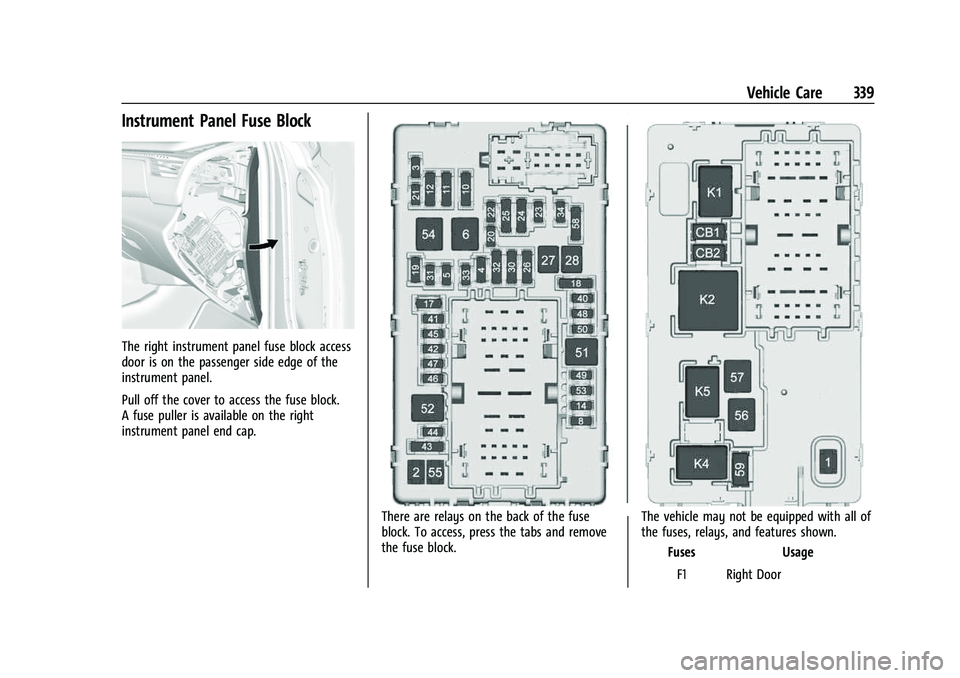
The right instrument panel fuse block access
door is on the passenger side edge of the
instrument panel.
Pull off the cover to access the fuse block.
A fuse puller is available on the right
instrument panel end cap.
There are relays on the back of the fuse
block. To access, press the tabs and remove
the fuse block.The vehicle may not be equipped with all of
the fuses, relays, and features shown.
Fuses Usage
F1 Right Door
Page 388 of 438
Chevrolet Tahoe/Suburban Owner Manual (GMNA-Localizing-U.S./Canada/
Mexico-15555985) - 2022 - CRC - 12/3/21
Vehicle Care 387
commercial upholstery cleaner or spot lifter.
If ring formation occurs, clean the entire
fabric or carpet.
After cleaning, use a paper towel to blot
excess moisture.
Cleaning High Gloss Surfaces and Vehicle
Information and Radio Displays
Use a microfiber cloth on high gloss surfaces
or vehicle displays. First, use a soft bristle
brush to remove dirt that can scratch the
surface. Then gently clean by rubbing with a
microfiber cloth. Never use window cleaners
or solvents. Periodically hand wash the
microfiber cloth separately, using mild soap.
Do not use bleach or fabric softener. Rinse
thoroughly and air dry before next use.
Caution
Do not attach a device with a suction cup
to the display. This may cause damage
and would not be covered by the vehicle
warranty.
Instrument Panel, Leather, Vinyl, Other
Plastic Surfaces, Low Gloss Paint
Surfaces, and Natural Open Pore Wood
Surfaces
Use a soft bristle brush to remove dust from
knobs and crevices on the instrument
cluster. Use a soft microfiber cloth
dampened with water to remove dust and
loose dirt. For a more thorough cleaning,
use a soft microfiber cloth dampened with a
mild soap and water solution.
Caution
Soaking or saturating leather, especially
perforated leather, as well as other
interior surfaces, may cause permanent
damage. Wipe excess moisture from
these surfaces after cleaning and allow
them to dry naturally. Never use heat,
steam, or spot removers. Do not use
liquids that contain alcohol or solvents on
leather seats. Do not use cleaners that
contain silicone or wax-based products.
Cleaners containing these solvents can
permanently change the appearance and
feel of leather or soft trim, and are not
recommended.Do not use cleaners that increase gloss,
especially on the instrument panel. Reflected
glare can decrease visibility through the
windshield under certain conditions.
Caution
Use of air fresheners may cause
permanent damage to plastics and
painted surfaces. If an air freshener
comes in contact with any plastic or
painted surface in the vehicle, blot
immediately and clean with a soft cloth
dampened with a mild soap solution.
Damage caused by air fresheners would
not be covered by the vehicle warranty.
Cargo Cover and Convenience Net
If equipped, wash with warm water and
mild detergent. Do not use chlorine bleach.
Rinse with cold water, and then dry
completely.
Care of Seat Belts
Keep belts clean and dry.