stop start CHEVROLET SUBURBAN 2022 Workshop Manual
[x] Cancel search | Manufacturer: CHEVROLET, Model Year: 2022, Model line: SUBURBAN, Model: CHEVROLET SUBURBAN 2022Pages: 438, PDF Size: 14.08 MB
Page 283 of 438
Chevrolet Tahoe/Suburban Owner Manual (GMNA-Localizing-U.S./Canada/
Mexico-15555985) - 2022 - CRC - 12/3/21
282 Driving and Operating
Make wider turns than normal when towing,
so trailer will not go over soft shoulders,
over curbs, or strike road signs, trees,
or other objects. Always signal turns well in
advance. Do not steer or brake suddenly.
Driving on Grades
Reduce speed and shift to a lower gear
before starting down a long or steep
downhill grade. If the transmission is not
shifted down, the brakes may overheat and
result in reduced braking efficiency.
The vehicle can tow in D (Drive). Shift the
transmission to a lower gear if the
transmission shifts too often under heavy
loads and/or hilly conditions.
When towing at higher altitudes, engine
coolant will boil at a lower temperature
than at lower altitudes. If the engine is
turned off immediately after towing at high
altitude on steep uphill grades, the vehicle
could show signs similar to engine
overheating. To avoid this, let the engine
run, preferably on level ground, with the
transmission in P (Park) for a few minutes
before turning the engine off. If the
overheat warning comes on, seeEngine
Overheating 0322.
Parking on Hills
{Warning
To prevent serious injury or death,
always park your vehicle and trailer on a
level surface when possible.
When parking your vehicle and your trailer
on a hill: 1. Press the brake pedal, but do not shift into P (Park) yet. Turn the wheels into
the curb if facing downhill or into traffic
if facing uphill.
2. Have someone place chocks under the trailer wheels.
3. When the wheel chocks are in place, gradually release the brake pedal to
allow the chocks to absorb the load of
the trailer.
4. Reapply the brake pedal. Then apply the parking brake and shift into P (Park).
5. Release the brake pedal.
Leaving After Parking on a Hill
1. Apply and hold the brake pedal.
.Start the engine.
.Shift into a gear.
.Release the parking brake. 2. Let up on the brake pedal.
3. Drive slowly until the trailer is clear of
the chocks.
4. Stop and have someone pick up and store the chocks.
Launching and Retrieving a Boat
Backing the Trailer into the Water
{Warning
.Have all passengers get out of the
vehicle before backing onto the sloped
part of the ramp. Lower the driver and
passenger side windows before
backing onto the ramp. This will
provide a means of escape in the
unlikely event the vehicle slides into
the water.
.If the boat launch surface is slippery,
have the driver remain in the vehicle
with the brake pedal applied while the
boat is being launched. The boat
launch can be especially slippery at
low tide when part of the ramp was
previously submerged at high tide. Do
not back onto the ramp to launch the
boat if you are not sure the vehicle
can maintain traction.
(Continued)
Page 284 of 438
Chevrolet Tahoe/Suburban Owner Manual (GMNA-Localizing-U.S./Canada/
Mexico-15555985) - 2022 - CRC - 12/3/21
Driving and Operating 283
Warning (Continued)
.Do not move the vehicle if someone is
in the path of the trailer. Some parts
of the trailer might be underwater and
not visible to people who are assisting
in launching the boat.
Disconnect the wiring to the trailer before
backing the trailer into the water to prevent
damage to the electrical circuits on the
trailer. Reconnect the wiring to the trailer
after removing the trailer from the water.
If the trailer has electric brakes that can
function when the trailer is submerged, it
might help to leave the electrical trailer
connector attached to maintain trailer brake
functionality while on the boat ramp.
To back the trailer into the water: 1. If equipped, place the vehicle in four-wheel-drive high.
2. Slowly back down the boat ramp until the boat is floating, but no further than
necessary.
3. Press and hold the brake pedal, but do not shift into P (Park) yet.
4. Have someone place chocks under the front wheels of the vehicle. 5. Gradually release the brake pedal to
allow the chocks to absorb the load of
the trailer.
6. Reapply the brake pedal. Then apply the parking brake and shift into P (Park).
7. Release the brake pedal.
Pulling the Trailer from the Water 1. Press and hold the brake pedal.
2. Start the engine and shift into a gear.
3. Release the parking brake.
4. Let up on the brake pedal.
5. Drive slowly until the tires are clear of the chocks.
6. Stop and have someone pick up and store the chocks.
7. Slowly pull the trailer from the water.
8. Once the vehicle and trailer have been driven from the sloped part of the boat
ramp, the vehicle can be shifted from
four-wheel-drive high. Shift into the drive
mode that is appropriate for the road
conditions.
Caution
If the vehicle tires begin to spin and the
vehicle begins to slide toward the water,
remove your foot from the accelerator
pedal and apply the brake pedal. Seek
help to have the vehicle towed up
the ramp.
Maintenance when Trailer Towing
The vehicle needs service more often when
used to tow trailers. See Maintenance
Schedule 0390. It is especially important to
check the engine oil, axle lubricant, belts,
cooling system, and brake system before
and during each trip.
Check periodically that all nuts and bolts on
the trailer hitch are tight.
Engine Cooling when Trailer Towing
The cooling system may temporarily
overheat during severe operating conditions.
See Engine Overheating 0322.
Trailer Towing
If equipped with a diesel engine, see the
Duramax diesel supplement.
Page 293 of 438
Chevrolet Tahoe/Suburban Owner Manual (GMNA-Localizing-U.S./Canada/
Mexico-15555985) - 2022 - CRC - 12/3/21
292 Driving and Operating
Use only a round, seven-wire connector with
flat blade terminals meeting SAE J2863
specifications for proper electrical
connectivity.
The seven-wire harness contains the
following trailer circuits:
.Yellow/Grey: Left Stop/Turn Signal
.Green/Violet: Right Stop/Turn Signal
.Grey/Brown: Taillamps
.White: Ground
.White/Green: Back-up Lamps
.Red/Green: Battery Feed
.Dark Blue: Trailer Brake
To help charge a remote (non-vehicle)
battery change drive mode to Tow Haul.
If the trailer is too light for Tow/Haul Mode,
turn on the headlamps to help charge the
battery.
Electric Brake Control Wiring Provisions
These wiring provisions are included with
the vehicle as part of the trailer wiring
package. These provisions are for an electric
brake controller.
The harness should be installed by your
dealer or a qualified service center. Refer to the aftermarket electric trailer brake
controller owner's manual to determine wire
color coding of the electric trailer brake
controller. The wire colors on the brake
controller may be different from the vehicle.
Trailer Lamps
Always check all trailer lamps are working at
the beginning of each trip, and periodically
on longer trips.
If equipped, the Trailering App will monitor
the RH turn/brake lamp circuit, LH turn/
brake lamp circuit, running lamp circuit, and
reverse lamp circuits on the trailer. DIC
messages and Trailering App alerts may be
displayed if lighting circuit issues are
detected on the trailer.
Pressing START LIGHT TEST in the Trailering
App automatically activates trailer lamps.
The Trailering App is not a substitute for
manually inspecting your trailer lamps. See
Trailering App
0298.
Trailer Connection and Lamp Messages
When a trailer is properly connected and
working, no trailer connection or lamp
messages appear on the Driver Information Center (DIC). However; if the vehicle detects
an issue with a trailer connection or lamp,
you may see the following DIC message(s):
.TRAILER DISCONNECTED CHECK
CONNECTION appears when a connected
trailer is disconnected. It appears
immediately when the vehicle is on,
or upon the next start-up if the trailer
was disconnected while the vehicle was
off. Check the trailer connection as
appropriate.
.CHECK TRAILER XXX LAMP appears when
there is a detected lamp or wiring fault
on the trailer. Check the trailer wiring and
lamps.
Turn Signals When Towing a Trailer
When properly connected, the trailer turn
signals should will illuminate to indicate the
vehicle is turning, changing lanes,
or stopping. When towing a trailer, the
arrows on the instrument cluster will
illuminate even if the trailer is not properly
connected or the bulbs are burned out.
Tow/Haul Mode
For instructions on how to enter Tow/Haul
mode, see
Driver Mode Control 0236.
Page 299 of 438
Chevrolet Tahoe/Suburban Owner Manual (GMNA-Localizing-U.S./Canada/
Mexico-15555985) - 2022 - CRC - 12/3/21
298 Driving and Operating
Always know the maximum speed rating for
the trailer tires before driving. This may be
significantly lower than the vehicle tire
speed rating. The speed rating may be on
the trailer tire sidewall. If the speed rating is
not shown, the default trailer tire speed
rating is 105 km/h (65 mph).
Trailering App
Trailer Lights App
If equipped, the Trailer Lights App is on the
Home Page of the infotainment display.
Touch Start to cycle the trailer lamps on and
off to determine if they are working. The
test follows this sequence:1. The running lights turn on first and remain on throughout the sequence.
2. The brake lights turn on for about two seconds.
3. The left turn signal light flashes three times.
4. The right turn signal light flashes three times.
5. The reverse lights turn on for about two seconds. 6. Steps 2–5 repeat for approximately
one minute and 45 seconds, or until the
test deactivates.
Touch Stop to stop the test. The test will
automatically end after one minute and
45 seconds.
The sequence also deactivates when any of
the following occur:
.The ignition is turned off.
.The transmission is shifted out of P (Park).
.The brake pedal is pressed.
.The turn signal is activated.
.The hazard warning lights are activated.
Trailering App
If equipped, the Trailering App is on the
Home Page of the infotainment display.
If equipped this feature allows profiles for
connected trailers to be created to view
status, to store and track trailer usage
information, and to set up towing assist
features.
The Trailering App Welcome Page will
appear when the Trailering App is opened
for the first time from the Home Page. When a trailer is electrically connected and
a trailer profile has not been created, there
will be an option to create a profile, use a
guest profile, or select Accessory/No trailer.
To turn the Trailer Detection Alert on, select
ON in the Settings tab.
When a trailer is electrically connected and
after a Trailer Profile has been created, the
trailer detection pop-up will appear with a
list of all of the custom Trailer Profiles made
on the vehicle. To load an existing Trailer
Profile, select one of the Trailer Profiles
listed, or load the Guest Trailer Profile by
selecting GUEST TRAILER. Touching
Accessory/No trailer will select Accessory/No
trailer as the active Trailer Profile and will
dismiss the pop- up. Shifting the vehicle
from P (Park) will select Guest Trailer as the
active Trailer Profile and will dismiss the
pop-up.
Create a Trailer Profile
Touch Add Trailer on the trailer detection
pop-up or touch + Add Trailer in the
Trailering App.
Follow on-screen instructions to set up
profile.
Page 303 of 438
Chevrolet Tahoe/Suburban Owner Manual (GMNA-Localizing-U.S./Canada/
Mexico-15555985) - 2022 - CRC - 12/3/21
302 Driving and Operating
Trailering App System will not display a
Trailer Detection Alert to the user when a
trailer is connected.
When a trailer is connected and the ignition
is off, the Trailering App System will
periodically pulse the lighting circuits of the
trailer to verify if it still connected. The
trailer lights may periodically flash as a
result of this trailer connection detection.
These flashes may be more visible in dark
ambient light environments. The flashing or
flickering lights are a normal condition and
the Trailering App System has built-in
protections to prevent the battery from
draining. When Theft Alert is also enabled
the frequency and pattern of this flashing
will change.
If a connected trailer becomes disconnected,
a message about the trailer disconnect will
appear on the DIC immediately (if vehicle is
on) or upon next ignition cycle (if trailer
was disconnected while vehicle is off). Check
your trailer connection if needed.
Connection Problem
If any of the trailer connections are lost, a
message about the connection issue will
appear on the Driver Information Center(DIC). The infotainment display will also
show the connection issue in the Lights
Status view.
Connection Trailer Lighting Faults Detected
The Trailering App System monitors for
electrical faults on the trailer lights.
A message about the lighting issue will
appear on the DIC. The infotainment display
will also show the lighting issue in the
Lights Status view. Repair your trailer lights
if needed. A trailer lighting issue is not
covered by your GM warranty.
The Running Lights connection may not
detect partial outages. Activate the light test
to check all trailer lamps. See
“Light Test”
following.
Light Test
Touch Start Light Test to cycle the trailer
lights on and off to determine if they are
working. The test follows this sequence:
1. The running lights turn on first and remain on throughout the sequence.
2. The brake lights turn on for about two seconds.
3. The left turn signal light flashes three times. 4. The right turn signal light flashes three
times.
5. The reverse lights turn on for about two seconds.
6. Steps 2–5 repeat for approximately one minute and 45 seconds, or until the
test deactivates.
7. Touch Stop to stop the test. The test will automatically end after one minute and
45 seconds.
The sequence also deactivates when any of
the following occur:
.The ignition is turned off.
.The transmission is shifted out of
P (Park).
.The brake pedal is pressed.
.The turn signal is activated.
.The hazard warning lights are activated.
Page 309 of 438
Chevrolet Tahoe/Suburban Owner Manual (GMNA-Localizing-U.S./Canada/
Mexico-15555985) - 2022 - CRC - 12/3/21
308 Vehicle Care
Vehicle Care
General Information
General Information . . . . . . . . . . . . . . . . . . 309
California Perchlorate MaterialsRequirements . . . . . . . . . . . . . . . . . . . . . . . 309
Accessories and Modifications . . . . . . . . . 309
Vehicle Checks
Doing Your Own Service Work . . . . . . . . 309
Hood . . . . . . . . . . . . . . . . . . . . . . . . . . . . . . . . . . 310
Engine Compartment Overview . . . . . . . . 312
Engine Oil . . . . . . . . . . . . . . . . . . . . . . . . . . . . . 315
Engine Oil Life System . . . . . . . . . . . . . . . . . 316
Automatic Transmission Fluid . . . . . . . . . . 317
Engine Air Filter Life System . . . . . . . . . . . 318
Engine Air Cleaner/Filter . . . . . . . . . . . . . . . 318
Cooling System . . . . . . . . . . . . . . . . . . . . . . . . 319
Engine Overheating . . . . . . . . . . . . . . . . . . . . 322
Engine Fan . . . . . . . . . . . . . . . . . . . . . . . . . . . . 324
Washer Fluid . . . . . . . . . . . . . . . . . . . . . . . . . . 324
Brakes . . . . . . . . . . . . . . . . . . . . . . . . . . . . . . . . . 324
Brake Pad Life System . . . . . . . . . . . . . . . . . 325
Brake Fluid . . . . . . . . . . . . . . . . . . . . . . . . . . . . 326
Battery - North America . . . . . . . . . . . . . . . 327
Four-Wheel Drive . . . . . . . . . . . . . . . . . . . . . . 327
Front Axle . . . . . . . . . . . . . . . . . . . . . . . . . . . . . 328
Rear Axle . . . . . . . . . . . . . . . . . . . . . . . . . . . . . . 328
Park Brake and P (Park) Mechanism Check . . . . . . . . . . . . . . . . . . . . . . . . . . . . . . . . 328 Wiper Blade Replacement . . . . . . . . . . . . . 329
Glass Replacement . . . . . . . . . . . . . . . . . . . . 330
Windshield Replacement . . . . . . . . . . . . . . 330
Gas Strut(s) . . . . . . . . . . . . . . . . . . . . . . . . . . . 330
Headlamp Aiming
Front Headlamp Aiming . . . . . . . . . . . . . . . 331
Bulb Replacement
Bulb Replacement . . . . . . . . . . . . . . . . . . . . . . 331
LED Lighting . . . . . . . . . . . . . . . . . . . . . . . . . . . 331
Taillamps, Turn Signal, Stoplamps, and
Back-Up Lamps . . . . . . . . . . . . . . . . . . . . . . . 331
Electrical System
Electrical System Overload . . . . . . . . . . . . . 332
Fuses and Circuit Breakers . . . . . . . . . . . . . 334
Engine Compartment Fuse Block . . . . . . . 335
Instrument Panel Fuse Block . . . . . . . . . . 339
Rear Compartment Fuse Block . . . . . . . . . 341
Wheels and Tires
Tires . . . . . . . . . . . . . . . . . . . . . . . . . . . . . . . . . . . 343
All-Season Tires . . . . . . . . . . . . . . . . . . . . . . . 344
Winter Tires . . . . . . . . . . . . . . . . . . . . . . . . . . . 344
Low-Profile Tires . . . . . . . . . . . . . . . . . . . . . . . 344
All-Terrain Tires . . . . . . . . . . . . . . . . . . . . . . . . 345
Tire Sidewall Labeling . . . . . . . . . . . . . . . . . 345
Tire Designations . . . . . . . . . . . . . . . . . . . . . . 346
Tire Terminology and Definitions . . . . . . 347
Tire Pressure . . . . . . . . . . . . . . . . . . . . . . . . . . 349 Tire Pressure for High-Speed
Operation . . . . . . . . . . . . . . . . . . . . . . . . . . . 350
Tire Pressure Monitor System . . . . . . . . . . 351
Tire Pressure Monitor Operation . . . . . . . 352
Tire Inspection . . . . . . . . . . . . . . . . . . . . . . . . 356
Tire Rotation . . . . . . . . . . . . . . . . . . . . . . . . . . 356
When It Is Time for New Tires . . . . . . . . 357
Buying New Tires . . . . . . . . . . . . . . . . . . . . . 358
Different Size Tires and Wheels . . . . . . . 359
Uniform Tire Quality Grading . . . . . . . . . 359
Wheel Alignment and Tire Balance . . . . 360
Wheel Replacement . . . . . . . . . . . . . . . . . . . 360
Tire Chains . . . . . . . . . . . . . . . . . . . . . . . . . . . . 361
If a Tire Goes Flat . . . . . . . . . . . . . . . . . . . . . 362
Tire Changing . . . . . . . . . . . . . . . . . . . . . . . . . 363
Full-Size Spare Tire . . . . . . . . . . . . . . . . . . . . . 373
Jump Starting
Jump Starting - North America . . . . . . . . 373
Towing the Vehicle
Towing the Vehicle . . . . . . . . . . . . . . . . . . . . 376
Recreational Vehicle Towing . . . . . . . . . . . 377
Appearance Care
Exterior Care . . . . . . . . . . . . . . . . . . . . . . . . . . . 381
Interior Care . . . . . . . . . . . . . . . . . . . . . . . . . . . 385
Floor Mats . . . . . . . . . . . . . . . . . . . . . . . . . . . . 388
Page 311 of 438
Chevrolet Tahoe/Suburban Owner Manual (GMNA-Localizing-U.S./Canada/
Mexico-15555985) - 2022 - CRC - 12/3/21
310 Vehicle Care
This vehicle has an airbag system. Before
attempting to do your own service work,
seeServicing the Airbag-Equipped Vehicle
0 67.
If equipped with remote vehicle start, open
the hood before performing any service
work to prevent remote starting the vehicle
accidentally. See Remote Vehicle Start 012.
Keep a record with all parts receipts and list
the mileage and the date of any service
work performed. See Maintenance Records
0 401.
Caution
Even small amounts of contamination can
cause damage to vehicle systems. Do not
allow contaminants to contact the fluids,
reservoir caps, or dipsticks.
Hood
{Warning
For vehicles with auto engine stop/start,
turn the vehicle off before opening the
hood. If the vehicle is on, the engine will
start when the hood is opened. You or
others could be injured.
{Warning
Components under the hood can get hot
from running the engine. To help avoid
the risk of burning unprotected skin,
never touch these components until they
have cooled, and always use a glove or
towel to avoid direct skin contact.
Clear any snow from the hood before
opening. To open the hood:
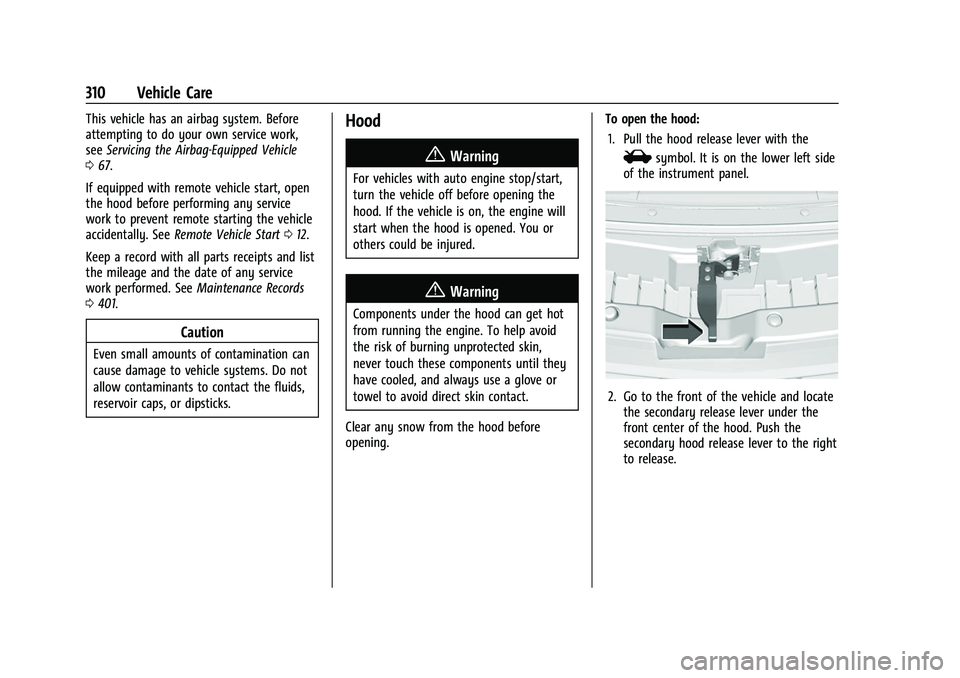
1. Pull the hood release lever with the
isymbol. It is on the lower left side
of the instrument panel.
2. Go to the front of the vehicle and locate the secondary release lever under the
front center of the hood. Push the
secondary hood release lever to the right
to release.
Page 323 of 438

Chevrolet Tahoe/Suburban Owner Manual (GMNA-Localizing-U.S./Canada/
Mexico-15555985) - 2022 - CRC - 12/3/21
322 Vehicle Care
Caution
Failure to follow the specific coolant fill
procedure could cause the engine to
overheat and could cause system
damage. If coolant is not visible in the
surge tank, contact your dealer.
If no coolant is visible in the surge tank, add
coolant.
1. Remove the coolant surge tank pressure cap when the cooling system, including
the coolant surge tank pressure cap and
upper radiator hose, is no longer hot.
Turn the pressure cap slowly
counterclockwise about one full turn. If a
hiss is heard, wait for that to stop.
A hiss means there is still some
pressure left.
2. Keep turning the pressure cap slowly, and remove it. 3. Fill the coolant surge tank with the
proper mixture to the full cold mark.
4. With the coolant surge tank pressure cap off, start the engine and let it run until
the engine coolant temperature gauge
indicates approximately 90 °C (195 °F).
By this time, the coolant level inside the
coolant surge tank may be lower. If the
level is lower, add more of the proper
mixture to the coolant surge tank until
the level reaches the indicated mark.
5. Replace the pressure cap tightly.
6. Verify coolant level after the engine is shut off and the coolant is cold.
If necessary, repeat coolant fill procedure
Steps 1–6.
Caution
If the pressure cap is not tightly installed,
coolant loss and engine damage may
occur. Be sure the cap is properly and
tightly secured.
Engine Overheating
Caution
Do not run the engine if there is a leak
in the engine cooling system. This can
cause a loss of all coolant and can
damage the system and vehicle. Have
any leaks fixed right away.
The vehicle has several indicators to warn of
engine overheating.
There is a coolant temperature gauge and a
engine coolant temperature warning light in
the vehicle's instrument cluster. See Engine
Coolant Temperature Gauge 0110 andEngine
Coolant Temperature Warning Light 0119.
In addition, there are ENGINE OVERHEATED
STOP ENGINE, ENGINE OVERHEATED IDLE
ENGINE, and ENGINE POWER IS REDUCED
messages in the Driver Information
Center (DIC).
If the decision is made not to lift the hood
when this warning appears, get service help
right away.
If the decision is made to lift the hood,
make sure the vehicle is parked on a level
surface. See Roadside Assistance Program
0 409.
Page 328 of 438
Chevrolet Tahoe/Suburban Owner Manual (GMNA-Localizing-U.S./Canada/
Mexico-15555985) - 2022 - CRC - 12/3/21
Vehicle Care 327
{Warning
The wrong or contaminated brake fluid
could result in damage to the brake
system. This could result in the loss of
braking leading to a possible injury.
Always use the proper GM approved
brake fluid.
Caution
If brake fluid is spilled on the vehicle's
painted surfaces, the paint finish can be
damaged. Immediately wash off any
painted surface.
Battery - North America
The original equipment battery is
maintenance free. Do not remove the cap
and do not add fluid.
Refer to the replacement number shown on
the original battery label when a new
battery is needed. SeeEngine Compartment
Overview 0312 for battery location.
The vehicle has an Absorbed Glass Mat
(AGM) 12-volt battery. Installation of a
standard 12-volt battery will result in
reduced 12-volt battery life. When using a 12-volt battery charger on the
12-volt AGM battery, some chargers have an
AGM battery setting on the charger.
If available, use the AGM setting on the
charger, to limit charge voltage to 14.8 volts.
Follow the charger manufacturer's
instructions.
Stop/Start System
This vehicle has a Stop/Start system to shut
off the engine to help conserve fuel. See
Stop/Start System
0220.
{Warning
WARNING: Battery posts, terminals and
related accessories can expose you to
chemicals including lead and lead
compounds, which are known to the
State of California to cause cancer and
birth defects or other reproductive harm.
Wash hands after handling. For more
information go to
www.P65Warnings.ca.gov.
See the warning on the back cover.
Vehicle Storage
{Warning
Batteries have acid that can burn you and
gas that can explode. You can be badly
hurt if you are not careful. See Jump
Starting - North America 0373 for tips on
working around a battery without
getting hurt.
Infrequent Usage: Remove the black,
negative (−) cable from the battery to keep
the battery from running down.
Extended Storage: Remove the black,
negative (−) cable from the battery or use a
battery trickle charger.
Four-Wheel Drive
Transfer Case
When to Check Lubricant
Refer to Maintenance Schedule 0390 to
determine when to check the lubricant.
Page 335 of 438

Chevrolet Tahoe/Suburban Owner Manual (GMNA-Localizing-U.S./Canada/
Mexico-15555985) - 2022 - CRC - 12/3/21
334 Vehicle Care
3. Use the fuse puller to remove the fusefrom the top or side, as shown above.
4. If the fuse must be replaced immediately, spare fuses are also
provided on the instrument panel end
cap or borrow a replacement fuse with
the same amperage from the fuse block.
Choose a vehicle feature that is not
needed to safely operate the vehicle.
Repeat Steps 2-3.
5. Insert the replacement fuse into the empty slot of the blown fuse.
At the next opportunity, see your dealer to
replace the blown fuse.
Headlamp Wiring
An electrical overload may cause the lamps
to go on and off, or in some cases to
remain off. Have the headlamp wiring
checked right away if the lamps go on and
off or remain off.
Windshield Wipers
If the wiper motor overheats due to heavy
snow or ice, the windshield wipers will stop
until the motor cools and will then restart.
Although the circuit is protected from
electrical overload, overload due to heavy
snow or ice may cause wiper linkage
damage. Always clear ice and heavy snow
from the windshield before using the
windshield wipers.
If the overload is caused by an electrical
problem and not snow or ice, be sure to get
it fixed.
Fuses and Circuit Breakers
The wiring circuits in the vehicle are
protected from short circuits by a
combination of fuses and circuit breakers.
This greatly reduces the chance of damage
caused by electrical problems.
{Danger
Fuses and circuit breakers are marked
with their ampere rating. Do not exceed
the specified amperage rating when
replacing fuses and circuit breakers. Use
of an oversized fuse or circuit breaker can
result in a vehicle fire. You and others
could be seriously injured or killed.
{Warning
Installation or use of fuses that do not
meet GM’s original fuse specifications is
dangerous. The fuses could fail, and result
in a fire. You or others could be injured
or killed, and the vehicle could be
damaged.
See Accessories and Modifications 0309 and
General Information 0309.