mirror CHEVROLET TAHOE 2006 2.G Owner's Manual
[x] Cancel search | Manufacturer: CHEVROLET, Model Year: 2006, Model line: TAHOE, Model: CHEVROLET TAHOE 2006 2.GPages: 540, PDF Size: 3.06 MB
Page 155 of 540
Memory Seat
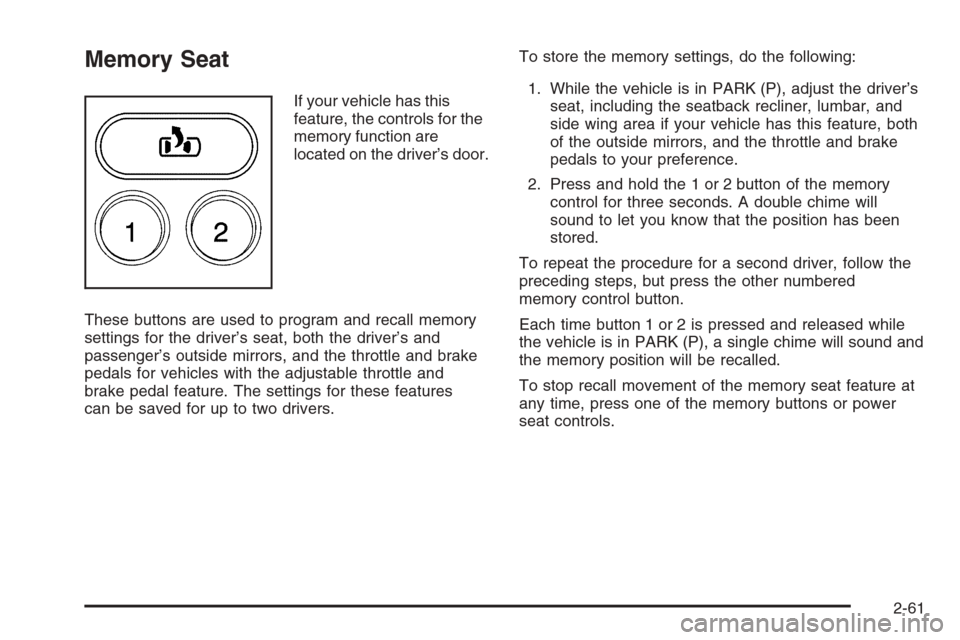
If your vehicle has this
feature, the controls for the
memory function are
located on the driver’s door.
These buttons are used to program and recall memory
settings for the driver’s seat, both the driver’s and
passenger’s outside mirrors, and the throttle and brake
pedals for vehicles with the adjustable throttle and
brake pedal feature. The settings for these features
can be saved for up to two drivers.To store the memory settings, do the following:
1. While the vehicle is in PARK (P), adjust the driver’s
seat, including the seatback recliner, lumbar, and
side wing area if your vehicle has this feature, both
of the outside mirrors, and the throttle and brake
pedals to your preference.
2. Press and hold the 1 or 2 button of the memory
control for three seconds. A double chime will
sound to let you know that the position has been
stored.
To repeat the procedure for a second driver, follow the
preceding steps, but press the other numbered
memory control button.
Each time button 1 or 2 is pressed and released while
the vehicle is in PARK (P), a single chime will sound and
the memory position will be recalled.
To stop recall movement of the memory seat feature at
any time, press one of the memory buttons or power
seat controls.
2-61
Page 180 of 540
Defogging and Defrosting
Fog on the inside of the windows is a result of high
humidity (moisture) condensing on the cool window
glass. This can be minimized if the climate control
system is used properly. There are two modes to choose
from to clear fog or frost from your windshield. Use
the defog mode to clear the windows of fog or moisture
and warm the passengers. Use the defrost mode to
remove fog or frost from the windshield more quickly.
Turn the right knob to select one of the following modes:
-(Defog):This mode directs the air to the �oor
outlets, windshield and the side window vents. The
air conditioning compressor will run automatically to
dehumidify the air to prevent window fogging. The
recirculation mode cannot be selected while in the
defog mode.
1(Defrost):This mode directs most of the air to the
windshield and the side window vents, with only a
little air directed to the �oor vents. The air conditioning
compressor will run automatically to dehumidify the
air to prevent window fogging. The recirculation mode
cannot be selected while in defrost mode.
Do not drive the vehicle until all the windows are clear.
Rear Window Defogger
The lines you see on the rear window warm the glass.
The rear window defogger uses a warming grid to
remove fog from the rear window.
<(Rear):Press this button to turn the rear window
defogger on or off. An indicator light in the button
will come on to let you know that the rear window
defogger is activated.
The rear window defogger will automatically turn off
several minutes after the button is pressed. Pressing the
button while the defogger is running can also turn off
the defogger.
If your vehicle is equipped with heated mirrors this
button will activate them.
Notice:Do not use anything sharp on the inside of
the rear window. If you do, you could cut or damage
the warming grid, and the repairs would not be
covered by your warranty. Do not attach a temporary
vehicle license, tape, a decal or anything similar to
the defogger grid.
3-24
Page 186 of 540
Rear Window Defogger
If your vehicle has this feature, the lines you see on
the rear window warm the glass. The rear window
defogger uses a warming grid to remove fog from the
rear window.
<(Rear):Press this button to turn the rear window
defogger on or off. An indicator light in the button
will come on to let you know that the rear window
defogger is activated.
The rear window defogger will turn off about 10 minutes
after the button is pressed. If you need additional
warming time, press the button again.
If your vehicle is equipped with heated mirrors, this
button will activate them.
Notice:Do not use a razor blade or sharp object
to clear the inside rear window. Do not adhere
anything to the defogger grid lines in the rear glass.
These actions may damage the rear defogger.
Repairs would not be covered by your warranty.
Outlet Adjustment
Use the air outlets located in the center and on the side
of your instrument panel to direct the air�ow.
Operation Tips
Keep the hood and front air inlets free of ice, snow,
or any other obstruction (such as leaves). The
heater and defroster will work far better, reducing
the chance of fogging the inside of your windows.
When you enter a vehicle in cold weather, turn the
fan knob all the way to the right for a few moments
before driving. This helps clear the intake ducts
of snow and moisture, and reduces the chance of
fogging the inside of your window.
Keep the air path under the front seats clear of
objects. This helps air to circulate throughout
your vehicle.
Adding outside equipment to the front of your
vehicle, such as hood-air de�ectors, may affect the
performance of the heating and air conditioning
system. Check with your dealer before adding
equipment to the outside of your vehicle.
3-30
Page 193 of 540
Airbag Readiness Light
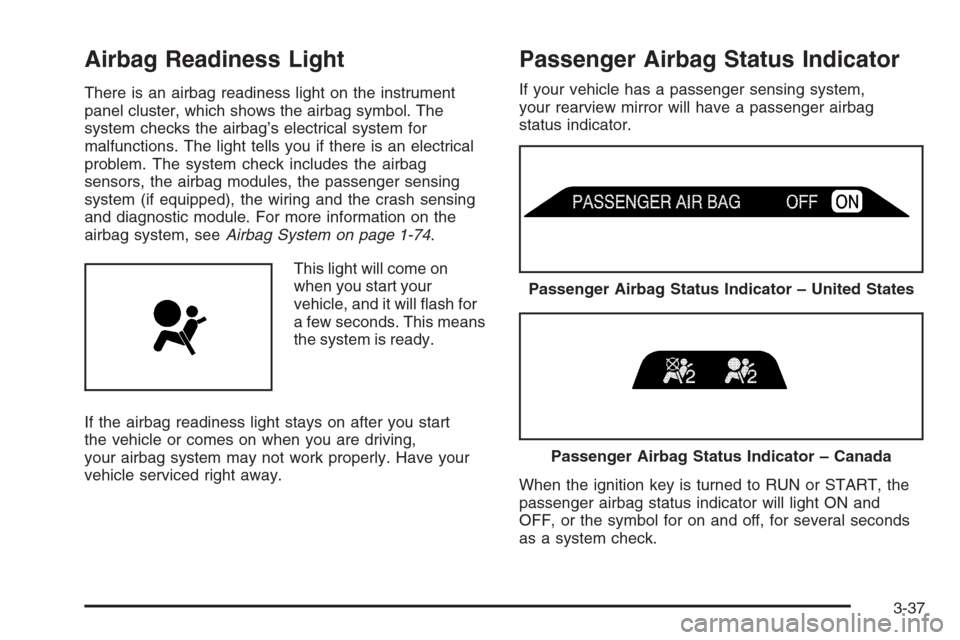
There is an airbag readiness light on the instrument
panel cluster, which shows the airbag symbol. The
system checks the airbag’s electrical system for
malfunctions. The light tells you if there is an electrical
problem. The system check includes the airbag
sensors, the airbag modules, the passenger sensing
system (if equipped), the wiring and the crash sensing
and diagnostic module. For more information on the
airbag system, seeAirbag System on page 1-74.
This light will come on
when you start your
vehicle, and it will �ash for
a few seconds. This means
the system is ready.
If the airbag readiness light stays on after you start
the vehicle or comes on when you are driving,
your airbag system may not work properly. Have your
vehicle serviced right away.
Passenger Airbag Status Indicator
If your vehicle has a passenger sensing system,
your rearview mirror will have a passenger airbag
status indicator.
When the ignition key is turned to RUN or START, the
passenger airbag status indicator will light ON and
OFF, or the symbol for on and off, for several seconds
as a system check.
Passenger Airbag Status Indicator – United States
Passenger Airbag Status Indicator – Canada
3-37
Page 226 of 540
Curb View
Press the customization button until CURB VIEW
appears in the display. To select your preference for
curb view, press the select button while CURB VIEW is
displayed on the DIC. Pressing the select button will
scroll through the following choices:
CURB VIEW: OFF (default):Neither outside mirror will
be tilted down when the vehicle is shifted into
REVERSE (R).
CURB VIEW: PASSENGER:The passenger’s outside
mirror will be tilted down when the vehicle is shifted
into REVERSE (R).
CURB VIEW: DRIVER:The driver’s outside mirror will
be tilted down when the vehicle is shifted into
REVERSE (R).
CURB VIEW: BOTH:The driver’s and passenger’s
outside mirrors will be tilted down when the vehicle is
shifted into REVERSE (R).
Choose one of the available options and press the
customization button while it is displayed on the DIC to
select it and move on to the next feature. For more
information on tilt mirror in reverse, seeOutside Curb
View Assist Mirrors on page 2-49.
Alarm Warning
Press the customization button until ALARM WARNING
appears in the display. To select your preference for
alarm warning, press the select button while ALARM
WARNING is displayed on the DIC. Pressing the select
button will scroll through the following choices:
ALARM WARNING: BOTH (default):The headlamps
will �ash and the horn will chirp when the alarm is
active.
ALARM WARNING: OFF:There will be no alarm
warning on activation.
ALARM WARNING: HORN:The horn will chirp when
the alarm is active.
ALARM WARNING: LAMPS:The headlamps will �ash
when the alarm is active.
Choose one of the available options and press the
customization button while your choice is displayed on
the DIC to select it and move on to the next feature.
For more information on alarm warning type, see
Content Theft-Deterrent on page 2-16.
3-70
Page 305 of 540
Do not get too close to the vehicle you want to
pass while you are awaiting an opportunity. For
one thing, following too closely reduces your area
of vision, especially if you are following a larger
vehicle. Also, you will not have adequate space
if the vehicle ahead suddenly slows or stops.
Keep back a reasonable distance.
When it looks like a chance to pass is coming up,
start to accelerate but stay in the right lane and
do not get too close. Time your move so you will be
increasing speed as the time comes to move into
the other lane. If the way is clear to pass, you
will have a running start that more than makes up
for the distance you would lose by dropping
back. And if something happens to cause you to
cancel your pass, you need only slow down
and drop back again and wait for another
opportunity.
If other vehicles are lined up to pass a slow vehicle,
wait your turn. But take care that someone is not
trying to pass you as you pull out to pass the slow
vehicle. Remember to glance over your shoulder
and check the blind spot.
Check your mirrors, glance over your shoulder and
start your left lane change signal before moving
out of the right lane to pass. When you are
far enough ahead of the passed vehicle to see its
front in your inside mirror, activate your right
lane change signal and move back into the right
lane. Remember that if your passenger side outside
mirror is convex, the vehicle you just passed may
seem to be farther away from you than it really is.
Try not to pass more than one vehicle at a time
on two-lane roads. Reconsider before passing
the next vehicle.
Do not overtake a slowly moving vehicle too rapidly.
Even though the brake lamps are not �ashing, it
may be slowing down or starting to turn.
If you are being passed, make it easy for the
following driver to get ahead of you. Perhaps
you can ease a little to the right.
4-15
Page 306 of 540
Loss of Control
Let us review what driving experts say about what
happens when the three control systems — brakes,
steering, and acceleration — do not have enough
friction where the tires meet the road to do what the
driver has asked.
In any emergency, do not give up. Keep trying to
steer and constantly seek an escape route or area of
less danger.
Skidding
In a skid, a driver can lose control of the vehicle.
Defensive drivers avoid most skids by taking reasonable
care suited to existing conditions, and by not overdriving
those conditions. But skids are always possible.
The three types of skids correspond to your vehicle’s
three control systems. In the braking skid, your wheels
are not rolling. In the steering or cornering skid, too much
speed or steering in a curve causes tires to slip and lose
cornering force. And in the acceleration skid, too much
throttle causes the driving wheels to spin.
A cornering skid is best handled by easing your foot off
the accelerator pedal.Remember: StabiliTrak
®helps avoid only the
acceleration skid. SeeStabiliTrak®System on page 4-9.
If the StabiliTrak®System is off, then an acceleration
skid is also best handled by easing your foot off
the accelerator pedal.
If your vehicle starts to slide, ease your foot off the
accelerator pedal and quickly steer the way you want
the vehicle to go. If you start steering quickly enough,
your vehicle may straighten out. Always be ready
for a second skid if it occurs.
Of course, traction is reduced when water, snow, ice,
gravel, or other material is on the road. For safety,
you will want to slow down and adjust your driving to
these conditions. It is important to slow down on slippery
surfaces because stopping distance will be longer and
vehicle control more limited.
While driving on a surface with reduced traction, try
your best to avoid sudden steering, acceleration,
or braking, including engine braking by shifting to a
lower gear. Any sudden changes could cause the tires
to slide. You may not realize the surface is slippery
until your vehicle is skidding. Learn to recognize warning
clues — such as enough water, ice, or packed snow
on the road to make a mirrored surface — and
slow down when you have any doubt.
Remember: Any Anti-Lock Brake System (ABS) helps
avoid only the braking skid.
4-16
Page 322 of 540
If the water is not too deep, drive slowly through it. At
faster speeds, water splashes on your ignition system
and your vehicle can stall. Stalling can also occur if you
get your tailpipe under water. And, as long as your
tailpipe is under water, you will never be able to start your
engine. When you go through water, remember that when
your brakes get wet, it may take you longer to stop.
{CAUTION:
Driving through rushing water can be
dangerous. Deep water can sweep your vehicle
downstream and you and your passengers
could drown. If it is only shallow water, it can
still wash away the ground from under your
tires, and you could lose traction and roll the
vehicle over. Do not drive through rushing
water.
SeeDriving in Rain and on Wet Roads on page 4-34for
more information on driving through water.
After Off-Road Driving
Remove any brush or debris that has collected on the
underbody, chassis, or under the hood. These
accumulations can be a �re hazard.
After operation in mud or sand, have the brake linings
cleaned and checked. These substances can cause
glazing and uneven braking. Check the body structure,
steering, suspension, wheels, tires, and exhaust
system for damage. Also, check the fuel lines and
cooling system for any leakage.
Your vehicle will require more frequent service due to
off-road use. Refer to the Maintenance Schedule
for additional information.
Driving at Night
Night driving is more dangerous than day driving.
One reason is that some drivers are likely to be
impaired — by alcohol or drugs, with night vision
problems, or by fatigue.
Here are some tips on night driving.
Drive defensively.
Do not drink and drive.
Adjust the inside rearview mirror to reduce the
glare from headlamps behind you.
4-32
Page 328 of 540
At the entrance, there is usually a ramp that leads to the
freeway. If you have a clear view of the freeway as you
drive along the entrance ramp, you should begin to check
traffic. Try to determine where you expect to blend with
the �ow. Try to merge into the gap at close to the
prevailing speed. Switch on your turn signal, check your
mirrors, and glance over your shoulder as often as
necessary. Try to blend smoothly with the traffic �ow.
Once you are on the freeway, adjust your speed to
the posted limit or to the prevailing rate if it is slower.
Stay in the right lane unless you want to pass.
Before changing lanes, check your mirrors. Then use
your turn signal.
Just before you leave the lane, glance quickly over your
shoulder to make sure there is not another vehicle in
your blind spot.
Once you are moving on the freeway, make certain
you allow a reasonable following distance. Expect
to move slightly slower at night.
When you want to leave the freeway, move to the
proper lane well in advance. If you miss your exit,
do not, under any circumstances, stop and back up.
Drive on to the next exit.The exit ramp can be curved, sometimes quite sharply.
The exit speed is usually posted.
Reduce your speed according to your speedometer, not
to your sense of motion. After driving for any distance
at higher speeds, you may tend to think you are
going slower than you actually are.
Before Leaving on a Long Trip
Make sure you are ready. Try to be well rested. If you
must start when you are not fresh — such as after
a day’s work — do not plan to make too many miles
that �rst part of the journey. Wear comfortable clothing
and shoes you can easily drive in.
Is your vehicle ready for a long trip? If you keep it
serviced and maintained, it is ready to go. If it needs
service, have it done before starting out. Of course, you
will �nd experienced and able service experts in GM
dealerships all across North America. They will be ready
and willing to help if you need it.
4-38
Page 329 of 540
Here are some things you can check before a trip:
Windshield Washer Fluid:Is the reservoir full?
Are all windows clean inside and outside?
Wiper Blades:Are they in good shape?
Fuel, Engine Oil, Other Fluids:Have you checked
all levels?
Lamps:Are they all working? Are the lenses clean?
Tires:They are vitally important to a safe,
trouble-free trip. Is the tread good enough for
long-distance driving? Are the tires all in�ated to
the recommended pressure?
Weather Forecasts:What is the weather outlook
along your route? Should you delay your trip a
short time to avoid a major storm system?
Maps:Do you have up-to-date maps?
Highway Hypnosis
Is there actually such a condition as highway hypnosis?
Or is it just plain falling asleep at the wheel? Call it
highway hypnosis, lack of awareness, or whatever.
There is something about an easy stretch of road with
the same scenery, along with the hum of the tires on
the road, the drone of the engine, and the rush of
the wind against the vehicle that can make you sleepy.
Do not let it happen to you! If it does, your vehicle
can leave the road in less than a second, and you
could crash and be injured.
What can you do about highway hypnosis? First, be
aware that it can happen.
Then here are some tips:
Make sure your vehicle is well ventilated, with a
comfortably cool interior.
Keep your eyes moving. Scan the road ahead
and to the sides. Check your mirrors and your
instruments frequently.
If you get sleepy, pull off the road into a rest,
service, or parking area and take a nap, get some
exercise, or both. For safety, treat drowsiness
on the highway as an emergency.
4-39