parking brake CHEVROLET TAHOE 2010 3.G Owner's Manual
[x] Cancel search | Manufacturer: CHEVROLET, Model Year: 2010, Model line: TAHOE, Model: CHEVROLET TAHOE 2010 3.GPages: 608, PDF Size: 6.53 MB
Page 422 of 608
Parking on Hills
{WARNING:
Parking the vehicle on a hill with the trailer
attached can be dangerous. If something goes
wrong, the rig could start to move. People can be
injured, and both the vehicle and the trailer can be
damaged. When possible, always park the rig on
a flat surface.
If parking the rig on a hill: 1. Press the brake pedal, but do not shift into P (Park) yet. Turn the wheels into the curb if facing downhill
or into traffic if facing uphill.
2. Have someone place chocks under the trailer wheels.
3. When the wheel chocks are in place, release the regular brakes until the chocks absorb the load.
4. Reapply the brake pedal. Then apply the parking brake and shift into P (Park).
5. If the vehicle is four-wheel-drive and has a two-speed transfer case, be sure the transfer case
is in a drive gear and not in N (Neutral).
6. Release the brake pedal.
{WARNING:
It can be dangerous to get out of the vehicle if the
shift lever is not fully in P (Park) with the parking
brake firmly set. The vehicle can roll.
If the engine has been left running, the vehicle
can move suddenly. You or others could be
injured. To be sure the vehicle will not move, even
when on fairly level ground, use the steps that
follow.
Always put the shift lever fully in P (Park) with the
parking brake firmly set.
If the transfer case on a four-wheel-drive vehicle
is in N (Neutral), the vehicle will be free to roll,
even if the shift lever is in P (Park). Be sure
the transfer case is in a drive gear —not in
N (Neutral).
5-64
Page 423 of 608
Leaving After Parking on a Hill
1. Apply and hold the brake pedal.
2. Start the engine
3. Shift into a gear
4. Release the parking brake
5. Let up on the brake pedal.
6. Drive slowly until the trailer is clear of the chocks.
7. Stop and have someone pick up and store thechocks.
Maintenance When Trailer Towing
The vehicle needs service more often when pulling a
trailer. See this manual's Maintenance Schedule or
Index for more information. Things that are especially
important in trailer operation are automatic transmission
fluid, engine oil, axle lubricant, belts, cooling system
and brake system. It is a good idea to inspect these
before and during the trip.
Check periodically to see that all hitch nuts and bolts
are tight.
Trailer Wiring Harness
The vehicle is equipped with the following wiring
harnesses for towing a trailer.
Basic Trailer Wiring
The trailer wiring harness, with a seven-pin connector,
is located at the rear of the vehicle and is tied to the
vehicle's frame. The harness connector can be plugged
into a seven-pin universal heavy-duty trailer connector
available through your dealer.
The seven-wire harness contains the following trailer
circuits:
.Yellow: Left Stop/Turn Signal
.Dark Green: Right Stop/Turn Signal
.Brown: Taillamps
.White: Ground
.Light Green: Back-up Lamps
.Red: Battery Feed*
.Dark Blue: Trailer Brake*
*The fuses for these two circuits are installed in the
underhood electrical center, but the wires are not
connected. They should be connected by your dealer or
a qualified service center.
5-65
Page 450 of 608
How to Check Automatic Transmission
Fluid
Because this operation can be a little difficult, you may
choose to have this done at the dealer service
department.
If you do it yourself, be sure to follow all the instructions
here or you could get a false reading on the dipstick.
Notice:Too much or too little fluid can damage the
transmission. Too much can mean that some of the
fluid could come out and fall on hot engine parts or
exhaust system parts, starting a fire. Too little fluid
could cause the transmission to overheat. Be sure
to get an accurate reading if checking the
transmission fluid.
Wait at least 30 minutes before checking the
transmission fluid level if you have been driving:
.When outside temperatures are above
32°C (90°F).
.At high speed for quite a while.
.In heavy traffic —especially in hot weather.
.While pulling a trailer.
To get the right reading, the fluid should be at normal
operating temperature, which is 82°C to 93°C (180°F
to 200°F). Get the vehicle warmed up by driving about 24 km
(15 miles) when outside temperatures are above 10°C
(50°F). If it is colder than 10°C (50°F), drive the vehicle
in 3 (Third) until the engine temperature gauge moves
and then remains steady for 10 minutes.
A cold fluid check can be made after the vehicle has
been sitting for eight hours or more with the engine off,
but this is used only as a reference. Let the engine run
at idle for five minutes if outside temperatures are 10°C
(50°F) or more. If it is colder than 10°C (50°F), you may
have to idle the engine longer. Should the fluid level be
low during this cold check, you must check the fluid hot
before adding fluid. Checking the fluid hot will give you
a more accurate reading of the fluid level.
Checking the Fluid Level
Prepare the vehicle as follows:
1. Park the vehicle on a level place. Keep the engine running.
2. With the parking brake applied, place the shift lever in P (Park).
3. With your foot on the brake pedal, move the shift lever through each gear range, pausing for about
three seconds in each range. Then, position the
shift lever in P (Park).
4. Let the engine run at idle for three minutes or more.
6-24
Page 453 of 608
How to Check Automatic Transmission
Fluid
Notice:Too much or too little fluid can damage
the transmission. Too much can mean that some of
the fluid could come out and fall on hot engine parts
or exhaust system parts, starting a fire. Too little
fluid could cause the transmission to overheat.
Be sure to get an accurate reading if checking the
transmission fluid.
Before checking the fluid level, prepare the vehicle as
follows:
1. Start the engine and park the vehicle on a level surface. Keep the engine running.
2. Apply the parking brake and place the shift lever in P (Park). 3. With your foot on the brake pedal, move the shift
lever through each gear range, pausing for about
three seconds in each range. Then, move the shift
lever back to P (Park).
4. Allow the engine to idle (500 –800 rpm) for at least
one minute. Slowly release the brake pedal.
5. Keep the engine running and press the Trip/Fuel button or trip odometer reset stem until TRANS
TEMP (Transmission Temperature) displays on the
Driver Information Center (DIC).
6. Using the TRANS TEMP reading, determine and perform the appropriate check procedure. If the
TRANS TEMP reading is not within the required
temperature ranges, allow the vehicle to cool,
or operate the vehicle until the appropriate
transmission fluid temperature is reached.
6-27
Page 472 of 608

Jump Starting
If the vehicle is a Two-mode Hybrid, see the Two-mode
Hybrid manual for more information.
If the vehicle's battery (or batteries) has run down, you
may want to use another vehicle and some jumper
cables to start your vehicle. Be sure to use the following
steps to do it safely.
{WARNING:
Batteries can hurt you. They can be dangerous
because:
.They contain acid that can burn you.
.They contain gas that can explode or ignite.
.They contain enough electricity to burn you.
If you do not follow these steps exactly, some or
all of these things can hurt you. Notice:
Ignoring these steps could result in costly
damage to the vehicle that would not be covered by
the warranty.
Trying to start the vehicle by pushing or pulling it
will not work, and it could damage the vehicle.
1. Check the other vehicle. It must have a 12-volt battery with a negative ground system.
Notice: If the other vehicle's system is not a 12-volt
system with a negative ground, both vehicles can
be damaged. Only use vehicles with 12-volt systems
with negative grounds to jump start your vehicle.
2. Get the vehicles close enough so the jumper cables can reach, but be sure the vehicles are not
touching each other. If they are, it could cause a
ground connection you do not want. You would
not be able to start your vehicle, and the bad
grounding could damage the electrical systems.
To avoid the possibility of the vehicles rolling, set
the parking brake firmly on both vehicles involved
in the jump start procedure. Put the automatic
transmission in P (Park) or a manual transmission
in N (Neutral) before setting the parking brake.
If the vehicle has a four-wheel-drive transfer case
with a N (Neutral) position, be sure the transfer
case is in a drive gear, not in N (Neutral).
6-46
Page 503 of 608
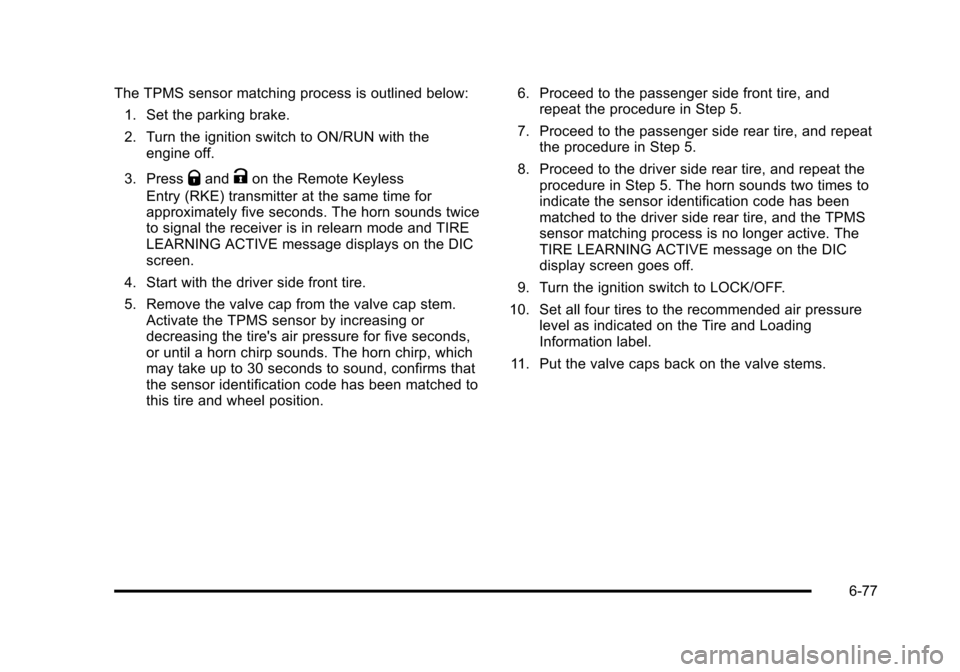
The TPMS sensor matching process is outlined below:1. Set the parking brake.
2. Turn the ignition switch to ON/RUN with the engine off.
3. Press
QandKon the Remote Keyless
Entry (RKE) transmitter at the same time for
approximately five seconds. The horn sounds twice
to signal the receiver is in relearn mode and TIRE
LEARNING ACTIVE message displays on the DIC
screen.
4. Start with the driver side front tire.
5. Remove the valve cap from the valve cap stem. Activate the TPMS sensor by increasing or
decreasing the tire's air pressure for five seconds,
or until a horn chirp sounds. The horn chirp, which
may take up to 30 seconds to sound, confirms that
the sensor identification code has been matched to
this tire and wheel position. 6. Proceed to the passenger side front tire, and
repeat the procedure in Step 5.
7. Proceed to the passenger side rear tire, and repeat the procedure in Step 5.
8. Proceed to the driver side rear tire, and repeat the procedure in Step 5. The horn sounds two times to
indicate the sensor identification code has been
matched to the driver side rear tire, and the TPMS
sensor matching process is no longer active. The
TIRE LEARNING ACTIVE message on the DIC
display screen goes off.
9. Turn the ignition switch to LOCK/OFF.
10. Set all four tires to the recommended air pressure level as indicated on the Tire and Loading
Information label.
11. Put the valve caps back on the valve stems.
6-77
Page 514 of 608
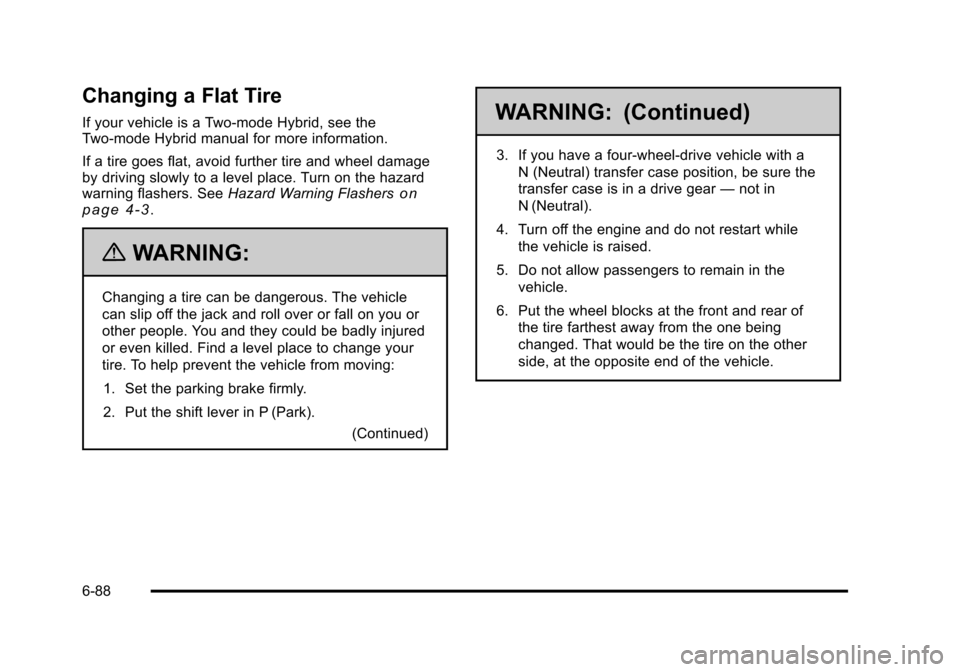
Changing a Flat Tire
If your vehicle is a Two-mode Hybrid, see the
Two-mode Hybrid manual for more information.
If a tire goes flat, avoid further tire and wheel damage
by driving slowly to a level place. Turn on the hazard
warning flashers. SeeHazard Warning Flashers
on
page 4‑3.
{WARNING:
Changing a tire can be dangerous. The vehicle
can slip off the jack and roll over or fall on you or
other people. You and they could be badly injured
or even killed. Find a level place to change your
tire. To help prevent the vehicle from moving:
1. Set the parking brake firmly.
2. Put the shift lever in P (Park). (Continued)
WARNING: (Continued)
3. If you have a four-wheel-drive vehicle with aN (Neutral) transfer case position, be sure the
transfer case is in a drive gear —not in
N (Neutral).
4. Turn off the engine and do not restart while the vehicle is raised.
5. Do not allow passengers to remain in the vehicle.
6. Put the wheel blocks at the front and rear of the tire farthest away from the one being
changed. That would be the tire on the other
side, at the opposite end of the vehicle.
6-88
Page 550 of 608
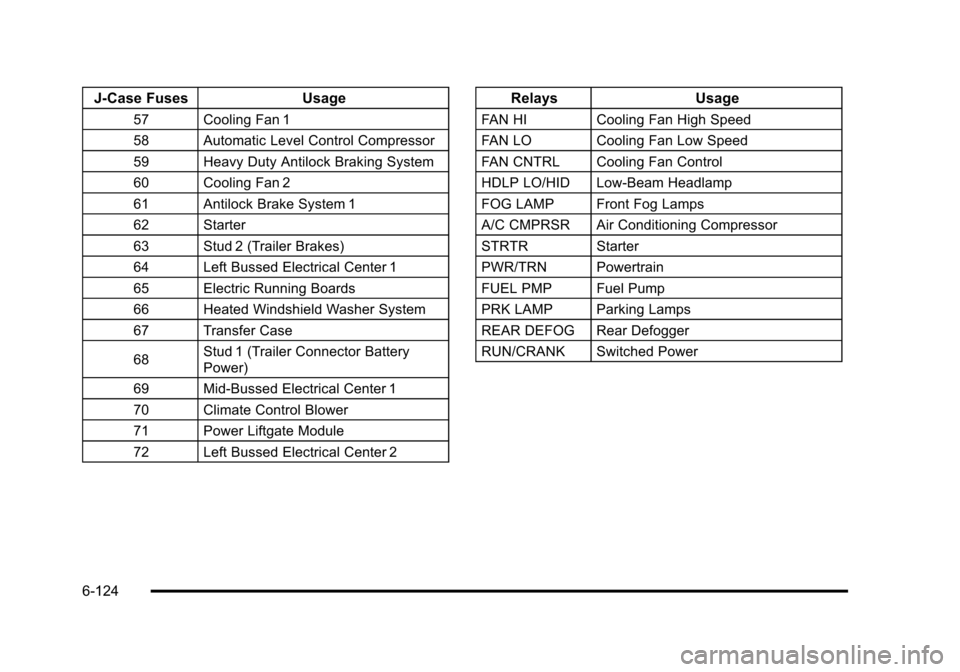
J-Case FusesUsage
57 Cooling Fan 1
58 Automatic Level Control Compressor
59 Heavy Duty Antilock Braking System
60 Cooling Fan 2
61 Antilock Brake System 1
62 Starter
63 Stud 2 (Trailer Brakes)
64 Left Bussed Electrical Center 1
65 Electric Running Boards
66 Heated Windshield Washer System
67 Transfer Case
68Stud 1 (Trailer Connector Battery
Power)
69 Mid-Bussed Electrical Center 1
70 Climate Control Blower
71 Power Liftgate Module
72 Left Bussed Electrical Center 2
Relays Usage
FAN HI Cooling Fan High Speed
FAN LO Cooling Fan Low Speed
FAN CNTRL Cooling Fan Control
HDLP LO/HID Low-Beam Headlamp
FOG LAMP Front Fog Lamps
A/C CMPRSR Air Conditioning Compressor
STRTR Starter
PWR/TRN Powertrain
FUEL PMP Fuel Pump
PRK LAMP Parking Lamps
REAR DEFOG Rear Defogger
RUN/CRANK Switched Power
6-124
Page 558 of 608
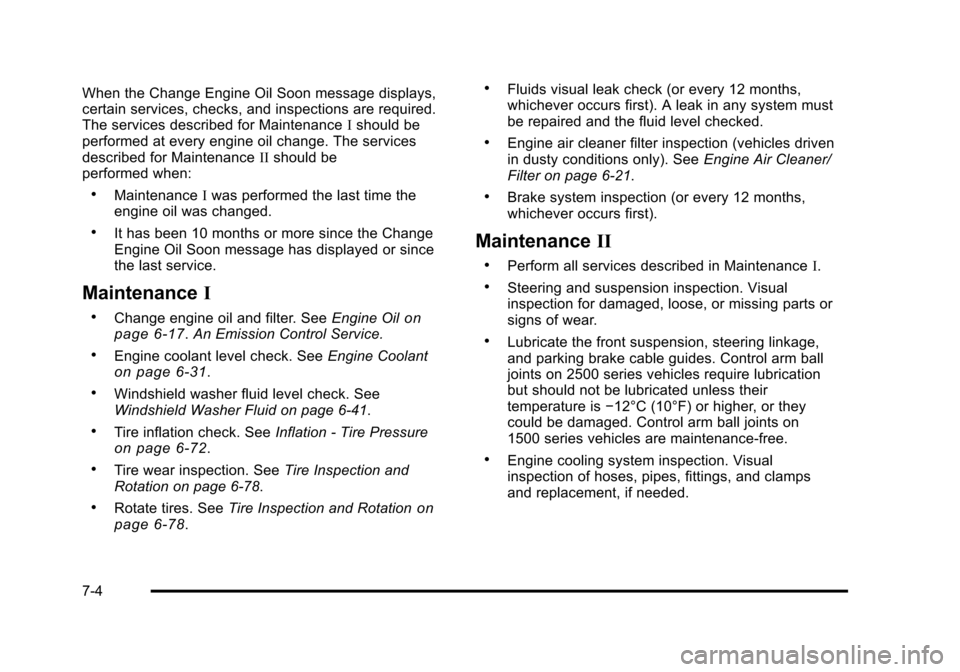
When the Change Engine Oil Soon message displays,
certain services, checks, and inspections are required.
The services described for MaintenanceIshould be
performed at every engine oil change. The services
described for Maintenance IIshould be
performed when:
.Maintenance Iwas performed the last time the
engine oil was changed.
.It has been 10 months or more since the Change
Engine Oil Soon message has displayed or since
the last service.
Maintenance I
.Change engine oil and filter. See Engine Oilon
page 6‑17. An Emission Control Service.
.Engine coolant level check. See Engine Coolanton page 6‑31.
.Windshield washer fluid level check. See
Windshield Washer Fluid on page 6‑41.
.Tire inflation check. SeeInflation - Tire Pressureon page 6‑72.
.Tire wear inspection. See Tire Inspection and
Rotation on page 6‑78.
.Rotate tires. See Tire Inspection and Rotationon
page 6‑78.
.Fluids visual leak check (or every 12 months,
whichever occurs first). A leak in any system must
be repaired and the fluid level checked.
.Engine air cleaner filter inspection (vehicles driven
in dusty conditions only). See Engine Air Cleaner/
Filter on page 6‑21.
.Brake system inspection (or every 12 months,
whichever occurs first).
Maintenance II
.Perform all services described in Maintenance I.
.Steering and suspension inspection. Visual
inspection for damaged, loose, or missing parts or
signs of wear.
.Lubricate the front suspension, steering linkage,
and parking brake cable guides. Control arm ball
joints on 2500 series vehicles require lubrication
but should not be lubricated unless their
temperature is−12°C (10°F) or higher, or they
could be damaged. Control arm ball joints on
1500 series vehicles are maintenance‐free.
.Engine cooling system inspection. Visual
inspection of hoses, pipes, fittings, and clamps
and replacement, if needed.
7-4
Page 560 of 608
Once a Year
.Starter switch check. SeeOwner Checks and
Services on page 7‑10.
.Parking brake and automatic transmission P (Park)
mechanism check. See Owner Checks and
Services on page 7‑10.
.Automatic transmission shiftlock control system
check. See Owner Checks and Serviceson
page 7‑10.
.Ignition transmission lock check. See Owner
Checks and Services on page 7‑10.
.Hood and liftgate gas strut support service.
Visually inspect gas strut for signs of wear,
corrosion, cracks, loss of lubricant, or other
damage. Check the hold open ability of gas strut.
Replace as necessary with genuine parts from
your dealer.
.Engine cooling system and pressure cap pressure
check. Radiator and air conditioning condenser
outside cleaning. See Cooling System
on
page 6‑30.
.Exhaust system and nearby heat shields
inspection for loose or damaged components.
.Accelerator pedal check for damage, high effort,
or binding. Replace if needed.
First Engine Oil Change After Every
40 000 km/25,000 Miles
.Fuel system inspection for damage or leaks.
First Engine Oil Change After Every
80 000 km/50,000 Miles
.Engine air cleaner filter replacement. See Engine
Air Cleaner/Filter on page 6‑21.
.Automatic transmission fluid change (severe
service) for vehicles with Gross Vehicle Weight
Rating (GVWR) over 3 901 kg (8,600 lbs) or mainly
driven in heavy city traffic in hot weather, in hilly or
mountainous terrain, when frequently towing a
trailer, or used for taxi, police, or delivery service.
See Automatic Transmission Fluid (4-Speed
Transmission)
on page 6‑23or Automatic
Transmission Fluid (6-Speed Transmission)on
page 6‑26.
7-6