four wheel drive CHEVROLET TAHOE 2010 3.G Owner's Guide
[x] Cancel search | Manufacturer: CHEVROLET, Model Year: 2010, Model line: TAHOE, Model: CHEVROLET TAHOE 2010 3.GPages: 608, PDF Size: 6.53 MB
Page 479 of 608

.For all 6.0L 1500 series and all 6.2L non‐all wheel
drive 1500 series luxury model applications, the
proper level is from 0.6 inch to 1.6 inches (15 mm
to 40 mm) below the bottom of the filler plug hole,
located on the rear axle. Add only enough fluid to
reach the proper level.
.The proper fill level for the 2500 series is from 0 to
1/2 inch (0 to 13 mm) below the bottom of the filler
plug hole, located at the front of the axle. Add only
enough fluid to reach the proper level.
Four-Wheel Drive
Lubricant checks in this section also apply to these
vehicles. There are two additional systems that need
lubrication.
Transfer Case
When to Check Lubricant
It is not necessary to regularly check transfer case fluid
unless you suspect there is a leak, or you hear an
unusual noise. A fluid loss could indicate a problem.
Have it inspected and repaired.
How to Check Lubricant
Active Transfer Case
A. Fill Plug
B. Drain Plug
To get an accurate reading, the vehicle should be on a
level surface.
If the level is below the bottom of the fill plug hole, you
will need to add some lubricant. Add enough lubricant
to raise the level to the bottom of the fill plug hole. Use
care not to overtighten the plug.
6-53
Page 502 of 608

.One or more TPMS sensors are missing or
damaged. The DIC message and the TPMS
malfunction light should go off when the TPMS
sensors are installed and the sensor matching
process is performed successfully. See your dealer
for service.
.Replacement tires or wheels do not match your
vehicle's original equipment tires or wheels. Tires
and wheels other than those recommended for
your vehicle could prevent the TPMS from
functioning properly. SeeBuying New Tires
on
page 6‑80.
.Operating electronic devices or being near facilities
using radio wave frequencies similar to the TPMS
could cause the TPMS sensors to malfunction.
If the TPMS is not functioning it cannot detect or signal
a low tire condition. See your dealer for service if the
TPMS malfunction light and DIC message comes on
and stays on.
TPMS Sensor Matching Process
Each TPMS sensor has a unique identification code.
Any time you rotate your vehicle's tires or replace one
or more of the TPMS sensors, the identification codes
will need to be matched to the new tire/wheel position.
The sensors are matched to the tire/wheel positions in
the following order: driver side front tire, passenger side
front tire, passenger side rear tire, and driver side rear
tire using a TPMS diagnostic tool. See your dealer for
service.
The TPMS sensors can also be matched to each
tire/wheel position by increasing or decreasing the tire's
air pressure. If increasing the tire's air pressure, do not
exceed the maximum inflation pressure indicated on the
tire's sidewall.
To decrease air-pressure out of a tire you can use the
pointed end of the valve cap, a pencil-style air pressure
gauge, or a key.
You have two minutes to match the first tire/wheel
position, and five minutes overall to match all
four tire/wheel positions. If it takes longer than
two minutes, to match the first tire and wheel, or
more than five minutes to match all four tire and wheel
positions the matching process stops and you need to
start over.
6-76
Page 503 of 608
The TPMS sensor matching process is outlined below:1. Set the parking brake.
2. Turn the ignition switch to ON/RUN with the engine off.
3. Press
QandKon the Remote Keyless
Entry (RKE) transmitter at the same time for
approximately five seconds. The horn sounds twice
to signal the receiver is in relearn mode and TIRE
LEARNING ACTIVE message displays on the DIC
screen.
4. Start with the driver side front tire.
5. Remove the valve cap from the valve cap stem. Activate the TPMS sensor by increasing or
decreasing the tire's air pressure for five seconds,
or until a horn chirp sounds. The horn chirp, which
may take up to 30 seconds to sound, confirms that
the sensor identification code has been matched to
this tire and wheel position. 6. Proceed to the passenger side front tire, and
repeat the procedure in Step 5.
7. Proceed to the passenger side rear tire, and repeat the procedure in Step 5.
8. Proceed to the driver side rear tire, and repeat the procedure in Step 5. The horn sounds two times to
indicate the sensor identification code has been
matched to the driver side rear tire, and the TPMS
sensor matching process is no longer active. The
TIRE LEARNING ACTIVE message on the DIC
display screen goes off.
9. Turn the ignition switch to LOCK/OFF.
10. Set all four tires to the recommended air pressure level as indicated on the Tire and Loading
Information label.
11. Put the valve caps back on the valve stems.
6-77
Page 514 of 608

Changing a Flat Tire
If your vehicle is a Two-mode Hybrid, see the
Two-mode Hybrid manual for more information.
If a tire goes flat, avoid further tire and wheel damage
by driving slowly to a level place. Turn on the hazard
warning flashers. SeeHazard Warning Flashers
on
page 4‑3.
{WARNING:
Changing a tire can be dangerous. The vehicle
can slip off the jack and roll over or fall on you or
other people. You and they could be badly injured
or even killed. Find a level place to change your
tire. To help prevent the vehicle from moving:
1. Set the parking brake firmly.
2. Put the shift lever in P (Park). (Continued)
WARNING: (Continued)
3. If you have a four-wheel-drive vehicle with aN (Neutral) transfer case position, be sure the
transfer case is in a drive gear —not in
N (Neutral).
4. Turn off the engine and do not restart while the vehicle is raised.
5. Do not allow passengers to remain in the vehicle.
6. Put the wheel blocks at the front and rear of the tire farthest away from the one being
changed. That would be the tire on the other
side, at the opposite end of the vehicle.
6-88
Page 533 of 608
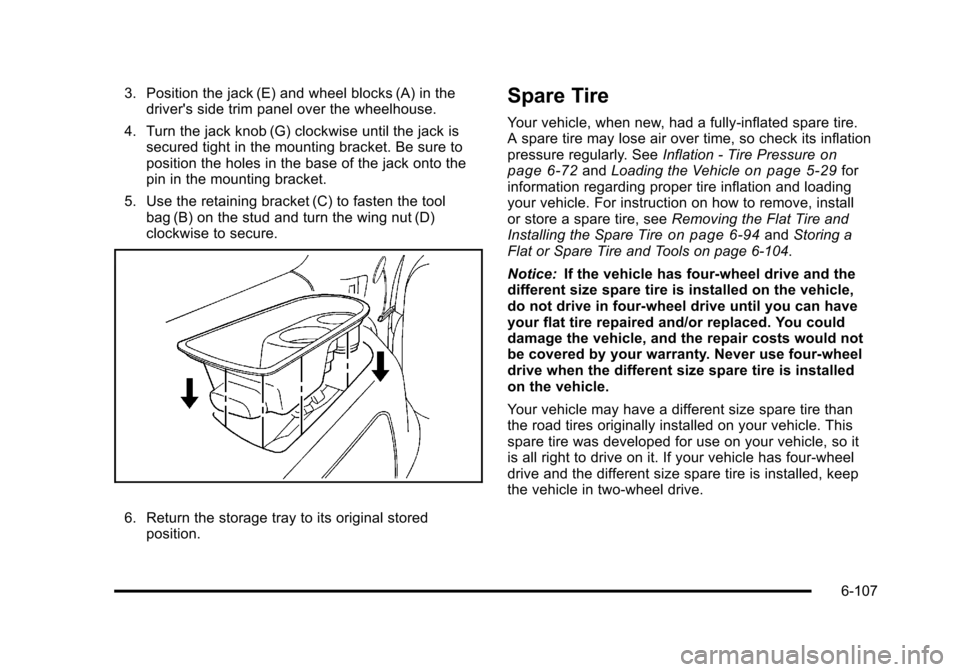
3. Position the jack (E) and wheel blocks (A) in thedriver's side trim panel over the wheelhouse.
4. Turn the jack knob (G) clockwise until the jack is secured tight in the mounting bracket. Be sure to
position the holes in the base of the jack onto the
pin in the mounting bracket.
5. Use the retaining bracket (C) to fasten the tool bag (B) on the stud and turn the wing nut (D)
clockwise to secure.
6. Return the storage tray to its original storedposition.
Spare Tire
Your vehicle, when new, had a fully-inflated spare tire.
A spare tire may lose air over time, so check its inflation
pressure regularly. See Inflation - Tire Pressure
on
page 6‑72and Loading the Vehicleon page 5‑29for
information regarding proper tire inflation and loading
your vehicle. For instruction on how to remove, install
or store a spare tire, see Removing the Flat Tire and
Installing the Spare Tire
on page 6‑94and Storing a
Flat or Spare Tire and Tools on page 6‑104.
Notice: If the vehicle has four-wheel drive and the
different size spare tire is installed on the vehicle,
do not drive in four-wheel drive until you can have
your flat tire repaired and/or replaced. You could
damage the vehicle, and the repair costs would not
be covered by your warranty. Never use four-wheel
drive when the different size spare tire is installed
on the vehicle.
Your vehicle may have a different size spare tire than
the road tires originally installed on your vehicle. This
spare tire was developed for use on your vehicle, so it
is all right to drive on it. If your vehicle has four-wheel
drive and the different size spare tire is installed, keep
the vehicle in two-wheel drive.
6-107
Page 559 of 608

.Windshield wiper blade inspection for wear,
cracking, or contamination and windshield and
wiper blade cleaning, if contaminated. See
Windshield, Backglass, and Wiper Blades
on
page 6‑113. Worn or damaged wiper blade
replacement. See Windshield Wiper Blade
Replacement on page 6‑61.
.Body hinges and latches, key lock cylinders,
folding seat hardware, and liftgate hinges,
linkage, and handle pivot points lubrication.
See Recommended Fluids and Lubricants
on
page 7‑12. More frequent lubrication may be
required when vehicle is exposed to a corrosive
environment. Applying silicone grease on
weatherstrips with a clean cloth makes them last
longer, seal better, and not stick or squeak.
.Restraint system component check. See Checking
the Restraint Systems on page 2‑101.
.Automatic transmission fluid level check
and adding fluid, if needed. See Automatic
Transmission Fluid (4-Speed Transmission)
on
page 6‑23or Automatic Transmission Fluid
(6-Speed Transmission) on page 6‑26.
.Four‐wheel drive vehicles: Transfer case fluid level
check and adding fluid, if needed.
.Engine air cleaner filter inspection. See Engine Air
Cleaner/Filter on page 6‑21.
Additional Required Services
At Each Fuel Stop
.Engine oil level check. See Engine Oilon
page 6‑17.
.Engine coolant level check. See Engine Coolanton page 6‑31.
.Windshield washer fluid level check. See
Windshield Washer Fluid on page 6‑41.
Once a Month
.Tire inflation check. SeeInflation - Tire Pressureon page 6‑72.
.Tire wear inspection. See Tire Inspection and
Rotation on page 6‑78.
7-5
Page 561 of 608

.Four‐wheel drive only: Transfer case fluid change
(severe service) for vehicles mainly driven when
frequently towing a trailer, or used for taxi, police,
or delivery service. Check vent hose at transfer
case for kinks and proper installation. Check to be
sure vent hose is unobstructed, clear, and free of
debris. During any maintenance, if a power washer
is used to clean mud and dirt from the underbody,
care should be taken to not directly spray the
transfer case output seals. High pressure water
can overcome the seals and contaminate the
transfer case fluid. Contaminated fluid will
decrease the life of the transfer case and should
be replaced..Evaporative control system inspection. Check all
fuel and vapor lines and hoses for proper hook‐up,
routing, and condition. Check that the purge valve,
if the vehicle has one, works properly. Replace as
needed.An Emission Control Service. The U.S.
Environmental Protection Agency or the California
Air Resources Board has determined that the
failure to perform this maintenance item will not
nullify the emission warranty or limit recall liability
prior to the completion of the vehicle's useful life.
We, however, urge that all recommended
maintenance services be performed at the
indicated intervals and the maintenance be
recorded.
7-7
Page 562 of 608

First Engine Oil Change After Every
160 000 km/100,000 Miles
.Automatic transmission fluid change (normal
service). SeeAutomatic Transmission Fluid
(4-Speed Transmission)
on page 6‑23or
Automatic Transmission Fluid (6-Speed
Transmission) on page 6‑26.
.Four‐wheel drive only: Transfer case fluid change
(normal service). Check vent hose at transfer case
for kinks and proper installation. Check to be sure
vent hose is unobstructed, clear, and free of
debris. During any maintenance, if a power washer
is used to clean mud and dirt from the underbody,
care should be taken to not directly spray the
transfer case output seals. High pressure water
can overcome the seals and contaminate the
transfer case fluid. Contaminated fluid will
decrease the life of the transfer case and should
be replaced.
.Spark plug replacement and spark plug wires
inspection. An Emission Control Service.
First Engine Oil Change After Every
240 000 km/150,000 Miles
.Engine cooling system drain, flush, and refill,
cooling system and cap pressure check, and
cleaning of outside of radiator and air conditioning
condenser (or every 5 years, whichever occurs
first). SeeEngine Coolant
on page 6‑31.An
Emission Control Service.
.Engine accessory drive belt inspection for fraying,
excessive cracks, or obvious damage and
replacement, if needed. An Emission Control
Service.
7-8
Page 563 of 608

Scheduled Maintenance
ServiceMaintenanceIMaintenance II
Change engine oil and filter. Reset oil life system. ••
Engine coolant level check. ••
Windshield washer fluid level check. ••
Tire inflation pressures check. ••
Tire wear inspection. ••
Rotate tires. ••
Fluids visual leak check. ••
Engine air cleaner filter inspection (vehicles driven in dusty conditions only). ••
Brake system inspection. ••
Steering and suspension inspection. •
Chassis components lubrication. •
Engine cooling system inspection. •
Windshield wiper blades inspection. •
Body components lubrication. •
Restraint system components check. •
Automatic transmission fluid level check. •
Four‐wheel drive only: Transfer case fluid level check. •
Engine air cleaner filter inspection (vehicles not driven in dusty conditions). •
7-9
Page 566 of 608

Recommended Fluids and
Lubricants
Fluids and lubricants identified below by name, part
number, or specification can be obtained from your
dealer.Usage Fluid/Lubricant
Engine Oil Engine oil which meets GM Standard
GM6094M and displays the American
Petroleum Institute Certified for
Gasoline Engines starburst symbol.
To determine the proper viscosity for
your vehicle's engine, see
Engine Oil
on page 6‑17.
Engine Coolant 50/50 mixture of clean, drinkable
water and use only DEX-COOL
®
Coolant. See
Engine Coolanton
page 6‑31.
Hydraulic Brake System DOT 3 Hydraulic Brake Fluid
(GM Part No. U.S. 12377967,
in Canada 89021320).
Windshield Washer Optikleen
®Washer Solvent.
Usage Fluid/Lubricant
Power Steering
System GM Power Steering Fluid
(GM Part No. U.S. 89021184,
in Canada 89021186).
Automatic
Transmission DEXRON
®-VI Automatic Transmission
Fluid.
Key Lock
Cylinders Multi-Purpose Lubricant, Superlube
(GM Part No. U.S. 12346241,
in Canada 10953474).
Chassis
Lubrication Chassis Lubricant
(GM Part No. U.S. 12377985,
in Canada 88901242) or lubricant
meeting requirements of NLGI #2,
Category LB or GC-LB.
Front Axle
(1500 Series
Vehicles with
Four-Wheel Drive) SAE 80W-90 Axle Lubricant
(GM Part No. U.S. 89021671,
in Canada 89021672).
Front Axle
(2500 Series
Vehicles with Four-Wheel Drive) SAE 75W-90 Synthetic Axle Lubricant
(GM Part No. U.S. 89021677,
in Canada 89021678).
7-12