four wheel drive CHEVROLET TAHOE 2010 3.G Owner's Manual
[x] Cancel search | Manufacturer: CHEVROLET, Model Year: 2010, Model line: TAHOE, Model: CHEVROLET TAHOE 2010 3.GPages: 608, PDF Size: 6.53 MB
Page 386 of 608

Rocking Your Vehicle to Get It Out
Turn the steering wheel left and right to clear the area
around the front wheels. For four-wheel-drive vehicles,
shift into Four‐Wheel High or, if the vehicle has a
two‐speed automatic transfer case, Four‐Wheel Low.
For vehicles with StabiliTrak
®, turn the traction control
part of the system off. Shift back and forth between
R (Reverse) and a forward gear, spinning the wheels as
little as possible. To prevent transmission wear, wait
until the wheels stop spinning before shifting gears.
Release the accelerator pedal while shifting, and press
lightly on the accelerator pedal when the transmission is
in gear. Slowly spinning the wheels in the forward and
reverse directions causes a rocking motion that could
free the vehicle. If that does not get the vehicle out after
a few tries, it might need to be towed out. Recovery
hooks can be used, if the vehicle has them. If the
vehicle does need to be towed out, see Towing Your
Vehicle on page 5‑40.
Recovery Hooks
{WARNING:
These hooks, when used, are under a lot of force.
Always pull the vehicle straight out. Never pull on
the hooks at a sideways angle. The hooks could
break off and you or others could be injured from
the chain or cable snapping back.
5-28
Page 399 of 608

Dinghy Towing
Two-Wheel-Drive Vehicles and Four-Wheel
Drive Vehicles with a Single Speed
Automatic Transfer Case
Notice:If the vehicle is towed with all four wheels
on the ground, the drivetrain components could be
damaged. The repairs would not be covered by the
vehicle warranty. Do not tow the vehicle with all
four wheels on the ground. Two-wheel-drive vehicles and four-wheel drive vehicles
with a single speed automatic transfer case should
not be towed with all four wheels on the ground.
Two-wheel-drive transmissions have no provisions for
internal lubrication while being towed. Four-wheel drive
vehicles with a single speed automatic transfer case
have no neutral position and will spin the transmission
when the rear wheels turn.
5-41
Page 400 of 608
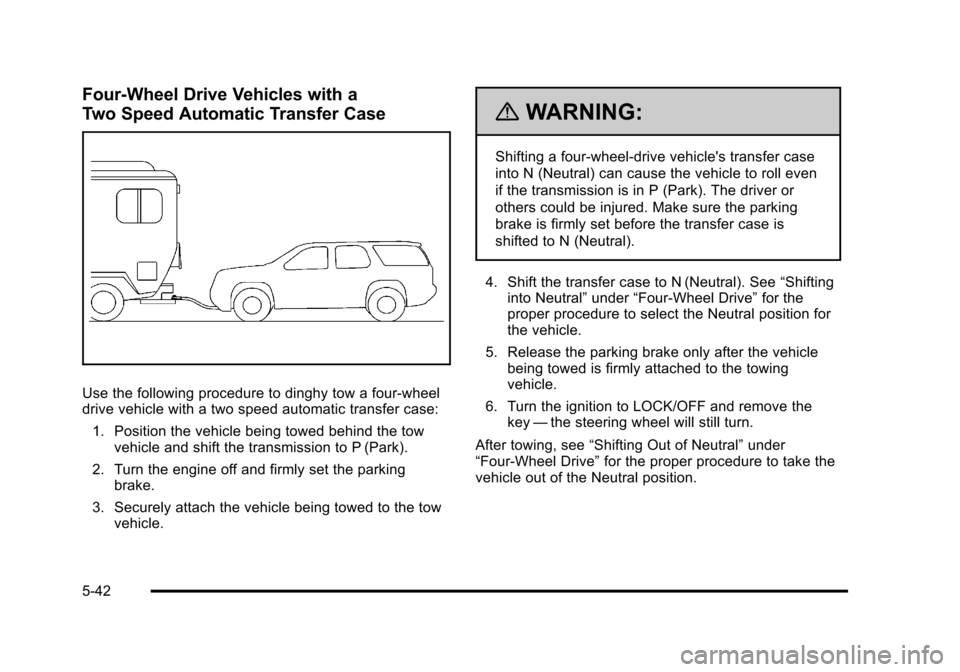
Four-Wheel Drive Vehicles with a
Two Speed Automatic Transfer Case
Use the following procedure to dinghy tow a four-wheel
drive vehicle with a two speed automatic transfer case:1. Position the vehicle being towed behind the tow vehicle and shift the transmission to P (Park).
2. Turn the engine off and firmly set the parking brake.
3. Securely attach the vehicle being towed to the tow vehicle.
{WARNING:
Shifting a four-wheel-drive vehicle's transfer case
into N (Neutral) can cause the vehicle to roll even
if the transmission is in P (Park). The driver or
others could be injured. Make sure the parking
brake is firmly set before the transfer case is
shifted to N (Neutral).
4. Shift the transfer case to N (Neutral). See “Shifting
into Neutral” under“Four-Wheel Drive” for the
proper procedure to select the Neutral position for
the vehicle.
5. Release the parking brake only after the vehicle being towed is firmly attached to the towing
vehicle.
6. Turn the ignition to LOCK/OFF and remove the key —the steering wheel will still turn.
After towing, see “Shifting Out of Neutral” under
“Four-Wheel Drive” for the proper procedure to take the
vehicle out of the Neutral position.
5-42
Page 401 of 608

Dolly Towing
Front Towing (Front Wheels Off the
Ground)
Two-Wheel-Drive Vehicles and Four-Wheel
Drive Vehicles with a Single Speed
Automatic Transfer Case
Notice:If a two-wheel drive vehicle or a four-wheel
drive vehicle with a single speed automatic transfer
case is towed with the rear wheels on the ground, the transmission could be damaged. The repairs
would not be covered by the vehicle warranty. Never
tow the vehicle with the rear wheels on the ground.
Two-wheel-drive vehicles and four-wheel drive vehicles
with a single speed automatic transfer case should
not be towed with the rear wheels on the ground.
Two-wheel-drive transmissions have no provisions for
internal lubrication while being towed. Four-wheel drive
vehicles with a single speed automatic transfer case
have no neutral position and will spin the transmission
when the rear wheels turn.
To dolly tow a two‐wheel‐drive vehicle or a four-wheel
drive vehicle with a single speed automatic transfer
case, the vehicle must be towed with the rear wheels
on the dolly. See
“Rear Towing (Rear Wheels Off the
Ground)” later in this section for more information.
5-43
Page 402 of 608
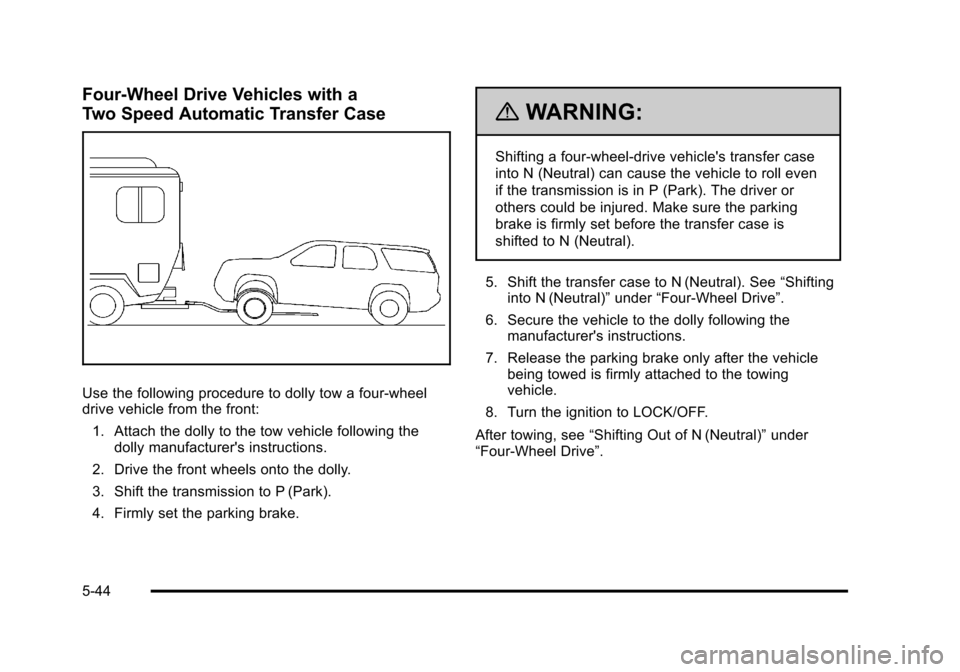
Four-Wheel Drive Vehicles with a
Two Speed Automatic Transfer Case
Use the following procedure to dolly tow a four-wheel
drive vehicle from the front:1. Attach the dolly to the tow vehicle following the dolly manufacturer's instructions.
2. Drive the front wheels onto the dolly.
3. Shift the transmission to P (Park).
4. Firmly set the parking brake.
{WARNING:
Shifting a four-wheel-drive vehicle's transfer case
into N (Neutral) can cause the vehicle to roll even
if the transmission is in P (Park). The driver or
others could be injured. Make sure the parking
brake is firmly set before the transfer case is
shifted to N (Neutral).
5. Shift the transfer case to N (Neutral). See “Shifting
into N (Neutral)” under“Four-Wheel Drive”.
6. Secure the vehicle to the dolly following the manufacturer's instructions.
7. Release the parking brake only after the vehicle being towed is firmly attached to the towing
vehicle.
8. Turn the ignition to LOCK/OFF.
After towing, see “Shifting Out of N (Neutral)” under
“Four-Wheel Drive”.
5-44
Page 403 of 608
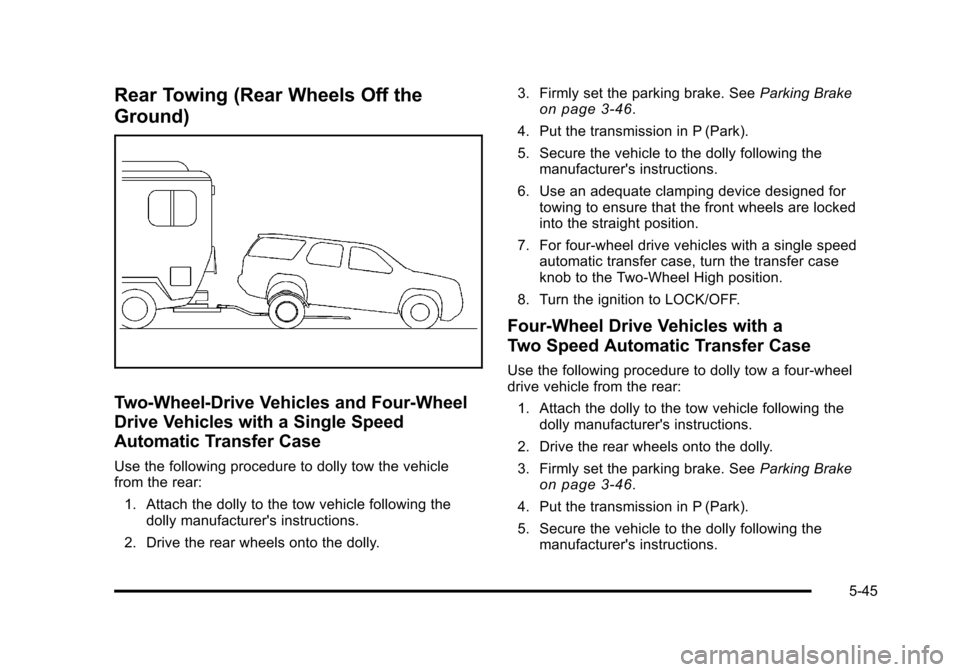
Rear Towing (Rear Wheels Off the
Ground)
Two-Wheel-Drive Vehicles and Four-Wheel
Drive Vehicles with a Single Speed
Automatic Transfer Case
Use the following procedure to dolly tow the vehicle
from the rear:1. Attach the dolly to the tow vehicle following the dolly manufacturer's instructions.
2. Drive the rear wheels onto the dolly. 3. Firmly set the parking brake. See
Parking Brake
on page 3‑46.
4. Put the transmission in P (Park).
5. Secure the vehicle to the dolly following the manufacturer's instructions.
6. Use an adequate clamping device designed for towing to ensure that the front wheels are locked
into the straight position.
7. For four-wheel drive vehicles with a single speed automatic transfer case, turn the transfer case
knob to the Two-Wheel High position.
8. Turn the ignition to LOCK/OFF.
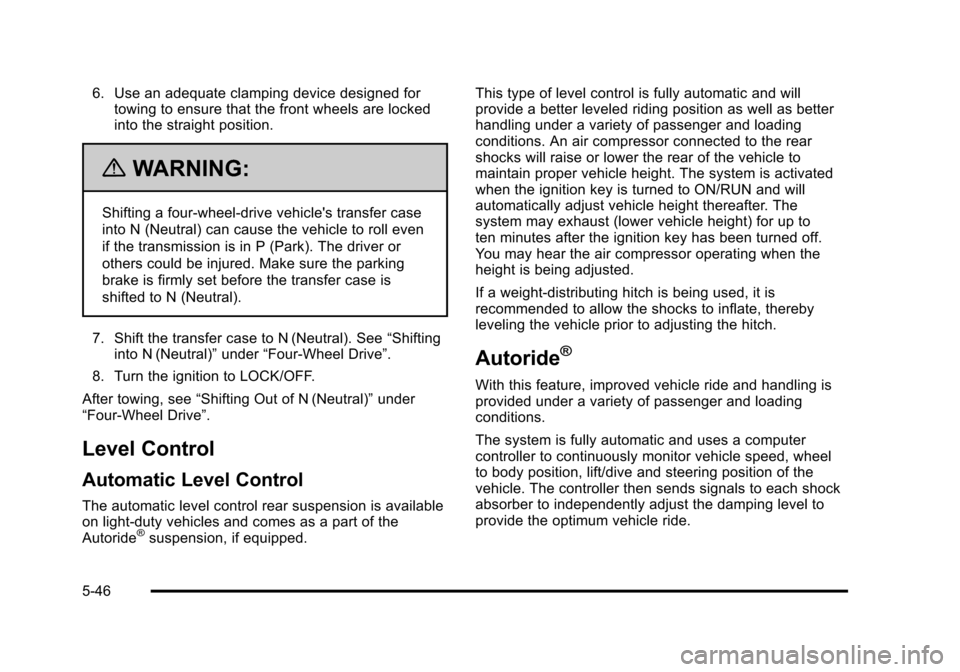
Four-Wheel Drive Vehicles with a
Two Speed Automatic Transfer Case
Use the following procedure to dolly tow a four-wheel
drive vehicle from the rear: 1. Attach the dolly to the tow vehicle following the dolly manufacturer's instructions.
2. Drive the rear wheels onto the dolly.
3. Firmly set the parking brake. See Parking Brake
on page 3‑46.
4. Put the transmission in P (Park).
5. Secure the vehicle to the dolly following the manufacturer's instructions.
5-45
Page 404 of 608
6. Use an adequate clamping device designed fortowing to ensure that the front wheels are locked
into the straight position.
{WARNING:
Shifting a four-wheel-drive vehicle's transfer case
into N (Neutral) can cause the vehicle to roll even
if the transmission is in P (Park). The driver or
others could be injured. Make sure the parking
brake is firmly set before the transfer case is
shifted to N (Neutral).
7. Shift the transfer case to N (Neutral). See “Shifting
into N (Neutral)” under“Four-Wheel Drive”.
8. Turn the ignition to LOCK/OFF.
After towing, see “Shifting Out of N (Neutral)” under
“Four-Wheel Drive”.
Level Control
Automatic Level Control
The automatic level control rear suspension is available
on light‐duty vehicles and comes as a part of the
Autoride
®suspension, if equipped. This type of level control is fully automatic and will
provide a better leveled riding position as well as better
handling under a variety of passenger and loading
conditions. An air compressor connected to the rear
shocks will raise or lower the rear of the vehicle to
maintain proper vehicle height. The system is activated
when the ignition key is turned to ON/RUN and will
automatically adjust vehicle height thereafter. The
system may exhaust (lower vehicle height) for up to
ten minutes after the ignition key has been turned off.
You may hear the air compressor operating when the
height is being adjusted.
If a weight‐distributing hitch is being used, it is
recommended to allow the shocks to inflate, thereby
leveling the vehicle prior to adjusting the hitch.
Autoride®
With this feature, improved vehicle ride and handling is
provided under a variety of passenger and loading
conditions.
The system is fully automatic and uses a computer
controller to continuously monitor vehicle speed, wheel
to body position, lift/dive and steering position of the
vehicle. The controller then sends signals to each shock
absorber to independently adjust the damping level to
provide the optimum vehicle ride.
5-46
Page 422 of 608
Parking on Hills
{WARNING:
Parking the vehicle on a hill with the trailer
attached can be dangerous. If something goes
wrong, the rig could start to move. People can be
injured, and both the vehicle and the trailer can be
damaged. When possible, always park the rig on
a flat surface.
If parking the rig on a hill: 1. Press the brake pedal, but do not shift into P (Park) yet. Turn the wheels into the curb if facing downhill
or into traffic if facing uphill.
2. Have someone place chocks under the trailer wheels.
3. When the wheel chocks are in place, release the regular brakes until the chocks absorb the load.
4. Reapply the brake pedal. Then apply the parking brake and shift into P (Park).
5. If the vehicle is four-wheel-drive and has a two-speed transfer case, be sure the transfer case
is in a drive gear and not in N (Neutral).
6. Release the brake pedal.
{WARNING:
It can be dangerous to get out of the vehicle if the
shift lever is not fully in P (Park) with the parking
brake firmly set. The vehicle can roll.
If the engine has been left running, the vehicle
can move suddenly. You or others could be
injured. To be sure the vehicle will not move, even
when on fairly level ground, use the steps that
follow.
Always put the shift lever fully in P (Park) with the
parking brake firmly set.
If the transfer case on a four-wheel-drive vehicle
is in N (Neutral), the vehicle will be free to roll,
even if the shift lever is in P (Park). Be sure
the transfer case is in a drive gear —not in
N (Neutral).
5-64
Page 427 of 608

Section 6 Service and Appearance Care
Service. . . . . . . . . . . . . . . . . . . . . . . . . . . . . . . . . . . . . . . . . . . . . 6-4
Accessories and Modifications . . . . . . . . . . . . . . . . . . 6-4
California Proposition 65 Warning . . . . . . . . . . . . . . . 6-5
California Perchlorate Materials Requirements . . . . . . . . . . . . . . . . . . . . . . . . . . . . . . . . . 6-5
Doing Your Own Service Work . . . . . . . . . . . . . . . . . . 6-5
Adding Equipment to the Outside of the Vehicle . . . . . . . . . . . . . . . . . . . . . . . . . . . . . . . . . . . . . . . . 6-6
Fuel . . . . . . . . . . . . . . . . . . . . . . . . . . . . . . . . . . . . . . . . . . . . . . . . . 6-6
Gasoline Octane . . . . . . . . . . . . . . . . . . . . . . . . . . . . . . . . 6-7
Gasoline Specifications . . . . . . . . . . . . . . . . . . . . . . . . . 6-7
California Fuel . . . . . . . . . . . . . . . . . . . . . . . . . . . . . . . . . . 6-8
Additives . . . . . . . . . . . . . . . . . . . . . . . . . . . . . . . . . . . . . . . . 6-8
Fuel E85 (85% Ethanol) . . . . . . . . . . . . . . . . . . . . . . . . . 6-9
Fuels in Foreign Countries . . . . . . . . . . . . . . . . . . . . . 6-10
Filling the Tank . . . . . . . . . . . . . . . . . . . . . . . . . . . . . . . . . 6-11
Filling a Portable Fuel Container . . . . . . . . . . . . . . . 6-13
Checking Things Under the Hood . . . . . . . . . . . . . . . 6-14
Hood Release . . . . . . . . . . . . . . . . . . . . . . . . . . . . . . . . . 6-14
Engine Compartment Overview . . . . . . . . . . . . . . . . 6-16
Engine Oil . . . . . . . . . . . . . . . . . . . . . . . . . . . . . . . . . . . . . 6-17 Engine Oil Life System . . . . . . . . . . . . . . . . . . . . . . . . 6-20
Engine Air Cleaner/Filter . . . . . . . . . . . . . . . . . . . . . . . 6-21
Automatic Transmission Fluid (4-Speed
Transmission) . . . . . . . . . . . . . . . . . . . . . . . . . . . . . . . 6-23
Automatic Transmission Fluid (6-Speed
Transmission) . . . . . . . . . . . . . . . . . . . . . . . . . . . . . . . 6-26
Cooling System . . . . . . . . . . . . . . . . . . . . . . . . . . . . . . . . 6-30
Engine Coolant . . . . . . . . . . . . . . . . . . . . . . . . . . . . . . . . 6-31
Engine Overheating . . . . . . . . . . . . . . . . . . . . . . . . . . . 6-36
Overheated Engine Protection Operating Mode . . . . . . . . . . . . . . . . . . . . . . . . . . . . . 6-39
Engine Fan Noise . . . . . . . . . . . . . . . . . . . . . . . . . . . . . 6-39
Power Steering Fluid . . . . . . . . . . . . . . . . . . . . . . . . . . 6-40
Windshield Washer Fluid . . . . . . . . . . . . . . . . . . . . . . 6-41
Brakes . . . . . . . . . . . . . . . . . . . . . . . . . . . . . . . . . . . . . . . . . 6-42
Battery . . . . . . . . . . . . . . . . . . . . . . . . . . . . . . . . . . . . . . . . . 6-45
Jump Starting . . . . . . . . . . . . . . . . . . . . . . . . . . . . . . . . . . 6-46
Rear Axle . . . . . . . . . . . . . . . . . . . . . . . . . . . . . . . . . . . . . . . . . 6-51
Four-Wheel Drive . . . . . . . . . . . . . . . . . . . . . . . . . . . . . . . . . 6-53
Front Axle . . . . . . . . . . . . . . . . . . . . . . . . . . . . . . . . . . . . . . . . . 6-54
6-1
Page 472 of 608

Jump Starting
If the vehicle is a Two-mode Hybrid, see the Two-mode
Hybrid manual for more information.
If the vehicle's battery (or batteries) has run down, you
may want to use another vehicle and some jumper
cables to start your vehicle. Be sure to use the following
steps to do it safely.
{WARNING:
Batteries can hurt you. They can be dangerous
because:
.They contain acid that can burn you.
.They contain gas that can explode or ignite.
.They contain enough electricity to burn you.
If you do not follow these steps exactly, some or
all of these things can hurt you. Notice:
Ignoring these steps could result in costly
damage to the vehicle that would not be covered by
the warranty.
Trying to start the vehicle by pushing or pulling it
will not work, and it could damage the vehicle.
1. Check the other vehicle. It must have a 12-volt battery with a negative ground system.
Notice: If the other vehicle's system is not a 12-volt
system with a negative ground, both vehicles can
be damaged. Only use vehicles with 12-volt systems
with negative grounds to jump start your vehicle.
2. Get the vehicles close enough so the jumper cables can reach, but be sure the vehicles are not
touching each other. If they are, it could cause a
ground connection you do not want. You would
not be able to start your vehicle, and the bad
grounding could damage the electrical systems.
To avoid the possibility of the vehicles rolling, set
the parking brake firmly on both vehicles involved
in the jump start procedure. Put the automatic
transmission in P (Park) or a manual transmission
in N (Neutral) before setting the parking brake.
If the vehicle has a four-wheel-drive transfer case
with a N (Neutral) position, be sure the transfer
case is in a drive gear, not in N (Neutral).
6-46