ECU CHEVROLET TAHOE 2010 3.G Workshop Manual
[x] Cancel search | Manufacturer: CHEVROLET, Model Year: 2010, Model line: TAHOE, Model: CHEVROLET TAHOE 2010 3.GPages: 608, PDF Size: 6.53 MB
Page 402 of 608
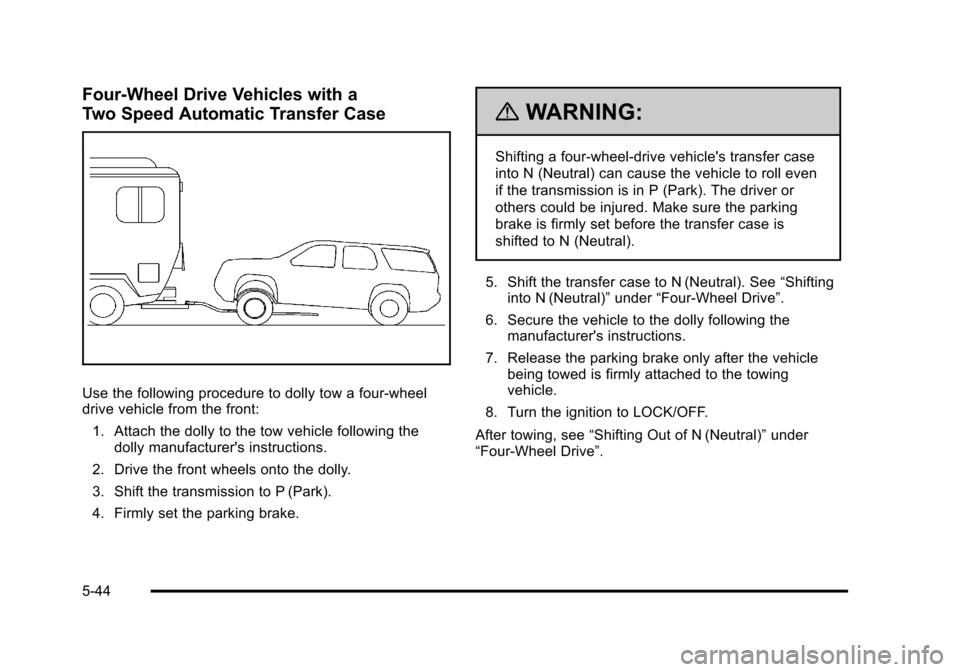
Four-Wheel Drive Vehicles with a
Two Speed Automatic Transfer Case
Use the following procedure to dolly tow a four-wheel
drive vehicle from the front:1. Attach the dolly to the tow vehicle following the dolly manufacturer's instructions.
2. Drive the front wheels onto the dolly.
3. Shift the transmission to P (Park).
4. Firmly set the parking brake.
{WARNING:
Shifting a four-wheel-drive vehicle's transfer case
into N (Neutral) can cause the vehicle to roll even
if the transmission is in P (Park). The driver or
others could be injured. Make sure the parking
brake is firmly set before the transfer case is
shifted to N (Neutral).
5. Shift the transfer case to N (Neutral). See “Shifting
into N (Neutral)” under“Four-Wheel Drive”.
6. Secure the vehicle to the dolly following the manufacturer's instructions.
7. Release the parking brake only after the vehicle being towed is firmly attached to the towing
vehicle.
8. Turn the ignition to LOCK/OFF.
After towing, see “Shifting Out of N (Neutral)” under
“Four-Wheel Drive”.
5-44
Page 403 of 608
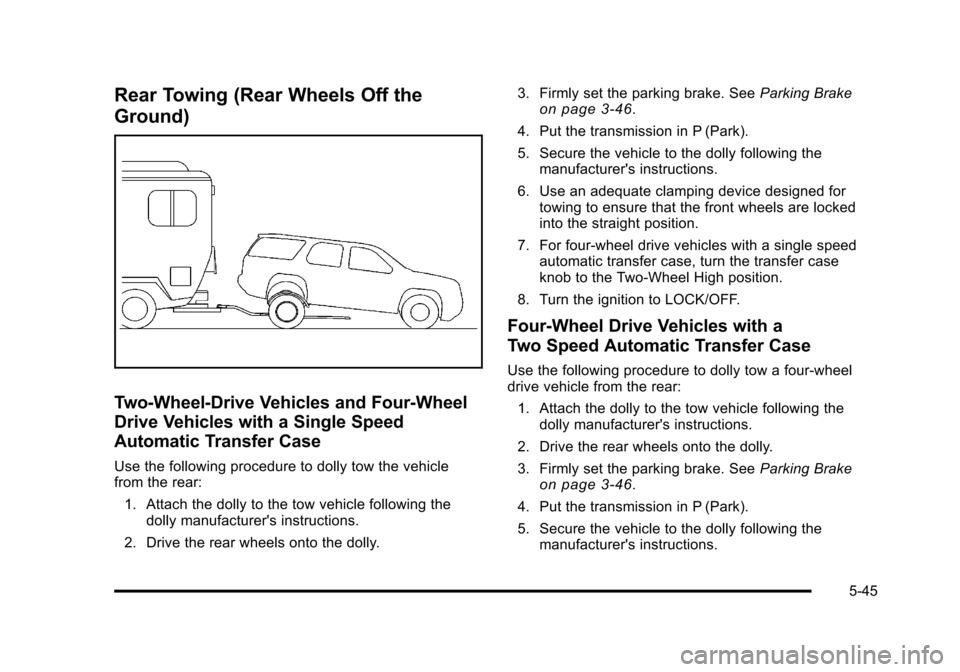
Rear Towing (Rear Wheels Off the
Ground)
Two-Wheel-Drive Vehicles and Four-Wheel
Drive Vehicles with a Single Speed
Automatic Transfer Case
Use the following procedure to dolly tow the vehicle
from the rear:1. Attach the dolly to the tow vehicle following the dolly manufacturer's instructions.
2. Drive the rear wheels onto the dolly. 3. Firmly set the parking brake. See
Parking Brake
on page 3‑46.
4. Put the transmission in P (Park).
5. Secure the vehicle to the dolly following the manufacturer's instructions.
6. Use an adequate clamping device designed for towing to ensure that the front wheels are locked
into the straight position.
7. For four-wheel drive vehicles with a single speed automatic transfer case, turn the transfer case
knob to the Two-Wheel High position.
8. Turn the ignition to LOCK/OFF.
Four-Wheel Drive Vehicles with a
Two Speed Automatic Transfer Case
Use the following procedure to dolly tow a four-wheel
drive vehicle from the rear: 1. Attach the dolly to the tow vehicle following the dolly manufacturer's instructions.
2. Drive the rear wheels onto the dolly.
3. Firmly set the parking brake. See Parking Brake
on page 3‑46.
4. Put the transmission in P (Park).
5. Secure the vehicle to the dolly following the manufacturer's instructions.
5-45
Page 420 of 608
Driving with a Trailer
{WARNING:
When towing a trailer, exhaust gases may collect
at the rear of the vehicle and enter if the liftgate,
trunk/hatch, or rear-most window is open.
Engine exhaust contains carbon monoxide (CO)
which cannot be seen or smelled. It can cause
unconsciousness and even death.
To maximize safety when towing a trailer:
.Have the exhaust system inspected for leaks
and make necessary repairs before starting
a trip.
.Never drive with the liftgate, trunk/hatch,
or rear-most window open.
.Fully open the air outlets on or under the
instrument panel.
.Adjust the Climate Control system to a setting
that brings in only outside air and set the fan
speed to the highest setting. See Climate
Control System in the Index.
For more information about carbon monoxide, see
Engine Exhaust on page 3‑50. Towing a trailer requires a certain amount of
experience. The combination you are driving is
longer and not as responsive as the vehicle itself.
Get acquainted with the handling and braking of the
rig before setting out for the open road.
Before starting, check all trailer hitch parts and
attachments, safety chains, electrical connectors,
lamps, tires and mirrors. If the trailer has electric
brakes, start the combination moving and then apply
the trailer brake controller by hand to be sure the
brakes work.
During the trip, check occasionally to be sure that the
load is secure and the lamps and any trailer brakes
still work.
Following Distance
Stay at least twice as far behind the vehicle ahead as
you would when driving the vehicle without a trailer.
This can help to avoid heavy braking and sudden turns.
Passing
More passing distance is needed when towing a trailer.
The combination will not accelerate as quickly and is
longer so it is necessary to go much farther beyond the
passed vehicle before returning to the lane.
5-62
Page 462 of 608
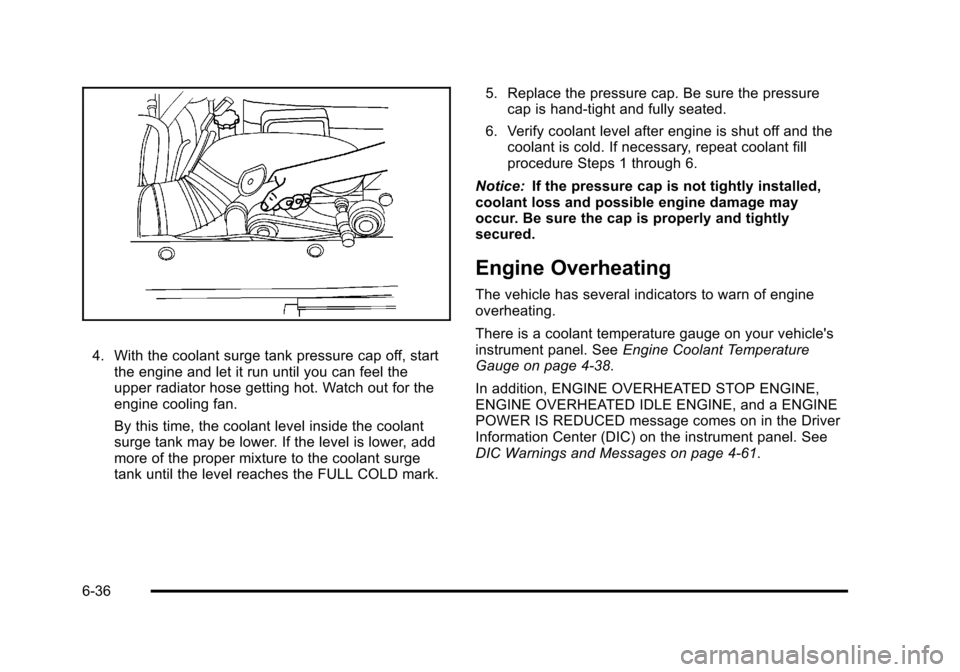
4. With the coolant surge tank pressure cap off, startthe engine and let it run until you can feel the
upper radiator hose getting hot. Watch out for the
engine cooling fan.
By this time, the coolant level inside the coolant
surge tank may be lower. If the level is lower, add
more of the proper mixture to the coolant surge
tank until the level reaches the FULL COLD mark. 5. Replace the pressure cap. Be sure the pressure
cap is hand-tight and fully seated.
6. Verify coolant level after engine is shut off and the coolant is cold. If necessary, repeat coolant fill
procedure Steps 1 through 6.
Notice: If the pressure cap is not tightly installed,
coolant loss and possible engine damage may
occur. Be sure the cap is properly and tightly
secured.
Engine Overheating
The vehicle has several indicators to warn of engine
overheating.
There is a coolant temperature gauge on your vehicle's
instrument panel. See Engine Coolant Temperature
Gauge on page 4‑38.
In addition, ENGINE OVERHEATED STOP ENGINE,
ENGINE OVERHEATED IDLE ENGINE, and a ENGINE
POWER IS REDUCED message comes on in the Driver
Information Center (DIC) on the instrument panel. See
DIC Warnings and Messages on page 4‑61.
6-36
Page 505 of 608
{WARNING:
Rust or dirt on a wheel, or on the parts to
which it is fastened, can make wheel nuts
become loose after time. The wheel could
come off and cause an accident. When you
change a wheel, remove any rust or dirt from
places where the wheel attaches to the
vehicle. In an emergency, you can use a
cloth or a paper towel to do this; but be
sure to use a scraper or wire brush later,
if needed, to get all the rust or dirt off.
SeeChanging a Flat Tire
on page 6‑88.
Make sure the spare tire is stored securely. Push,
pull, and then try to rotate or turn the tire. If it
moves, tighten the cable. See Storing a Flat or
Spare Tire and Tools
on page 6‑104.
When It Is Time for New Tires
Various factors, such as maintenance, temperatures,
driving speeds, vehicle loading, and road conditions,
influence when you need new tires.
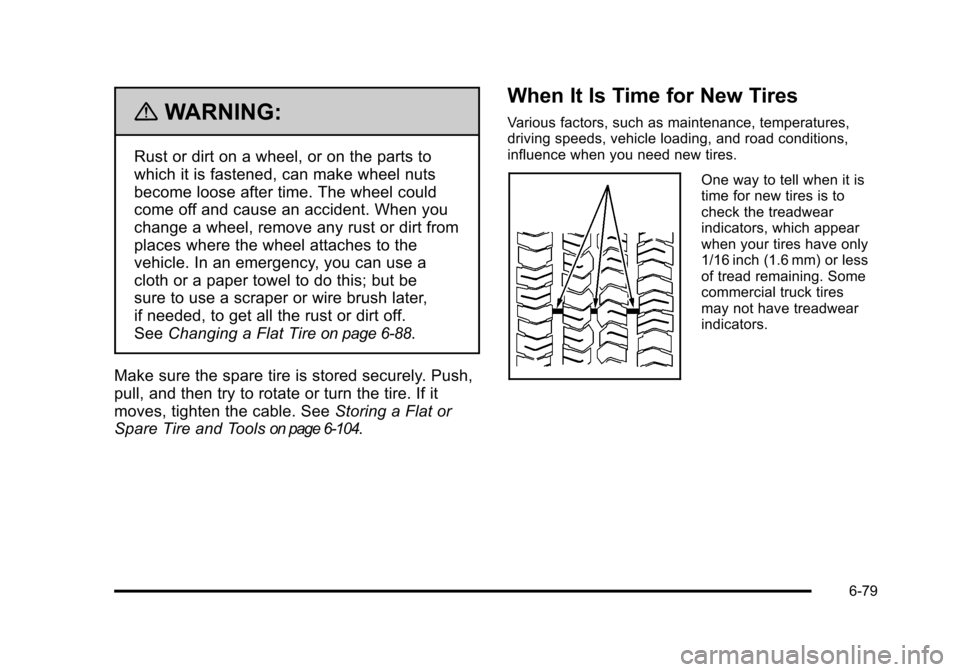
One way to tell when it is
time for new tires is to
check the treadwear
indicators, which appear
when your tires have only
1/16 inch (1.6 mm) or less
of tread remaining. Some
commercial truck tires
may not have treadwear
indicators.
6-79
Page 512 of 608
Tire Chains
If your vehicle is a Two‐mode Hybrid, see the
Two‐mode Hybrid manual for more information.
{WARNING:
If your vehicle has P265/65R18 or P275/55R20
size tires, do not use tire chains. They can
damage your vehicle because there is not enough
clearance. Tire chains used on a vehicle without
the proper amount of clearance can cause
damage to the brakes, suspension, or other
vehicle parts. The area damaged by the tire
chains could cause you to lose control of your
vehicle and you or others may be injured in a
crash.(Continued)
WARNING: (Continued)
Use another type of traction device only if its
manufacturer recommends it for use on your
vehicle and tire size combination and road
conditions. Follow that manufacturer's
instructions. To help avoid damage to your
vehicle, drive slowly, readjust or remove the
device if it is contacting your vehicle, and do not
spin your vehicle's wheels.
If you do find traction devices that will fit, install
them on the rear tires.
Notice: If your vehicle has P265/70R17 size tires,
use tire chains only where legal and only when you
must. Use chains that are the proper size for your
vehicle's tires. Install them on the rear tires only.
Do not use chains on the front tires.
Tighten them as tightly as possible with the ends
securely fastened. Drive slowly and follow the chain
manufacturer's instructions. If you can hear the
chains contacting your vehicle, stop and retighten
them. If the contact continues, slow down until it
stops. Driving too fast or spinning the wheels with
chains on will damage your vehicle.
6-86
Page 528 of 608
5. If the spare does not lower, turn the wrenchcounterclockwise until approximately 6 inches
(15 cm) of cable is exposed.
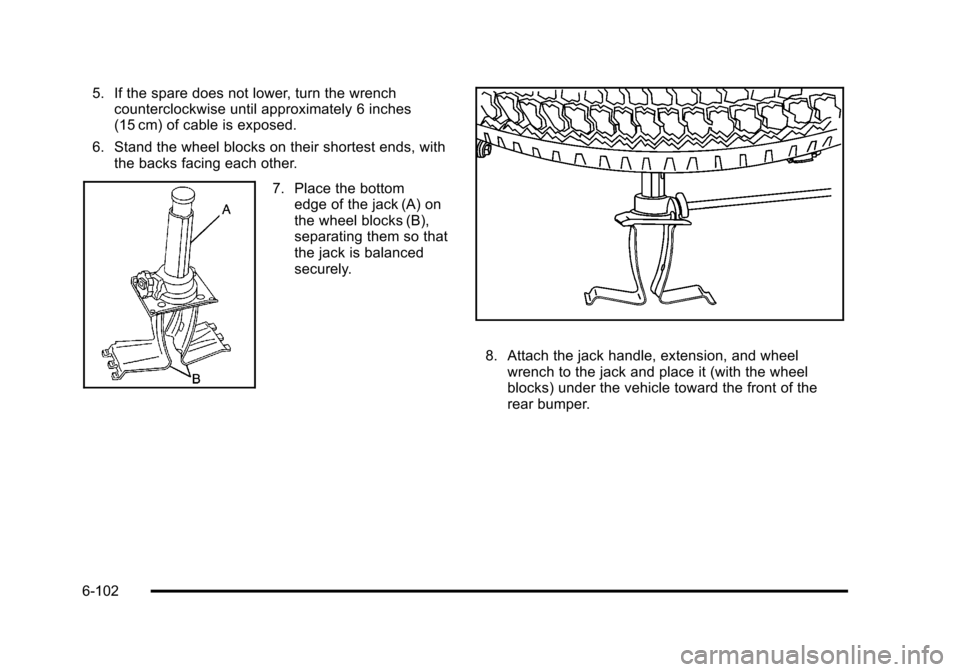
6. Stand the wheel blocks on their shortest ends, with the backs facing each other.
7. Place the bottomedge of the jack (A) on
the wheel blocks (B),
separating them so that
the jack is balanced
securely.
8. Attach the jack handle, extension, and wheelwrench to the jack and place it (with the wheel
blocks) under the vehicle toward the front of the
rear bumper.
6-102
Page 532 of 608
5. Raise the tire part way upward. Make sure theretainer is seated in the wheel opening.
6. Raise the tire fully against the underside of the vehicle by turning the wheel wrench clockwise until
you hear two clicks or feel it skip twice. You cannot
overtighten the cable.
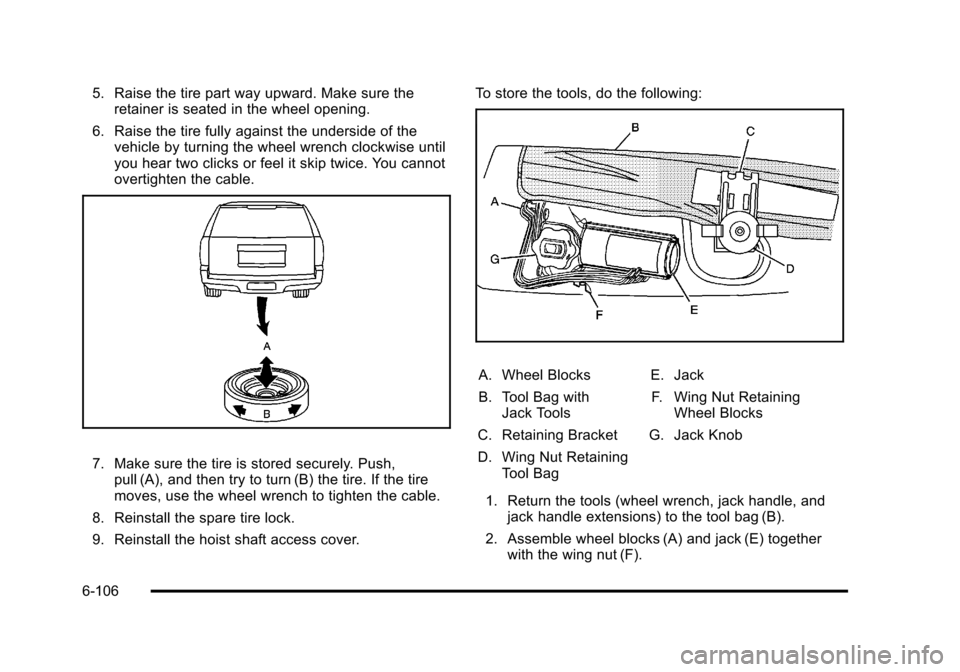
7. Make sure the tire is stored securely. Push,pull (A), and then try to turn (B) the tire. If the tire
moves, use the wheel wrench to tighten the cable.
8. Reinstall the spare tire lock.
9. Reinstall the hoist shaft access cover. To store the tools, do the following:
A. Wheel Blocks
B. Tool Bag with
Jack Tools
C. Retaining Bracket
D. Wing Nut Retaining Tool Bag E. Jack
F. Wing Nut Retaining Wheel Blocks
G. Jack Knob
1. Return the tools (wheel wrench, jack handle, and jack handle extensions) to the tool bag (B).
2. Assemble wheel blocks (A) and jack (E) together with the wing nut (F).
6-106
Page 533 of 608
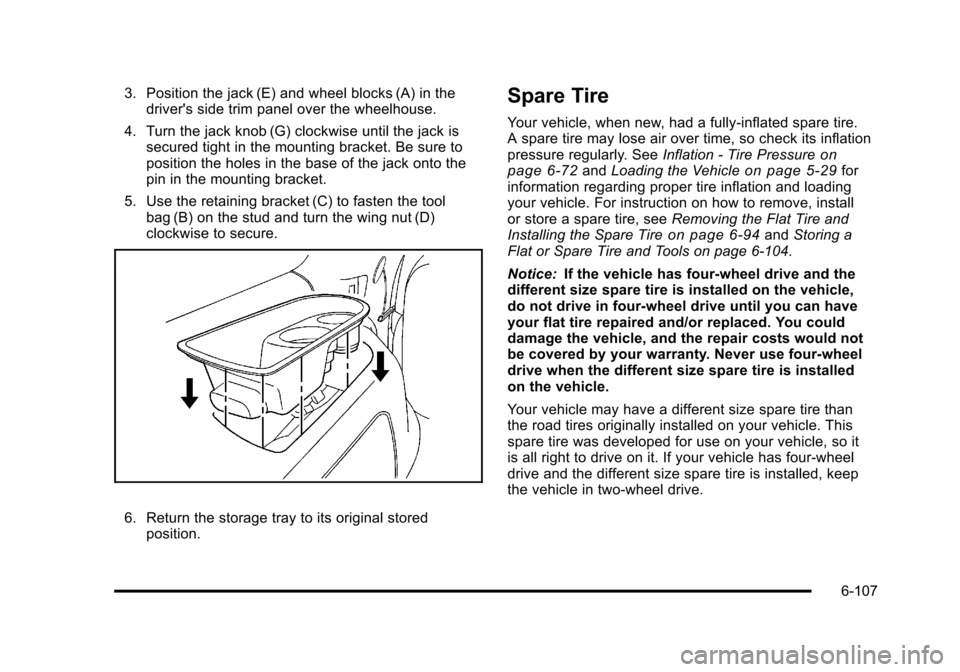
3. Position the jack (E) and wheel blocks (A) in thedriver's side trim panel over the wheelhouse.
4. Turn the jack knob (G) clockwise until the jack is secured tight in the mounting bracket. Be sure to
position the holes in the base of the jack onto the
pin in the mounting bracket.
5. Use the retaining bracket (C) to fasten the tool bag (B) on the stud and turn the wing nut (D)
clockwise to secure.
6. Return the storage tray to its original storedposition.
Spare Tire
Your vehicle, when new, had a fully-inflated spare tire.
A spare tire may lose air over time, so check its inflation
pressure regularly. See Inflation - Tire Pressure
on
page 6‑72and Loading the Vehicleon page 5‑29for
information regarding proper tire inflation and loading
your vehicle. For instruction on how to remove, install
or store a spare tire, see Removing the Flat Tire and
Installing the Spare Tire
on page 6‑94and Storing a
Flat or Spare Tire and Tools on page 6‑104.
Notice: If the vehicle has four-wheel drive and the
different size spare tire is installed on the vehicle,
do not drive in four-wheel drive until you can have
your flat tire repaired and/or replaced. You could
damage the vehicle, and the repair costs would not
be covered by your warranty. Never use four-wheel
drive when the different size spare tire is installed
on the vehicle.
Your vehicle may have a different size spare tire than
the road tires originally installed on your vehicle. This
spare tire was developed for use on your vehicle, so it
is all right to drive on it. If your vehicle has four-wheel
drive and the different size spare tire is installed, keep
the vehicle in two-wheel drive.
6-107
Page 580 of 608

Calling for Assistance
When calling Roadside Assistance, have the following
information ready:
.Your name, home address, and home telephone
number
.Telephone number of your location
.Location of the vehicle
.Model, year, color, and license plate number of the
vehicle
.Odometer reading, Vehicle Identification Number
(VIN), and delivery date of the vehicle
.Description of the problem
Coverage
Services are provided up to 5 years/100,000 miles
(160 000 km), whichever comes first.
In the U.S., anyone driving the vehicle is covered. In
Canada, a person driving the vehicle without permission
from the owner is not covered.
Roadside Assistance is not a part of the New Vehicle
Limited Warranty. Chevrolet and General Motors of
Canada Limited reserve the right to make any changes
or discontinue the Roadside Assistance program at any
time without notification.Chevrolet and General Motors of Canada Limited
reserve the right to limit services or payment to an
owner or driver if they decide the claims are made too
often, or the same type of claim is made many times.
Services Provided
.Emergency Fuel Delivery:
Delivery of enough
fuel for the vehicle to get to the nearest service
station.
.Lock‐Out Service: Service is provided to unlock
the vehicle if you are locked out. A remote unlock
may be available if you have OnStar
®. For security
reasons, the driver must present identification
before this service is given.
.Emergency Tow From a Public Road or
Highway: Tow to the nearest Chevrolet dealer for
warranty service, or if the vehicle was in a crash
and cannot be driven. Assistance is also given
when the vehicle is stuck in the sand, mud,
or snow.
.Flat Tire Change: Service is provided to change
a flat tire with the spare tire. The spare tire,
if equipped, must be in good condition and
properly inflated. It is the owner's responsibility for
the repair or replacement of the tire if it is not
covered by the warranty.
.Battery Jump Start: Service is provided to jump
start a dead battery.
8-8