turn signal CHEVROLET TAHOE 2010 3.G Owners Manual
[x] Cancel search | Manufacturer: CHEVROLET, Model Year: 2010, Model line: TAHOE, Model: CHEVROLET TAHOE 2010 3.GPages: 608, PDF Size: 6.53 MB
Page 9 of 608

A.Outlet Adjustment on page 4‑26.
B. Turn Signal/Multifunction Lever on page 4‑4.
C. Instrument Panel Cluster on page 4‑30.
D. Hazard Warning Flashers
on page 4‑3.
E. Shift Lever. See Automatic Transmission Operation
on page 3‑32.
F. Tow/Haul Mode
on page 3‑38(If Equipped).
G. Driver Information Center (DIC) Buttons. See Driver Information Center (DIC) on page 4‑47.
H. Audio System(s) on page 4‑80.
I. Exterior Lamps on page 4‑11.
J. Dome Lamp Override
on page 4‑15.Instrument
Panel Brightnesson page 4‑14. Fog Lampson
page 4‑13(If Equipped).
K. Hood Release on page 6‑14.
L. Integrated Trailer Brake Controller (If Equipped). Towing a Trailer on page 5‑47.
M. Automatic Transfer Case Control. (If Equipped). See Four-Wheel Drive (Two Speed Automatic
Transfer Case)
on page 3‑39or Four-Wheel Drive
(Single Speed Automatic Transfer Case)on
page 3‑44. N.
Cruise Control on page 4‑8.
O. Tilt Wheel on page 4‑3.
P. Horn on page 4‑3.
Q. Audio Steering Wheel Controls on page 4‑136.
R. Climate Control System
on page 4‑18orDual
Automatic Climate Control Systemon page 4‑20(If Equipped).
S. Accessory Power Outlet(s)
on page 4‑16.
Cigarette Lighter (If Equipped). See Ashtray(s) and
Cigarette Lighter
on page 4‑17.
T. StabiliTrak®Systemon page 5‑6(If Equipped).
Pedal Adjust Button (If Equipped). See Adjustable
Throttle and Brake Pedal
on page 3‑30. Ultrasonic
Rear Parking Assist (URPA)on page 3‑56(If Equipped). Heated Windshield Washer Fluid
Button (If Equipped). See Windshield Washeron
page 4‑6. Power Assist Stepson page 3‑17(If Equipped).
U. Glove Box on page 3‑73.
1-3
Page 10 of 608
Initial Drive Information
This section provides a brief overview about some of
the important features that may or may not be on your
specific vehicle.
For more detailed information, refer to each of the
features which can be found later in this owner manual.
Remote Keyless Entry (RKE) System
The RKE transmitter is used to remotely lock and
unlock the doors from up to 60 m (195 feet) away from
the vehicle.
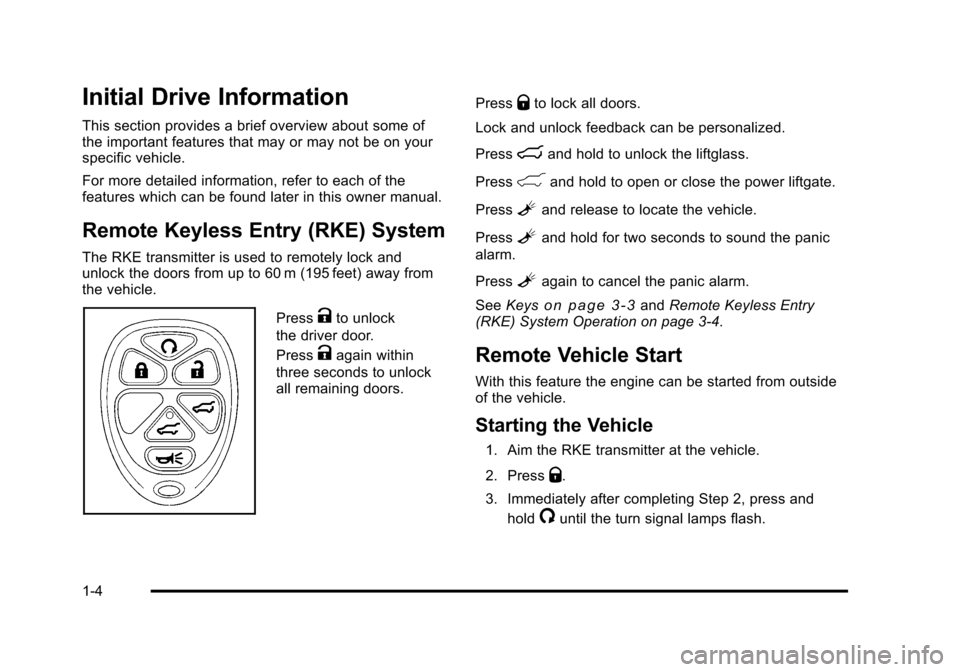
PressKto unlock
the driver door.
Press
Kagain within
three seconds to unlock
all remaining doors. Press
Qto lock all doors.
Lock and unlock feedback can be personalized.
Press
mand hold to unlock the liftglass.
Press
&and hold to open or close the power liftgate.
Press
Land release to locate the vehicle.
Press
Land hold for two seconds to sound the panic
alarm.
Press
Lagain to cancel the panic alarm.
See Keys
on page 3‑3andRemote Keyless Entry
(RKE) System Operation on page 3‑4.
Remote Vehicle Start
With this feature the engine can be started from outside
of the vehicle.
Starting the Vehicle
1. Aim the RKE transmitter at the vehicle.
2. Press
Q.
3. Immediately after completing Step 2, press and hold
/until the turn signal lamps flash.
1-4
Page 145 of 608
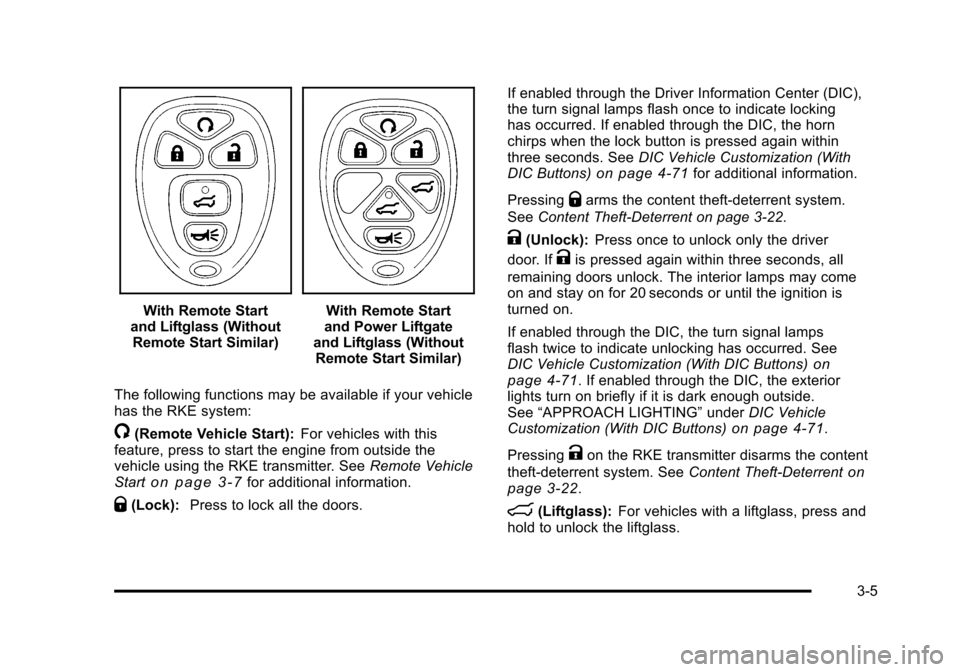
With Remote Start
and Liftglass (Without Remote Start Similar)With Remote Start
and Power Liftgate
and Liftglass (Without Remote Start Similar)
The following functions may be available if your vehicle
has the RKE system:
/(Remote Vehicle Start): For vehicles with this
feature, press to start the engine from outside the
vehicle using the RKE transmitter. See Remote Vehicle
Start
on page 3‑7for additional information.
Q(Lock): Press to lock all the doors. If enabled through the Driver Information Center (DIC),
the turn signal lamps flash once to indicate locking
has occurred. If enabled through the DIC, the horn
chirps when the lock button is pressed again within
three seconds. See
DIC Vehicle Customization (With
DIC Buttons)
on page 4‑71for additional information.
Pressing
Qarms the content theft‐deterrent system.
See Content Theft-Deterrent on page 3‑22.
K(Unlock): Press once to unlock only the driver
door. If
Kis pressed again within three seconds, all
remaining doors unlock. The interior lamps may come
on and stay on for 20 seconds or until the ignition is
turned on.
If enabled through the DIC, the turn signal lamps
flash twice to indicate unlocking has occurred. See
DIC Vehicle Customization (With DIC Buttons)
on
page 4‑71. If enabled through the DIC, the exterior
lights turn on briefly if it is dark enough outside.
See “APPROACH LIGHTING” underDIC Vehicle
Customization (With DIC Buttons)
on page 4‑71.
Pressing
Kon the RKE transmitter disarms the content
theft‐deterrent system. See Content Theft-Deterrent
on
page 3‑22.
m(Liftglass): For vehicles with a liftglass, press and
hold to unlock the liftglass.
3-5
Page 146 of 608
&(Power Liftgate):For vehicles with a power
liftgate, press and hold to open and close the liftgate.
The taillamps flash and a chime sounds to indicate
when the liftgate is opening and closing.
L(Vehicle Locator/Panic Alarm): Press and release
to locate the vehicle. The turn signal lamps flash and
the horn sounds three times.
Press and hold
Lfor more than two seconds to
activate the panic alarm. The turn signal lamps flash
and the horn sounds repeatedly for 30 seconds.
The alarm turns off when the ignition is moved to
ON/RUN or
Lis pressed again. The ignition must
be in LOCK/OFF for the panic alarm to work.
The vehicle comes with two transmitters. Each
transmitter will have a number on it, “1”or“2”. These
numbers correspond to the driver of the vehicle. For
example, the memory seat position for driver 1 will
be recalled when using the transmitter labeled “1”,
if enabled through the DIC. See Memory Seat,
Mirrors, and Pedals
on page 2‑10and DIC Vehicle
Customization (With DIC Buttons)on page 4‑71for
more information.
Programming Transmitters to the
Vehicle
Only RKE transmitters programmed to this vehicle will
work. If a transmitter is lost or stolen, a replacement can
be purchased and programmed through your dealer.
When the replacement transmitter is programmed to
this vehicle, all remaining transmitters must also be
reprogrammed. Any lost or stolen transmitters will no
longer work once the new transmitter is programmed.
The vehicle can have a maximum of eight transmitters
programmed to it. See “Relearn Remote Key” under
DIC Operation and Displays (With DIC Buttons)
on
page 4‑47or DIC Operation and Displays (Without DIC
Buttons)on page 4‑55for instructions on how to
program RKE transmitters to the vehicle.
Battery Replacement
Replace the battery if the REPLACE BATTERY IN
REMOTE KEY message displays in the DIC. See
“REPLACE BATTERY IN REMOTE KEY” underDIC
Warnings and Messages
on page 4‑61for additional
information.
Notice: When replacing the battery, do not touch
any of the circuitry on the transmitter. Static from
your body could damage the transmitter.
3-6
Page 148 of 608
Do not use the remote start feature if your vehicle is low
on fuel. Your vehicle may run out of fuel.
If your vehicle has the remote start feature, the RKE
transmitter functions will have an increased range of
operation. However, the range may be less while the
vehicle is running.
There are other conditions which can affect the
performance of the transmitter, seeRemote Keyless
Entry (RKE) System
on page 3‑4for additional
information.
/ (Remote Start): This button will be on the RKE
transmitter if you have remote start.
To start the vehicle using the remote start feature:
1. Aim the transmitter at the vehicle.
2. Press and release the transmitter's lock button. The vehicle's doors will lock. Immediately press
and hold the transmitter's remote start button until
the turn signal lights flash. If you cannot see the
vehicle's lights, press and hold the remote start
button for two to four seconds. Pressing the remote
start button again after the vehicle has started will
turn the engine off. When the vehicle starts, the parking lamps will turn
on and remain on while the vehicle is running.
If the vehicle is left running it will automatically shut
off after 10 minutes unless a time extension has
been done.
3. If it is the first remote start since the vehicle has been driven, repeat these steps, while the engine
is still running, to extend the engine running time
by 10 minutes. Remote start can be extended
one time.
After entering the vehicle during a remote start, insert
and turn the key to RUN to drive the vehicle.
To manually shut off a remote start, do any of the
following:
.Aim the RKE transmitter at the vehicle and press
the remote start button until the parking lamps
turn off.
.Turn on the hazard warning flashers.
.Turn the ignition switch on and then off.
3-8
Page 151 of 608
Delayed Locking
When locking the doors with the power lock switch
and a door or the liftgate is open, the doors will lock
five seconds after the last door is closed. You will hear
three chimes to signal that the delayed locking feature
is in use.
Pressing the power lock switch twice will override the
delayed locking feature and immediately lock all the
doors.
This feature will not operate if the key is in the ignition.
You can program this feature using the Driver
Information Center (DIC). See DELAY DOOR LOCK
underDIC Vehicle Customization (With DIC Buttons)
on
page 4‑71.
Programmable Automatic Door
Locks
Vehicles with an automatic lock/unlock feature enable
you to program the vehicle's power door locks. You can
program this feature through the Driver Information
Center (DIC). See DIC Vehicle Customization (With DIC
Buttons)
on page 4‑71for more information on DIC
programming.
Rear Door Security Locks
Your vehicle has rear door security locks. These
prevent passengers from opening the rear doors from
the inside.
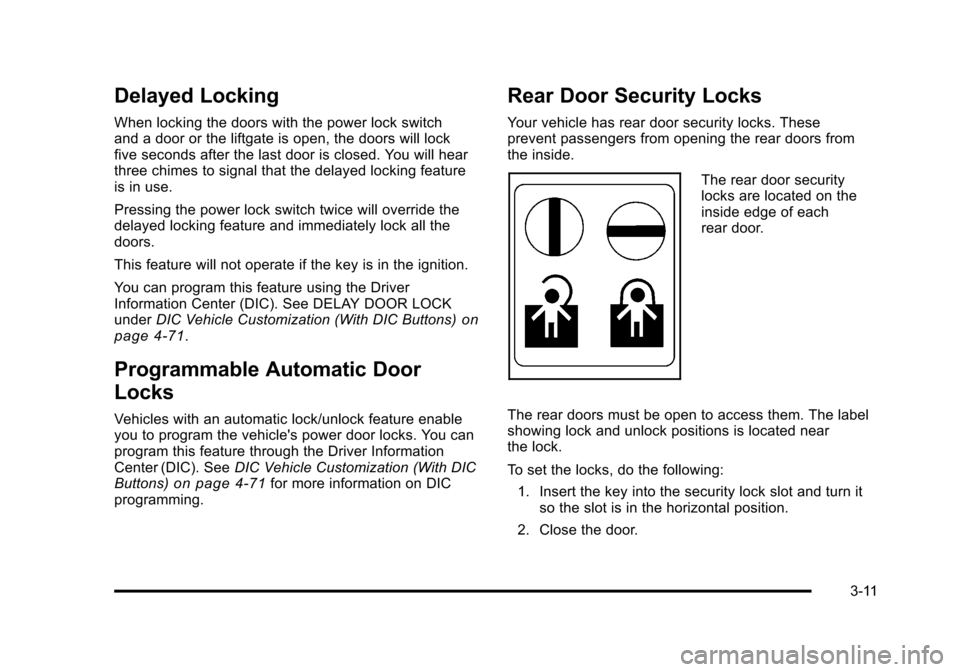
The rear door security
locks are located on the
inside edge of each
rear door.
The rear doors must be open to access them. The label
showing lock and unlock positions is located near
the lock.
To set the locks, do the following: 1. Insert the key into the security lock slot and turn it so the slot is in the horizontal position.
2. Close the door.
3-11
Page 193 of 608
Outside Towing Mirrors
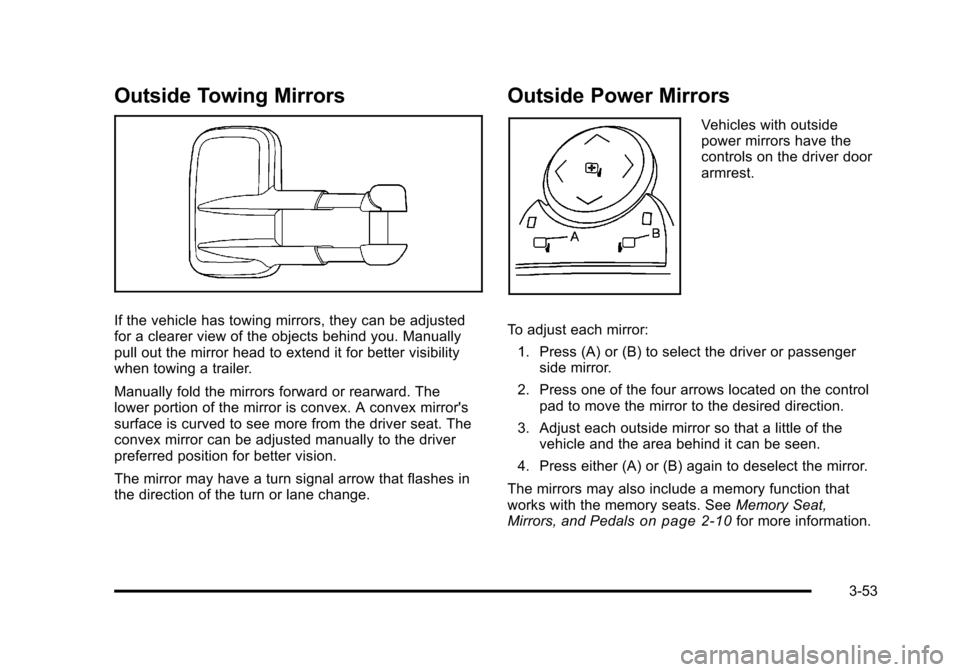
If the vehicle has towing mirrors, they can be adjusted
for a clearer view of the objects behind you. Manually
pull out the mirror head to extend it for better visibility
when towing a trailer.
Manually fold the mirrors forward or rearward. The
lower portion of the mirror is convex. A convex mirror's
surface is curved to see more from the driver seat. The
convex mirror can be adjusted manually to the driver
preferred position for better vision.
The mirror may have a turn signal arrow that flashes in
the direction of the turn or lane change.
Outside Power Mirrors
Vehicles with outside
power mirrors have the
controls on the driver door
armrest.
To adjust each mirror: 1. Press (A) or (B) to select the driver or passenger side mirror.
2. Press one of the four arrows located on the control pad to move the mirror to the desired direction.
3. Adjust each outside mirror so that a little of the vehicle and the area behind it can be seen.
4. Press either (A) or (B) again to deselect the mirror.
The mirrors may also include a memory function that
works with the memory seats. See Memory Seat,
Mirrors, and Pedals
on page 2‑10for more information.
3-53
Page 194 of 608
Manually fold the mirrors inward to prevent damage
when going through an automatic car wash. To fold,
push the mirror toward the vehicle. Push the mirror
outward, to return to its original position.
Outside Power Foldaway Mirrors
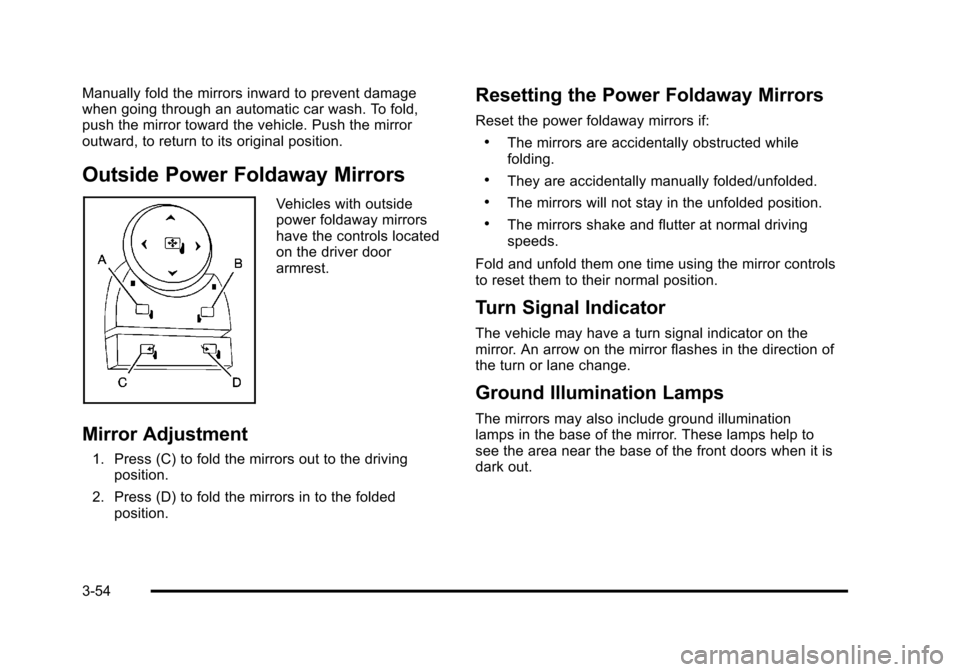
Vehicles with outside
power foldaway mirrors
have the controls located
on the driver door
armrest.
Mirror Adjustment
1. Press (C) to fold the mirrors out to the drivingposition.
2. Press (D) to fold the mirrors in to the folded position.
Resetting the Power Foldaway Mirrors
Reset the power foldaway mirrors if:
.The mirrors are accidentally obstructed while
folding.
.They are accidentally manually folded/unfolded.
.The mirrors will not stay in the unfolded position.
.The mirrors shake and flutter at normal driving
speeds.
Fold and unfold them one time using the mirror controls
to reset them to their normal position.
Turn Signal Indicator
The vehicle may have a turn signal indicator on the
mirror. An arrow on the mirror flashes in the direction of
the turn or lane change.
Ground Illumination Lamps
The mirrors may also include ground illumination
lamps in the base of the mirror. These lamps help to
see the area near the base of the front doors when it is
dark out.
3-54
Page 198 of 608
PARK ASST BLOCKED SEE OWNERS MANUAL:
This message can occur under the following conditions:
.The ultrasonic sensors are not clean. Keep the
vehicle's rear bumper free of mud, dirt, snow, ice
and slush. For cleaning instructions, seeWashing
Your Vehicle on page 6‑111.
.The park assist sensors are covered by frost or
ice. Frost or ice can form around and behind the
sensors and may not always be seen; this can
occur after washing the vehicle in cold weather.
The message may not clear until the frost or ice
has melted.
.A trailer was attached to the vehicle, or a bicycle
or an object was hanging out of the liftgate during
the last drive cycle. Once the attached object is
removed, URPA will return to normal operation.
.A tow bar is attached to the vehicle.
.The vehicle's bumper is damaged. Take the vehicle
to your dealer to repair the system.
.Other conditions may affect system performance,
such as vibrations from a jackhammer or the
compression of air brakes on a very large truck.
If the system is still disabled, after driving forward at
least 40 km/h (25 mph), take the vehicle to your dealer.
Side Blind Zone Alert (SBZA)
The vehicle may have a Side Blind Zone Alert (SBZA)
system. Read this entire section before using the
system.
{WARNING:
SBZA is only a lane changing aid and does not
replace driver vision. SBZA does not detect:
.Vehicles outside the side blind zones which
may be rapidly approaching.
.Pedestrians, bicyclists, or animals.
Failure to use proper care when changing lanes
may result in damage to the vehicle, injury,
or death. Always check the outside and rearview
mirrors, glance over your shoulder, and use the
turn signal before changing lanes.
When the system detects a vehicle in the side blind
zone, amber SBZA displays light up in the side mirrors.
This indicates that it may be unsafe to change lanes.
3-58
Page 199 of 608
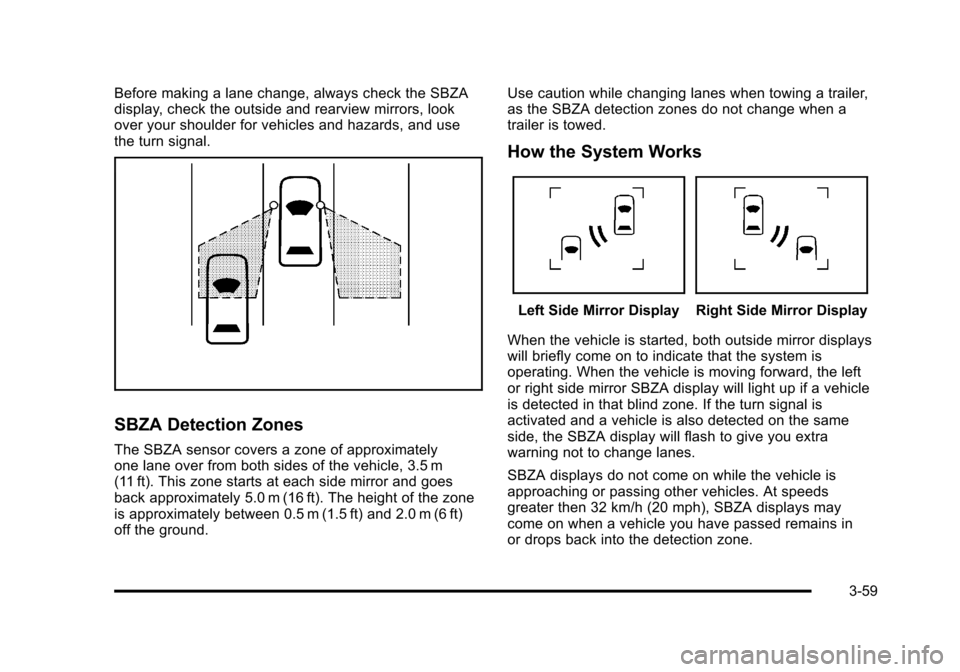
Before making a lane change, always check the SBZA
display, check the outside and rearview mirrors, look
over your shoulder for vehicles and hazards, and use
the turn signal.
SBZA Detection Zones
The SBZA sensor covers a zone of approximately
one lane over from both sides of the vehicle, 3.5 m
(11 ft). This zone starts at each side mirror and goes
back approximately 5.0 m (16 ft). The height of the zone
is approximately between 0.5 m (1.5 ft) and 2.0 m (6 ft)
off the ground.Use caution while changing lanes when towing a trailer,
as the SBZA detection zones do not change when a
trailer is towed.
How the System Works
Left Side Mirror DisplayRight Side Mirror Display
When the vehicle is started, both outside mirror displays
will briefly come on to indicate that the system is
operating. When the vehicle is moving forward, the left
or right side mirror SBZA display will light up if a vehicle
is detected in that blind zone. If the turn signal is
activated and a vehicle is also detected on the same
side, the SBZA display will flash to give you extra
warning not to change lanes.
SBZA displays do not come on while the vehicle is
approaching or passing other vehicles. At speeds
greater then 32 km/h (20 mph), SBZA displays may
come on when a vehicle you have passed remains in
or drops back into the detection zone.
3-59