clock CHEVROLET TAHOE 2015 4.G User Guide
[x] Cancel search | Manufacturer: CHEVROLET, Model Year: 2015, Model line: TAHOE, Model: CHEVROLET TAHOE 2015 4.GPages: 495, PDF Size: 6.56 MB
Page 357 of 495
Black plate (18,1)Chevrolet 2015i Tahoe/Suburban Owner Manual (GMNA-Localizing-U.S./
Canada/Mexico-8431502) - 2015 - crc - 1/12/15
10-18 Vehicle Care
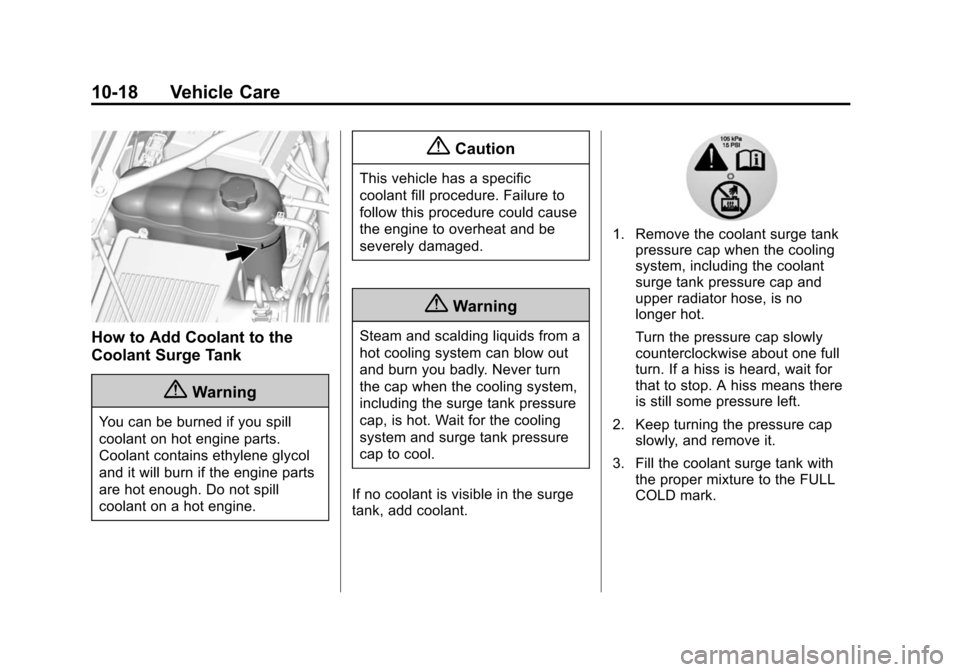
How to Add Coolant to the
Coolant Surge Tank
{Warning
You can be burned if you spill
coolant on hot engine parts.
Coolant contains ethylene glycol
and it will burn if the engine parts
are hot enough. Do not spill
coolant on a hot engine.
{Caution
This vehicle has a specific
coolant fill procedure. Failure to
follow this procedure could cause
the engine to overheat and be
severely damaged.
{Warning
Steam and scalding liquids from a
hot cooling system can blow out
and burn you badly. Never turn
the cap when the cooling system,
including the surge tank pressure
cap, is hot. Wait for the cooling
system and surge tank pressure
cap to cool.
If no coolant is visible in the surge
tank, add coolant.
1. Remove the coolant surge tank pressure cap when the cooling
system, including the coolant
surge tank pressure cap and
upper radiator hose, is no
longer hot.
Turn the pressure cap slowly
counterclockwise about one full
turn. If a hiss is heard, wait for
that to stop. A hiss means there
is still some pressure left.
2. Keep turning the pressure cap slowly, and remove it.
3. Fill the coolant surge tank with the proper mixture to the FULL
COLD mark.
Page 371 of 495
Black plate (32,1)Chevrolet 2015i Tahoe/Suburban Owner Manual (GMNA-Localizing-U.S./
Canada/Mexico-8431502) - 2015 - crc - 1/12/15
10-32 Vehicle Care
2. Remove the headlamp bulbassembly cover by turning it
counterclockwise.
3. Turn the bulb socket counterclockwise to remove it
from the headlamp assembly
and pull it straight out.
4. Unplug the electrical connector from the old bulb by releasing
the clip on the bulb socket.
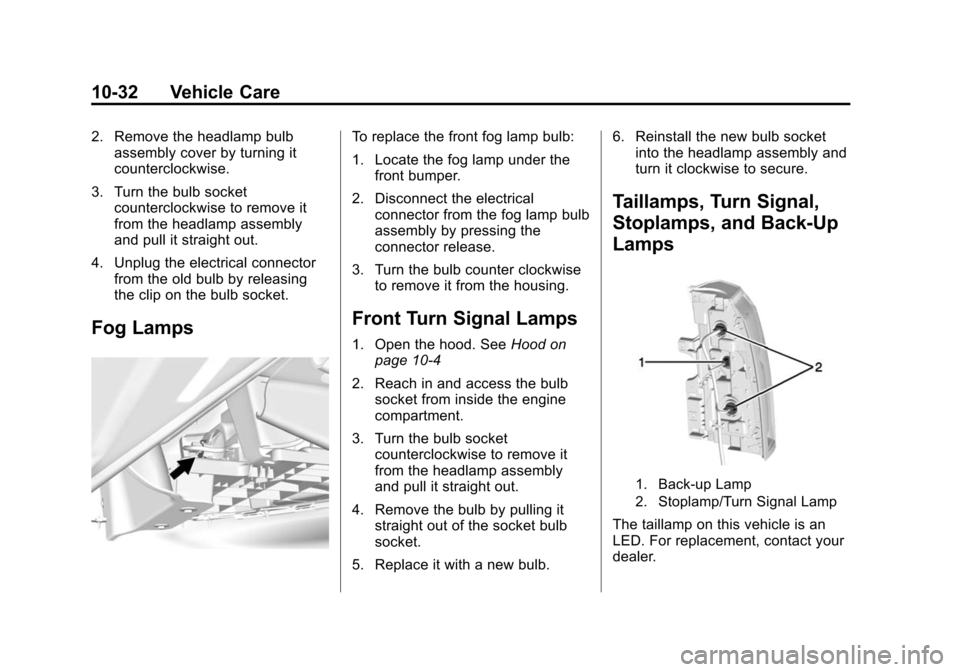
Fog Lamps
To replace the front fog lamp bulb:
1. Locate the fog lamp under the
front bumper.
2. Disconnect the electrical connector from the fog lamp bulb
assembly by pressing the
connector release.
3. Turn the bulb counter clockwise to remove it from the housing.
Front Turn Signal Lamps
1. Open the hood. See Hood on
page 10-4
2. Reach in and access the bulb socket from inside the engine
compartment.
3. Turn the bulb socket counterclockwise to remove it
from the headlamp assembly
and pull it straight out.
4. Remove the bulb by pulling it straight out of the socket bulb
socket.
5. Replace it with a new bulb. 6. Reinstall the new bulb socket
into the headlamp assembly and
turn it clockwise to secure.
Taillamps, Turn Signal,
Stoplamps, and Back-Up
Lamps
1. Back-up Lamp
2. Stoplamp/Turn Signal Lamp
The taillamp on this vehicle is an
LED. For replacement, contact your
dealer.
Page 372 of 495
Black plate (33,1)Chevrolet 2015i Tahoe/Suburban Owner Manual (GMNA-Localizing-U.S./
Canada/Mexico-8431502) - 2015 - crc - 1/12/15
Vehicle Care 10-33
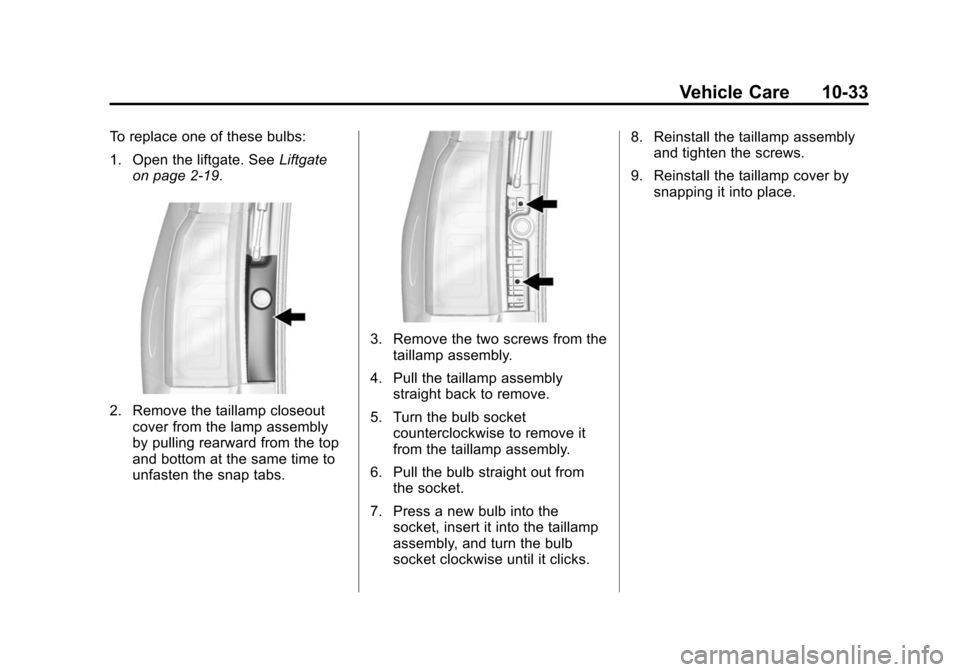
To replace one of these bulbs:
1. Open the liftgate. SeeLiftgate
on page 2-19.
2. Remove the taillamp closeout cover from the lamp assembly
by pulling rearward from the top
and bottom at the same time to
unfasten the snap tabs.
3. Remove the two screws from thetaillamp assembly.
4. Pull the taillamp assembly straight back to remove.
5. Turn the bulb socket counterclockwise to remove it
from the taillamp assembly.
6. Pull the bulb straight out from the socket.
7. Press a new bulb into the socket, insert it into the taillamp
assembly, and turn the bulb
socket clockwise until it clicks. 8. Reinstall the taillamp assembly
and tighten the screws.
9. Reinstall the taillamp cover by snapping it into place.
Page 373 of 495
Black plate (34,1)Chevrolet 2015i Tahoe/Suburban Owner Manual (GMNA-Localizing-U.S./
Canada/Mexico-8431502) - 2015 - crc - 1/12/15
10-34 Vehicle Care
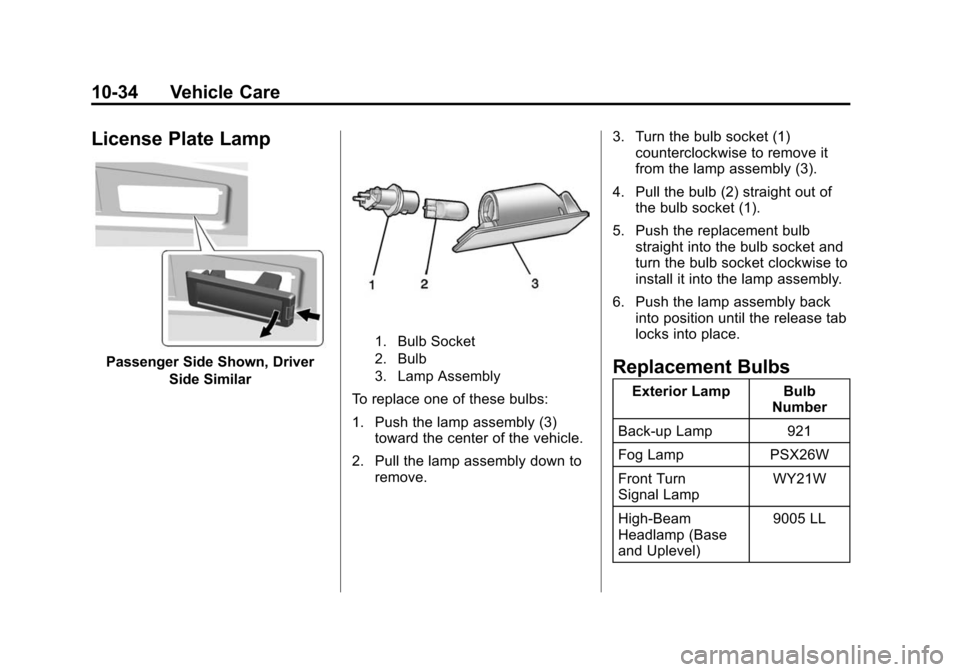
License Plate Lamp
Passenger Side Shown, DriverSide Similar
1. Bulb Socket
2. Bulb
3. Lamp Assembly
To replace one of these bulbs:
1. Push the lamp assembly (3)toward the center of the vehicle.
2. Pull the lamp assembly down to remove. 3. Turn the bulb socket (1)
counterclockwise to remove it
from the lamp assembly (3).
4. Pull the bulb (2) straight out of the bulb socket (1).
5. Push the replacement bulb straight into the bulb socket and
turn the bulb socket clockwise to
install it into the lamp assembly.
6. Push the lamp assembly back into position until the release tab
locks into place.
Replacement Bulbs
Exterior Lamp Bulb Number
Back-up Lamp 921
Fog Lamp PSX26W
Front Turn
Signal Lamp WY21W
High-Beam
Headlamp (Base
and Uplevel) 9005 LL
Page 409 of 495
Black plate (70,1)Chevrolet 2015i Tahoe/Suburban Owner Manual (GMNA-Localizing-U.S./
Canada/Mexico-8431502) - 2015 - crc - 1/12/15
10-70 Vehicle Care
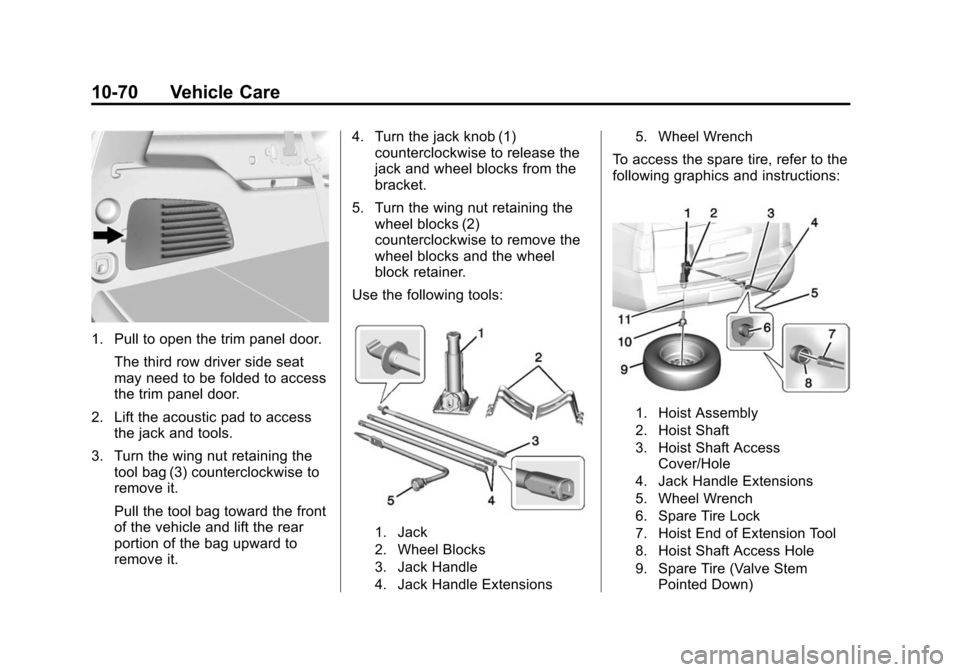
1. Pull to open the trim panel door.The third row driver side seat
may need to be folded to access
the trim panel door.
2. Lift the acoustic pad to access the jack and tools.
3. Turn the wing nut retaining the tool bag (3) counterclockwise to
remove it.
Pull the tool bag toward the front
of the vehicle and lift the rear
portion of the bag upward to
remove it. 4. Turn the jack knob (1)
counterclockwise to release the
jack and wheel blocks from the
bracket.
5. Turn the wing nut retaining the wheel blocks (2)
counterclockwise to remove the
wheel blocks and the wheel
block retainer.
Use the following tools:
1. Jack
2. Wheel Blocks
3. Jack Handle
4. Jack Handle Extensions 5. Wheel Wrench
To access the spare tire, refer to the
following graphics and instructions:
1. Hoist Assembly
2. Hoist Shaft
3. Hoist Shaft Access
Cover/Hole
4. Jack Handle Extensions
5. Wheel Wrench
6. Spare Tire Lock
7. Hoist End of Extension Tool
8. Hoist Shaft Access Hole
9. Spare Tire (Valve Stem Pointed Down)
Page 410 of 495
Black plate (71,1)Chevrolet 2015i Tahoe/Suburban Owner Manual (GMNA-Localizing-U.S./
Canada/Mexico-8431502) - 2015 - crc - 1/12/15
Vehicle Care 10-71
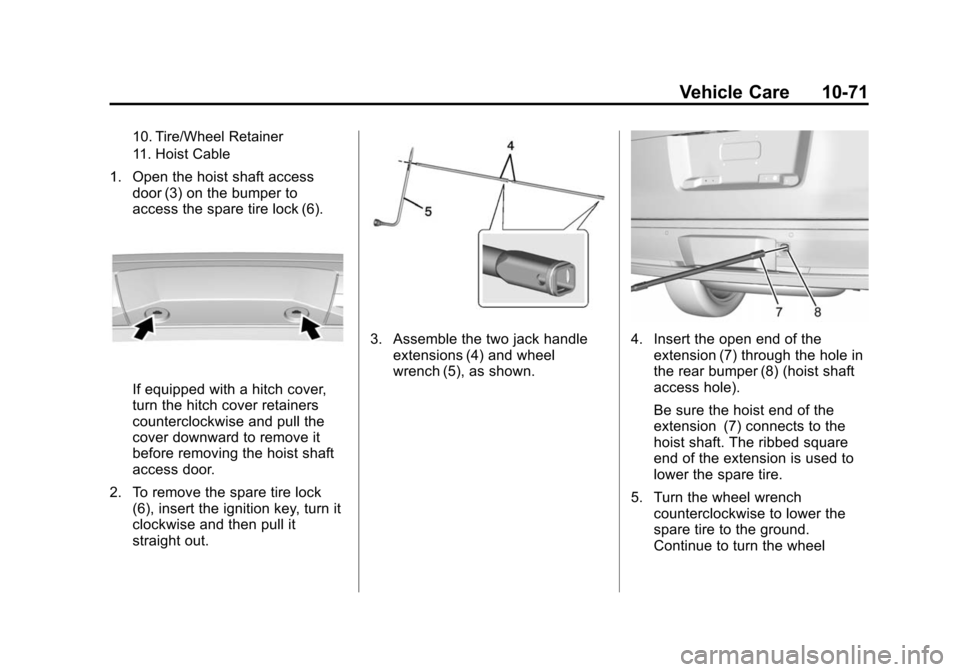
10. Tire/Wheel Retainer
11. Hoist Cable
1. Open the hoist shaft accessdoor (3) on the bumper to
access the spare tire lock (6).
If equipped with a hitch cover,
turn the hitch cover retainers
counterclockwise and pull the
cover downward to remove it
before removing the hoist shaft
access door.
2. To remove the spare tire lock (6), insert the ignition key, turn it
clockwise and then pull it
straight out.
3. Assemble the two jack handleextensions (4) and wheel
wrench (5), as shown.4. Insert the open end of theextension (7) through the hole in
the rear bumper (8) (hoist shaft
access hole).
Be sure the hoist end of the
extension (7) connects to the
hoist shaft. The ribbed square
end of the extension is used to
lower the spare tire.
5. Turn the wheel wrench counterclockwise to lower the
spare tire to the ground.
Continue to turn the wheel
Page 411 of 495
Black plate (72,1)Chevrolet 2015i Tahoe/Suburban Owner Manual (GMNA-Localizing-U.S./
Canada/Mexico-8431502) - 2015 - crc - 1/12/15
10-72 Vehicle Care
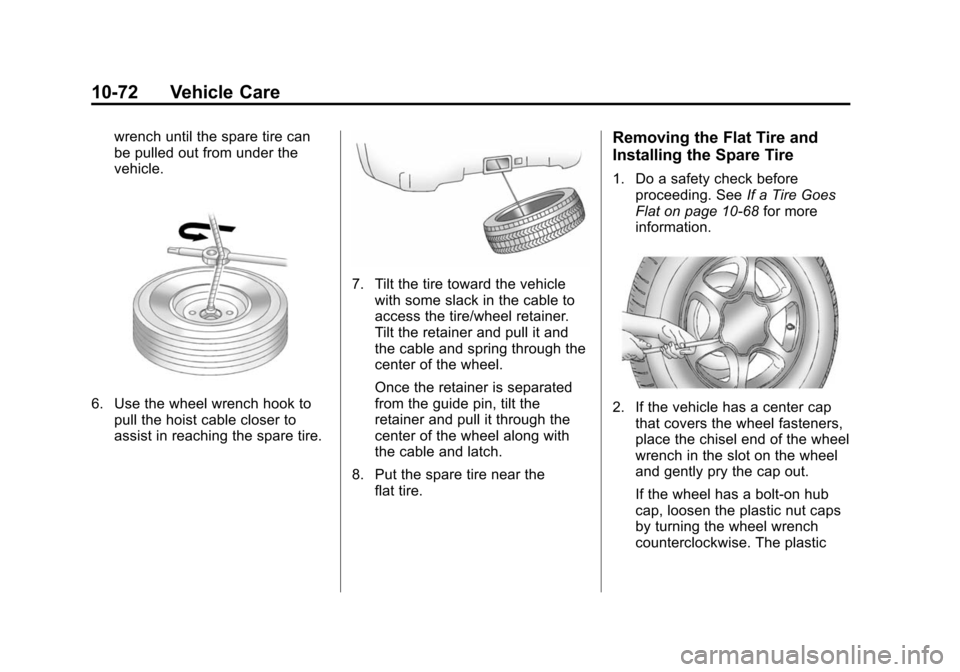
wrench until the spare tire can
be pulled out from under the
vehicle.
6. Use the wheel wrench hook topull the hoist cable closer to
assist in reaching the spare tire.
7. Tilt the tire toward the vehiclewith some slack in the cable to
access the tire/wheel retainer.
Tilt the retainer and pull it and
the cable and spring through the
center of the wheel.
Once the retainer is separated
from the guide pin, tilt the
retainer and pull it through the
center of the wheel along with
the cable and latch.
8. Put the spare tire near the flat tire.
Removing the Flat Tire and
Installing the Spare Tire
1. Do a safety check beforeproceeding. See If a Tire Goes
Flat on page 10-68 for more
information.
2. If the vehicle has a center cap that covers the wheel fasteners,
place the chisel end of the wheel
wrench in the slot on the wheel
and gently pry the cap out.
If the wheel has a bolt-on hub
cap, loosen the plastic nut caps
by turning the wheel wrench
counterclockwise. The plastic
Page 412 of 495
Black plate (73,1)Chevrolet 2015i Tahoe/Suburban Owner Manual (GMNA-Localizing-U.S./
Canada/Mexico-8431502) - 2015 - crc - 1/12/15
Vehicle Care 10-73
nut caps will be retained in the
hub cap after it is removed from
the wheel.
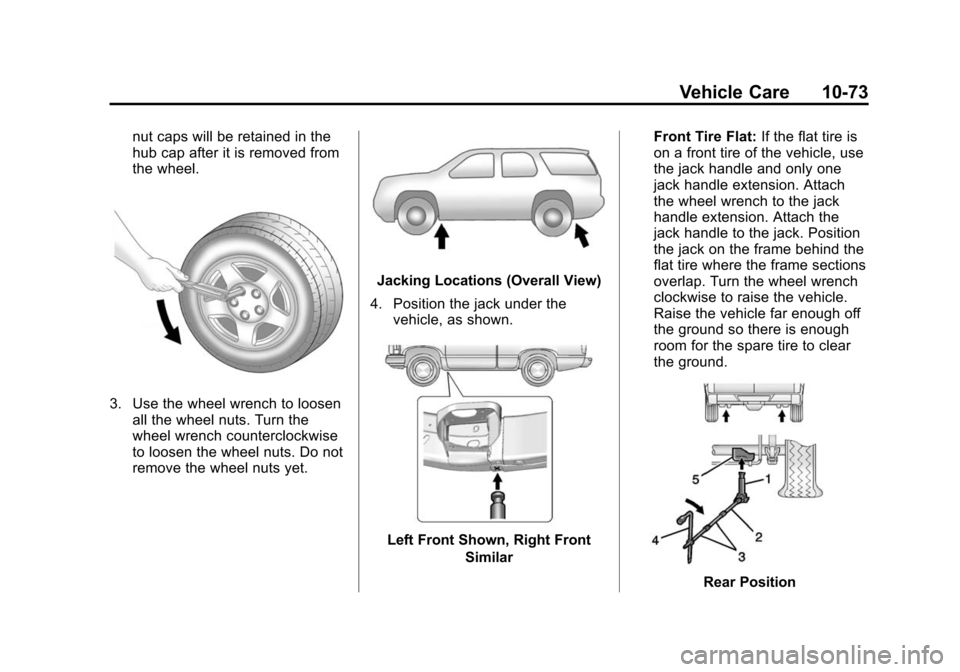
3. Use the wheel wrench to loosenall the wheel nuts. Turn the
wheel wrench counterclockwise
to loosen the wheel nuts. Do not
remove the wheel nuts yet.
Jacking Locations (Overall View)
4. Position the jack under the vehicle, as shown.
Left Front Shown, Right Front
Similar Front Tire Flat:
If the flat tire is
on a front tire of the vehicle, use
the jack handle and only one
jack handle extension. Attach
the wheel wrench to the jack
handle extension. Attach the
jack handle to the jack. Position
the jack on the frame behind the
flat tire where the frame sections
overlap. Turn the wheel wrench
clockwise to raise the vehicle.
Raise the vehicle far enough off
the ground so there is enough
room for the spare tire to clear
the ground.
Rear Position
Page 413 of 495
Black plate (74,1)Chevrolet 2015i Tahoe/Suburban Owner Manual (GMNA-Localizing-U.S./
Canada/Mexico-8431502) - 2015 - crc - 1/12/15
10-74 Vehicle Care
Rear Tire Flat:If the flat tire is
on a rear tire of the vehicle, use
the jack handle (2) and both jack
handle extensions (3). Attach the
wheel wrench (4) to the jack
handle extensions (3). Attach the
jack handle (2) to the jack (1).
Use the jacking pad (5) provided
on the rear axle. Turn the wheel
wrench (4) clockwise to raise the
vehicle. Raise the vehicle far
enough off the ground so there
is enough room for the spare tire
to clear the ground.
{Warning
Getting under a vehicle when it is
lifted on a jack is dangerous.
If the vehicle slips off the jack,
you could be badly injured or
killed. Never get under a vehicle
when it is supported only by
a jack.
{Warning
Raising the vehicle with the jack
improperly positioned can
damage the vehicle and even
make the vehicle fall. To help
avoid personal injury and vehicle
damage, be sure to fit the jack lift
head into the proper location
before raising the vehicle.
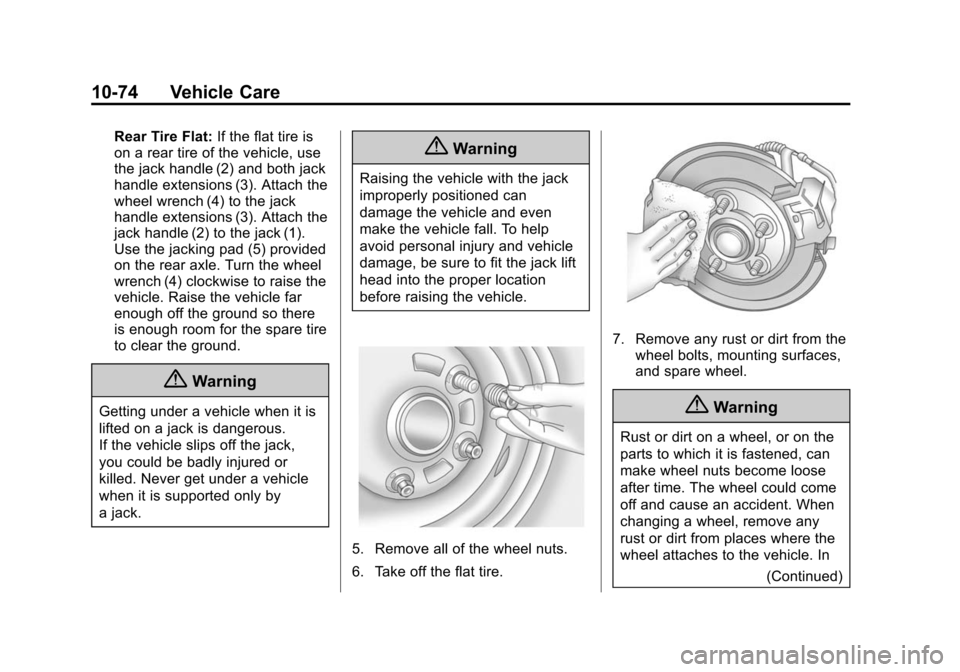
5. Remove all of the wheel nuts.
6. Take off the flat tire.
7. Remove any rust or dirt from the
wheel bolts, mounting surfaces,
and spare wheel.
{Warning
Rust or dirt on a wheel, or on the
parts to which it is fastened, can
make wheel nuts become loose
after time. The wheel could come
off and cause an accident. When
changing a wheel, remove any
rust or dirt from places where the
wheel attaches to the vehicle. In
(Continued)
Page 414 of 495
Black plate (75,1)Chevrolet 2015i Tahoe/Suburban Owner Manual (GMNA-Localizing-U.S./
Canada/Mexico-8431502) - 2015 - crc - 1/12/15
Vehicle Care 10-75
Warning (Continued)
an emergency, a cloth or a paper
towel can be used; however, use
a scraper or wire brush later to
remove all rust or dirt.
8. Put the wheel nuts back on with the rounded end of the nuts
toward the wheel after mounting
the spare tire.
{Warning
Never use oil or grease on bolts
or nuts because the nuts might
come loose. The vehicle's wheel
could fall off, causing a crash.
9. Tighten each wheel nut by hand. Then use the wheel wrench to
tighten the nuts until the wheel is
held against the hub. 10. Turn the wheel wrench
counterclockwise to lower the
vehicle. Lower the jack
completely.
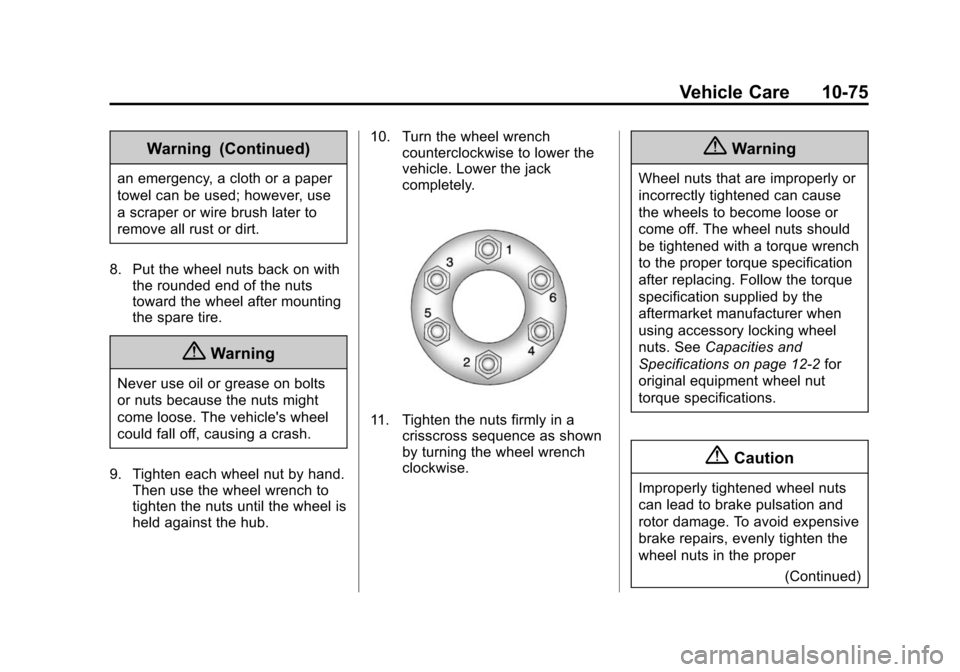
11. Tighten the nuts firmly in a
crisscross sequence as shown
by turning the wheel wrench
clockwise.
{Warning
Wheel nuts that are improperly or
incorrectly tightened can cause
the wheels to become loose or
come off. The wheel nuts should
be tightened with a torque wrench
to the proper torque specification
after replacing. Follow the torque
specification supplied by the
aftermarket manufacturer when
using accessory locking wheel
nuts. See Capacities and
Specifications on page 12-2 for
original equipment wheel nut
torque specifications.
{Caution
Improperly tightened wheel nuts
can lead to brake pulsation and
rotor damage. To avoid expensive
brake repairs, evenly tighten the
wheel nuts in the proper
(Continued)