brake CHEVROLET TAHOE 2023 Owners Manual
[x] Cancel search | Manufacturer: CHEVROLET, Model Year: 2023, Model line: TAHOE, Model: CHEVROLET TAHOE 2023Pages: 443, PDF Size: 18.73 MB
Page 325 of 443
Chevrolet Tahoe/Suburban Owner Manual (GMNA-Localizing-U.S./Canada/
Mexico-16416971) - 2023 - CRC - 4/26/22
324 Vehicle Care
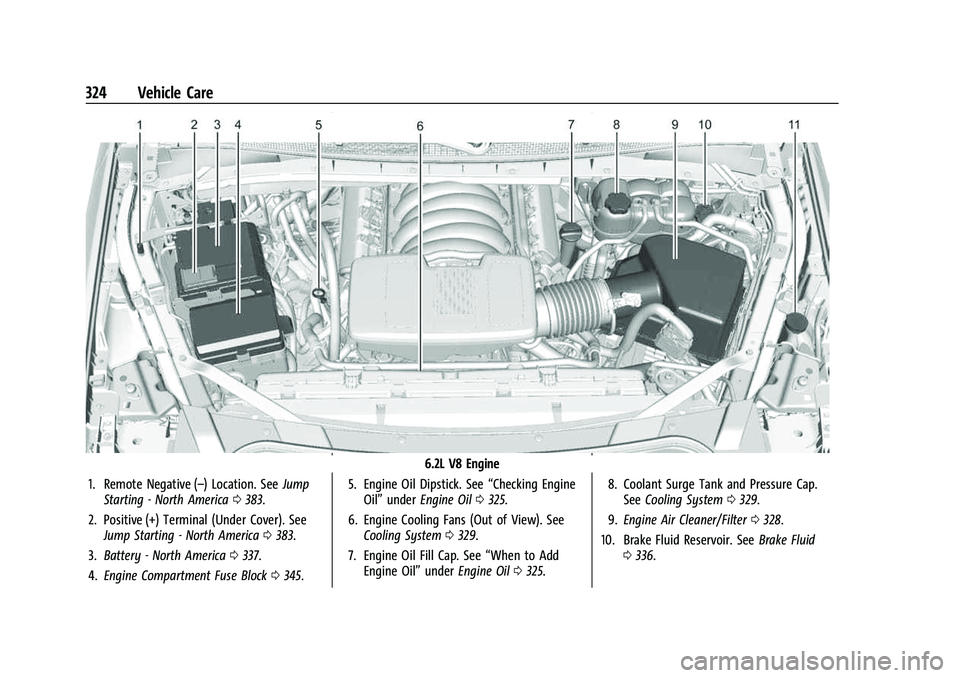
6.2L V8 Engine
1. Remote Negative (–) Location. See Jump
Starting - North America 0383.
2. Positive (+) Terminal (Under Cover). See Jump Starting - North America 0383.
3. Battery - North America 0337.
4. Engine Compartment Fuse Block 0345. 5. Engine Oil Dipstick. See
“Checking Engine
Oil” under Engine Oil 0325.
6. Engine Cooling Fans (Out of View). See Cooling System 0329.
7. Engine Oil Fill Cap. See “When to Add
Engine Oil” underEngine Oil 0325. 8. Coolant Surge Tank and Pressure Cap.
See Cooling System 0329.
9. Engine Air Cleaner/Filter 0328.
10. Brake Fluid Reservoir. See Brake Fluid
0 336.
Page 336 of 443
Chevrolet Tahoe/Suburban Owner Manual (GMNA-Localizing-U.S./Canada/
Mexico-16416971) - 2023 - CRC - 4/26/22
Vehicle Care 335
Brakes
Disc brake linings have built-in wear
indicators that make a high-pitched warning
sound when the brake linings are worn and
new linings are needed. The sound can come
and go or can be heard all the time when
the vehicle is moving, except when applying
the brake pedal firmly.
{Warning
The brake wear warning sound means
that soon the brakes will not work well.
That could lead to a crash. When the
brake wear warning sound is heard, have
the vehicle serviced.
Caution
Continuing to drive with worn-out brake
linings could result in costly brake
repairs.
Some driving conditions or climates can
cause a brake squeal when the brakes are
first applied, clearing up following several
applications. This does not mean something
is wrong with the brakes. Properly torqued wheel nuts are necessary
to help prevent brake pulsation. When tires
are rotated, inspect brake linings for wear
and evenly tighten wheel nuts in the proper
sequence to torque specifications. See
Capacities and Specifications
0408.
Brake pads should be replaced as complete
axle sets.
Brake Pedal Travel
See your dealer if the brake pedal does not
return to normal height, or if there is a
rapid increase in pedal travel. This could be
a sign that brake service may be required.
Replacing Brake System Parts
Always replace brake system parts with
new, approved replacement parts. If this is
not done, the brakes may not work
properly. The braking performance can
change in many ways if the wrong brake
parts are installed or if parts are improperly
installed.
Brake Pad Life System
When to Change Brake Pads
This vehicle has a system that estimates the
remaining life of the front and rear brake
pads. Brake pad life is displayed in the
Driver Information Center (DIC), along with
a percentage for each axle. The system must
be reset every time the brake pads are
changed.
When the system has determined that the
brake pads need to be replaced, a message
will display, which may include mileage
remaining.
Brake pads should always be replaced as
complete axle sets.
How to Reset the Brake Pad Life System
The system will automatically detect when
significantly worn brake pads are replaced.
When the ignition is turned on after new
pads and wear sensors are installed, a
message will display. Follow the prompts to
reset the system.
Page 337 of 443

Chevrolet Tahoe/Suburban Owner Manual (GMNA-Localizing-U.S./Canada/
Mexico-16416971) - 2023 - CRC - 4/26/22
336 Vehicle Care
The brake pad life system can also be
manually reset:1. Display Brake Pad Life on the DIC. See Driver Information Center (DIC) (Uplevel)
0126 orDriver Information Center (DIC)
(Base Level) 0123.
2. Select the Brake Pad Life menu.
3. Select front or rear pads as appropriate.
4. Select YES on the confirmation message. Repeat for pads on the other axle if they
were also replaced.
How to Disable the Brake Pad Life
System
The brake pad life system can be turned off.
This may be necessary if aftermarket brake
pads without wear sensors are installed.
When the system is turned off, the front
and rear brake pad life percentages will not
display. However, the built-in wear
indicators that make a high-pitched warning
sound when the brake pads are worn can
still determine when the pads should be
replaced. See Brakes0335. To turn off the brake pad life system:
1. Display Brake Pad Life on the DIC. See Driver Information Center (DIC) (Uplevel)
0126 orDriver Information Center (DIC)
(Base Level) 0123.
2. Select the Brake Pad Life menu.
3. Select DISABLE.
To turn the brake pad life system back on,
follow the above steps but select ENABLE in
Step 2.
Brake Fluid
The brake master cylinder reservoir is filled
with GM approved DOT 4 brake fluid as
indicated on the reservoir cap. See Engine
Compartment Overview 0322 for the
location of the reservoir. Checking Brake Fluid
With the vehicle in P (Park) on a level
surface, the brake fluid level should be
between the minimum and maximum marks
on the brake fluid reservoir.
There are only two reasons why the brake
fluid level in the reservoir may go down:
.Normal brake lining wear. When new
linings are installed, the fluid level goes
back up.
.A fluid leak in the brake hydraulic system.
Have the brake hydraulic system fixed.
With a leak, the brakes will not
work well.
Always clean the brake fluid reservoir cap
and the area around the cap before
removing it.
Do not top off the brake fluid. Adding fluid
does not correct a leak. If fluid is added
when the linings are worn, there will be too
much fluid when new brake linings are
installed. Add or remove fluid, as necessary,
only when work is done on the brake
hydraulic system.
Page 338 of 443
Chevrolet Tahoe/Suburban Owner Manual (GMNA-Localizing-U.S./Canada/
Mexico-16416971) - 2023 - CRC - 4/26/22
Vehicle Care 337
{Warning
If too much brake fluid is added, it can
spill on the engine and burn, if the
engine is hot enough. You or others could
be burned, and the vehicle could be
damaged. Add brake fluid only when
work is done on the brake hydraulic
system.
When the brake fluid falls to a low level,
the brake warning light comes on. See Brake
System Warning Light 0115.
Brake fluid absorbs water over time which
degrades the effectiveness of the brake fluid.
Replace brake fluid at the specified intervals
to prevent increased stopping distance. See
Maintenance Schedule 0400.
What to Add
Use only GM approved DOT 4 brake fluid
from a clean, sealed container. See
Recommended Fluids and Lubricants 0404.
{Warning
The wrong or contaminated brake fluid
could result in damage to the brake
system. This could result in the loss of
braking leading to a possible injury.
Always use the proper GM approved
brake fluid.
Caution
If brake fluid is spilled on the vehicle's
painted surfaces, the paint finish can be
damaged. Immediately wash off any
painted surface.
Battery - North America
The original equipment battery is
maintenance free. Do not remove the cap
and do not add fluid.
Refer to the replacement number shown on
the original battery label when a new
battery is needed. See Engine Compartment
Overview 0322 for battery location.
The vehicle has an Absorbent Glass Mat
(AGM) 12-volt battery. Installation of a
standard 12-volt battery will result in
reduced 12-volt battery life. When using a 12-volt battery charger on the
12-volt AGM battery, some chargers have an
AGM battery setting on the charger.
If available, use the AGM setting on the
charger, to limit charge voltage to 14.8 volts.
Follow the charger manufacturer's
instructions.
Stop/Start System
This vehicle has a Stop/Start system to shut
off the engine to help conserve fuel. See
Stop/Start System
0211.
{Warning
WARNING: Battery posts, terminals and
related accessories can expose you to
chemicals including lead and lead
compounds, which are known to the
State of California to cause cancer and
birth defects or other reproductive harm.
Wash hands after handling. For more
information go to
www.P65Warnings.ca.gov.
See California Proposition 65 Warning 01.
Page 340 of 443
Chevrolet Tahoe/Suburban Owner Manual (GMNA-Localizing-U.S./Canada/
Mexico-16416971) - 2023 - CRC - 4/26/22
Vehicle Care 339
indicate a problem. Have it inspected and
repaired. This service can be complex. See
your dealer.
Do not directly power wash the transfer
case and/or front/rear axle output seals.
High pressure water can overcome the seals
and contaminate the fluid. Contaminated
fluid will decrease the life of the transfer
case and/or drive axles and should be
replaced.
Park Brake and P (Park)
Mechanism Check
{Warning
When you are doing this check, the
vehicle could begin to move. You or
others could be injured and property
could be damaged. Make sure there is
room in front of the vehicle in case it
begins to roll. Be ready to apply the
regular brake at once should the vehicle
begin to move.
Park on a fairly steep hill, with the vehicle
facing downhill. Keeping your foot on the
regular brake, set the parking brake.
.To check the parking brake's holding
ability: With the engine running and the
transmission in N (Neutral), slowly remove
foot pressure from the regular brake
pedal. Do this until the vehicle is held by
the parking brake only.
.To check the P (Park) mechanism's holding
ability: With the engine running, shift to
P (Park). Then release the parking brake
followed by the regular brake.
Contact your dealer if service is required.
Wiper Blade Replacement
Windshield wiper blades should be inspected
for wear or cracking.
For the proper type and size, see
Maintenance Replacement Parts 0405.
Caution
Allowing the wiper arm to touch the
windshield when no wiper blade is
installed could damage the windshield.
Any damage that occurs would not be
covered by the vehicle warranty. Do not
allow the wiper arm to touch the
windshield.
Front Wiper Blade Replacement
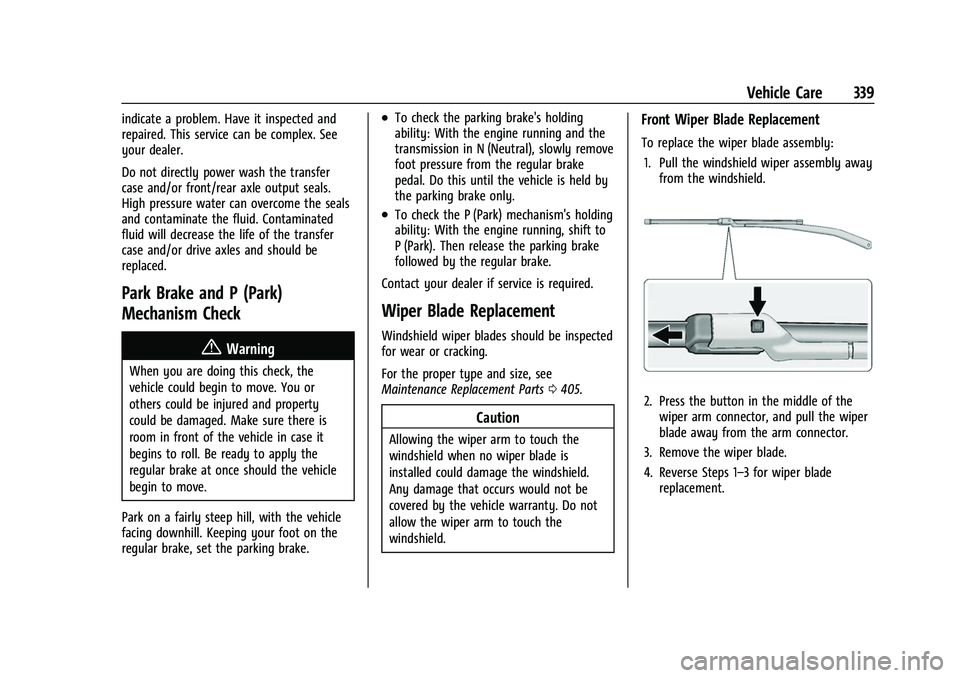
To replace the wiper blade assembly:
1. Pull the windshield wiper assembly away from the windshield.
2. Press the button in the middle of thewiper arm connector, and pull the wiper
blade away from the arm connector.
3. Remove the wiper blade.
4. Reverse Steps 1–3 for wiper blade replacement.
Page 348 of 443
Chevrolet Tahoe/Suburban Owner Manual (GMNA-Localizing-U.S./Canada/
Mexico-16416971) - 2023 - CRC - 4/26/22
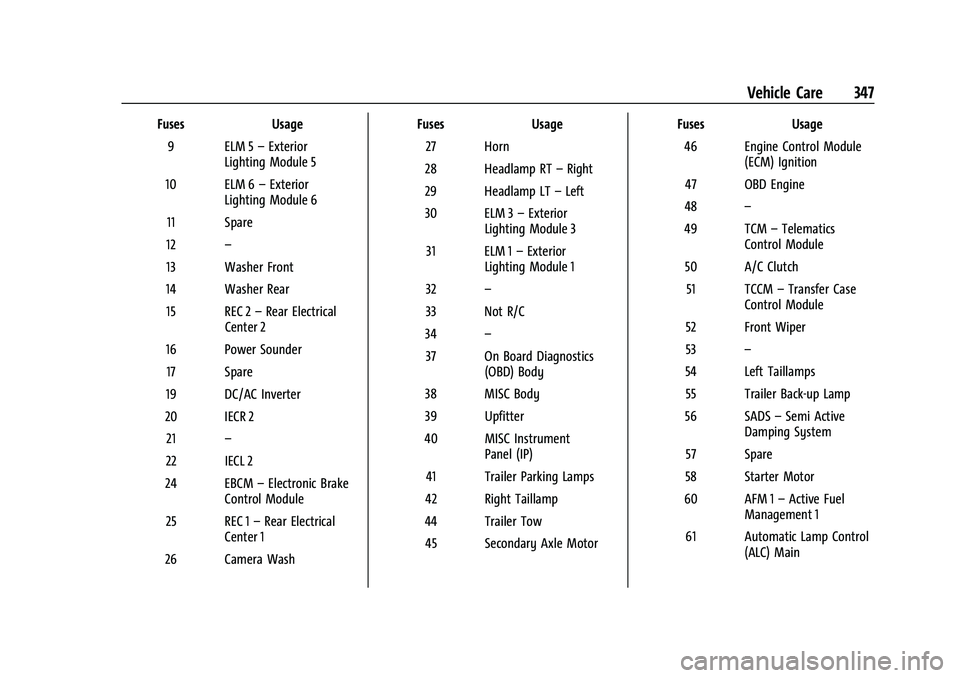
Vehicle Care 347
FusesUsage
9 ELM 5 –Exterior
Lighting Module 5
10 ELM 6 –Exterior
Lighting Module 6
11 Spare
12 –
13 Washer Front
14 Washer Rear 15 REC 2 –Rear Electrical
Center 2
16 Power Sounder 17 Spare
19 DC/AC Inverter
20 IECR 2 21 –
22 IECL 2
24 EBCM –Electronic Brake
Control Module
25 REC 1 –Rear Electrical
Center 1
26 Camera Wash Fuses
Usage
27 Horn
28 Headlamp RT –Right
29 Headlamp LT –Left
30 ELM 3 –Exterior
Lighting Module 3
31 ELM 1 –Exterior
Lighting Module 1
32 –
33 Not R/C
34 –
37 On Board Diagnostics (OBD) Body
38 MISC Body
39 Upfitter
40 MISC Instrument Panel (IP)
41 Trailer Parking Lamps
42 Right Taillamp
44 Trailer Tow 45 Secondary Axle Motor Fuses
Usage
46 Engine Control Module (ECM) Ignition
47 OBD Engine
48 –
49 TCM –Telematics
Control Module
50 A/C Clutch 51 TCCM –Transfer Case
Control Module
52 Front Wiper
53 –
54 Left Taillamps 55 Trailer Back-up Lamp
56 SADS –Semi Active
Damping System
57 Spare
58 Starter Motor
60 AFM 1 –Active Fuel
Management 1
61 Automatic Lamp Control (ALC) Main
Page 349 of 443
Chevrolet Tahoe/Suburban Owner Manual (GMNA-Localizing-U.S./Canada/
Mexico-16416971) - 2023 - CRC - 4/26/22
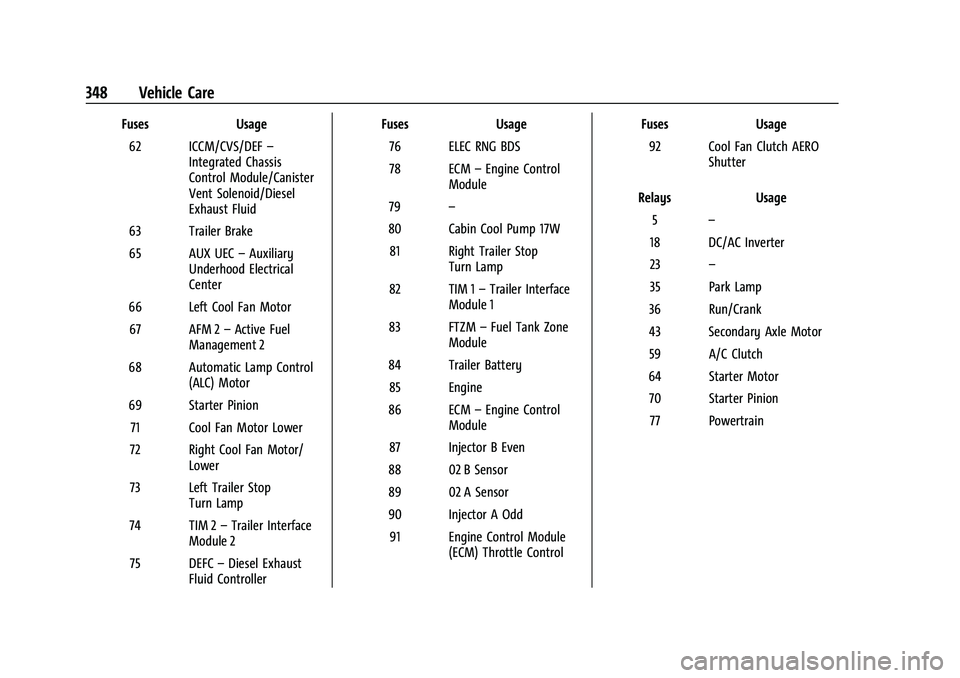
348 Vehicle Care
FusesUsage
62 ICCM/CVS/DEF –
Integrated Chassis
Control Module/Canister
Vent Solenoid/Diesel
Exhaust Fluid
63 Trailer Brake
65 AUX UEC –Auxiliary
Underhood Electrical
Center
66 Left Cool Fan Motor 67 AFM 2 –Active Fuel
Management 2
68 Automatic Lamp Control (ALC) Motor
69 Starter Pinion 71 Cool Fan Motor Lower
72 Right Cool Fan Motor/ Lower
73 Left Trailer Stop Turn Lamp
74 TIM 2 –Trailer Interface
Module 2
75 DEFC –Diesel Exhaust
Fluid Controller Fuses
Usage
76 ELEC RNG BDS
78 ECM –Engine Control
Module
79 –
80 Cabin Cool Pump 17W 81 Right Trailer Stop Turn Lamp
82 TIM 1 –Trailer Interface
Module 1
83 FTZM –Fuel Tank Zone
Module
84 Trailer Battery 85 Engine
86 ECM –Engine Control
Module
87 Injector B Even
88 02 B Sensor
89 02 A Sensor
90 Injector A Odd 91 Engine Control Module (ECM) Throttle Control Fuses
Usage
92 Cool Fan Clutch AERO Shutter
Relays Usage
5 –
18 DC/AC Inverter
23 –
35 Park Lamp
36 Run/Crank
43 Secondary Axle Motor
59 A/C Clutch
64 Starter Motor 70 Starter Pinion 77 Powertrain
Page 351 of 443
Chevrolet Tahoe/Suburban Owner Manual (GMNA-Localizing-U.S./Canada/
Mexico-16416971) - 2023 - CRC - 4/26/22
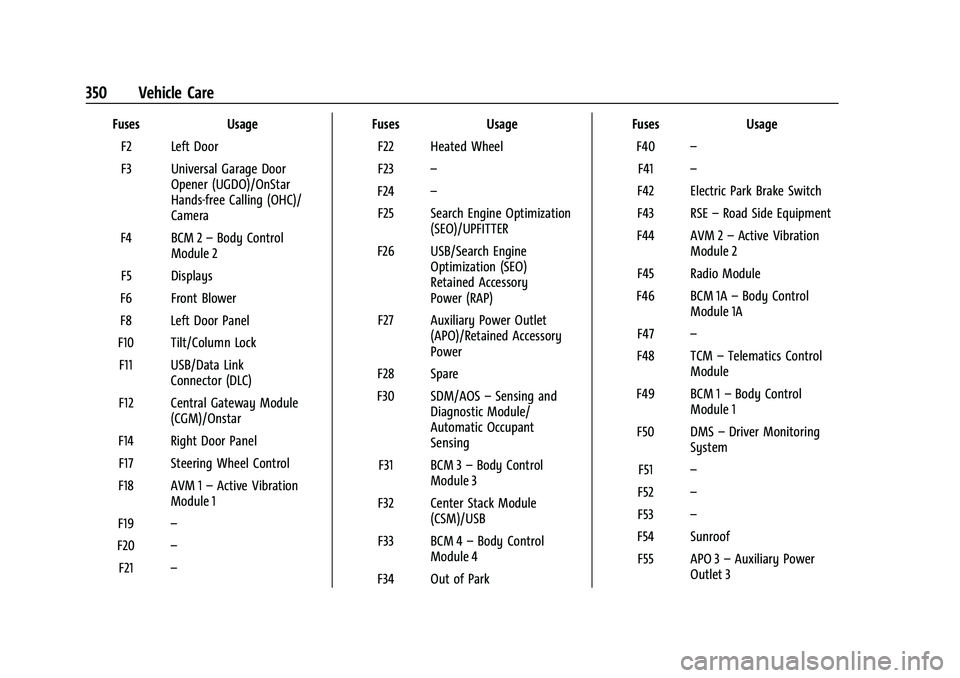
350 Vehicle Care
FusesUsage
F2 Left Door
F3 Universal Garage Door Opener (UGDO)/OnStar
Hands-free Calling (OHC)/
Camera
F4 BCM 2 –Body Control
Module 2
F5 Displays
F6 Front Blower
F8 Left Door Panel
F10 Tilt/Column Lock F11 USB/Data Link Connector (DLC)
F12 Central Gateway Module (CGM)/Onstar
F14 Right Door Panel F17 Steering Wheel Control
F18 AVM 1 –Active Vibration
Module 1
F19 –
F20 –
F21 – Fuses
Usage
F22 Heated Wheel
F23 –
F24 –
F25 Search Engine Optimization (SEO)/UPFITTER
F26 USB/Search Engine Optimization (SEO)
Retained Accessory
Power (RAP)
F27 Auxiliary Power Outlet (APO)/Retained Accessory
Power
F28 Spare
F30 SDM/AOS –Sensing and
Diagnostic Module/
Automatic Occupant
Sensing
F31 BCM 3 –Body Control
Module 3
F32 Center Stack Module (CSM)/USB
F33 BCM 4 –Body Control
Module 4
F34 Out of Park Fuses
Usage
F40 –
F41 –
F42 Electric Park Brake Switch
F43 RSE –Road Side Equipment
F44 AVM 2 –Active Vibration
Module 2
F45 Radio Module
F46 BCM 1A –Body Control
Module 1A
F47 –
F48 TCM –Telematics Control
Module
F49 BCM 1 –Body Control
Module 1
F50 DMS –Driver Monitoring
System
F51 –
F52 –
F53 –
F54 Sunroof F55 APO 3 –Auxiliary Power
Outlet 3
Page 363 of 443
Chevrolet Tahoe/Suburban Owner Manual (GMNA-Localizing-U.S./Canada/
Mexico-16416971) - 2023 - CRC - 4/26/22
362 Vehicle Care
Caution (Continued)
sealant is not covered by the vehicle
warranty. Always use only the GM
approved tire sealant available through
your dealer or included in the vehicle.
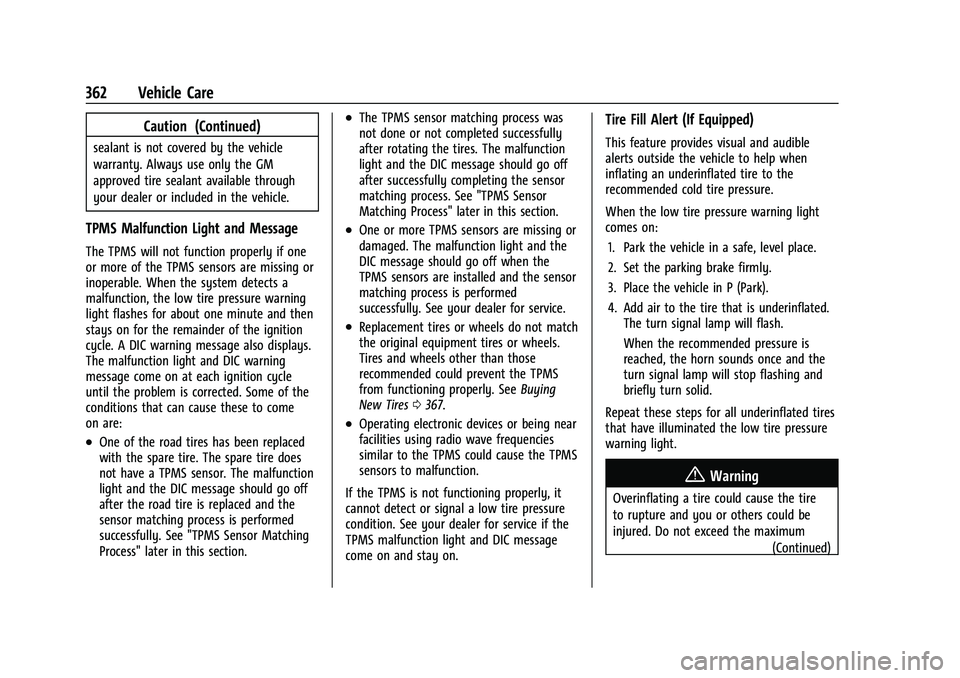
TPMS Malfunction Light and Message
The TPMS will not function properly if one
or more of the TPMS sensors are missing or
inoperable. When the system detects a
malfunction, the low tire pressure warning
light flashes for about one minute and then
stays on for the remainder of the ignition
cycle. A DIC warning message also displays.
The malfunction light and DIC warning
message come on at each ignition cycle
until the problem is corrected. Some of the
conditions that can cause these to come
on are:
.One of the road tires has been replaced
with the spare tire. The spare tire does
not have a TPMS sensor. The malfunction
light and the DIC message should go off
after the road tire is replaced and the
sensor matching process is performed
successfully. See "TPMS Sensor Matching
Process" later in this section.
.The TPMS sensor matching process was
not done or not completed successfully
after rotating the tires. The malfunction
light and the DIC message should go off
after successfully completing the sensor
matching process. See "TPMS Sensor
Matching Process" later in this section.
.One or more TPMS sensors are missing or
damaged. The malfunction light and the
DIC message should go off when the
TPMS sensors are installed and the sensor
matching process is performed
successfully. See your dealer for service.
.Replacement tires or wheels do not match
the original equipment tires or wheels.
Tires and wheels other than those
recommended could prevent the TPMS
from functioning properly. SeeBuying
New Tires 0367.
.Operating electronic devices or being near
facilities using radio wave frequencies
similar to the TPMS could cause the TPMS
sensors to malfunction.
If the TPMS is not functioning properly, it
cannot detect or signal a low tire pressure
condition. See your dealer for service if the
TPMS malfunction light and DIC message
come on and stay on.
Tire Fill Alert (If Equipped)
This feature provides visual and audible
alerts outside the vehicle to help when
inflating an underinflated tire to the
recommended cold tire pressure.
When the low tire pressure warning light
comes on: 1. Park the vehicle in a safe, level place.
2. Set the parking brake firmly.
3. Place the vehicle in P (Park).
4. Add air to the tire that is underinflated. The turn signal lamp will flash.
When the recommended pressure is
reached, the horn sounds once and the
turn signal lamp will stop flashing and
briefly turn solid.
Repeat these steps for all underinflated tires
that have illuminated the low tire pressure
warning light.
{Warning
Overinflating a tire could cause the tire
to rupture and you or others could be
injured. Do not exceed the maximum (Continued)
Page 368 of 443
Chevrolet Tahoe/Suburban Owner Manual (GMNA-Localizing-U.S./Canada/
Mexico-16416971) - 2023 - CRC - 4/26/22
Vehicle Care 367
Number (TIN) molded into one side of the
tire sidewall. The last four digits of the TIN
indicate the tire manufactured date. The
first two digits represent the week and the
last two digits, the year. For example, the
third week of the year 2020 would have a
4-digit DOT date of 0320. Week 01 is the
first full week (Sunday through Saturday) of
each year.
Vehicle Storage
Tires age when stored normally mounted on
a parked vehicle. Park a vehicle that will be
stored for at least a month in a cool, dry,
clean area away from direct sunlight to slow
aging. This area should be free of grease,
gasoline, or other substances that can
deteriorate rubber.
Parking for an extended period can cause
flat spots on the tires that may result in
vibrations while driving. When storing a
vehicle for at least a month, remove the
tires or raise the vehicle to reduce the
weight from the tires.
Buying New Tires
GM has developed and matched specific
tires for the vehicle. The original
equipment tires installed were designedto meet General Motors Tire
Performance Criteria Specification (TPC
Spec) system rating. When replacement
tires are needed, GM strongly
recommends buying tires with the same
TPC Spec rating.
GM's exclusive TPC Spec system
considers over a dozen critical
specifications that impact the overall
performance of the vehicle, including
brake system performance, ride and
handling, traction control, and tire
pressure monitoring performance. GM's
TPC Spec number is molded onto the
tire's sidewall near the tire size. If the
tires have an all-season tread design,
the TPC Spec number will be followed
by MS for mud and snow. See
Tire
Sidewall Labeling 0354 for additional
information.
GM recommends replacing worn tires in
complete sets of four. Uniform tread
depth on all tires will help to maintain
the performance of the vehicle. Braking
and handling performance may be
adversely affected if all the tires are not replaced at the same time. If proper
rotation and maintenance have been
done, all four tires should wear out at
about the same time. However, if it is
necessary to replace only one axle set
of worn tires, place the new tires on
the rear axle. See
Tire Rotation0365.
{Warning
Tires could explode during improper
service. Attempting to mount or
dismount a tire could cause injury or
death. Only your dealer or authorized
tire service center should mount or
dismount the tires.
{Warning
Mixing tires of different sizes (other
than those originally installed on the
vehicle), brands, tread patterns,
or types may cause loss of vehicle
control, resulting in a crash or other
vehicle damage. Use the correct size,
brand, and type of tire on all wheels.