Side steps turn off CHEVROLET TAHOE 2023 Owners Manual
[x] Cancel search | Manufacturer: CHEVROLET, Model Year: 2023, Model line: TAHOE, Model: CHEVROLET TAHOE 2023Pages: 443, PDF Size: 18.73 MB
Page 25 of 443

Chevrolet Tahoe/Suburban Owner Manual (GMNA-Localizing-U.S./Canada/
Mexico-16416971) - 2023 - CRC - 4/25/22
24 Keys, Doors, and Windows
Power Assist Steps
{Warning
To avoid personal injury or property
damage, before entering or exiting the
vehicle, be sure the power assist step is
fully extended. Do not step on the power
assist step while it is moving. Never place
hands or other body parts between the
extended power assist step and the
vehicle.
If equipped, the power assist steps will
deploy when the door is opened and
automatically retract three seconds after the
door is closed. The power assist steps will
retract immediately if the vehicle starts
moving.
Disable the power assist steps before jacking
or placing any object under the vehicle. Too
much ice buildup may prevent deployment
of the power assist steps. Check the step
position before exiting the vehicle. If this
happens, disable the power assist steps,
clear the ice, then enable the assist steps
and confirm normal function prior to use. Keep hands, children, pets, objects, and
clothing clear of the power assist steps
when in motion. The steps will reverse
direction if they encounter an obstruction
when opening or closing. Remove the
obstruction, then open and close the door
on the same side to complete the motion of
the assist steps. If the obstruction is not
cleared, the assist steps remain extended
while driving.
Both power assist steps can extend or
retract for cleaning. To view available
settings from the infotainment screen, touch
Settings > Vehicle > Remote Lock, Unlock,
Start.
Enable/Disable
To view available settings from the
infotainment screen, touch Settings >
Vehicle > Remote Lock, Unlock, Start.
Vehicle Security
This vehicle has theft-deterrent features;
however, they do not make the vehicle
impossible to steal.
Vehicle Alarm System
The indicator light, on the driver door near
the window, indicates the status of the
system. See
Power Door Locks 015
Arming the Alarm System
1. Turn off the vehicle.
2. Lock the vehicle in one of three ways:
.Use the remote key.
.Use the Keyless Access system.
.With a door open, pressQon the
interior of the door.
3. After 30 seconds the alarm system will arm, and the indicator light will begin to
slowly flash. Pressing
Qon the remote
Page 68 of 443
Chevrolet Tahoe/Suburban Owner Manual (GMNA-Localizing-U.S./Canada/
Mexico-16416971) - 2023 - CRC - 4/25/22
Seats and Restraints 67
4. Reinstall the child restraint following thedirections provided by the child restraint
manufacturer and refer to Securing Child
Restraints (With the Seat Belt in the
Center Front Seat) 085 or
Securing Child Restraints (With the Seat
Belt in the Rear Seat) 083 or
Securing Child Restraints (With the Seat
Belt in the Front Passenger Seat) 085.
Make sure the seat belt retractor is
locked by pulling the shoulder belt all
the way out of the retractor when
installing the child restraint, even if the
child restraint is equipped with a seat
belt lock off. When the retractor lock is
set, the belt can be tightened but not
pulled out of the retractor.
5. If, after reinstalling the child restraint and restarting the vehicle, the ON
indicator is still lit, turn the vehicle off.
Then slightly recline the vehicle seatback
and adjust the seat cushion,
if adjustable, to make sure that the
vehicle seatback is not pushing the child
restraint into the seat cushion.
Also make sure the child restraint is not
trapped under the vehicle head restraint.
If this happens, adjust the head restraint.
See Head Restraints 036. 6. Restart the vehicle.
The passenger sensing system may or may
not turn off the airbag for a child in a child
restraint depending upon the child’s size.
It is better to secure child restraints in a
rear seat. Consider using another vehicle to
transport the child when a rear seat is not
available. Never put a rear-facing child
restraint in the front seat, even if the ON
indicator is not lit.
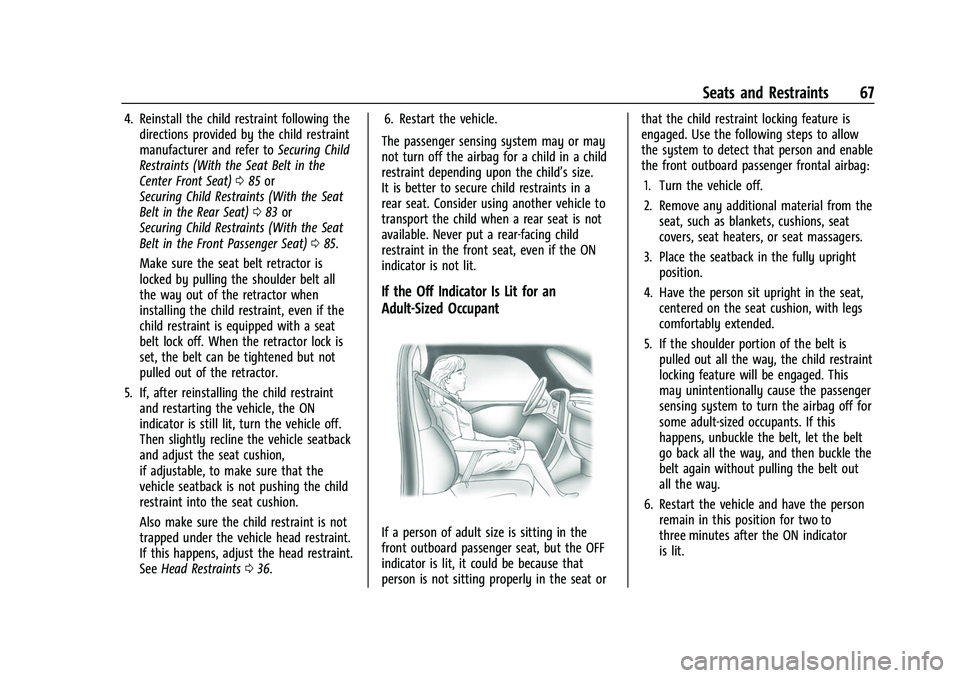
If the Off Indicator Is Lit for an
Adult-Sized Occupant
If a person of adult size is sitting in the
front outboard passenger seat, but the OFF
indicator is lit, it could be because that
person is not sitting properly in the seat or that the child restraint locking feature is
engaged. Use the following steps to allow
the system to detect that person and enable
the front outboard passenger frontal airbag:
1. Turn the vehicle off.
2. Remove any additional material from the seat, such as blankets, cushions, seat
covers, seat heaters, or seat massagers.
3. Place the seatback in the fully upright position.
4. Have the person sit upright in the seat, centered on the seat cushion, with legs
comfortably extended.
5. If the shoulder portion of the belt is pulled out all the way, the child restraint
locking feature will be engaged. This
may unintentionally cause the passenger
sensing system to turn the airbag off for
some adult-sized occupants. If this
happens, unbuckle the belt, let the belt
go back all the way, and then buckle the
belt again without pulling the belt out
all the way.
6. Restart the vehicle and have the person remain in this position for two to
three minutes after the ON indicator
is lit.
Page 88 of 443
Chevrolet Tahoe/Suburban Owner Manual (GMNA-Localizing-U.S./Canada/
Mexico-16416971) - 2023 - CRC - 4/25/22
Seats and Restraints 87
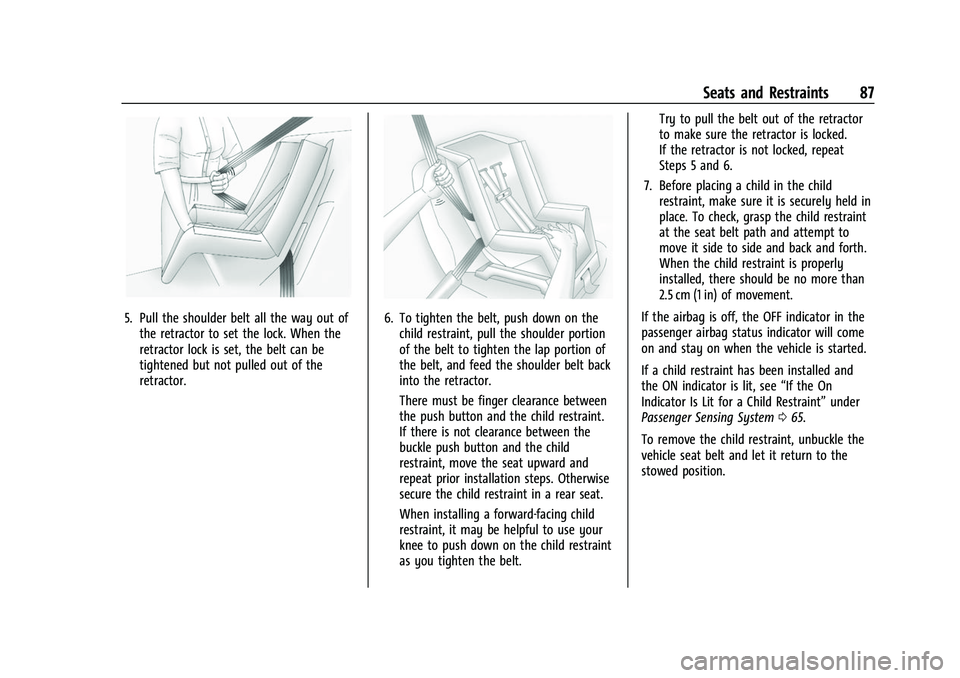
5. Pull the shoulder belt all the way out ofthe retractor to set the lock. When the
retractor lock is set, the belt can be
tightened but not pulled out of the
retractor.6. To tighten the belt, push down on thechild restraint, pull the shoulder portion
of the belt to tighten the lap portion of
the belt, and feed the shoulder belt back
into the retractor.
There must be finger clearance between
the push button and the child restraint.
If there is not clearance between the
buckle push button and the child
restraint, move the seat upward and
repeat prior installation steps. Otherwise
secure the child restraint in a rear seat.
When installing a forward-facing child
restraint, it may be helpful to use your
knee to push down on the child restraint
as you tighten the belt. Try to pull the belt out of the retractor
to make sure the retractor is locked.
If the retractor is not locked, repeat
Steps 5 and 6.
7. Before placing a child in the child restraint, make sure it is securely held in
place. To check, grasp the child restraint
at the seat belt path and attempt to
move it side to side and back and forth.
When the child restraint is properly
installed, there should be no more than
2.5 cm (1 in) of movement.
If the airbag is off, the OFF indicator in the
passenger airbag status indicator will come
on and stay on when the vehicle is started.
If a child restraint has been installed and
the ON indicator is lit, see “If the On
Indicator Is Lit for a Child Restraint” under
Passenger Sensing System 065.
To remove the child restraint, unbuckle the
vehicle seat belt and let it return to the
stowed position.
Page 172 of 443
Chevrolet Tahoe/Suburban Owner Manual (GMNA-Localizing-U.S./Canada/
Mexico-16416971) - 2023 - CRC - 4/26/22
Infotainment System 171
.The pairing process is disabled when the
vehicle is moving.
.Pairing only needs to be completed once,
unless the pairing information on the cell
phone changes or the cell phone is
deleted from the system.
.If multiple paired cell phones are within
range of the system, the system connects
to the paired cell phone that is set to
First to Connect. If there is no phone set
to First to Connect, it will link to the
device which was used last. To link to a
different paired phone, see“Linking to a
Different Phone” later in this section.
Pairing a Phone 1. Make sure Bluetooth has been enabled on the cell phone before starting pairing.
2. Touch the PHONE icon on the Home Page or the phone shortcut on the
applications tray at the bottom of the
screen.
3. Touch Phone at the top of the infotainment display. There may also be
an Add option in the middle of the
Phone screen. Touching this Add Phone
option will shortcut to the Phone
List menu.
4. Touch Add Phone. 5. Select the vehicle name shown on the
infotainment display from your phone’s
Bluetooth Settings list.
6. Follow the instructions on the cell phone to confirm the six-digit code shown on
the infotainment display and touch Pair.
7. Start the pairing process on the cell phone to be paired to the vehicle. See
the cell phone manufacturer's user guide
for information on this process. Once the
cell phone is paired, it will show under
Connected.
8. If the vehicle does not appear on your phone, there are a few ways to start the
pairing process over:
.Turn the phone off and then back on.
.Go back to the beginning of the
Phone menus on the infotainment
display and restart the pairing
process.
.Reset the phone, but this step should
be done as a last effort.
9. If the phone prompts to accept connection or allow phone book
download, select Always Accept and
Allow. The phone book may not be
available if not accepted. 10. Repeat Steps 1−8 to pair additional
phones.
First to Connect Paired Phones
If multiple paired cell phones are within the
range of the system, the system connects to
the paired cell phone that is set as First to
Connect. To enable a paired phone as the
First to Connect phone, make sure the
phone is turned on, then touch Settings,
then System, and then touch Phones.
Phones will display all paired and all
connected phones, and media player devices.
Phones can be added and removed,
connected and disconnected. To set a phone
as First to Connect, touch
yto the right
of the phone to open the phone’s settings
menu. Select the First to Connect option, to
enable the setting for that device.
Secondary Phone
A cell phone can be enabled as a Secondary
Phone by touching
yto the right of the
paired cell phone name to open the phone
settings menu. If a cell phone is enabled as
a Secondary Phone, it can connect
simultaneously alongside another Bluetooth
mobile device. In doing so, the Secondary
Phone will be labeled as Incoming Calls. This
means the device can only receive calls. The
Page 308 of 443
Chevrolet Tahoe/Suburban Owner Manual (GMNA-Localizing-U.S./Canada/
Mexico-16416971) - 2023 - CRC - 5/16/22
Driving and Operating 307
Always know the maximum speed rating for
the trailer tires before driving. This may be
significantly lower than the vehicle tire
speed rating. The speed rating may be on
the trailer tire sidewall. If the speed rating is
not shown, the default trailer tire speed
rating is 105 km/h (65 mph).
Trailering App
Trailer Lights App
If equipped, the Trailer Lights App is on the
home page of the infotainment screen.
Touch Start to cycle the trailer lamps on and
off to determine if they are working. The
test follows this sequence:1. The running lights turn on first and remain on throughout the sequence.
2. The brake lights turn on for about two seconds.
3. The left turn signal light flashes three times.
4. The right turn signal light flashes three times.
5. The reverse lights turn on for about two seconds. 6. Steps 2–5 repeat for approximately
one minute and 45 seconds, or until the
test deactivates.
Touch Stop to stop the test. The test will
automatically end after one minute and
45 seconds.
The sequence deactivates when any of the
following occur:
.The vehicle is turned off.
.The transmission is shifted out of P (Park).
.The brake pedal is pressed.
.The turn signal is activated.
.The hazard warning lights are activated.
Trailering App
If equipped, the Trailering App is on the
home page of the infotainment screen.
If equipped, this feature allows profiles for
connected trailers to be created to view
status, to store and track trailer usage
information, and to set up towing assist
features.
The Trailering App welcome page will appear
when the Trailering App is opened for the
first time from the Home Page. When a trailer is electrically connected and
a trailer profile has not been created, there
will be an option to create a profile, use a
guest profile, or select Accessory/No trailer.
When a trailer is electrically connected and
after a Trailer Profile has been created, the
trailer detection pop-up will appear with a
list of all of the custom Trailer Profiles made
on the vehicle. To load an existing Trailer
Profile, select one of the Trailer Profiles
listed, or load the Guest Trailer Profile by
selecting GUEST TRAILER. Touching
Accessory/No trailer will select Accessory/No
trailer as the active Trailer Profile and will
dismiss the pop-up. Shifting the vehicle from
P (Park) selects Guest Trailer as the active
Trailer Profile and will dismiss the pop-up.
Create a Trailer Profile
Touch Add Trailer on the trailer detection
pop-up or touch + Add Trailer in the
Trailering App.
Follow on-screen instructions to set up
profile.
After a profile is created, set up for
additional features may become available,
such as Tow/Haul mode reminder, Trailer
Tire Pressure Monitoring System,
maintenance reminders, or towing assist.
Page 309 of 443
Chevrolet Tahoe/Suburban Owner Manual (GMNA-Localizing-U.S./Canada/
Mexico-16416971) - 2023 - CRC - 5/16/22
308 Driving and Operating
Import a Trailer Profile
Touch Import on the trailer detection pop-up
or touch Import in the Trailering App.
Follow on-screen instructions to import
profile.
After a profile is imported, it can be selected
from the trailer list. If equipped, the Tow/
Haul mode reminder, Brake Gain Setting,
and Trailer Tire Pressure sensor learning do
not import.
Trailer Feature Setup
Tow/Haul Mode Reminder
To turn the Tow/Haul Mode Reminder
setting on, touch Yes. To turn it off,
touch No.
Trailer Tire Pressure Setup
If the Trailer Tire Pressure Monitoring
System (TTPMS) is detected, touch the Tire
Pressure Monitoring icon to set up tire
pressure monitoring.
The trailer tire pressure sensors transmits up
to 7 m (23 feet) from the hitch receiver of
the vehicle.
A trailer must be electrically connected to
the vehicle before starting the
sensor-to-vehicle learn process.After selecting Start from the Learn Sensors
screen, use the Tool Method or the Manual
Method (described below) to learn each tire
sensor, during which the current tire number
will be highlighted.
Each sensor has a maximum of two minutes
to learn. After a sensor is learned, a
checkmark appears next to the tire, the
vehicle horn will sound, the vehicle’s brake
lamps will flash, and all working trailer
lamps will flash. It then moves to the next
sensor.
To cancel the process, touch Stop.
The recommended tire pressure must be
entered for the trailer tires. This allows the
vehicle to alert when the tire pressure is
high or low.
TTPMS must learn the location of the
installed tire sensors to show correct air
pressure and temperature for each tire. To
set up, use one of the following options or
see a tire or trailer dealer for service. The
learning process must be repeated when the
trailer tires are rotated or replaced.
Tool Method: A TTPMS activation tool can
be purchased separately to learn the sensor
locations.
Manual Method: Without the tool, the air
pressure can be increased or decreased in
each tire for 10 seconds. Do not exceed the
maximum inflation pressure found on the
tire sidewalls. Make sure to re-adjust tire
pressure to the recommended level when
the process is complete.
Sensor Learning Steps
To complete the sensor-to-vehicle learn
process:
1. Touch Start on the Learn Sensors screen. The horn chirps twice and the Learning
Active screen appears on the
infotainment display.
2. Start with the driver side front trailer tire.
3. Activate the tool near the valve stem or adjust the air pressure of this tire until
the horn chirps and all working vehicle
and trailer lights flash.
The process stops without saving the
sensor locations if this step takes more
than two minutes.
4. Move to the next tire and repeat Step 3 for each sensor. The horn chirps twice
when all sensors are completed.
5. Return to the vehicle to complete the setup.
Page 333 of 443
Chevrolet Tahoe/Suburban Owner Manual (GMNA-Localizing-U.S./Canada/
Mexico-16416971) - 2023 - CRC - 4/26/22
332 Vehicle Care
Caution
Failure to follow the specific coolant fill
procedure could cause the engine to
overheat and could cause system
damage. If coolant is not visible in the
surge tank, contact your dealer.
If no coolant is visible in the surge tank, add
coolant.
1. Remove the coolant surge tank pressure cap when the cooling system, including
the coolant surge tank pressure cap and
upper radiator hose, is no longer hot.
Turn the pressure cap slowly
counterclockwise about one full turn. If a
hiss is heard, wait for that to stop.
A hiss means there is still some
pressure left.
2. Keep turning the pressure cap slowly, and remove it.
3. Fill the coolant surge tank with the proper mixture to the full cold mark. 4. With the coolant surge tank pressure cap
off, start the engine and let it run until
the engine coolant temperature gauge
indicates approximately 90 °C (195 °F).
By this time, the coolant level inside the
coolant surge tank may be lower. If the
level is lower, add more of the proper
mixture to the coolant surge tank until
the level reaches the indicated mark.
5. Replace the pressure cap tightly.
6. Verify coolant level after the engine is shut off and the coolant is cold.
If necessary, repeat coolant fill procedure
Steps 1–6.
Caution
If the pressure cap is not tightly installed,
coolant loss and engine damage may
occur. Be sure the cap is properly and
tightly secured.
Engine Overheating
Caution
Do not run the engine if there is a leak
in the engine cooling system. This can
cause a loss of all coolant and can
damage the system and vehicle. Have
any leaks fixed right away.
The vehicle has several indicators to warn of
engine overheating.
There is a coolant temperature gauge and a
engine coolant temperature warning light in
the vehicle's instrument cluster. See Engine
Coolant Temperature Gauge 0109
andEngine Coolant Temperature Warning
Light 0119.
In addition, there are ENGINE OVERHEATED
STOP ENGINE, ENGINE OVERHEATED IDLE
ENGINE, and ENGINE POWER IS REDUCED
messages in the Driver Information
Center (DIC).
If the decision is made not to lift the hood
when this warning appears, get service help
right away.
Page 344 of 443
Chevrolet Tahoe/Suburban Owner Manual (GMNA-Localizing-U.S./Canada/
Mexico-16416971) - 2023 - CRC - 4/26/22
Vehicle Care 343
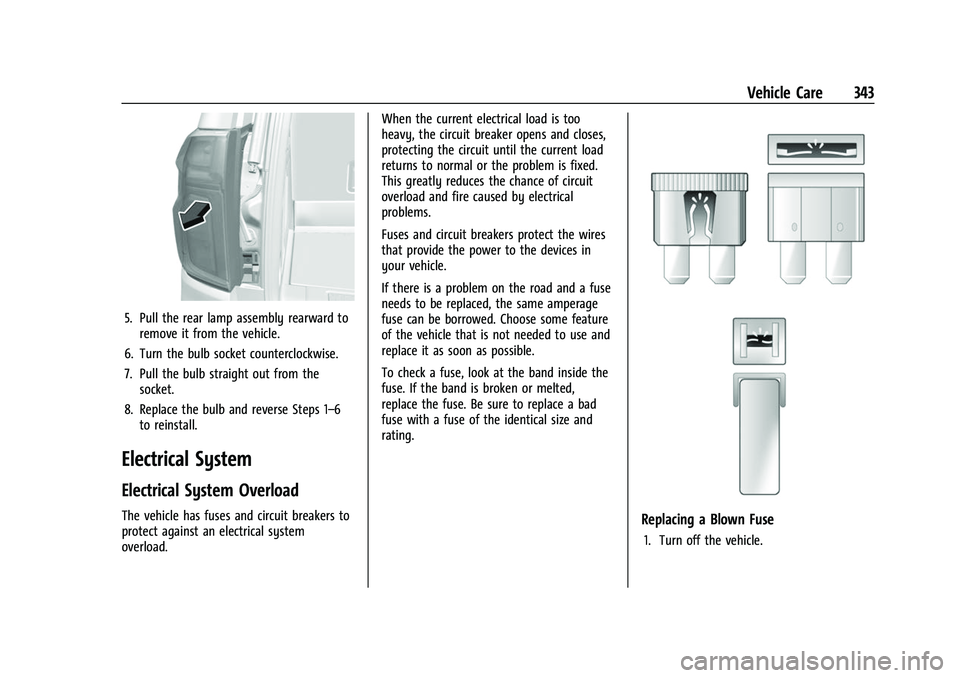
5. Pull the rear lamp assembly rearward toremove it from the vehicle.
6. Turn the bulb socket counterclockwise.
7. Pull the bulb straight out from the socket.
8. Replace the bulb and reverse Steps 1–6 to reinstall.
Electrical System
Electrical System Overload
The vehicle has fuses and circuit breakers to
protect against an electrical system
overload. When the current electrical load is too
heavy, the circuit breaker opens and closes,
protecting the circuit until the current load
returns to normal or the problem is fixed.
This greatly reduces the chance of circuit
overload and fire caused by electrical
problems.
Fuses and circuit breakers protect the wires
that provide the power to the devices in
your vehicle.
If there is a problem on the road and a fuse
needs to be replaced, the same amperage
fuse can be borrowed. Choose some feature
of the vehicle that is not needed to use and
replace it as soon as possible.
To check a fuse, look at the band inside the
fuse. If the band is broken or melted,
replace the fuse. Be sure to replace a bad
fuse with a fuse of the identical size and
rating.Replacing a Blown Fuse
1. Turn off the vehicle.
Page 363 of 443
Chevrolet Tahoe/Suburban Owner Manual (GMNA-Localizing-U.S./Canada/
Mexico-16416971) - 2023 - CRC - 4/26/22
362 Vehicle Care
Caution (Continued)
sealant is not covered by the vehicle
warranty. Always use only the GM
approved tire sealant available through
your dealer or included in the vehicle.
TPMS Malfunction Light and Message
The TPMS will not function properly if one
or more of the TPMS sensors are missing or
inoperable. When the system detects a
malfunction, the low tire pressure warning
light flashes for about one minute and then
stays on for the remainder of the ignition
cycle. A DIC warning message also displays.
The malfunction light and DIC warning
message come on at each ignition cycle
until the problem is corrected. Some of the
conditions that can cause these to come
on are:
.One of the road tires has been replaced
with the spare tire. The spare tire does
not have a TPMS sensor. The malfunction
light and the DIC message should go off
after the road tire is replaced and the
sensor matching process is performed
successfully. See "TPMS Sensor Matching
Process" later in this section.
.The TPMS sensor matching process was
not done or not completed successfully
after rotating the tires. The malfunction
light and the DIC message should go off
after successfully completing the sensor
matching process. See "TPMS Sensor
Matching Process" later in this section.
.One or more TPMS sensors are missing or
damaged. The malfunction light and the
DIC message should go off when the
TPMS sensors are installed and the sensor
matching process is performed
successfully. See your dealer for service.
.Replacement tires or wheels do not match
the original equipment tires or wheels.
Tires and wheels other than those
recommended could prevent the TPMS
from functioning properly. SeeBuying
New Tires 0367.
.Operating electronic devices or being near
facilities using radio wave frequencies
similar to the TPMS could cause the TPMS
sensors to malfunction.
If the TPMS is not functioning properly, it
cannot detect or signal a low tire pressure
condition. See your dealer for service if the
TPMS malfunction light and DIC message
come on and stay on.
Tire Fill Alert (If Equipped)
This feature provides visual and audible
alerts outside the vehicle to help when
inflating an underinflated tire to the
recommended cold tire pressure.
When the low tire pressure warning light
comes on: 1. Park the vehicle in a safe, level place.
2. Set the parking brake firmly.
3. Place the vehicle in P (Park).
4. Add air to the tire that is underinflated. The turn signal lamp will flash.
When the recommended pressure is
reached, the horn sounds once and the
turn signal lamp will stop flashing and
briefly turn solid.
Repeat these steps for all underinflated tires
that have illuminated the low tire pressure
warning light.
{Warning
Overinflating a tire could cause the tire
to rupture and you or others could be
injured. Do not exceed the maximum (Continued)
Page 373 of 443
Chevrolet Tahoe/Suburban Owner Manual (GMNA-Localizing-U.S./Canada/
Mexico-16416971) - 2023 - CRC - 4/26/22
372 Vehicle Care
{Warning
Changing a tire can be dangerous. The
vehicle can slip off the jack and roll over
or fall causing injury or death. Find a
level place to change the tire. To help
prevent the vehicle from moving:1. Set the parking brake firmly.
2. Shift the vehicle to P (Park).
3. For vehicles with four-wheel drive with an N (Neutral) transfer case
position, be sure the transfer case is
in a drive gear —not in N (Neutral).
4. Turn off the engine and do not restart while the vehicle is raised.
5. Do not allow passengers to remain in the vehicle.
6. Place wheel blocks, if equipped, on both sides of the tire at the opposite
corner of the tire being changed.
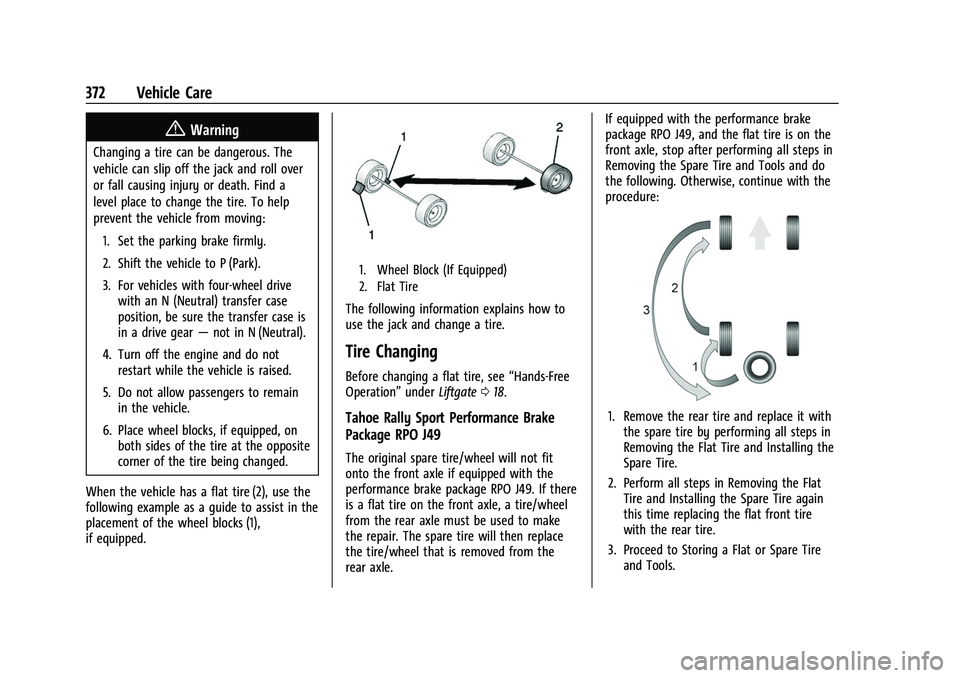
When the vehicle has a flat tire (2), use the
following example as a guide to assist in the
placement of the wheel blocks (1),
if equipped.
1. Wheel Block (If Equipped)
2. Flat Tire
The following information explains how to
use the jack and change a tire.
Tire Changing
Before changing a flat tire, see “Hands-Free
Operation” underLiftgate 018.
Tahoe Rally Sport Performance Brake
Package RPO J49
The original spare tire/wheel will not fit
onto the front axle if equipped with the
performance brake package RPO J49. If there
is a flat tire on the front axle, a tire/wheel
from the rear axle must be used to make
the repair. The spare tire will then replace
the tire/wheel that is removed from the
rear axle. If equipped with the performance brake
package RPO J49, and the flat tire is on the
front axle, stop after performing all steps in
Removing the Spare Tire and Tools and do
the following. Otherwise, continue with the
procedure:
1. Remove the rear tire and replace it with
the spare tire by performing all steps in
Removing the Flat Tire and Installing the
Spare Tire.
2. Perform all steps in Removing the Flat Tire and Installing the Spare Tire again
this time replacing the flat front tire
with the rear tire.
3. Proceed to Storing a Flat or Spare Tire and Tools.