steering CHEVROLET TRACKER 1993 Owner's Manual
[x] Cancel search | Manufacturer: CHEVROLET, Model Year: 1993, Model line: TRACKER, Model: CHEVROLET TRACKER 1993Pages: 339, PDF Size: 15.75 MB
Page 199 of 339
That your vehicle has rear-wheel
drive, or that
it has the
four-wheel-drive option.
vehicle.
The make, model, and year of your
Whether you can still move the shift
levers for the transmission and
transfer case,
if you have one.
If there was an accident, what was
damaged.
When the towing service arrives, let the
tow operator know that this manual
contains detailed towing instructions and
illustrations. The operator may want to
see them.
* T- help avoid injury to you or
Never let passengers ride in a
vehicle that is being towed.
Never tow faster than safe or
posted speeds
Never tow with damaged parts
not fully secured.
0 Never get under your vehicle
after it
has been lifted by the
tow truck.
chains on each side when towing
a vehicle.
hooks instead.
* Always use separate safety
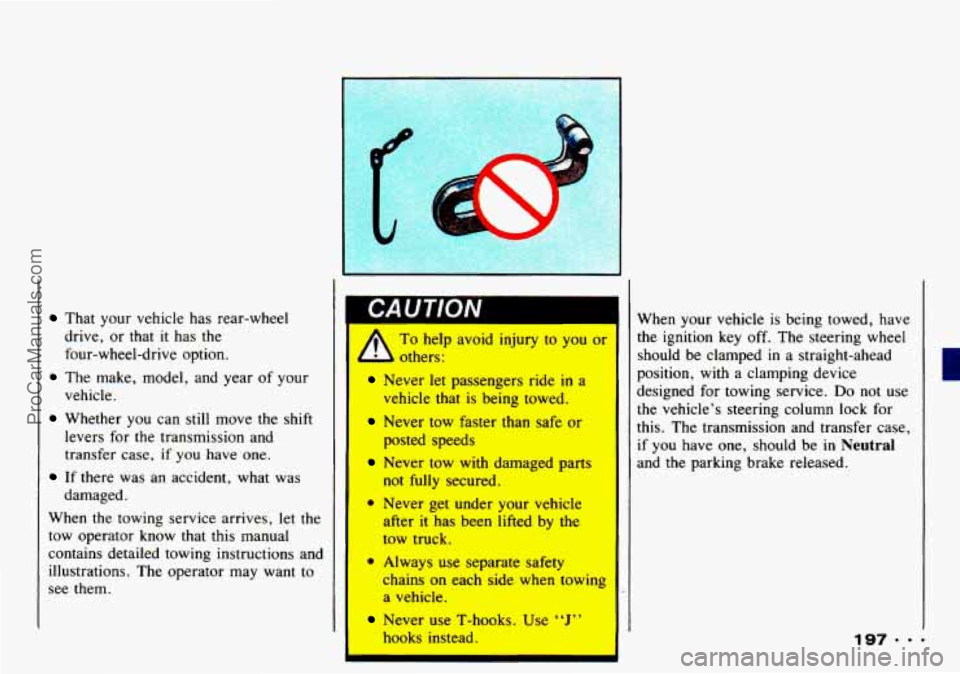
Never use T-hooks. Use “J”
When your vehicle is being towed, have
the ignition key off. The steering wheel
should be clamped
in a straight-ahead
position, with
a clamping device
designed for towing service.
Do not use
the vehicle’s steering column lock for
this. The transmission and transfer case,
if you have one, should be in Neutral
and the parking brake released.
ProCarManuals.com
Page 210 of 339
Problems on the Road
Zf a Tire Goes Hut
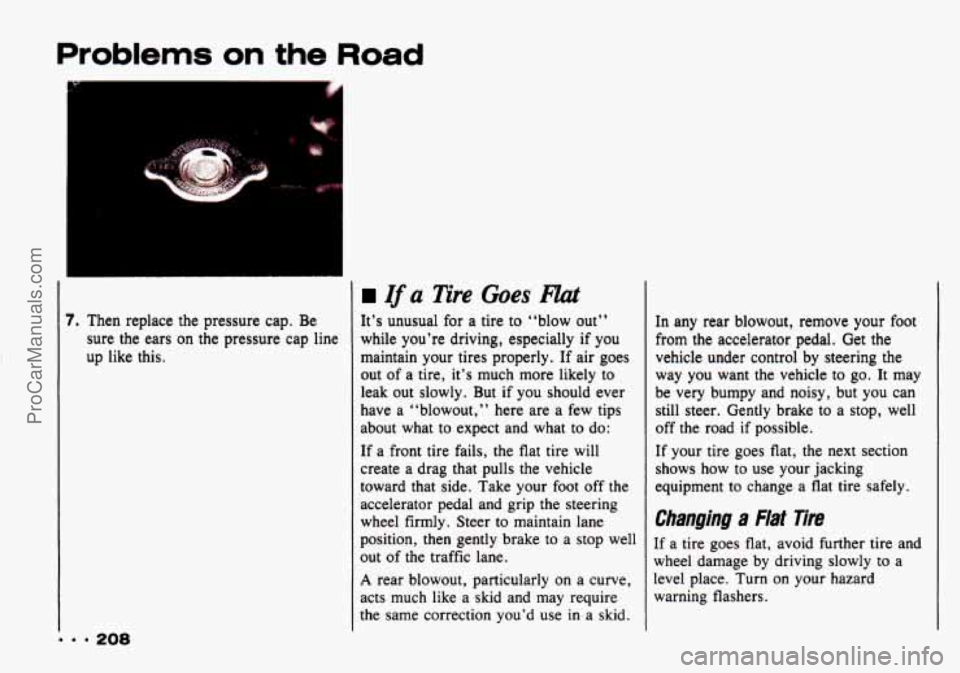
Then replace the pressure cap. Be
sure
the ears on the pressure cap line
up like
this.
9 208
It’s unusual for a tire to “blow out’’
while you’re driving, especially
if you
maintain your tires properly. If air goes
out of a tire, it’s much more likely to
leak out slowly. But if you should ever
have a “blowout,
” here are a few tips
about what to expect and what to do:
If a front tire fails, the flat tire will
create a drag that pulls the vehicle
toward that side. Take your foot off the
accelerator pedal and grip the steering
wheel firmly. Steer to maintain lane
position, then gently brake to a stop well
out of the traffic lane.
A rear blowout, particularly on a curve,
acts much like a skid and may require
the same correction you’d use
in a skid. In any
rear blowout, remove your
foot
from the accelerator pedal. Get the
vehicle under control by steering
the
way you want the vehicle to go. It may
be
very bumpy and noisy, but you can
still steer. Gently brake to a stop, well
off the road
if possible.
If your tire goes flat, the next section
shows how to use your jacking
equipment to change a flat tire safely.
ChanginQ a Flat lire
If a tire goes flat, avoid further tire and
wheel damage by driving slowly to a
level place. Turn
on your hazard
warning flashers.
..
ProCarManuals.com
Page 220 of 339
Problems on the Road
Rocking your vehicle to get it out:
First, turn your steering wheel left and
right. That will clear the area around
your front wheels. Then shift back and
forth between
R (Reverse) and a
forward gear (or with a manual
transmission, between First
or Second
gear and Reverse), spinning the wheels
as little as possible. Release the
accelerator pedal while you shift, and
press lightly
on the accelerator pedal
when the transmission is
in gear. If that doesn’t get you
out after a few tries,
you may need to be towed out. Or, you
can use your recovery hooks. If you do
need to be towed out,
see ‘‘Towing
Your Vehicle” in the Index.
-- --
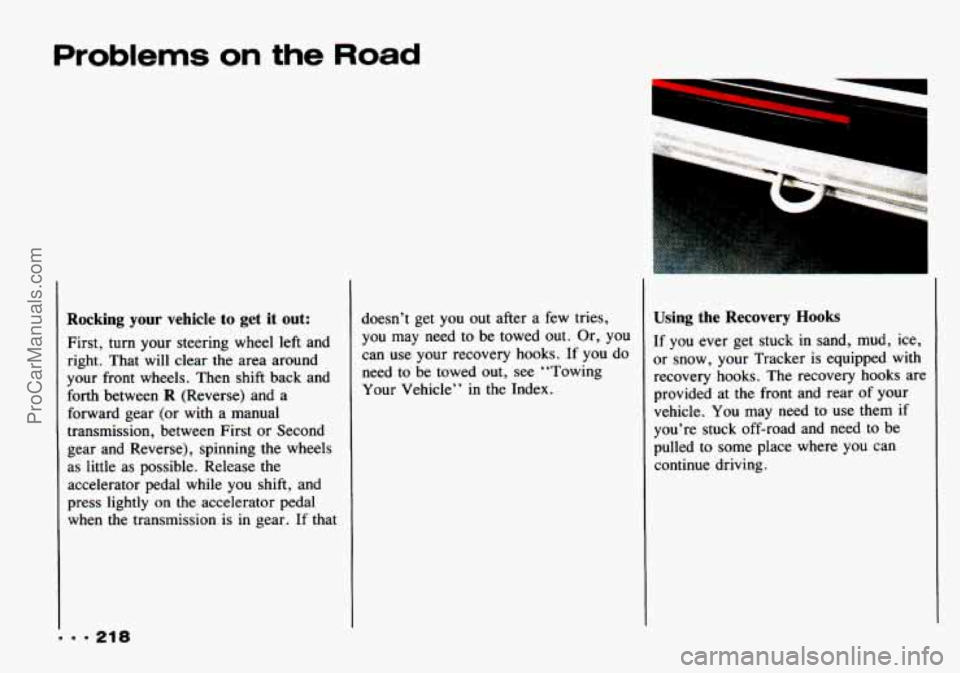
Using the Recovery Hooks
If you ever get stuck in sand, mud, ice,
or snow, your Tracker is equipped with
recovery hooks. The recovery hooks are
provided at the front and rear of your
vehicle. You may need to use them if
you’re stuck off-road and need to be
pulled to some place where you can
continue driving.
ProCarManuals.com
Page 223 of 339
Part 6
Here you wit1 find information
about the care of your Geo
. This
part begins with service and fuel
information. and then it shows
how to check important fluid and
lubricant levels
. There is also
technical information about your
vehicle. and
a section devoted to
its appearance care
.
ii iervice & Appearance Care
Service ............................................................. 222
Fuel ............................................................... 223
Checking Things under the Hood ........................................ 227 .
HoodRelease 227
Engineoil ........................................................ 229
Aircleaner ........................................................ 233
Automatic Transmission Fluid ........................................ 234
Manual Transmission Fluid ........................................... 237
Clutch Adjustment .................................................. 238
RearAxle ......................................................... 238
Four-WheelDrive .................................................. 239
Enginecoolant ..................................................... 240
Power Steering Fluid ................................................ 243
Windshield Washer Fluid ............................................ 244
Brake Master Cylinder ............................................... 245
Battery ........................................................... 247
Bulb Replacement .................................................... 248
LoadingYourVehicle ................................................. 252
Tires ............................................................... 253
Appearancecare ..................................................... 261
Appearance Care and Maintenance Materials .............................. 271
Vehicle Identification Number .......................................... 272
Service Parts Identification Label ........................................ 272
Add-on Electrical Equipment ........................................... 272
Fuses and Circuit Breakers ............................................. 273
ReplacementBulbs ................................................... 276
Capacities and Specifications ........................................... 277
221 .
.
......................................................
ProCarManuals.com
Page 230 of 339
Service & Appearance Care
l-
a
I LUU I lV1V
An electric fan under the
hood can start up and injure
you even when the engine is not
running. Keep hands, clothing and
tools away from any underhood
electric
fan. Don't reach through
the grille to release the underhood
lever.
I
7."
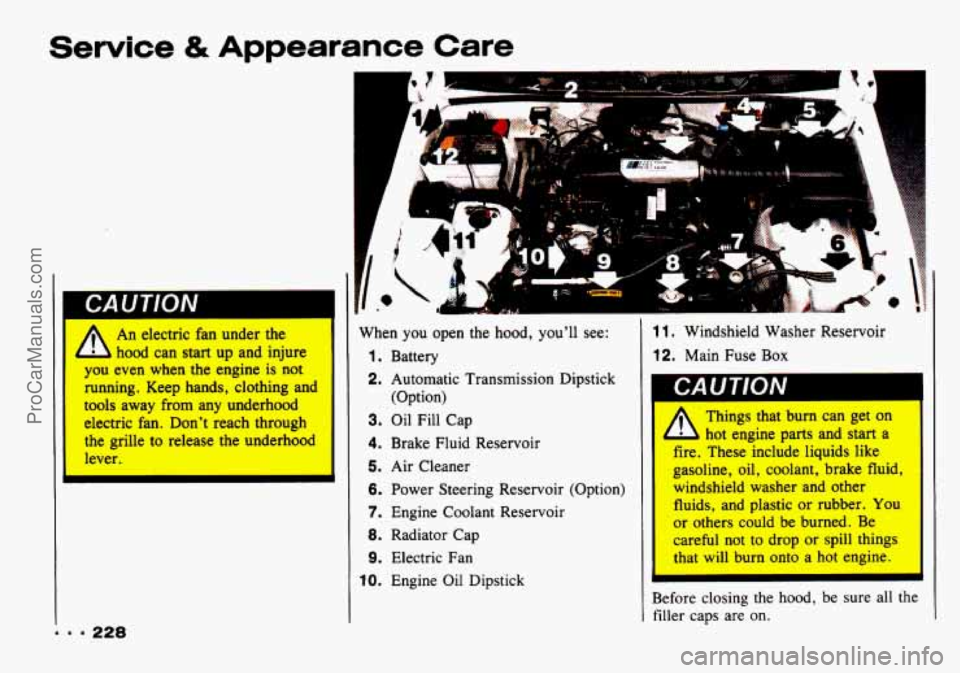
When you open the hood, you'll see:
1. Battery
2. Automatic Transmission Dipstick
(Option)
3. Oil Fill Cap
4. Brake Fluid Reservoir
5. Air Cleaner
6. Power Steering Reservoir (Option)
7. Engine Coolant Reservoir
8. Radiator Cap
9. Electric Fan
10. Engine Oil Dipstick
11. Windshield Washer Reservoir
12. Main Fuse Box
CAUTION
A
Things that burn can get on
hot engine parts and start a
fire. These include liquids like
gasoline, oil, coolant, brake fluid,
windshield washer and other
fluids, and plastic or rubber. You
or others could be burned. Be
careful not to drop or spill things
that will burn onto a hot engine.
Before closing the hood, be sure all the
filler caps are on.
... 228
ProCarManuals.com
Page 245 of 339
Radiator Pressure Cap
IVU I IIJt
Your radiator pressure cap is a 13
- i (90 kPa) pressure-type cap and
must be tightly installed to prevent
coolant
loss and possible engine
damage from overheating. Be sure
the arrows on the cap line up with
the overflow tube on the radiato
filler neck.
I
When you replace your radiator pressure
cap, an
AC* cap is recommended.
Thermostat
Engine coolant temperature is controlled
by a thermostat in the engine coolant
system. The thermostat stops the flow
of
coolant through the radiator until the
coolant reaches a preset temperature.
When you replace your thermostat, an
AC@ thermostat is recommended.
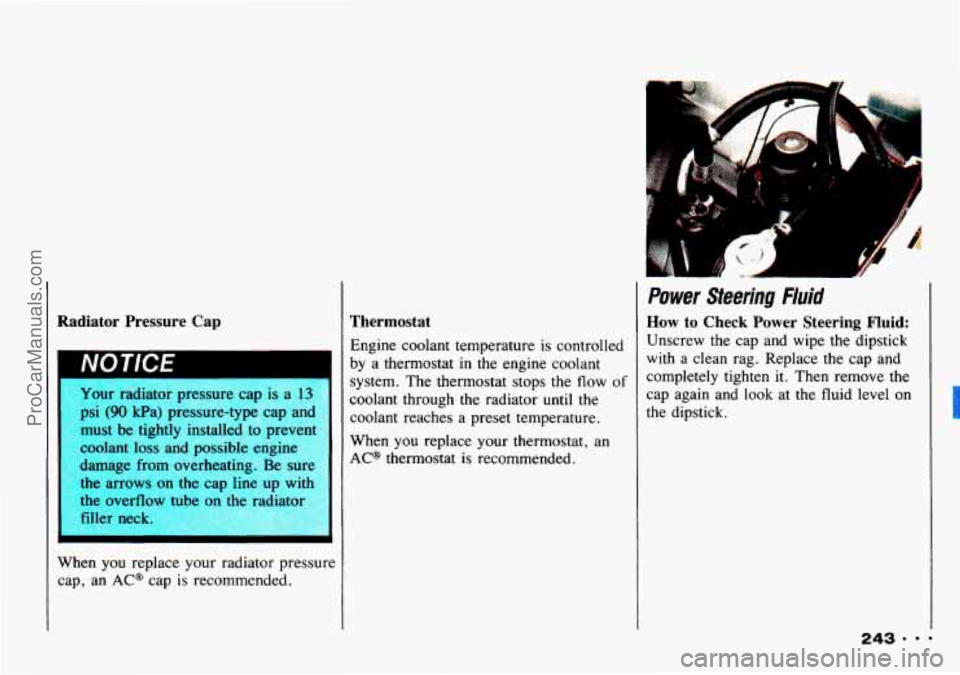
Power Steering Fluid
How to Check Power Steering Fluid:
Unscrew the cap and wipe the dipstick
with a clean rag. Replace the cap and
completely tighten it. Then remove the
cap again and look at the fluid level on
the dipstick.
ProCarManuals.com
Page 246 of 339
Service & Appearance Care
1
Windshield Washer Fluid
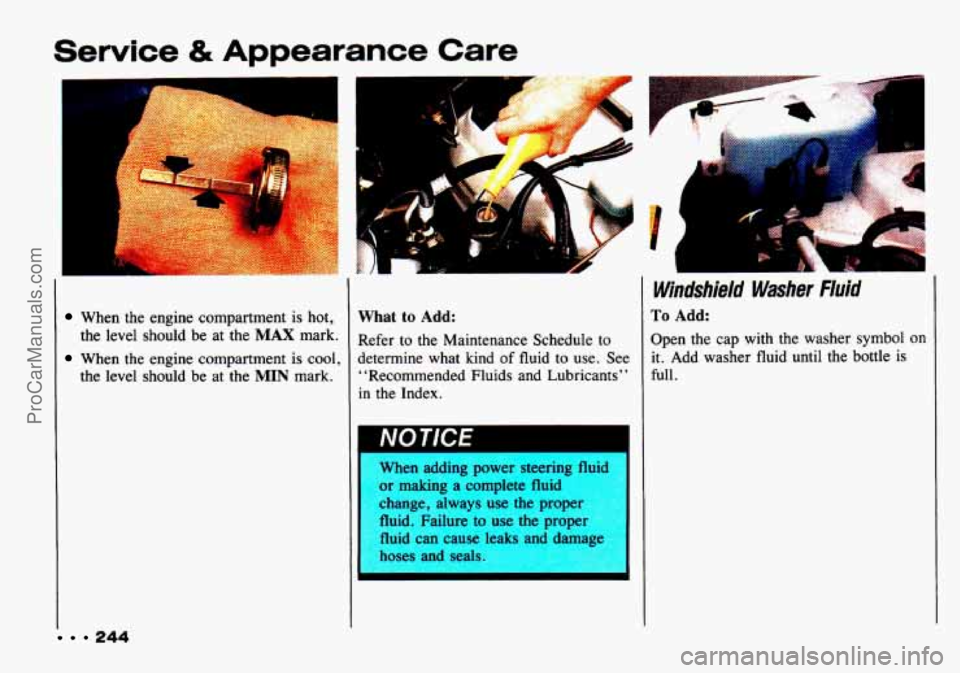
To Add:
Open the cap with the washer symbol on
it. Add washer fluid until the bottle is
full.
When the engine compartment is hot,
the level should be at the
MAX mark.
When the engine compartment is cool,
the level should be at the
MIN mark.
What to Add:
Refer to the Mainten lance Schedule to
determine what kind
of fluid to use. See
“Recommended Fluids and Lubricants”
in
the Index.
When adding power steering fluid
or making a complete fluid
change, always use the prope:
fluid. Failure to use the proper
fluid can cause leaks and damage
hoses and seals.
244
ProCarManuals.com
Page 288 of 339
Maintenance Schedule
Section A: Scheduled Maintenance Services (Cont.)
I
... 286
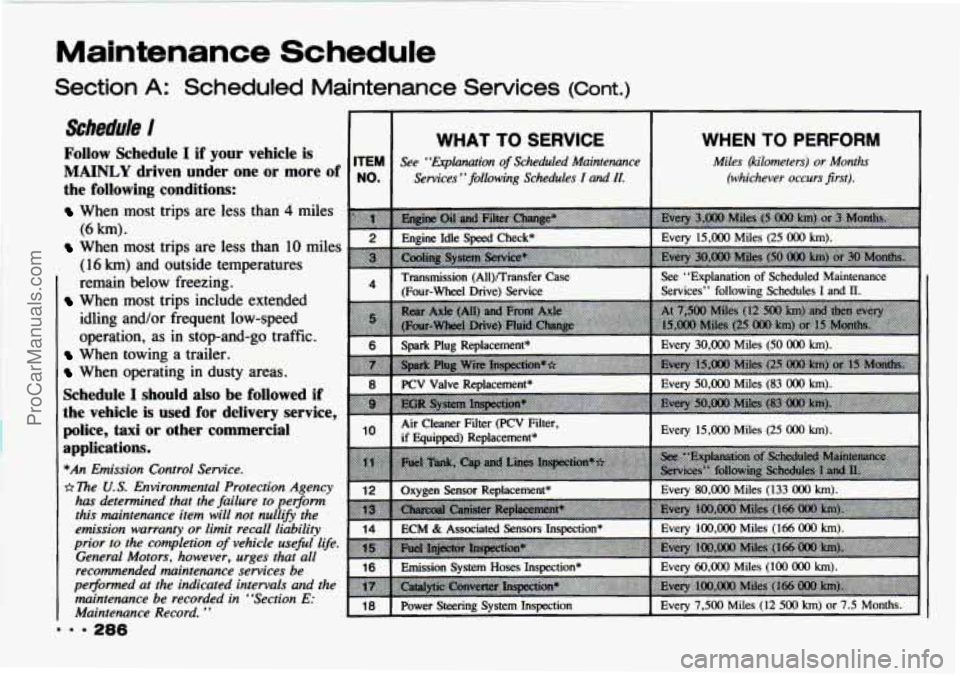
Schedule I
Follow Schedule I if your vehicle is
MAINLY driven under one or more of
the following conditions:
When most trips are less than 4 miles
When most trips are less than 10 miles
(6 km).
(16 km) and outside temperatures
remain below freezing.
When most trips include extended
idling and/or frequent low-speed
operation, as
in stop-and-go traffic.
When towing a trailer.
When operating in dusty areas.
Schedule I should also be followed if
the vehicle is used for delivery service,
police, taxi
or other commercial
applications.
*An Emission Control Service.
* The U. S. Environmental Protection Agency
has determined that the failure to perform
this maintenance item will not nullify the
emission warranty or limit recall liability
prior to the completion
of vehicle useful life.
General Motors, however, urges that all
recommended maintenance services be
performed at the indicated intervals and the
maintenance be recorded in "Section E:
Maintenance Record.
' '
ITEM
NO.
2
4
~
14
16
18
WHAT TO SERVICE
See "Explanation of Scheduled Maintenance
Services "following Schedules
t and It.
WHEN TO PERFORM
Miles (kilometers) or Months
(whichever occurs first).
PCV Valve Replacement* I Every 50,000 Miles (83 OOO km).
ECM & Associated Sensors Insmtion* I Every 100,OOO Miles (166 OOO h).
Power Steering System Inspection I Every 7,500 Miles (12 500 km) or 7.5 Months.
ProCarManuals.com
Page 290 of 339
Maintenance Schedule
Section A: Scheduled Maintenance Services (Cont.)
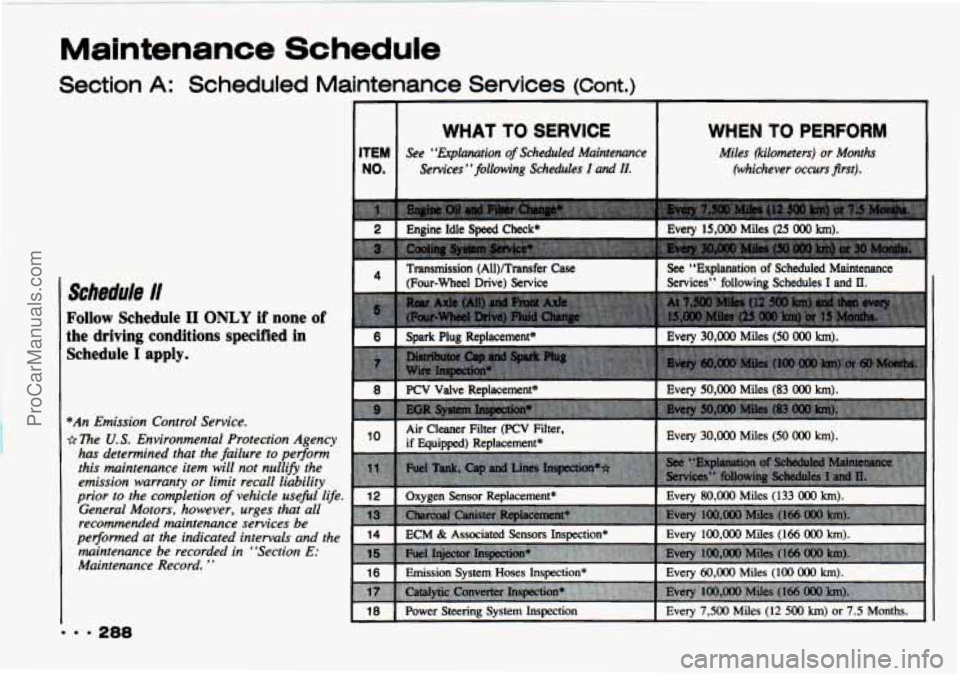
Schedule I/
Follow Schedule I1 ONLY if none of
the driving conditions specified in
Schedule
I apply.
BAn Emission Control Service.
The
U. S. Environmental Protection Agency
has determined that the failure to pedorm
this maintenance item will not nullify the
emission warranh, or limit recall liability
I I I
WHAT TO SERVICE
ITEM See "Explanation of Scheduled Maintenance
NO. Services "following Schedules I and II.
I
WHEN TO PERFORM
Miles (kilometers) or Months
(whichever occurs first).
I nrior to the cornthetion of vehicle useful life. I 12 I Oxygen Sensor Replacement* I Every 80,OOO Miles (133 oO( I-.--- -- -- I~- ~ .I I General Motors, however, urges thaiall
recommended maintenuncP
ront;rnr ho I
I 16 I Emission Svstem Hoses Insaxtion* I Everv 60.0o0 Miles (100 oO(
18 I Power Steering system Inspection I Every 7,500 Miles (12 500 km) or 7.5 Months. I I
... 288
ProCarManuals.com
Page 296 of 339
Maintenance Schedule
Section A: Scheduled Maintenance Services (Cont.)
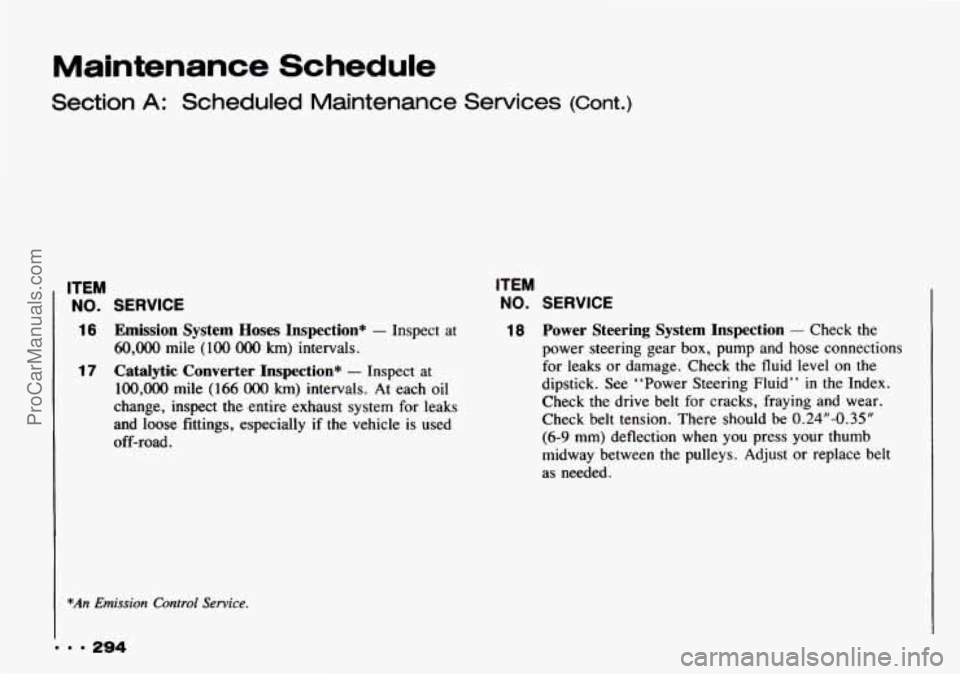
ITEM
NO. SERVICE
16 Emission System Hoses Inspection* - Inspect at
60,OOO mile (lo0 OOO km) intervals.
17 Catalytic Converter Inspection* - Inspect at
100,OOO mile (166 OOO km) intervals. At each oil
change, inspect the entire exhaust system for leaks
and loose fittings, especially if the vehicle is used
off-road.
*An Emission Control Service.
9 9 294
ITEM
NO. SERVICE
18 Power Steering System Inspection - Check the
power steering gear box, pump and hose connections
for leaks
or damage. Check the fluid level on the
dipstick.
See “Power Steering Fluid” in the Index.
Check the drive belt for cracks, fraying and wear.
Check belt tension. There should be
0.24”-0.35”
(6-9 mm) deflection when you press your thumb
midway between the pulleys. Adjust or replace belt
as needed.
ProCarManuals.com