change time CHEVROLET TRAIL BLAZER 2003 1.G Owners Manual
[x] Cancel search | Manufacturer: CHEVROLET, Model Year: 2003, Model line: TRAIL BLAZER, Model: CHEVROLET TRAIL BLAZER 2003 1.GPages: 436, PDF Size: 2.98 MB
Page 2 of 436

GENERAL MOTORS, GM, the GM Emblem,
CHEVROLET, the CHEVROLET Emblem and the name
TRAILBLAZER/TRAILBLAZER EXT are registered
trademarks of General Motors Corporation.
This manual includes the latest information at the time it
was printed. We reserve the right to make changes
after that time without further notice. For vehicles ®rst
sold in Canada, substitute the name ªGeneral Motors of
Canada Limitedº for Chevrolet Motor Division whenever
it appears in this manual.
Please keep this manual in your vehicle, so it will be
there if you ever need it when you're on the road. If you
sell the vehicle, please leave this manual in it so the
new owner can use it.
Canadian Owners
You can obtain a French copy of this manual from your
dealer or from:
Helm, Incorporated
P.O. Box 07130
Detroit, MI 48207
How to Use This Manual
Many people read their owner's manual from beginning
to end when they ®rst receive their new vehicle. If
you do this, it will help you learn about the features and
controls for your vehicle. In this manual, you will ®nd
that pictures and words work together to explain things.
Index
A good place to look for what you need is the Index in
back of the manual. It is an alphabetical list of what
is in the manual, and the page number where you will
®nd it.
Litho in U.S.A.
Part No. C 2338 B First Edition
Copyright General Motors Corporation 07/15/02
All Rights Reserved
ii
Page 37 of 436

{CAUTION:
Never do this.
Here a child is sitting in a seat that has a
lap-shoulder belt, but the shoulder part is
behind the child. If the child wears the belt in
this way, in a crash the child might slide under
the belt. The belt's force would then be applied
right on the child's abdomen. That could cause
serious or fatal injuries.
Wherever the child sits, the lap portion of the belt
should be worn low and snug on the hips, just touching
the child's thighs. This applies belt force to the child's
pelvic bones in a crash.
Infants and Young Children
Everyone in a vehicle needs protection! This includes
infants and all other children. Neither the distance
traveled nor the age and size of the traveler changes
the need, for everyone, to use safety restraints. In fact,
the law in every state in the United States and in
every Canadian province says children up to some age
must be restrained while in a vehicle.
Every time infants and young children ride in vehicles,
they should have the protection provided by appropriate
restraints. Young children should not use the vehicle's
adult safety belts alone, unless there is no other choice.
Instead, they need to use a child restraint.
1-31
Page 71 of 436

Remote Keyless Entry System
If equipped, the keyless entry system operates on a
radio frequency subject to Federal Communications
Commission (FCC) Rules and with Industry Canada.
This device complies with Part 15 of the FCC Rules.
Operation is subject to the following two conditions:
1. This device may not cause interference, and
2. This device must accept any interference received,
including interference that may cause undesired
operation of the device.
This device complies with RSS-210 of Industry Canada.
Operation is subject to the following two conditions:
1. This device may not cause interference, and
2. This device must accept any interference received,
including interference that may cause undesired
operation of the device.
Changes or modi®cations to this system by other than
an authorized service facility could void authorization to
use this equipment.At times you may notice a decrease in range. This is
normal for any remote keyless entry system. If the
transmitter does not work or if you have to stand closer
to your vehicle for the transmitter to work, try this:
·Check the distance. You may be too far from your
vehicle. You may need to stand closer during
rainy or snowy weather.
·Check the location. Other vehicles or objects may
be blocking the signal. Take a few steps to the
left or right, hold the transmitter higher, and
try again.
·Check to determine if battery replacement is
necessary. See ªBattery Replacementº under
Remote Keyless Entry System Operation on
page 2-6.
·If you are still having trouble, see your dealer or a
quali®ed technician for service.
2-5
Page 73 of 436

Battery Replacement
Under normal use, the battery in your remote keyless
entry transmitter should last about two years.
You can tell the battery is weak if the transmitter won't
work at the normal range in any location. If you have
to get close to your vehicle before the transmitter works,
it's probably time to change the battery.
The Driver Information Center (DIC) will display a
RFA # BATTERY LOW message when the transmitter
battery is low.
Notice:When replacing the battery, use care not to
touch any of the circuitry. Static from your body
transferred to these surfaces may damage the
transmitter.To replace the battery in the remote keyless entry
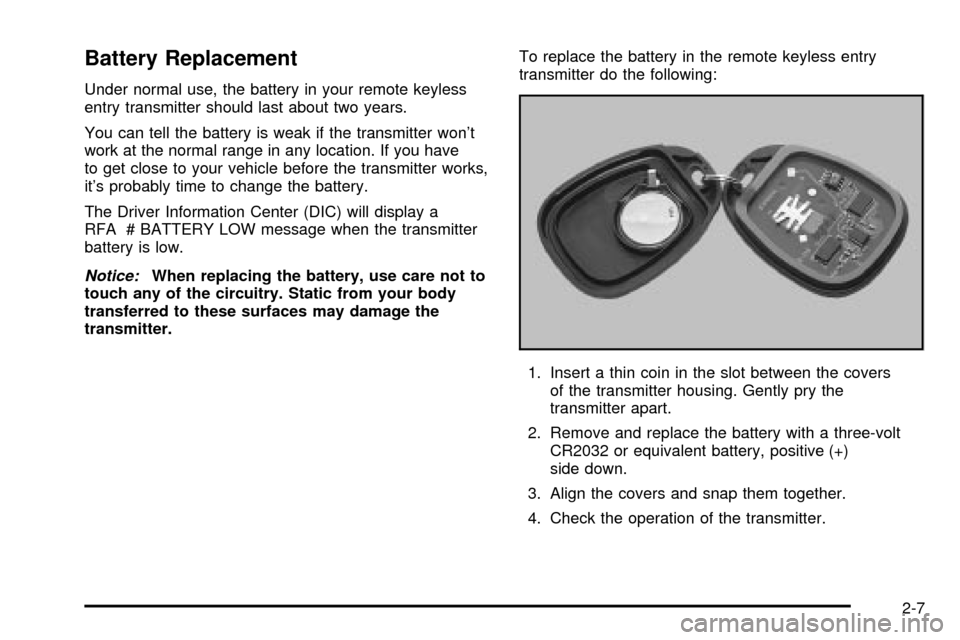
transmitter do the following:
1. Insert a thin coin in the slot between the covers
of the transmitter housing. Gently pry the
transmitter apart.
2. Remove and replace the battery with a three-volt
CR2032 or equivalent battery, positive (+)
side down.
3. Align the covers and snap them together.
4. Check the operation of the transmitter.
2-7
Page 75 of 436

Power Door Locks
The power door lock
switches are located on
the driver's and front
passenger's armrests.
Remove the ignition key and press the lock symbol to
lock all of the doors at once. To unlock the doors, press
the other side of the switch.
Delayed Locking
This feature makes it easier to use the power door
locks to lock all the doors and the liftgate when leaving
your vehicle.
The ®rst time you attempt to lock the doors using the
power lock switch or the remote keyless entry
transmitter, with a door or the liftgate open, three chimes
will signal that delayed locking is being used.
All doors and the liftgate can be reopened for up to
®ve seconds from the time the last door is closed.Five seconds after the last door is closed, all the doors
will lock. You can lock the doors immediately by
using the power door lock switch or by pressing the lock
button on the optional remote keyless entry transmitter
a second time.
If the key is inserted in the ignition, this feature will not
lock the doors. The lockout prevention feature will
operate instead.
You can enable or disable the delayed locking feature.
If the feature is disabled, the doors will lock immediately
when a power door lock switch or remote keyless
entry transmitter lock button is pressed.
Programming Delayed Locking
When your vehicle was shipped from the factory, the
delayed locking feature was programmed on, or
enabled. The mode may have been changed since it
left the factory. To turn the delayed locking feature on or
off, do the following:
1. Press and hold the power door lock switch on the
driver's door in the lock position.
2. Press the remote keyless entry transmitter unlock
button twice.
If the delayed locking feature was on, it will now be off.
If the feature was off, it will now be on.
2-9
Page 86 of 436

Starting Your Engine
Move your shift lever to PARK (P) or NEUTRAL (N).
Your engine won't start in any other
position ± that's a safety feature. To restart when you're
already moving, use NEUTRAL (N) only.
Notice:Do not try to shift to PARK (P) if your
vehicle is moving. If you do, you could damage the
transmission. Shift to PARK (P) only when your
vehicle is stopped.
1. With your foot off the accelerator pedal, turn the
ignition key to START. When the engine starts,
let go of the key. The idle speed will go down as
your engine gets warm.
Holding your key in START for longer than
15 seconds at a time will cause your battery to be
drained much sooner. And the excessive heat
can damage your starter motor. Wait about
15 seconds between each try to help avoid draining
your battery or damaging your starter.
2. If it doesn't start within 10 seconds, push the
accelerator pedal all the way to the ¯oor, while you
hold the ignition key in START. When the engine
starts, let go of the key and let up on the accelerator
pedal. Wait about 15 seconds between each try.When starting your engine in very cold weather
(below 0ÉF or-18ÉC), do this:
1. With your foot off the accelerator pedal, turn the
ignition key to START and hold it there up to
15 seconds. When the engine starts, let go of
the key.
2. If your engine still won't start (or starts but then
stops), it could be ¯ooded with too much gasoline.
Try pushing your accelerator pedal all the way to the
¯oor and holding it there as you hold the key in
START for about three seconds. When the engine
starts, let go of the key and accelerator. If the
vehicle starts brie¯y but then stops again, do the
same thing, but this time keep the pedal down
for ®ve or six seconds. This clears the extra
gasoline from the engine.
Notice:Your engine is designed to work with the
electronics in your vehicle. If you add electrical
parts or accessories, you could change the way the
engine operates. Before adding electrical equipment,
check with your dealer. If you do not, your engine
might not perform properly.
2-20
Page 103 of 436

To ®rst activate this feature, perform the following steps:
1. Press the Personalization button, located on the
steering wheel, until ªTilt Mirror in REVERSE (R)º
is displayed on the DIC display.
2. Press the Select button once to select the
passenger's side mirror, twice for the driver's side
mirror and three times for both mirrors. Then
press the Personalization button repeatedly until the
display goes blank.
3. With the engine running, engage the parking brake,
press the brake pedal and place the vehicle in
REVERSE (R) gear.
4. Adjust the passenger's side and then the driver's
side outside mirrors to the desired tilt positions.
These positions will be stored into memory once the
vehicle is shifted out of REVERSE (R).
When the vehicle is placed in PARK (P) or in any
forward gear, the mirror(s) will return to normal
driving position, following a short delay.
To change the tilt position, adjust the mirror while the
vehicle is in REVERSE (R) gear with the engine running,
the parking brake engaged and the brake pedal
pressed. The new position will be saved into memory
once the vehicle is shifted out of REVERSE (R).Outside Convex Mirror
A convex mirror's surface is curved so you can see
more from the driver's seat.
{CAUTION:
A convex mirror can make things (like other
vehicles) look farther away than they really are.
If you cut too sharply into the right or left lane,
you could hit a vehicle. Check your inside
mirror or glance over your shoulder before
changing lanes.
Outside Heated Mirrors
Your vehicle may have this feature.
When you operate the rear window defogger, a defogger
also warms the heated driver's and passenger's
outside rearview mirrors to help clear them of ice, snow
and condensation.
2-37
Page 127 of 436

Headlamp High/Low-Beam Changer
To change the headlamps from low to high beam, push
the lever toward the instrument panel. To return to
low-beam headlamps, pull the multifunction lever toward
you. Then release it.
When the high beams are
on, this indicator light on
the instrument panel
cluster will also be on.
Flash-to-Pass
This feature lets you use your high-beam headlamps to
signal a driver in front of you that you want to pass.
It works even if your headlamps are in the automatic
position.
To use it, pull the turn signal lever toward you, then
release it.
If your headlamps are in the automatic position or on
low beam, your high-beam headlamps will turn on.
They'll stay on as long as you hold the lever toward you.The high-beam indicator on the instrument panel cluster
will come on. Release the lever to return to normal
operation.
Windshield Wipers
8
(Mist):For a single wiping cycle, turn the band to
mist. Hold it there until the wipers start. Then let go.
The wipers will stop after one wipe. If you want
more wipes, hold the band on mist longer.
9(Off):To stop the wipers, move the band to off.
N(Windshield Wipers):Turn the band to control the
windshield wipers.
You can set the wiper speed for a long or short delay
between wipes. This can be very useful in light rain
or snow. Turn the band to choose the delay time. The
closer to the top of the lever, the shorter the delay.
For steady wiping at low speed, turn the band away from
you to the ®rst solid band past the delay settings. For
high-speed wiping, turn the band further, to the second
solid band past the delay settings. To stop the wipers,
move the band to off.
Be sure to clear ice and snow from the wiper blades
before using them. If they're frozen to the windshield,
carefully loosen or thaw them. If your blades do become
worn or damaged, get new blades or blade inserts.
3-9
Page 134 of 436

Automatic Headlamp System
When it is dark enough outside, your Automatic
Headlamp System will turn on your headlamps at the
normal brightness along with other lamps such as
the taillamps, sidemarker, parking lamps and the
instrument panel lights. The radio lights will also be on.
Your vehicle is equipped with a light sensor on the
top of the instrument panel. Be sure it is not covered or
the system will be on whenever the ignition is on.
The system may also turn on your lights when driving
through a parking garage, heavy overcast weather
or a tunnel. This is normal.
There is a delay in the transition between the daytime
and nighttime operation of the Daytime Running
Lamps (DRL) and the automatic headlamp systems, so
that driving under bridges or bright overhead street
lights does not affect the system. The DRL and
automatic headlamp system will only be affected when
the light sensor sees a change in lighting lasting
longer than the delay.If you start your vehicle in a dark garage, the automatic
headlamp system will come on immediately. Once
you leave the garage, it will take about one minute for
the automatic headlamp system to change to DRL if it is
light outside. During that delay, your instrument panel
cluster may not be as bright as usual. Make sure
your instrument panel brightness control is in the full
bright position.
To idle your vehicle with the automatic headlamp
system off, set the parking brake while the ignition is off.
Then start your vehicle. The automatic headlamp
system will stay off until you release the parking brake,
shift out of park or turn the exterior lamp control to
the off position as described in ªExterior Lampsº listed
previously.
Lamps On Reminder
A reminder tone will sound when your headlamps or
parking lamps are manually turned on, the driver's door
is open and your ignition is in LOCK or ACCESSORY.
To turn the tone off, turn the knob all the way
counterclockwise. In the automatic mode, the headlamps
turn off once the ignition key is in LOCK.
3-16
Page 169 of 436

Here are four things that some owners ask about. None
of these show a problem with your fuel gage:
·At the gas station, the gas pump shuts off before
the gage reads full.
·It takes a little more or less fuel to ®ll up than the
gage indicated. For example, the gage may have
indicated the tank was half full, but it actually took a
little more or less than half the tank's capacity to
®ll the tank.
·The gage moves a little when you turn a corner or
speed up.
·The gage doesn't go back to empty when you turn
off the ignition.
Low Fuel Warning Light
The light next to the fuel gage will come on brie¯y when
you are starting the engine.
This light comes on when the fuel tank is low on fuel.
To turn it off, add fuel to the fuel tank.
Driver Information Center (DIC)
Your vehicle may have this feature. The DIC display
is located on the instrument panel cluster above
the steering wheel. The DIC can display information
such as the trip odometer, fuel economy and
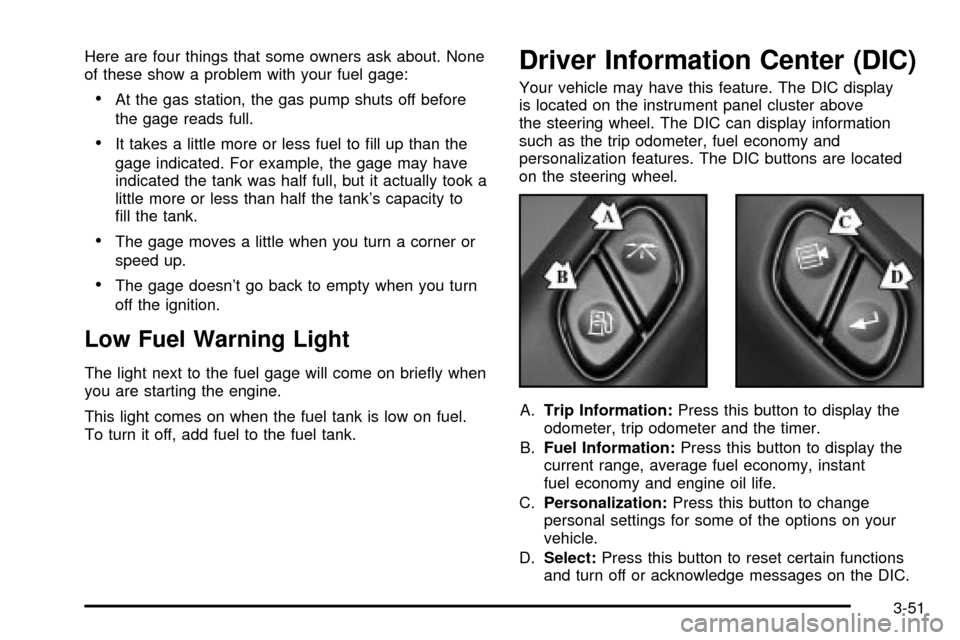
personalization features. The DIC buttons are located
on the steering wheel.
A.Trip Information:Press this button to display the
odometer, trip odometer and the timer.
B.Fuel Information:Press this button to display the
current range, average fuel economy, instant
fuel economy and engine oil life.
C.Personalization:Press this button to change
personal settings for some of the options on your
vehicle.
D.Select:Press this button to reset certain functions
and turn off or acknowledge messages on the DIC.
3-51