start stop button CHEVROLET TRAIL BLAZER 2003 1.G Owners Manual
[x] Cancel search | Manufacturer: CHEVROLET, Model Year: 2003, Model line: TRAIL BLAZER, Model: CHEVROLET TRAIL BLAZER 2003 1.GPages: 436, PDF Size: 2.98 MB
Page 170 of 436
DIC Operation and Displays
The DIC comes on when the ignition is on. After a short
delay the DIC will display the current driver and the
information that was last displayed before the engine
was turned off.
If a problem is detected, a warning message will appear
on the display. Pressing the select button will
acknowledge any current warning or service messages.
The DIC has different modes which can be accessed
by pressing the four buttons on the DIC. These buttons
are trip information, fuel information, personalization
and select. The button functions are detailed in
the following.
Trip Information
Use the trip information button to scroll through the
odometer, TRIP A, TRIP B and TIMER.
Odometer
Press the trip information button until the odometer
appears on the display. This shows the total distance
the vehicle has been driven in either miles or kilometers.
Pressing the reset stem located on the instrument
cluster with the vehicle off will also display the odometer.
Trip A and Trip B
Press the trip information button until TRIP A or TRIP B
is displayed. This shows the current distance traveled
since the last reset for each trip odometer in either miles
or kilometers. Both odometers can be used at the
same time.
Each trip odometer can be reset to zero separately by
pressing select while the desired trip odometer is
displayed. You can also reset the trip odometers with
the reset stem on the cluster. If you press and hold the
reset stem for four seconds, the display will show the
distance traveled since the last ignition cycle.
Timer
The DIC can be used as a stopwatch. Press the select
button while TIMER is displayed to start the timer.
The display will show the amount of time that has
passed since the timer was last reset (not including time
the ignition is off). Time will continue to be counted as
long as the ignition is on, even if another display is being
shown on the DIC. The timer will record up to 99 hours,
59 minutes and 59 seconds (99:59:59) after which
the display will roll back to zero.
To stop the counting of time, press the select button
brie¯y while TIMER is displayed.
To reset the timer to zero, press and hold the select
button while TIMER is displayed.
3-52
Page 180 of 436
SERVICE BRAKE SYSTEM
If a problem occurs with the brake system this message
will appear on the DIC. If this message appears, stop
as soon as possible and turn off the vehicle. Restart the
vehicle and check for the message on the DIC display.
If the message is still displayed, or appears again when
you begin driving, the brake system needs service.
TURN SIGNAL ON
If a turn signal is left on for 3/4 of a mile (1.2 km), this
message will appear on the display and you will
hear a chime. Move the turn signal/multifunction lever
to the off position. Pressing the select button will
acknowledge this message and clear it from the DIC
display.
REAR ACCESS OPEN
If the liftgate or liftglass is open while the ignition is in
RUN, this message will appear on the DIC and you will
hear a chime. Turn off the vehicle and check the
liftgate and liftglass. Restart the vehicle and check for
the message on the DIC display. Pressing the select
button will acknowledge this message and clear it from
the DIC display.
FUEL LEVEL LOW
If the fuel level is low in the vehicle's gas tank this
message will appear on the DIC and you will hear a
chime. Refuel as soon as possible. Pressing the select
button will acknowledge this message and clear it
from the DIC display.
CHECK WASHER FLUID
If the washer ¯uid level is low, this message will appear
on the DIC. Adding washer ¯uid will clear the message.
Pressing the select button will acknowledge this
message and clear it from the DIC display.
TRANS HOT IDLE ENGINE
If the transmission ¯uid in the vehicle gets hot, this
message will appear on the DIC. Driving with the
transmission ¯uid temperature high can cause damage
to the vehicle. Stop the vehicle and let it idle to allow
the transmission to cool. This message will clear when
the ¯uid temperature reaches a safe level.
3-62
Page 189 of 436
4 FWD (Forward):Press and hold this pushbutton to
advance quickly within a track. Press and hold this
pushbutton for less than two seconds to advance
at six times the normal playing speed. Press and hold
it for more than two seconds to advance at 17 times the
normal playing speed. Release it to play the passage.
The display will show ET and the
elapsed time.
6 RDM (Random):Press this pushbutton to hear the
tracks in random, rather than sequential, order. RDM ON
will appear on the display. RDM T and the track
number will appear on the display when each track
starts to play. Press this pushbutton again to turn
off random play. RDM OFF will appear on the display.
qSEEKr:Press the left arrow to go to the start
of the current or to the previous track. Press the
right arrow to go to the start of the next track. If either
arrow is held or pressed more than once, the player will
continue moving backward or forward through the CD.
DISP (Display):Press this knob to see how long
the current track has been playing. ET and the elapsed
time will appear on the display. To change the default
on the display (track or elapsed time), push the
knob until you see the display you want, then hold the
knob for two seconds. The radio will produce one
beep and selected display will now be the default.
AM FM:Press this button to listen to the radio when a
CD is playing. The disc will stop but remain in the player.CD AUX (Auxiliary):Press this button to play a CD
when listening to the radio.
ZEJT (Eject):Press this button to eject a CD. Eject
may be activated with either the ignition or radio off.
CDs may be loaded with the radio and ignition off if this
button is pressed ®rst.
Compact Disc Messages
If the disc comes out, it could be for one of the following
reasons:
·You're driving on a very rough road. When the road
becomes smoother, the disc should play.
·It's very hot. When the temperature returns to
normal, the disc should play.
·The disc is dirty, scratched, wet or upside down.
·The air is very humid. If so, wait about an hour and
try again.
·There may have been a problem while burning
the CD.
·The label may be caught in the CD player.
If the CD is not playing correctly, for any other reason,
try a known good CD.
If any error occurs repeatedly or if an error can't be
corrected, contact your dealer.
3-71
Page 199 of 436
6 RDM (Random):Press this pushbutton to hear the
tracks in random, rather than sequential, order. RDM ON
will appear on the display. RDM T and the track
number will appear on the display when each track
starts to play. Press this pushbutton again to turn
off random play. RDM OFF will appear on the display.
qSEEKr:Press the left arrow to go to the start
of the current or to the previous track. Press the right
arrow to go to the start of the next track. If either
arrow is held or pressed more then once, the player will
continue moving backward or forward through the CD.
DISPL (Display):Press this knob to see how long
the current track has been playing. ET and the elapsed
time will appear on the display. To change the default
on the display (track or elapsed time), push the
knob until you see the display you want, then hold the
knob for two seconds. The radio will produce one
beep and selected display will now be the default.
AM FM:Press this button to listen to the radio when a
CD is playing. The CD will stop but remain in the
player.
TAPE CD:Press this button to play a tape when
listening to the radio. Press this button to switch
between the tape and compact disc if both are loaded.
The inactive tape or CD will remain safely inside the
radio for future listening.
ZEJT (Eject):Press this button to stop a CD when
it is playing or to eject a CD when it is not playing.
Eject may be activated with either the ignition or radio
off. CDs may be loaded with the radio and ignition off if
this button is pressed ®rst.
Compact Disc Messages
If the disc comes out, it could be for one of the following
reasons:
·You're driving on a very rough road. When the road
becomes smoother the disc should play.
·It's very hot. When the temperature returns to
normal, the disc should play.
·The disc is dirty, scratched, wet or upside down.
·The air is very humid. If so, wait about an hour and
try again.
·There may have been a problem while burning
the CD.
·The label may be caught in the CD player.
If the CD is not playing correctly, for any other reason,
try a known good CD.
If any error occurs repeatedly or if an error can't be
corrected, contact your dealer.
3-81
Page 206 of 436
LOAD CDZ:Press the LOAD side of this button to
load CDs into the compact disc player. This compact
disc player will hold up to six discs.
To insert one disc, do the following:
1. Turn the ignition on.
2. Press and release the LOAD side of the LOAD CD
button.
3. Wait for the light, located to the right of the slot, to
turn green.
4. Load a disc. Insert the disc partway into the slot,
label side up. The player will pull the disc in.
When a disc is inserted, the CD symbol will be
displayed. If you select an equalization setting for your
disc, it will be activated each time you play a disc.
If the radio is on or off, the disc will begin to play
automatically.
To insert multiple discs, do the following:
1. Turn the ignition on.
2. Press and hold the LOAD side of the LOAD CD
button for two seconds.
You will hear a beep and the light, located to the
right of the slot, will begin to ¯ash.3. Once the light stops ¯ashing and turns green, load
a disc. Insert the disc partway into the slot, label
side up. The player will pull the disc in.
Once the disc is loaded, the light will begin ¯ashing
again. Once the light stops ¯ashing and turns
green you can load another disc. The disc player
takes up to six discs. Do not try to load more
than six.
To load more than one disc but less than six, complete
Steps 1 through 3. When you have ®nished loading
discs, with the radio on or off, press the LOAD side of
the LOAD CD button to cancel the loading function. The
radio will begin to play the last CD loaded.
When a disc is inserted, the CD symbol will be
displayed. If more than one disc has been loaded, a
number for each disc will be displayed. If you select an
equalization setting for your disc, it will be activated
each time you play a disc.
If the radio is on or off, the last disc loaded will begin to
play automatically.
As each new track starts to play, the track number will
appear on the display.
3-88
Page 207 of 436
Playing a Speci®c Loaded Compact
Disc
For every CD loaded, a number will appear on the radio
display. To play a speci®c CD, ®rst press the CD AUX
button to start playing a CD. Then press the numbered
pushbutton that corresponds to the CD you want to
play. A small bar will appear under the CD number that
is playing, and the track number will appear.
If an error appears on the radio display, see ªCompact
Disc Messagesº later in this section.
LOAD CD
Z(Eject):Pressing the CD eject side of
this button will eject a single disc or multiple discs.
To eject the disc that is currently playing, press
and release this button. To eject multiple discs, press
and hold this button for two seconds. You will hear
a beep and the light will ¯ash to let you know when a
disc is being ejected.
REMOVE CD will be displayed. You can now remove
the disc. If the disc is not removed, after 25 seconds, the
disc will be automatically pulled back into the receiver.
If you try to push the disc back into the receiver,
before the 25 second time period is complete, the
receiver will sense an error and will try to eject the disc
several times before stopping.Do not repeatedly press the CD eject side of the
LOAD CD eject button to eject a disc after you have
tried to push it in manually. The receivers 25-second
eject timer will reset at each press of eject, which
will cause the receiver to not eject the disc until the
25-second time period has elapsed.
Once the player stops and the disc is ejected, remove
the disc. After removing the disc, press the PWR
knob off and then on again. This will clear the
disc-sensing feature and enable discs to be loaded into
the player again.{REV (Reverse):Press and hold this button to
reverse quickly within a track. You will hear sound at a
reduced volume. Release it to play the passage.
The display will show elapsed time.
FWD
|(Forward):Press and hold this button to
advance quickly within a track. You will hear sound at a
reduced volume. Release it to play the passage. The
display will show elapsed time.
3-89
Page 208 of 436
RPT (Repeat):With repeat, you can repeat one track
or an entire disc. To use repeat, do the following:
·To repeat the track you are listening to, press and
release the RPT button. RPT will appear on the
display. Press RPT again to turn it off.
·To repeat the disc you are listening to, press and
hold the RPT button for two seconds. RPT will
appear on the display. Press RPT again to turn it off.
RDM (Random):With random, you can listen to
the tracks in random, rather than sequential, order, on
one disc or on all of the discs. To use random, do one of
the following:
·To play the tracks on the disc you are listening to in
random order, press and release the RDM button.
RANDOM ONE will appear on the display. Press
RDM again to turn it off.
·To play the tracks on all of the discs that are
loaded in random order, press and release RDM
for more than two seconds. You will hear a
beep and RANDOM ALL will appear on the display.
Press RDM again to turn it off.
AUTO EQ (Automatic Equalization):Press AUTO EQ
to select the desired equalization setting while playing
a compact disc. The equalization will be automatically
set whenever you play a compact disc. For more
information on AUTO EQ, see ªAUTO EQº listed
previously in this section.
sSEEKt:Press the left arrow to go to the start of
the current track, if more than ten seconds have passed.
Press the right arrow to go to the next track. If you
press the button more than once, the player will continue
moving backward or forward through the disc.
sSCANt:To scan one disc, press and hold either
SCAN arrow for more than two seconds until SCAN
appears on the display and you hear a beep. Use this
feature to listen to 10 seconds of each track of the
currently selected disc. SCAN will appear on the display.
Press either SCAN arrow again, to stop scanning.
To scan all loaded discs, press and hold either SCAN
arrow for more than four seconds until DISC SCAN
appears on the display and you hear a beep. Use this
feature to listen to 10 seconds of the ®rst tracks of each
disc loaded. Press either SCAN arrow again, to stop
scanning.
RCL (Recall):Push this knob to see how long the
current track has been playing. To change the default
on the display (track and elapsed time), push the
knob until you see the display you want, then hold the
knob until the display ¯ashes. The selected display
will now be the default.
AM FM:Press this button to play the radio when a
disc(s) is in the player.
3-90
Page 214 of 436
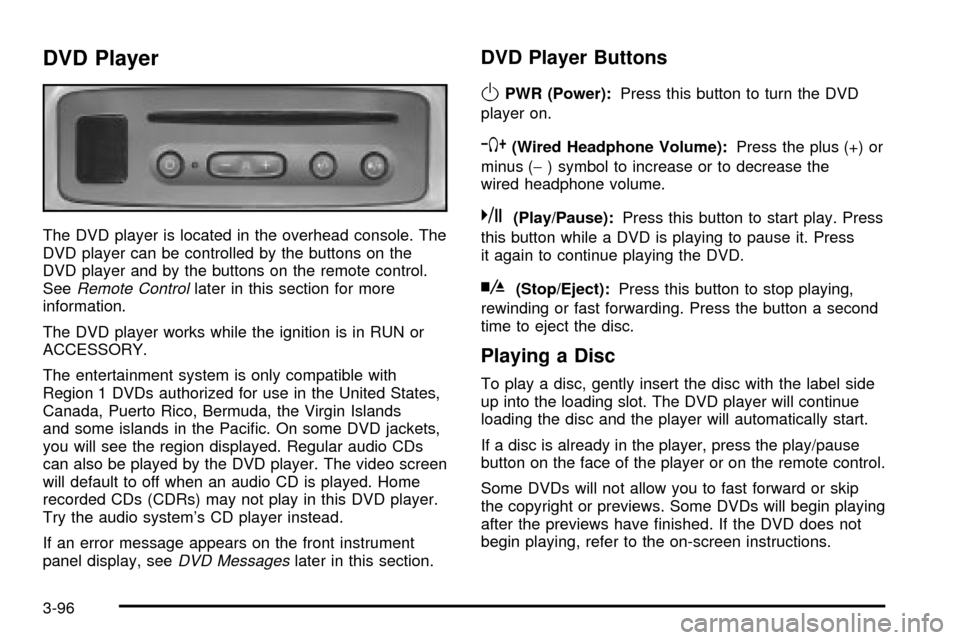
DVD Player
The DVD player is located in the overhead console. The
DVD player can be controlled by the buttons on the
DVD player and by the buttons on the remote control.
See
Remote Controllater in this section for more
information.
The DVD player works while the ignition is in RUN or
ACCESSORY.
The entertainment system is only compatible with
Region 1 DVDs authorized for use in the United States,
Canada, Puerto Rico, Bermuda, the Virgin Islands
and some islands in the Paci®c. On some DVD jackets,
you will see the region displayed. Regular audio CDs
can also be played by the DVD player. The video screen
will default to off when an audio CD is played. Home
recorded CDs (CDRs) may not play in this DVD player.
Try the audio system's CD player instead.
If an error message appears on the front instrument
panel display, see
DVD Messageslater in this section.
DVD Player Buttons
OPWR (Power):Press this button to turn the DVD
player on.
`(Wired Headphone Volume):Press the plus (+) or
minus (-) symbol to increase or to decrease the
wired headphone volume.
k(Play/Pause):Press this button to start play. Press
this button while a DVD is playing to pause it. Press
it again to continue playing the DVD.
h(Stop/Eject):Press this button to stop playing,
rewinding or fast forwarding. Press the button a second
time to eject the disc.
Playing a Disc
To play a disc, gently insert the disc with the label side
up into the loading slot. The DVD player will continue
loading the disc and the player will automatically start.
If a disc is already in the player, press the play/pause
button on the face of the player or on the remote control.
Some DVDs will not allow you to fast forward or skip
the copyright or previews. Some DVDs will begin playing
after the previews have ®nished. If the DVD does not
begin playing, refer to the on-screen instructions.
3-96
Page 217 of 436
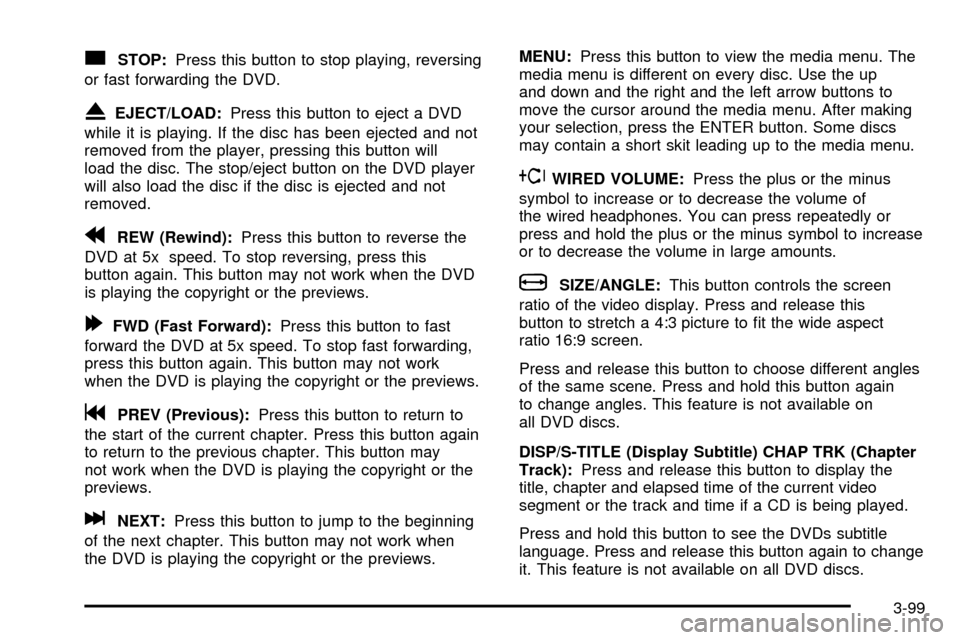
cSTOP:Press this button to stop playing, reversing
or fast forwarding the DVD.
XEJECT/LOAD:Press this button to eject a DVD
while it is playing. If the disc has been ejected and not
removed from the player, pressing this button will
load the disc. The stop/eject button on the DVD player
will also load the disc if the disc is ejected and not
removed.
rREW (Rewind):Press this button to reverse the
DVD at 5x speed. To stop reversing, press this
button again. This button may not work when the DVD
is playing the copyright or the previews.
[FWD (Fast Forward):Press this button to fast
forward the DVD at 5x speed. To stop fast forwarding,
press this button again. This button may not work
when the DVD is playing the copyright or the previews.
gPREV (Previous):Press this button to return to
the start of the current chapter. Press this button again
to return to the previous chapter. This button may
not work when the DVD is playing the copyright or the
previews.
lNEXT:Press this button to jump to the beginning
of the next chapter. This button may not work when
the DVD is playing the copyright or the previews.MENU:Press this button to view the media menu. The
media menu is different on every disc. Use the up
and down and the right and the left arrow buttons to
move the cursor around the media menu. After making
your selection, press the ENTER button. Some discs
may contain a short skit leading up to the media menu.
~WIRED VOLUME:Press the plus or the minus
symbol to increase or to decrease the volume of
the wired headphones. You can press repeatedly or
press and hold the plus or the minus symbol to increase
or to decrease the volume in large amounts.
bSIZE/ANGLE:This button controls the screen
ratio of the video display. Press and release this
button to stretch a 4:3 picture to ®t the wide aspect
ratio 16:9 screen.
Press and release this button to choose different angles
of the same scene. Press and hold this button again
to change angles. This feature is not available on
all DVD discs.
DISP/S-TITLE (Display Subtitle) CHAP TRK (Chapter
Track):Press and release this button to display the
title, chapter and elapsed time of the current video
segment or the track and time if a CD is being played.
Press and hold this button to see the DVDs subtitle
language. Press and release this button again to change
it. This feature is not available on all DVD discs.
3-99
Page 220 of 436
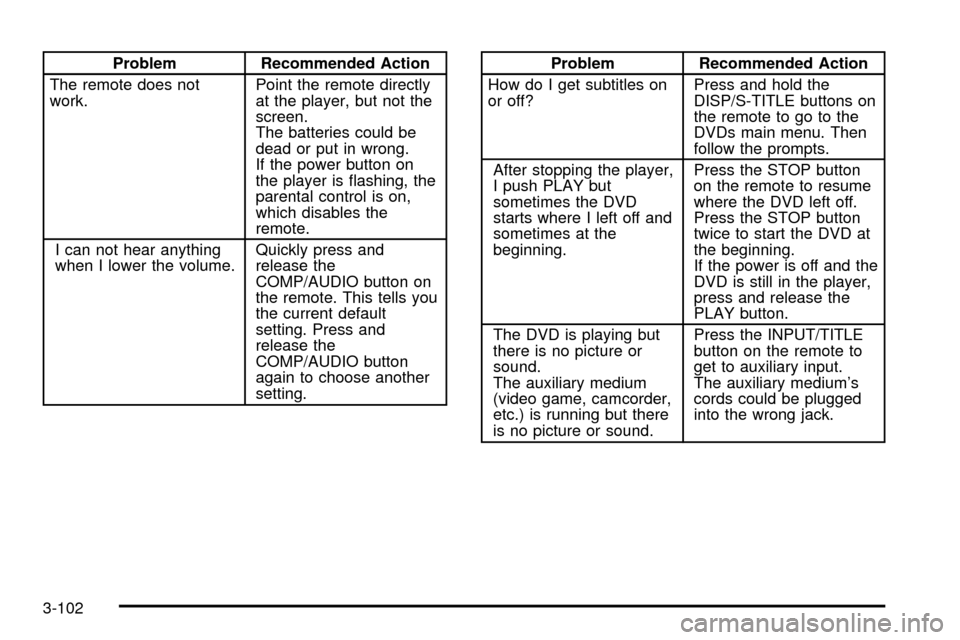
Problem Recommended Action
The remote does not
work.Point the remote directly
at the player, but not the
screen.
The batteries could be
dead or put in wrong.
If the power button on
the player is ¯ashing, the
parental control is on,
which disables the
remote.
I can not hear anything
when I lower the volume.Quickly press and
release the
COMP/AUDIO button on
the remote. This tells you
the current default
setting. Press and
release the
COMP/AUDIO button
again to choose another
setting.Problem Recommended Action
How do I get subtitles on
or off?Press and hold the
DISP/S-TITLE buttons on
the remote to go to the
DVDs main menu. Then
follow the prompts.
After stopping the player,
I push PLAY but
sometimes the DVD
starts where I left off and
sometimes at the
beginning.Press the STOP button
on the remote to resume
where the DVD left off.
Press the STOP button
twice to start the DVD at
the beginning.
If the power is off and the
DVD is still in the player,
press and release the
PLAY button.
The DVD is playing but
there is no picture or
sound.
The auxiliary medium
(video game, camcorder,
etc.) is running but there
is no picture or sound.Press the INPUT/TITLE
button on the remote to
get to auxiliary input.
The auxiliary medium's
cords could be plugged
into the wrong jack.
3-102