reset CHEVROLET TRAIL BLAZER 2006 1.G User Guide
[x] Cancel search | Manufacturer: CHEVROLET, Model Year: 2006, Model line: TRAIL BLAZER, Model: CHEVROLET TRAIL BLAZER 2006 1.GPages: 534, PDF Size: 2.91 MB
Page 199 of 534
Customization Button
4
(Customization):Press the customization button to
access the VEHICLE SETTINGS menu and customize
the settings to your vehicle. SeeDIC Vehicle
Customization on page 3-61for more information.
Select Button
r
(Select):Press the select button to reset certain
DIC functions, turn off or acknowledge messages
on the DIC display, and set your customization settings.
For example, this button will allow you to reset the
trip odometers, turn off the FUEL LEVEL LOW message,
and enables you to scroll through and select the
language in which the DIC information will appear.
DIC Warnings and Messages
Messages are displayed on the DIC to notify the driver
that the status of the vehicle has changed and that
some action may be needed by the driver to correct the
condition. More than one message may appear at
one time. They will appear one after the other. Some
messages may not require immediate action, but
you should press the trip stem on the instrument panel
cluster to acknowledge that you received the message
and to clear it from the display. Pressing any of the
DIC steering wheel buttons — trip information,
fuel information, customization, or select button — will
also acknowledge any warnings or service messages.
Some messages cannot be cleared from the display
because they are more urgent. These messages require
action before they can be removed from the DIC
display. The following are the possible messages that
can be displayed and some information about them.
3-55
Page 200 of 534
BATTERY NOT CHARGING
If the battery is not charging during operation, this
message will appear on the DIC. Driving with this
problem could drain your battery. Have the electrical
system checked by your GM dealer as soon as possible.
SeeVoltmeter Gage on page 3-38. Press the select
button to acknowledge this message and clear it from
the DIC display.
CHANGE ENGINE OIL
This message is displayed when the engine oil needs to
be changed and service is required for your vehicle.
SeeScheduled Maintenance on page 6-4andEngine
Oil on page 5-18for more information. Also seeEngine
Oil Life System on page 5-23for information on how
to reset the message. This message will clear itself after
10 seconds until the next ignition cycle.
CHECK TIRE PRESSURE
If your vehicle has a Tire Pressure Monitor (TPM)
system, and if a low tire pressure is detected in any of
the vehicle’s tires, this message will appear on the
DIC, along with a chime. Press the select button
to acknowledge this message and clear it from the DIC
display. The message will appear at each ignition
cycle until the tires are in�ated to the correct in�ation
pressure.
CHECK WASHER FLUID
If the washer �uid level is low, this message will appear
on the DIC. Adding washer �uid to the windshield
washer �uid reservoir will clear the message. See
Windshield Washer Fluid on page 5-40. Press the select
button to acknowledge this message and clear it from
the DIC display.
CURB VIEW ACTIVATED
The CURB VIEW ACTIVATED message is displayed
when the passenger outside rearview mirror moves into
the curb view position. SeeOutside Curb View Assist
Mirror on page 2-48for more information.
DRIVER DOOR AJAR
If the driver’s door is not fully closed, this message will
appear on the display and you will hear a chime.
Stop and turn off the vehicle, check the door for
obstacles, and close the door again. Check to see if the
message still appears on the DIC. Press the select
button to acknowledge this message and clear it from
the DIC display.
3-56
Page 203 of 534
SERVICE BRAKE SYSTEM
If a problem occurs with the brake system this message
will appear on the DIC. If this message appears, stop
as soon as possible and turn off the vehicle. Restart the
vehicle and check for the message on the DIC display.
If the message is still displayed, or appears again when
you begin driving, the brake system needs service.
See your GM dealer.
SERVICE STABILITRAK
If you ever see the SERVICE STABILITRAK message,
it means there may be a problem with your StabiliTrak®
system. If you see this message, try to reset the
system by performing the following: stop; turn off the
engine; then start the engine again. If the SERVICE
STABILITRAK message still comes on, it means there
is a problem. You should see your GM dealer for
service. The vehicle is safe to drive, however, you do
not have the bene�t of StabiliTrak
®, so reduce your
speed and drive accordingly. Press the select button to
acknowledge this message and clear it from the
DIC display.
SERVICE TIRE MONITOR
If your vehicle has a Tire Pressure Monitor (TPM)
system, this message will be displayed if one or more of
the tire monitor sensors have malfunctioned or if all of
the tire monitor sensors have not been programmed
successfully. See your GM dealer. Press the select
button to acknowledge this message and clear it from
the DIC display. The message will reappear at each
ignition cycle until the system has been serviced.
STABILITRAK ACTIVE
The STABILITRAK ACTIVE message will be displayed
anytime the system activates to maintain vehicle
stability. Any combination of engine speed management,
brake traction control, and stability control will display
the STABILITRAK ACTIVE message on the DIC.
STABILITRAK NOT READY
The STABILITRAK NOT READY message may be
displayed if driving conditions delay system initialization.
This is normal. Once the system initializes, the
STABILITRAK NOT READY message will no longer be
displayed on the DIC.
3-59
Page 210 of 534
Language
Press the customization button until LANGUAGE:
ENGLISH appears in the display. To select your
preference for display language, press the select button
while LANGUAGE: ENGLISH is displayed on the
DIC. Pressing the select button will scroll through the
following languages:
ENGLISH (default)
FRANCAIS (French)
ESPANOL (Spanish)
Choose one of the available options and press the
customization button while it is displayed on the DIC to
select it and move on to the next feature.
If you accidentally choose a language that you do not
want or understand, press and hold the customization
button and the trip information button at the same
time. The DIC will begin scrolling through the languages
in their particular language. English will be in English,
Francais will be in French, and Espanol will be in
Spanish. When you see the language that you would
like, release both buttons. The DIC will then display the
information in the language you chose.
You can also scroll through the different languages by
pressing and holding the trip reset stem for four seconds,
as long as you are in the odometer mode.
Units
Press the customization button until UNITS: U.S.
(ENGLISH) appears in the display. To select English or
metric, press the select button while UNITS: U.S.
(ENGLISH) is displayed on the DIC. Pressing the select
button will scroll through the following choices:
UNITS: U.S. (ENGLISH) (default)
UNITS: METRIC (km/L)
UNITS: METRIC (L/100 km)
If U.S. (ENGLISH) is chosen, all information will be
displayed in English units. For example, distance will be
displayed in miles (mi) and fuel economy in miles per
gallon (MPG). If METRIC (km/L) is chosen, all
information will be displayed in metric units. For
example, distance will be displayed in kilometers (km)
and fuel economy in kilometers per liter (km/L). If
METRIC (L/100 km) is chosen, all information will be
displayed in metric units. For example, distance will be
displayed in kilometers (km) and fuel economy in
liters per 100 kilometers (L/100 km).
Choose one of the available options and press the
customization button while it is displayed on the DIC to
select it and exit out of the customizable options.
3-66
Page 211 of 534
Audio System(s)
Determine which radio your vehicle has and then read
the pages following to familiarize yourself with its
features.
Driving without distraction is a necessity for a safer
driving experience. SeeDefensive Driving on page 4-2.
By taking a few moments to read this manual and
get familiar with your vehicle’s audio system, you can
use it with less effort, as well as take advantage of
its features. While your vehicle is parked, set up your
audio system by presetting your favorite radio stations,
setting the tone, and adjusting the speakers. Then,
when driving conditions permit, you can tune to
your favorite stations using the presets and steering
wheel controls if the vehicle has them.{CAUTION:
This system provides you with a far greater
access to audio stations and song listings.
Giving extended attention to entertainment
tasks while driving can cause a crash and you
or others can be injured or killed. Always keep
your eyes on the road and your mind on the
drive — avoid engaging in extended searching
while driving.
Keeping your mind on the drive is important for safe
driving. For more information, seeDefensive Driving on
page 4-2.
3-67
Page 212 of 534
Here are some ways in which you can help avoid
distraction while driving.
While your vehicle is parked:
Familiarize yourself with all of its controls.
Familiarize yourself with its operation.
Set up your audio system by presetting your
favorite radio stations, setting the tone, and
adjusting the speakers. Then, when driving
conditions permit, you can tune to your favorite
radio stations using the presets and steering wheel
controls if the vehicle has them.
Notice:Before adding any sound equipment to
your vehicle, such as an audio system, CD player,
CB radio, mobile telephone, or two-way radio, make
sure that it can be added by checking with your
dealer. Also, check federal rules covering mobile
radio and telephone units. If sound equipment can
be added, it is very important to do it properly.
Added sound equipment may interfere with
the operation of your vehicle’s engine, radio, or
other systems, and even damage them. Your
vehicle’s systems may interfere with the operation
of sound equipment that has been added.Notice:The chime signals related to safety belts,
parking brake, and other functions of your vehicle
operate through the radio/entertainment system.
If that equipment is replaced or additional equipment
is added to your vehicle, the chimes may not
work. Make sure that replacement or additional
equipment is compatible with your vehicle before
installing it. SeeAccessories and Modifications
on page 5-3.
Your vehicle has a feature called Retained Accessory
Power (RAP). With RAP, the audio system can be
played even after the ignition is turned off. SeeRetained
Accessory Power (RAP) on page 2-20for more
information.
3-68
Page 215 of 534
For XM™ (if equipped), press the INFO knob while
in XM™ mode to retrieve four different categories
of information related to the current song or channel:
Artist, Song Title, Category or PTY, Channel
Number/Channel Name.
To change the default on the display, press the INFO
knob until you see the display you want, then press and
hold the knob until you hear a beep. The selected
display will now be the default.
AUTO VOL (Automatic Volume):With automatic
volume, the audio system will adjust automatically to
make up for road and wind noise as you drive by
increasing the volume as vehicle speed increases.
Set the volume at the desired level. Press this button to
select LOW, MEDIUM, or HIGH. AVOL will appear
on the display. Each higher setting will provide more
volume compensation at faster vehicle speeds. To turn
automatic volume off, press this button until AVOL
OFF appears on the display.Finding a Station
BAND:Press this button to switch between FM1, FM2,
AM, or XM1 or XM2 (if equipped). The display will
show the selection.
TUNE:Turn this knob to select radio stations.
©SEEK¨:Press either the SEEK or the TYPE
arrows to go to the next or to the previous station and
stay there.
The radio will only seek stations with a strong signal
that are in the selected band.
©SCAN¨:Press and hold either the SCAN or the
TYPE arrows for two seconds until SCAN appears
on the display and you hear a beep. The radio will go to
a station, play for a few seconds, then go on to the
next station. Press either the SCAN or the TYPE arrows
again to stop scanning.
To scan preset stations, press and hold either the
SCAN or the TYPE arrows for more than four seconds.
PSCN will appear on the display and you will hear a
double beep. The radio will go to a preset station, play
for a few seconds, then go on to the next preset
station. Press either the SCAN or the TYPE arrows
again to stop scanning presets.
The radio will only scan stations with a strong signal
that are in the selected band.
3-71
Page 216 of 534
Setting Preset Stations
Up to 30 stations (six FM1, six FM2, and six AM,
six XM1 and six XM2 (if equipped), can be programed
on the six numbered pushbuttons, by performing
the following steps:
1. Turn the radio on.
2. Press BAND to select FM1, FM2, AM, or XM1
or XM2.
3. Tune in the desired station.
4. Press and hold one of the six numbered
pushbuttons until you hear a beep. Whenever that
numbered pushbutton is pressed, the station
that was set will return for that pushbutton.
5. Repeat the steps for each pushbutton.
To store an equalization setting to a preset station
perform the following:
1. Tune to the preset station.
2. Press and release the AUTO EQ button to select
the equalization setting.
Once the equalization no longer appears on
the display, the equalization will be set for that
preset station.
Setting the Tone
(Bass/Midrange/Treble)
AUDIO:Push and release the AUDIO knob until BASS,
MID (without Bose®), or TREB appears on the display.
Turn the knob to increase or to decrease. The display will
show the bass, midrange (without Bose
®), or treble level.
If a station is weak or noisy, decrease the treble.
To adjust the bass, midrange (without Bose
®), or treble to
the middle position while it is displayed, push and hold
the AUDIO knob. The radio will produce one beep and
adjust the display level to the middle position.
To adjust all tone and speaker controls to the middle
position, push and hold the AUDIO knob when no tone or
speaker control is displayed. ALL CENTERED will appear
on the display, you will hear a beep, and the display level
will be adjusted to the middle position.
AUTO EQ (Automatic Equalization):Press this button
to select customized equalization settings designed
for country/western, jazz, talk, pop, rock, and classical.
Selecting CUSTOM or adjusting the tone controls,
returns the EQ to the manual mode.
The radio will save separate AUTO EQ settings for each
preset and source.
If the radio is equipped with the Bose
®audio system,
the AUTO EQ settings are either CUSTOM or TALK.
3-72
Page 218 of 534
SCAN:Scan the stations within a PTY by performing
the following:
1. Press the TYPE button to activate program type
select mode. TYPE and the last selected PTY will
appear on the display.
2. Turn the TYPE knob or press and release the
TYPE button to select a PTY.
3. Once the desired PTY is displayed, press and
hold either the TYPE or the SCAN arrows for
two seconds, and the radio will begin scanning
the stations in the PTY.
4. Press either the TYPE or the SCAN arrows to stop
scanning.
BAND (Alternate Frequency):Alternate frequency
allows the radio to switch to a stronger station with the
same program type. To turn alternate frequency on,
press and hold BAND for two seconds. AF ON will
appear on the display. The radio may switch to stations
with a stronger frequency.
To turn alternate frequency off, press and hold BAND
again for two seconds. AF OFF will appear on the
display. The radio will not switch to other stations.
This function does not apply for XM™ Satellite Radio
Service.Setting Preset PTYs (RDS Only)
These buttons have factory PTY presets. Up to
12 PTYs (six FM1 and six FM2), can be programmed on
the six numbered pushbuttons, by performing the
following steps:
1. Press BAND to select FM1 or FM2.
2. Press the TYPE button to activate program type
select mode. TYPE and the last selected PTY will
appear on the display.
3. Turn the TYPE knob or press and release the
TYPE button to select a PTY.
4. Press and hold one of the six numbered pushbuttons
until you hear a beep. Whenever that numbered
pushbutton is pressed (while in program type mode),
the PTY that was set will return.
5. Repeat the steps for each pushbutton.
3-74
Page 220 of 534
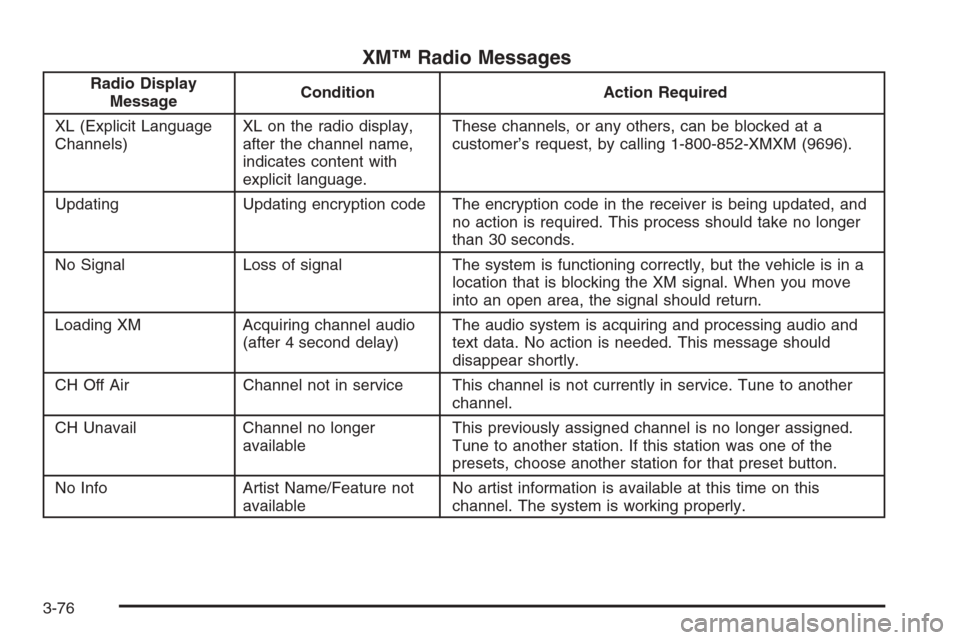
XM™ Radio Messages
Radio Display
MessageCondition Action Required
XL (Explicit Language
Channels)XL on the radio display,
after the channel name,
indicates content with
explicit language.These channels, or any others, can be blocked at a
customer’s request, by calling 1-800-852-XMXM (9696).
Updating Updating encryption code The encryption code in the receiver is being updated, and
no action is required. This process should take no longer
than 30 seconds.
No Signal Loss of signal The system is functioning correctly, but the vehicle is in a
location that is blocking the XM signal. When you move
into an open area, the signal should return.
Loading XM Acquiring channel audio
(after 4 second delay)The audio system is acquiring and processing audio and
text data. No action is needed. This message should
disappear shortly.
CH Off Air Channel not in service This channel is not currently in service. Tune to another
channel.
CH Unavail Channel no longer
availableThis previously assigned channel is no longer assigned.
Tune to another station. If this station was one of the
presets, choose another station for that preset button.
No Info Artist Name/Feature not
availableNo artist information is available at this time on this
channel. The system is working properly.
3-76